


DonorLeather
-
Content Count
37 -
Joined
-
Last visited
Recent Profile Visitors
2,727 profile views


-
Awesome Cord, thank you for looking. Let me know if you do have it, I'd be more than happy to reimburse you for it.
-
My tips for a "machine" look with Saddle Stitch
DonorLeather replied to DonorLeather's topic in Sewing Leather
In my opinion punching holes at an angle and pounding the thread flat is more of a Buck Stitch style mixed with a saddle stitch. The saddle stitch doesn't mean its from/for a saddle, though it could be used for that.... it means the threads "saddle" one another, or one on top of the other. A buck stitch uses slotted holes that are usually angled to create a diamond pattern in your sewing. I've worked leather professionally for 25 years and have done just about every kind of stitch or lace there is. This is just one example of a professional looking stitch that has been hand sewn. Also in my opinion, just because something is made by hand doesn't mean it has to be erratic and un-uniform. Take the painting of the last supper for example, just because its hand painted does this mean that some of the persons depicted should look like stick figures, while others are highly detailed and life like? The saddle stitch is also used in book making (which I also do) and doesn't even resemble the stitching I posted above. Yet you are inevitably only happy with what your happy with. -
My tips for a "machine" look with Saddle Stitch
DonorLeather replied to DonorLeather's topic in Sewing Leather
https://youtu.be/pnh6Br8dFOY -
Here is a few of my tips for getting your sewing to look like it was machine stitched. I took a few photos and a video, to hopefully show and explain it a bit better.... As you all know a saddle stitch is very nice looking and is accomplished by threading a needle on each end of the thread. The rule of thumb I use for measuring my piece of thread is slightly more than 3 times the length of your stitching. 3 times the length is how much thread you will use and the little more gives you enough thread to pass the needle into the thread to lock it as you work, and when you get to the end of your piece you have enough thread to backstitch to lock your sewing in place with no nasty looking knots. EG... if your piece to be stitched is 4" long, then you would cut a piece of thread that is 14" long (3 times 4" is 12" with 2" left over to lock the needle and backstitch). You start with your first hole by pushing one needle into the first hole, and pull the thread through until you have EQUAL amounts of thread on either side of your work. Now your ready to start stitching. It is always best to work from right to left, or left to right, but ALWAYS maintain that direction. Imagine your piece of work on a stitching pony in front of you... you have one needle in your right hand, and one in your left to help explain it. In this case I am working from right to left, meaning I push the right needle in first, then push the left needle through. Once you snug up the thread, you start into the next hole with the needle that is now on the right. When doing this, you should notice your right thread is always BEHIND your left thread. This is the key to making it look like it was machine sewn, and getting an even sturdy stitch. Push the right needle through and pull the thread a bit. Then push the LEFT needle through in FRONT of the thread you just pushed through. When pulling the thread tight, always pull the needles from ABOVE the threads in the holes, and when pulling the left needle, make sure it is between and above the threads in the work. The video and pictures below should help to explain this a bit better if I have confused you with my instructions.
-
-
Thank you Howard I received your email. It went into my spam folder... your not invisible at all, I'm just too old to know how to use my own inbox LOL. I have your scan and will give it a shot in the next few days =) I am still looking to purchase a hard copy of this pattern if anyone has an extra or one that's not needed any longer.
-
I would like to have a tracing of the tooling pattern if that's possible. I'd be happy to compensate you for the effort if you'd like Howard. Email address is Craig@Donorleather.com
-
Thanks Rock =) Ive been looking for a very long time and finally figured someone here would be able to help.
-
That's the one I'm looking for. Thanks hope someone has one they will sell or photocopy.
-
Hi all I am looking for an OLD craftaid pattern for a purse. The number was 2685 on the pattern, I believe it was from back in the 50s. If you can't sell yours, possibly a photocopy will do. Thanks in advance =) craig in virginia
-
Need Motorcycle Seat Covered, Died And Stitched.
DonorLeather replied to duraholiday's topic in Help Wanted
I can do the job for you, I am located in Virginia. My webstie is still under construction but you can view a few of my recently created items here http://donorleather.com/_gallery_.html I ship Fed-Ex with insurance only. Happy Biking! Craig -
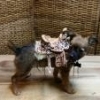
Thanks guys =) To get a guide line to follow for hole marking and punching on hair on, I use a low tack painters tape. Then I use a compass with a pencil to get my guide line, and roll my stitching marker up the guide line. Punch the holes then remove the tape, even though its low tack you should still pull it in the direction the hair normally lays. This works on suede and soft garment leathers also if you cant get a stitching line impression to take.
-
Here are a few things I have created recently. There is a Hair on Laptop/messengers bag, with zippered front panel that allows access to internal pockets mounted to the front inner wall, and storage for briefs and papers built into the zippered front panel, the lid also has a hidden panel with glove snaps for additional storage of briefs and papers, there is an internal pocket for a laptop (17" laptops fit awesome in this) and a rear storage pocket for books, or notebooks, with a final pocket on the rear wall to allow additional papers or briefs to be stored. LOTS AND LOTS of room in this bag. The hair on cow hide is in purple and black, and the sides are made of laminated pieces of veg tanned that have been dyed to match the colors of the hair on hide. I laced the sides with premium calfskin lace and did it in an Australian double loop stitch. The pencil bag is made out of the selvage of the hair on hide, and is a wide mouth design. The clutch is likewise made out of the selvage from the same hide and pairs very nicely.
-
Not Your Grandpa's Briefcase
DonorLeather replied to DonorLeather's topic in Satchels, Luggage and Briefcases
To line this case with glazed pigskin would take 3-4 (maybe more) sides since the surface area to cover is so great. Each side would run $20 a piece retail so you can see how the price would rocket up. I don't use fabric in my creations, unless it is specifically asked for by the customer. 100% leather here =) To make the pin-striping (that's what I like to call it as it comes out looking just like an awesome pinstripe) you simply use an adjustable groover like the craft aid 8074-00. I dye the leather first and let it dry overnight, then I take the groover and lightly score a pinstripe into the leather to add additional flair and style to the piece. It doesn't have to be a deep groove, just enough to take the surface off. Then I finish the leather with resoline. The edges of this case are finished now, I took the pictures that I posted before I finished the edges. At the time I was debating adding an Australian Double loop stitch with calf skin to the outside, as opposed to the saddle stitch you see. I decided to keep the saddle stitch and used gum to burnish the edges. -
Not Your Grandpa's Briefcase
DonorLeather replied to DonorLeather's topic in Satchels, Luggage and Briefcases
Thanks Ace, yes this is based off the expedition breifcase, but I modified it a bit. I used a thicker leather as I thought the leather that came in the basic kit from Tandy was a bit thin. Tandy had a clearance sale on the harware for this kit early in the year and I snatched up a few of them. I liked the fact that the case can be converted into a sling, crossbody, or even a backpack in addition to just being carried by the handle, so I basically used the same set-up on this one. Tandy's briefcase has a pocket on the outside rear of the case, and that didnt quite make sense to me. The whole point of a briefcase is to protect your paperwork or items and just having things stuffed into an item on the OUTSIDE of the bag really was offputting. I created an aditional pocket on the rear panel but on the INSIDE of the casem as well as another identical type of pocket on the inside of the FRONT of the case. I was debating on lining the interior with a nice glazed pigskin, but that would have rocketed up the price of this briefcase to an unreachable amount. I used larger diameter rivets on the handle area and backed the upset head (on the interior) with a larger diameter washer to distribute the weight of it being carried more evenly. I haven't fully loaded the briefcase with a laptop and books to test the handles ability to handle the weight, but I am fairly confident that a larger rivet and washer should hold indefinitely. The finish is oil dye saddle tan that I put on with a sponge then wiped off with a rag to try and give it a grainy, almost woody look to it.