


veritasleather
-
Content Count
29 -
Joined
-
Last visited
Posts posted by veritasleather
-
-
8 hours ago, fredk said:As long as the plate is not made of aluminium or magnesium alloy, try a soaking in a strong caustic soda solution. CS dissolves aluminium quickly
Yeah i am not sure if it is, the plate has a bit of weight to it so hopefully its not aluminum but not sure about magnesium. I have the Amazon (China) WT-90CT model. I will send a message to the seller and ask. They seem to be pretty good at responding.
-
14 hours ago, mike02130 said:Let us know if it worked.
Well it was worth a shot, tried to torch it and it didn't do much unfortunately .
-
6 minutes ago, mike02130 said:I'd try taking a torch to it. Show it who's the boss.
Thats actually not a bad idea, I removed the plate, I can take my mini torch to it. see what happens, im sure i won't damage it, its meant to handle up to 300 C.
-
Hello,
Just got a heat embosser and have been experimenting with different types of leathers and heat temps. I went a bit to hot and the heat plate just absorbed the aluminum foil paper and now I have all the residue left on the inner plate. Any idea how to remove this without sanding or using much abrasives?
thanks for the help!
Frank
-
7 hours ago, fredk said:It depends on how far the distortion has gone that you can correct it - mostly.
How sound is your ply? here any ply less than 1" thick is unstable and will twist and warp. Can you glue two layers of ply together, following ply rules?
Reason for using dbl side tape is a, the lower tack and b. easier to separate c. wet leather will stick to tape better than glue
What I would do is;
1. mark area about 23 x 23 inches on board, draw the lines for the square
2. apply dbl sided tape to board
3. wet leather, not dripping wet but wetter than for tooling
4. apply leather to the wood, inside the marked square using the marked lines as guide for the sides of the leather
5. work around the leather, laying it straight and pushing it down.
6. use a brayer or rolling pin to press the edges only flat, trying not to push the leather out of a straight edge. Don't press it down from the centre to the edges - this will exacerbate the problem
7. when it seems satisfactory, cover with sheets of clean white paper, then put another board on top, then put lots of weight, eg books, anvils on the board, concentrating on where the edges of the leather are.
8. leave for a couple hours, check lay of leather, press down any areas still not laying flat
9. = 7
10 = 8
11. leave to dry
12. continue working on piece as it is, stuck to the board
with some perseverance it might flatten out alright, you may be left with some wrinkles
alternative; scrap this piece and start afresh on a piece taped or glued to MDF (or ply)
Just my thoughts, and some little experience of flattening reticent leather
Ok, so looks like the double sided tape and a good solid flat board is going to be key. I will have to get some MDF instead of ply just to be safe and order some double sided tape. I am also hoping once I stitch it down to a heavy layer of leather it will flatten as well. thanks again for your tips and advise fredk.
-
20 minutes ago, fredk said:a. 22 x 22 what?
b. do you intend to just have the chess board leather so you can roll it up?
c. 2 to 2.4mm is on the thin size for that. 3.5mm plus would have been better
d. use double sided tape to mount the leather to a piece of MDF no less than 6mm thick preferably 12mm thick
Fredk, so the Chessboard is a 22" x 22" square of veg. tan leather. (b) yes, I still want to put a backing or liner under the 5-6 oz. to stabilize it? but would still want it to roll. (c) doubling it up the thickness with a liner (d) I have 1/4 inch. thick plywood, would that work? don't have double sided tape, but maybe cement it to the plywood since I will cover the glued area with backing leather?
Do you think this will straighten the leather or flatten it back??
thanks for your help.
-
Hey guys,
I am in need of some advice, I have been working on a 22 x 22 chessboard for a buddy of mine. I am using Chahin Weaver veg. tan 5-6 oz. leather. I went ahead and used clear packing tape on the back and now I have cut all my lines and cut a 1 1/2 rose border. but now all of the edges and borders are beginning to warp or curl up. Honestly, its beginning to look like a giant valet tray lol. I still have a lot of stamping to go, should I just continue with tooling or should I remove tape and glue it to cardboard? I would appreciate the help? What would you guys do in my situation?
Frank
-
4 hours ago, Stetson912 said:Contact cement should be plenty strong. Stitching wouldn't really help with cracking I don't think. Just conditioning the leather.
Got it, thanks again! I will try it out.
-
Great, yes thanks fellas, I will definitely try this, interesting on your pic @JKHelms, yours is stitched, i thought of that, but the customers current wheel is not stitched at all, he said they have had it for years but its begining to crack along the side.
-
Hey guys, I am making a 1" thick x 12" diameter veg. tan (sole leather) wheel with a 3/4 ID. for a knife co. they use it to knock off burrs after sharpening. I glued up 4 layers with Master's cement. My issue is that wheel is not very true or flat on the OD, I guess i didn't mate some of the edges that well. So, in some areas there is about 1/16th or less off on the edge. What would be a good way to flatten or even out the area?
thanks!
Frank
-
I think I can get their water stains, I am going to have try them out. And also dipping.
-
ok, I did my own test, I know most of you don't have to deal with this problem because you're not in CA. But i did test out the LOW VOC black Fiebings dye and I gotta say it was a pretty bad experience. I dyed a strap, let it dry 24 hours. I came back and it ended up pretty blotchy. And when I went to buff the cotton shirt I used ended up black with dye. I had to re-dye with pro oil black dye (Fiebings) again. After this, I had no problem, like night and day. Well, hope this helps someone.
-
Hey guys! I don't know if this has already been a topic. Has anyone compared Fiebing's Low VOC vs. their pro dye? I KNOW pro is the best! but here in Cali. its getting harder to get the pro dye. Just wondering if anyone has experienced the pros and cons when compared? Other than the harmful fumes of course. I guess I am asking performance wise.
thank you all!
-
On September 21, 2016 at 1:04 PM, Colt W Knight said:I've made several, and I have never used any stiffenters or backing. I have put some on with screws and some on with double side tape.
I've built a lot of guitars, and I wouldn't want a thick pick guard with a thick backer and leather. If anything, I would just line the back with brown paper sack material or packing tape.
Since you have experience making leather pick guards with no backing, So far none have curled or lifted when left with no backing?
-
Ah yes! thanks for all the advise, I have some good options now to try. I am going to experiment with all of the above.
-
36 minutes ago, bikermutt07 said:Well Formica is pretty thin. It comes in different thicknesses. Someone here posted a telecaster that had the entire body wrapped in leather. It was gorgeous.
I totally missed the Formica part of your last post. Yes, looks like Formica might just work! I will have to go check some out, thanks!
-
20 minutes ago, bikermutt07 said:I haven't done it, but if were to do it.....
I would laminate the leather to a pick guard and maybe just use longer screws.
If that's too tall in relationship to the strings a piece of Formica could be substituted.
.02
4 minutes ago, HorsehairBraider said:Huh, something I actually know about... My husband builds guitars. Normally they are made of plastic. But I know some are bakelite. He buys from is a company called Stewart MacDonald... Here is a link: Pick guard materials
They are pretty thin, I would think any really thin yet rigid material would work. I can ask him tomorrow, when he is back from work, if just a piece of leather by itself would work. I can't remember if these cover up electronics or not. Well, he will know!
Yeah bikermutt07 and HorsehairBraider, I thought about that, but it would be too tall. He gave me a .090 inch max height in total which is about 3/32nds and roughly around 6 oz. leather. I would like to keep the leather the thickest possible and backing be the thinner. Maybe if I find a cheap paper thin sticker type of pick guard?
-
Hey guys! I need some options and opinions on what to use as a stiffener/backing for some Tele style guitar pick guards. My customer wants me to make him a sample and I want to use the right type of backing to prevent shrinkage (if any) and of course to stiffen the leather? Do I even need a backing? is there just a finishing technic I can use? My customer wants a batch of these...so I better make it right the first time, know what I mean?
thanks for your time!
-
1 minute ago, JLSleather said:One more "tip" about the set-up..... when using a 25 needle, I would consider 6 per inch the MAX to stitch with, and probably aim at a bit longer stitch than that... 5 or 5 1/2 per inch. Too many holes too close together is called a "tear"
")
Yes, definitely, I believe I am at about 5 per inch. I like the look so far. My "LL" needles are ordered, I am checking to see if they have the "LR" available as well. I didn't find any in the Cutex store. Lets see what they say....
-
6 hours ago, JLSleather said:That edge guide really is a nice addition. People make videos these days more for attention than to actually make a valid point, but that would be other "not-Jeff" people. If the thing wasn't a 'plus' for me, there wouldn't be a video
That roller thingy that came with the machine isn't entirely useless, but the drop-down model is much more convenient (and less money, if i remember right).
I don't mind "clearing up" what I can and where i can, though it does seem quite petty that for two and a half THOUSAND dollars you get to hope that the machine is set up correctly and for information ask questions on a forum from someone OTHER THAN the place you got the machine. I bought a $10 digital stop watch recently, and EVEN THAT came with SOME kind of manual...
Yes, and thank you for making the video with that purpose. It works, its functional, minimal gap under the roller, it goes away when you don't need it, comes right back, boom! I want! Simple as that, And I have definitely gotten about 90% of my C4 questions answered here and on YouTube, so thanks again!
I am ordering the needles as well, hopefully they will send the right ones.
-
4 hours ago, JLSleather said:I've been using Organ needles. I lack the experience to confirm that they are THE BEST made, but they do stitch well, so there's that.
As for the 794 designation, the 7x4 is the same thing, said a different way. There was a chart around here somewhere explaining all of that.. but no idea where it went. They might also say DY3.
I got some recently from an ebay seller. Keep in mind, that i ordered from them twice... once I got just what I ordered... the other time I got a different needle (even though I emailed to confirm they were 'LL' points, they weren't).
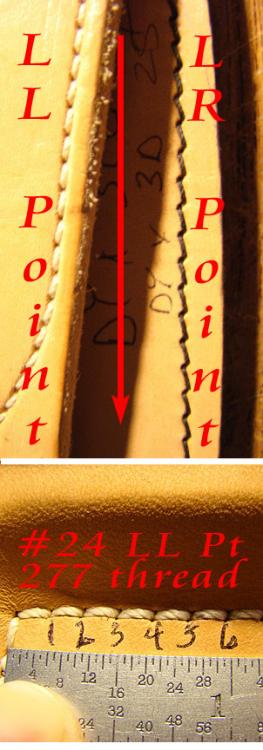
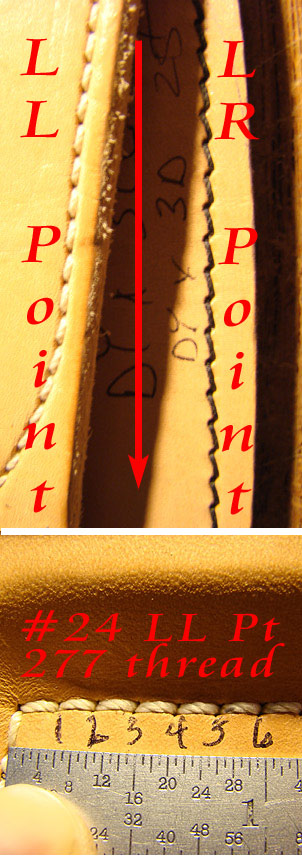
For 277 thread top and bottom, you'll likely want a #25 needle.
Great! This definitely points me in the right direction with needle selection. Thanks for clearing this stuff up. Also, side note: I recently discovered your holster downloads and edge guide video. cool stuff, and definitely going to try one of your holster patterns soon, and definitely order that edge guide from eBay.
Thanks again sir!
-
On May 6, 2016 at 10:32 AM, JLSleather said:Re: needle size to thread size. Keep in mind that not all needles are created equal. Two different manufacturers (or even the same manufacturer) may make - for example - a size 24 needle with a different hole size, point geometry, etc. Two needles can BOTH be 794 series and size 24 yet be considerably different. I wouldn't carve needle sizes in stone.. just a place to start - like how hard do you strike a punch (answer: hard as you need to).
Red has been on about poly thread for a while now. I tried poly thread (and still have some) but I prefer the nylon. From what I have read, the "advantage" of poly thread seems to be a bit more resistant to UV -- other words less likely do decay due to direct sunlight. This is not a new concept -- my monofilament fishing line has the same issue -- but it doesn't disintegrate over night. So, I largely (not exclusively) use nylon thread. This week I had opportunity to see a tooled handbag I made over 25 years ago -- does NOT need re-stitched
") Having said that, I've always liked Red's holsters, which appear to me to be both solid AND attractive.
Having said that, I've always liked Red's holsters, which appear to me to be both solid AND attractive.
Incidentally, my post above must have been 'fat-fingered'.. it should have ready that i prefer LL point needles. The stitch is much straighter, and tighter with the same tension setting.
QUICK PIC of the difference, both stitches were done without changing the stitch length or tension... Note that the black stitch on the right (LR point) appears longer due to the angle - it is the SAME stitch length as the left side.
JLSleather,
I have had my Cobra4 for just a couple of months and I finally got it to stitch correctly, thanks to many of the pros on this forum. Your pick above shows what I would like my stitches to look like. I want to continue to use 277 nylon on both top and bottom. Can you give me a specific model number of needles for the "LR" and "LL" and maybe the vendor to order from? I have been reading a lot about needles but I get thrown off by all the 7x3, 7x4, 200/xxx etc. I think I know the series for my machine is 794. I would really appreciate your help, or any of you guys that can help me out.
thank you!
-
7 hours ago, JMWendt said:I've noticed with these machines that I tend to screw up the thread occasionally when I remove an item from the work space. Then on the next round of sewing, the thread is wrong . . . usually the second tension disk where I accidentally get a loop of string in the spring around it, or I get it so the string is completely out of the disk. In the first case, the tension on the top string is too high, and I see knots on top. In the second case, tension is too low and I see knots on bottom.
I have also seen spools of thread that just unwind poorly from the thread stand, and they tend to twist into themselves then bind going through the feeder holes. This seems to happen on stiffer bonded threads, or anything I made the mistake of leaving in the sun for a month. My machine is near a window.
I'd check the thread path first before focusing on mechanical issues. But if the thread path looks good, then I'd monitor the thread behavior during sewing . . . just watch what is happening and see when it gets tension and starts showing knots. Then and only then would I start to look for mechanical issues.
My machine is also in a hot spot, I will definitely check the behavior of the thread and go from there ,
thanks!
-
On August 25, 2016 at 10:40 PM, MADMAX22 said:I believe he is talking about the spool of thread. If it doesn't come off smoothly it will mess with your top tension. Take your spool and gently pull thread off of it noting if there are any spots with a slight tension change like say it catches at one spot. This will translate to your stitches having momentary spots of very high top tension. I had a spool that was junking up on the bottom, top of the spool fed fine but bottom would stick and it would reak havic with my machine.
On August 26, 2016 at 2:30 AM, mikesc said:Another thing that can give you intermittent ( but regular ) changes in the top tension, is dirt in the tension assembly , actually inside the barrel part that the "take up spring" sits into..any speck of dirt there will prevent the spring from compressing properly when it moves ( it should move smoothly in it's "slot"on the side of the tension assembly, no jerkiness at all ) and so the tension every few stitches will not be the same..this is even more evident on a "zig zag" machine, when it happens there the "knots" will be "above" on one end of the stitch, and below or correctly seated on the other..
Had this problem on a singer 20U33 that I picked up a week ago, fixed the problem yesterday when doing an "overall service", ordered new tension assembly ( along with some other stuff ) from College sewing yesterday.
re thread spools..if they sit uncovered for a while they get dusty*, the dust can be a little sticky, this will make them unwind with uneven tension, likewise if they have been dropped or stored with pressure on any part of them, always store them upright ( not squashed together ) and covered up from dust and other pollutants..
* To avoid this dust etc, stick a lightweight clear plastic bag with a hole in it at the top over each "cone", feed the thread out to the "eye" in the thread stand , and on down through the "thread path" through this hole..make sure it does not "snag" ..MADMAXX22, I noticed when looking at my spool of thread that I had it set on the stand that the Leather Machine co. recommends for the bobbin thread spool. I don't know if this matters? So, this would be the stand farthest from the thread path. I will definitely check my spool of thread and see if it sticks anywhere, or if it pulls.
mikesc, I will definitely clean out the tension assembly areas and look for dust and dirt. This all makes a lot of sense now. My machine is definitely in an area that can accumulate much dust. I will definitely look for snags.
thanks guys!
Burned foil paper! how do I clean up the mess!?
in Leather Machinery
Posted · Report reply
I actually had it facing the right way, my mistake was that I had it way to hot, I had it set at 300c for paper according to the manual. The machines hot plate height from the bed comes set only about 1" clearance. I should have set that higher to give me more of a clearance to set the foil without touching the hot plate. But it was so hot that the hot plate sucked up the aluminum foil.