
.jpg.15f69bc1aa7395feddc4399d43e01832.jpg)

Brooks125
-
Content Count
339 -
Joined
-
Last visited
Posts posted by Brooks125
-
-
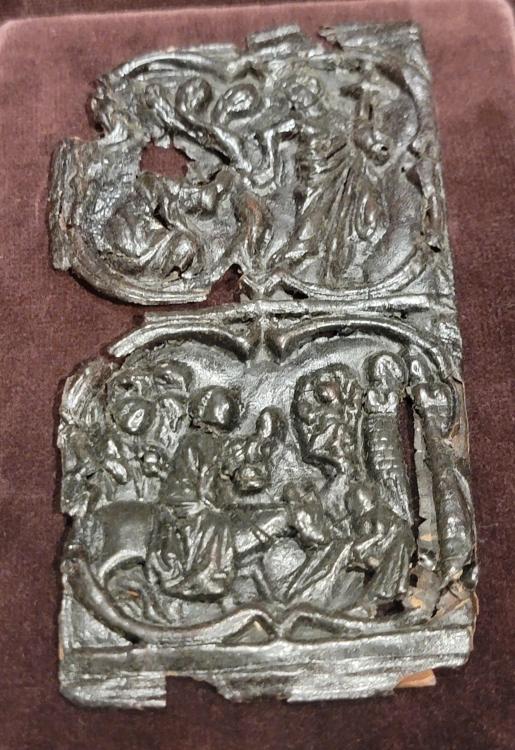
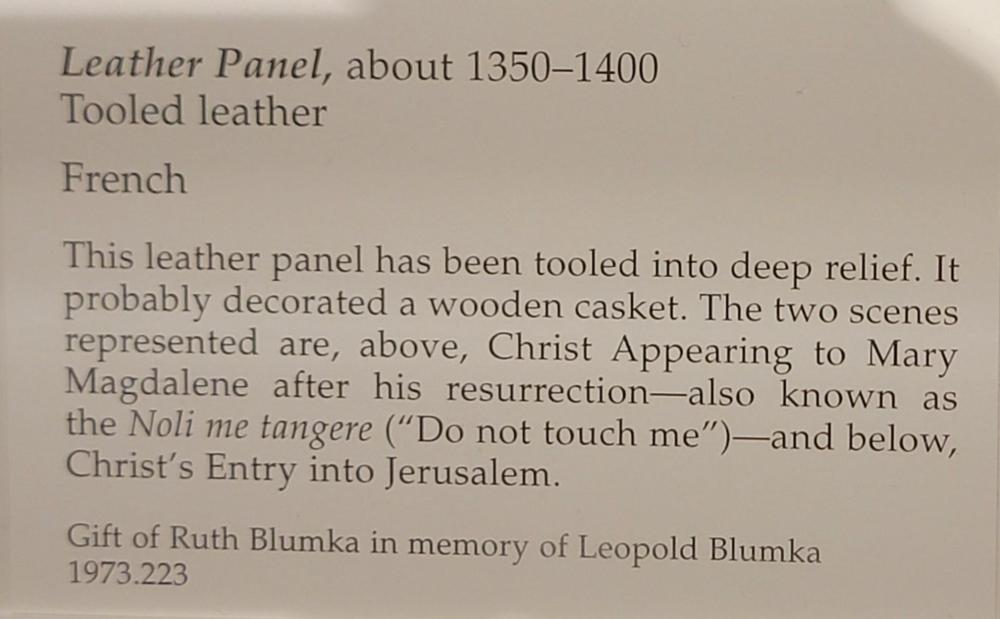
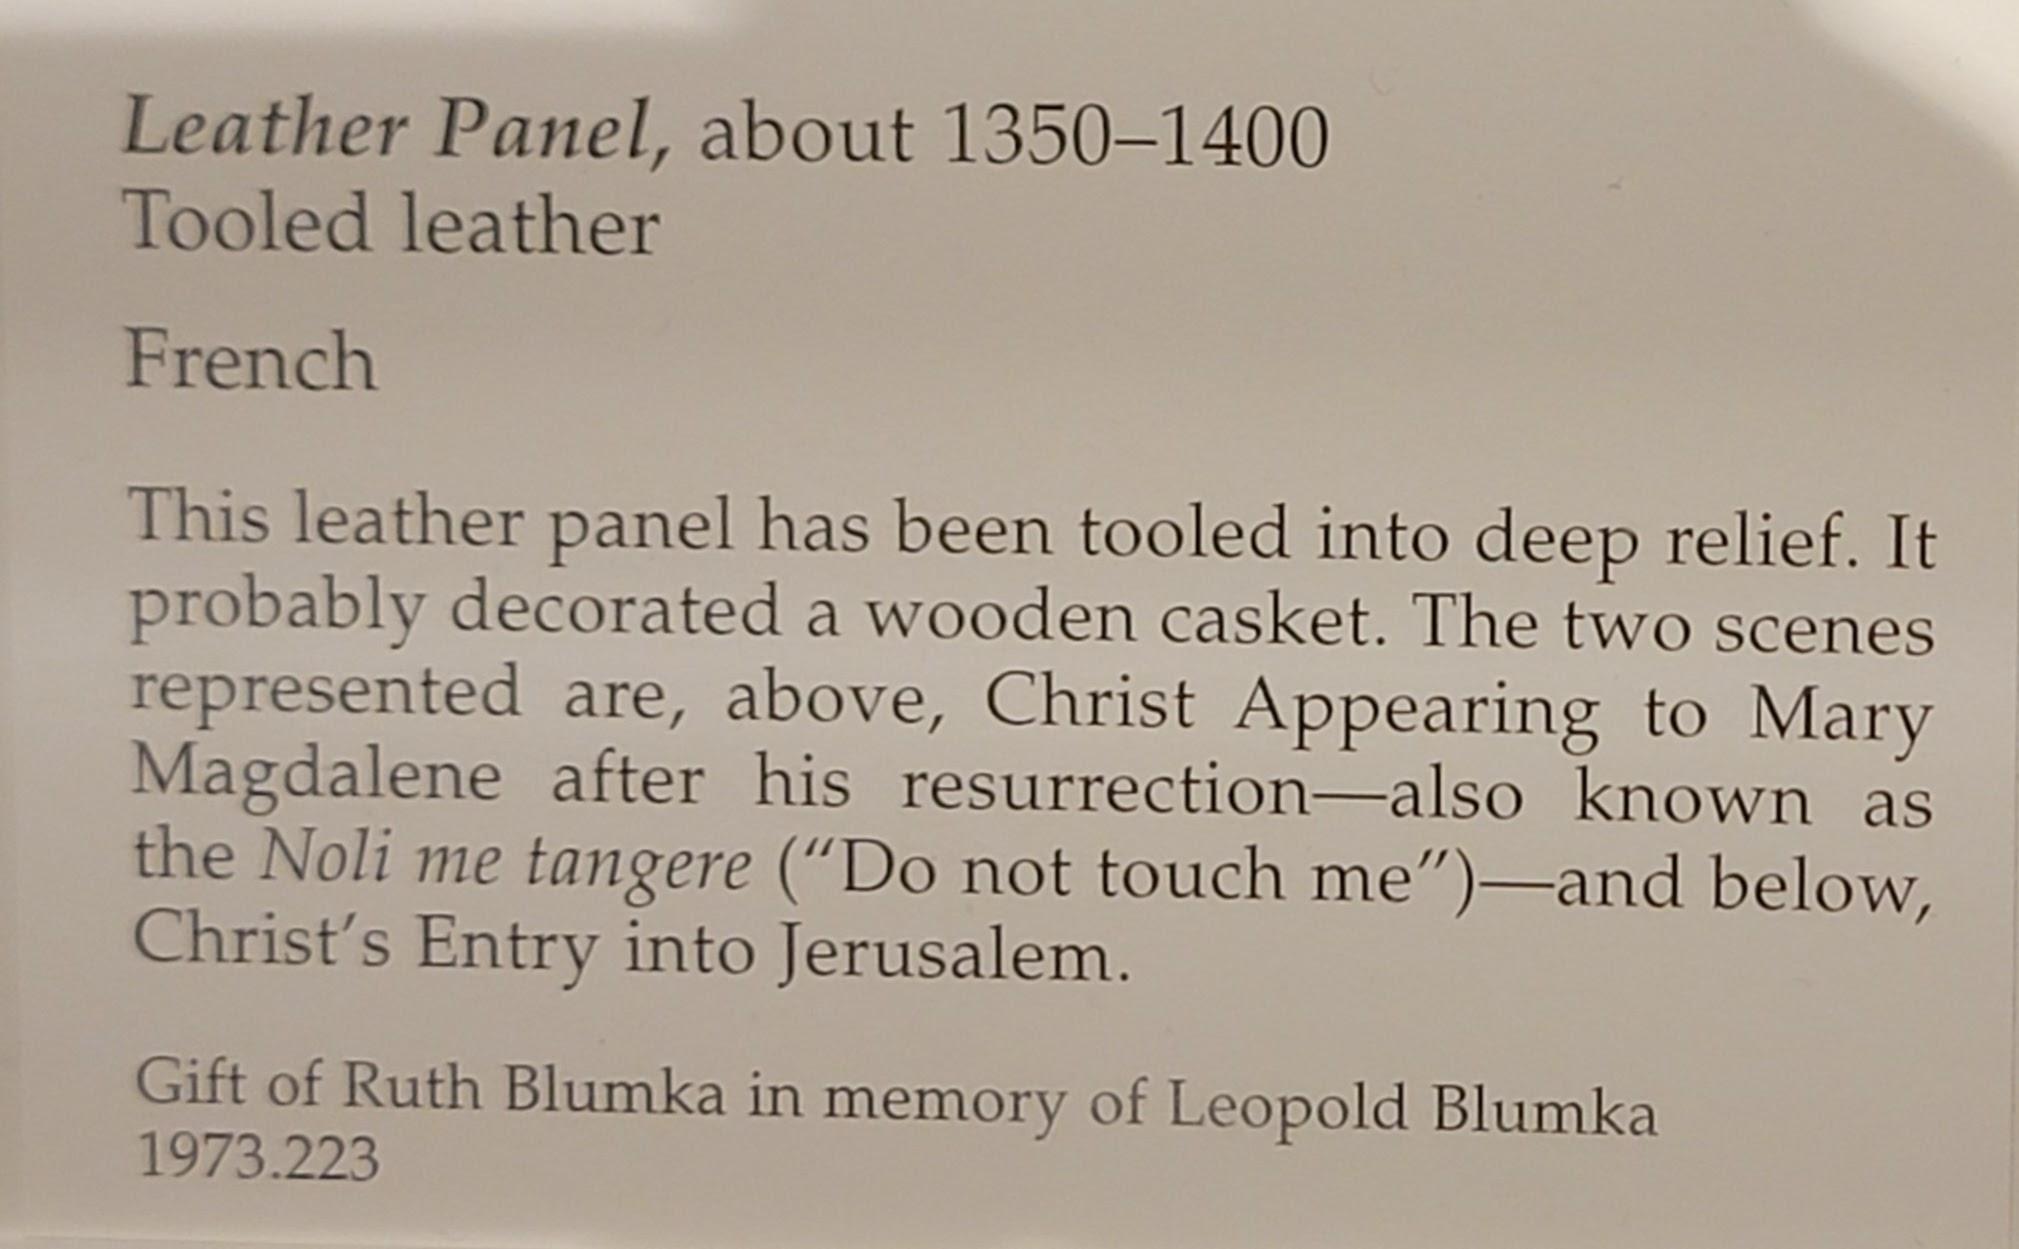
The local schools are on Spring Break this week and my wife and I went to the Cleveland Museum of Art for a day trip. We found this little gem along the way. I can only imagine the tools and practices used to make this. ... and talk about deep lines and relief! What are the odds any of our stuff will be under glass 600-700 years from now?
-
3 hours ago, LiftPig said:Beautiful work. I love a tooled holster as much as the next holster builder but there's something elegant in a well done rough-out rig.
Three questions since I'm considering building one:
1. How thick of steel did you put in the deflector?
2. What size thread did you use to stitch it? Looks like 346 but the weight is perfect for the rig.
3. Did you make your own pattern or is this one I could get somewhere?
Cheers,
J
No steel is allowed on US Quick Draw Assoc holsters. It's all rawhide.
277 thread off the machine. I did hand stitch the welt, same thread.
I always make my own patterns, which also allowed for the slight rear rake on these.
Thanks!
-
8 hours ago, MarshalWill said:Those look good. Nice work, there.
Your holsters are much better looking than the one rawhide lined holster I made one time as an experiment. The leather wouldn't glue to the rawhide and to shape it, it shrank at a very different rate than the rest of the holster. It worked well but looked funky.
I went through an entire side of rawhide to get this right. It's all about timing. Wet enough to mold, dry enough to cement. Once you start, clear your calendar because you have to work it until it starts drying, because it has to be set when you're done.
-
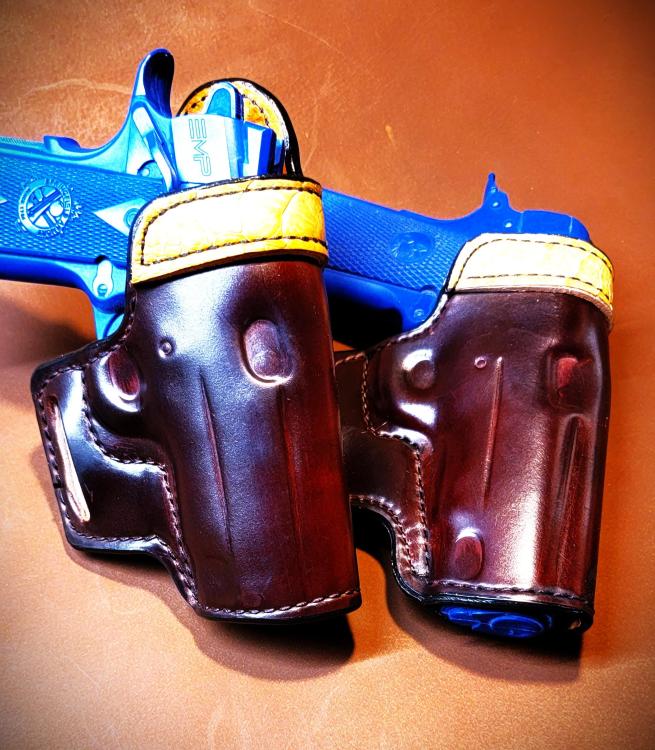
New item time! A couple months ago, I received a request for a "Fist Full of Dollars - walk and draw rig." The customer specified a few adjustments from the Man With No Name:- It needed to be a double rig- He wanted to use it for quick-draw- It had to fit a pair of 4.62" Ruger VaquerosThe QD requirement meant it all had to be rawhide lined, which is a departure for me, and it needed bullet deflectors. This is probably the 4th version I came up with for the order .. I could not be happier. AND the power of the internet means he found me from Washington State (I'm in Ohio!)I'm kinda jazzed about this one!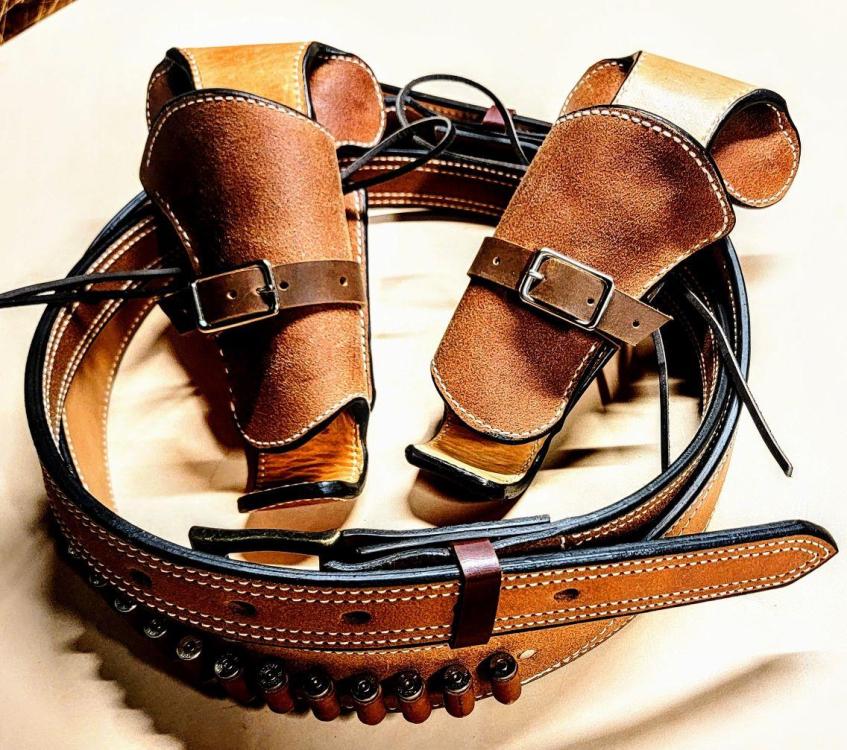
-
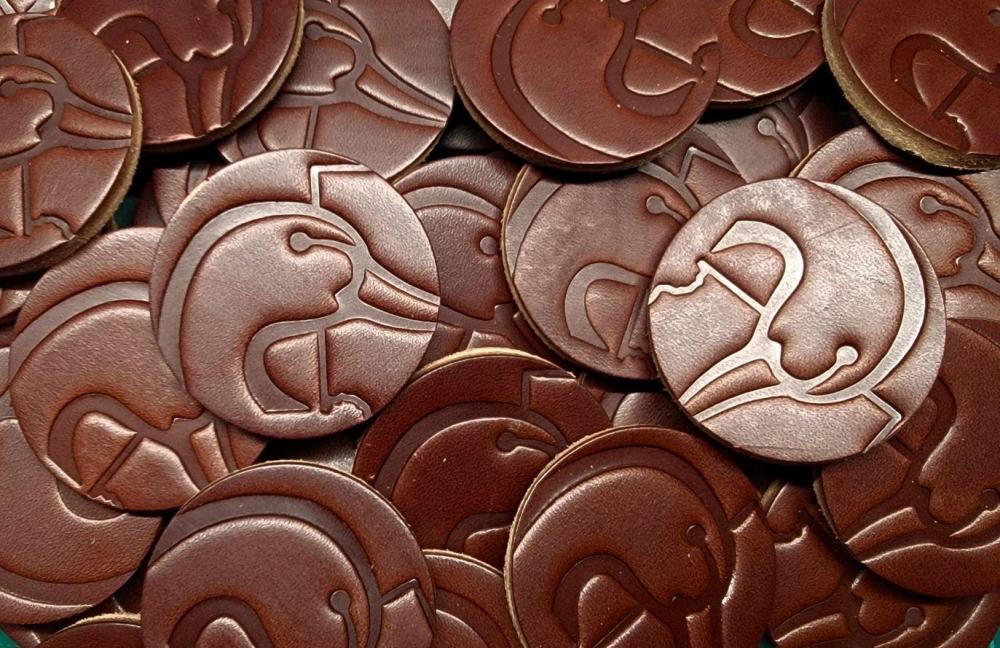
... as a bonus, I used the rounds produced from the 2" punch to make these "coins". Since I have use of the stamp, I made about 50 or so. Any idea what use they might have, other than they just look cool? I suggested some type of "challenge coins" for the club, but I dunno. (That bridle is fun to cut and stamp!)
-
On 2/19/2024 at 2:18 PM, TomE said:If I may suggest finishing and sealing the edges for outdoor use. This will help repel dirt and moisture to improve wear. I use mostly bridle leather for tack. It is a bit trickier to burnish than plain veg tan because the fibers are stuffed with fats and oils. You can get a fairly smooth edge by burnishing without sanding. My process is to bevel the edge then lightly wet it with water. I apply a small amount of saddle soap with a finger - just enough to feel it starting to get slick. Too much water or saddle soap will decrease the amount of dye absorbed in the subsequent step. I use a power burnishing wheel but canvas also works well to make the first pass. I then dye the edge with Pro dye or a 50:50 mix of Pro dye and Martin's Edge Solution. Once the dye soaks in I add a little saddle soap and burnish again. Gum tragacanth also works at this stage instead of saddle soap, but GT will seal the edge so you can't apply more dye if needed. Martin's Edge Solution creates a firm edge that is not sealed. I burnish before and after dyeing because it's easier to apply the edge dye evenly on a smooth edge. I usually finish by sealing the edge with beeswax applied with a heated edge iron. I let the wax harden for several hours before buffing with a soap cloth. This makes a serviceable edge for horse tack. I avoid acrylic finishes so the tack can be cleaned and conditioned as needed.
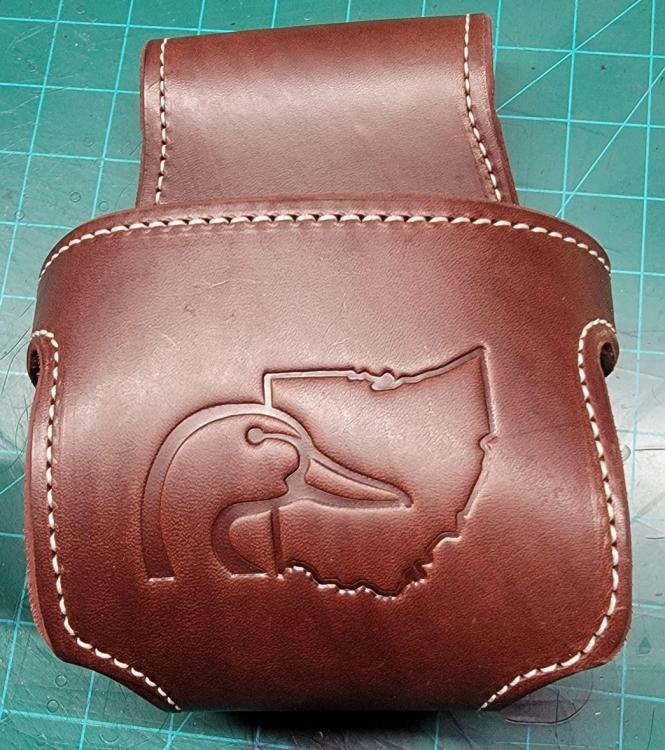
Tom E for the win. Nice edges and looks good. I'm fortunate to have a burnishing wheel attached to my drill press, since this is a "production run"-type order. The local DU was able to get a nice 3" wide brass stamp, which I was able to use on a few things, but it really sets this project off nicely. Side note: this project uses a LOT of material. At $30/pc, it really just covers material and I'm donating the labor. I get about 8-9 pcs per side of bridle leather in 12-13oz. Thanks for the input, everyone!
-
1 hour ago, TomE said:If I may suggest finishing and sealing the edges for outdoor use. This will help repel dirt and moisture to improve wear. I use mostly bridle leather for tack. It is a bit trickier to burnish than plain veg tan because the fibers are stuffed with fats and oils. You can get a fairly smooth edge by burnishing without sanding. My process is to bevel the edge then lightly wet it with water. I apply a small amount of saddle soap with a finger - just enough to feel it starting to get slick. Too much water or saddle soap will decrease the amount of dye absorbed in the subsequent step. I use a power burnishing wheel but canvas also works well to make the first pass. I then dye the edge with Pro dye or a 50:50 mix of Pro dye and Martin's Edge Solution. Once the dye soaks in I add a little saddle soap and burnish again. Gum tragacanth also works at this stage instead of saddle soap, but GT will seal the edge so you can't apply more dye if needed. Martin's Edge Solution creates a firm edge that is not sealed. I burnish before and after dyeing because it's easier to apply the edge dye evenly on a smooth edge. I usually finish by sealing the edge with beeswax applied with a heated edge iron. I let the wax harden for several hours before buffing with a soap cloth. This makes a serviceable edge for horse tack. I avoid acrylic finishes so the tack can be cleaned and conditioned as needed.
Thanks Tom. I will try that. It is good that I have plenty of scrap and the sanding did seem a bit "frayed". I'll try your version, or some close approximation - Thanks!
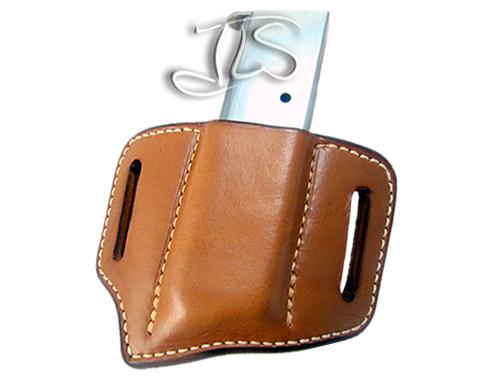
1 hour ago, fredk said:That chap needs a heavier gauge belt. Its bending and twisting
No kidding. I'm often amazed at what some people will publish in their product shots.
-
No logo yet, still waiting on them to get the stamp.
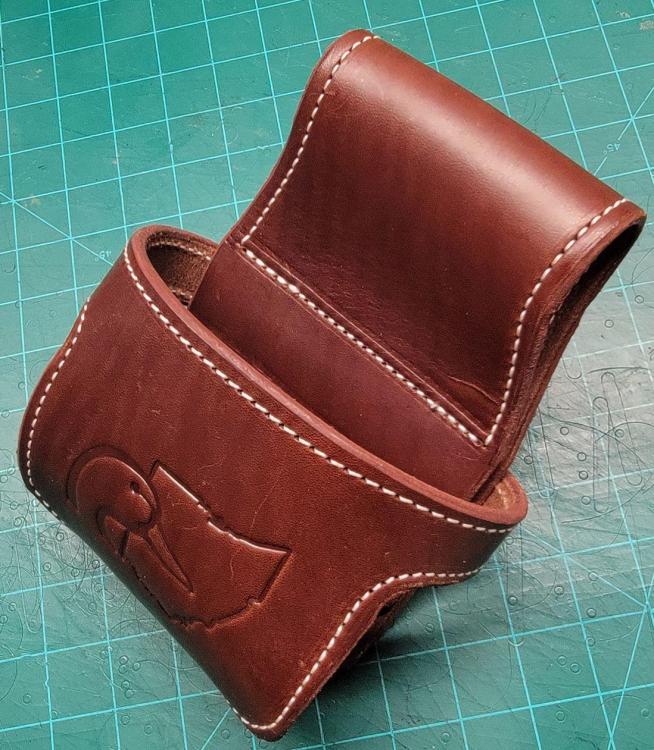
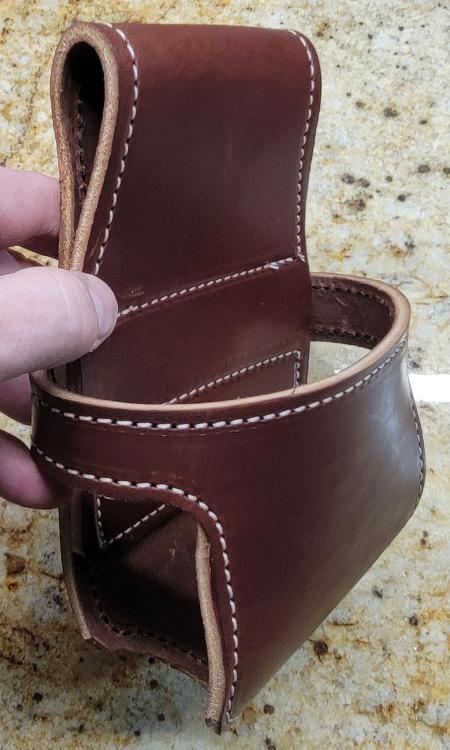
It holds the shotgun at your side. It's not particularly original, as I've seen them in the past and very early on, I tried to imitate them. This turned out much better.
.png.20757c660441e99cf255fb26304b1e00.png)
-
I was commissioned to make sponsor gifts for the local Ducks Unlimited Banquet. I was asked for suggestions and I came up with some of the usuals ... drink coasters or dresser valets with the DU logo stamped in. My contact suggested these shot gun holsters. In working up the prototype, I impressed even myself with 2 things:
1 - I picked the right material - 12/13 Bridle stock. No dying. No edging and it looks good. (The prototype has some VERY rough edges, but that was by design)
2 - It seems I got the pattern down on the first try, which is not typical for these odd projects.
One note, they use a LOT of material and the design doesn't lend itself well to yield. I got 9 out of the first side of leather. The order is for 20 units! This should be fun, and I'm hoping will expand my product base a little, as well.
-
On 1/21/2024 at 3:26 AM, Cattleman said:.... Horse hide is much tighter grained (so much so that even the sharpest knife will follow the grain if one isnt very careful), ....
I did get some hard rolled and finished the pouch. It turned out well. I discovered the difficulty cutting straight lines, that you mention here. I wish I knew that going in. Thanks for the advice. Here's my finished product.
-
I found those two pages previously. All I can find on the CFDA site is an explanation as to WHY they have the rules they do ... but none of the rules. The second link send you to a "Page Not Found". I'm going to go with the posts from some of the local clubs, which seem to be pretty consistent.
-
I am working on a Cowboy Fast Draw holster, a first for me. I understand the holster need to be lined with rawhide, not metal. One site said a bullet deflector is suggested, but not required for adults. What I am having trouble finding are the regulated dimensions for the holsters. Bob Marshall did a video a few years ago and he indicated a maximum (I think) space of 1.25" from the front of the holster to the point where the hammer meets the frame. And there was a minimum (or maximum) space from the throat to the top of the holster. When I look for regulations and require dimensions, I find local club regulations and the CFDA site has an explanation as to WHY the rules exists, but not the rules themselves. If anyone has access to current CFDA requirements, I would like to see them before I make really nice, unusable rig for someone.
Thanks in Advance.
-
I recently took an order to do a mag pouch, specifically in horse hide. Thus far, I have only worked in cowhide, mostly Hermann Oak 8-9oz veg tan. I found horse hide strips on Tannery Row. They distinguish between soft and hard rolled. What is the difference? Is the hard rolled more like a rawhide, or just a firmer version of the hide? Does one tool and form better than another. If this works out, I may expand my products to include horse hide, as I know some people have a near cult-like attraction to horse hide. Does it work better with thinner weights or is that pretty similar? Any help avoiding pitfalls is appreciated.
-
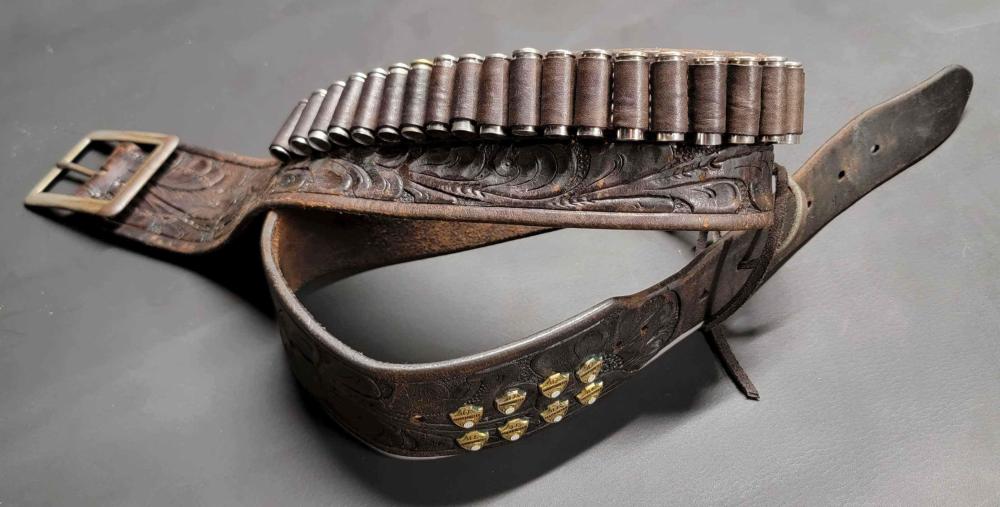
21 hours ago, YinTx said:Nice daunting work. I would have been tempted to put a backing piece of leather for the belt loops to attach to so they didn't damage the leather more. What are the decorative rivets? The backs look like cartridge primer and base.
Those are IPA Marksman and IPA Sharpshooter badges. IPA is the International Police Assoc. I'm guessing they are shooting merits for qualification, etc.
-
Here is the backside, showing the damage done to 80+ year old leather and a couple repair jobs in! It was difficult finding workable leather at times, but it worked out beautifully!
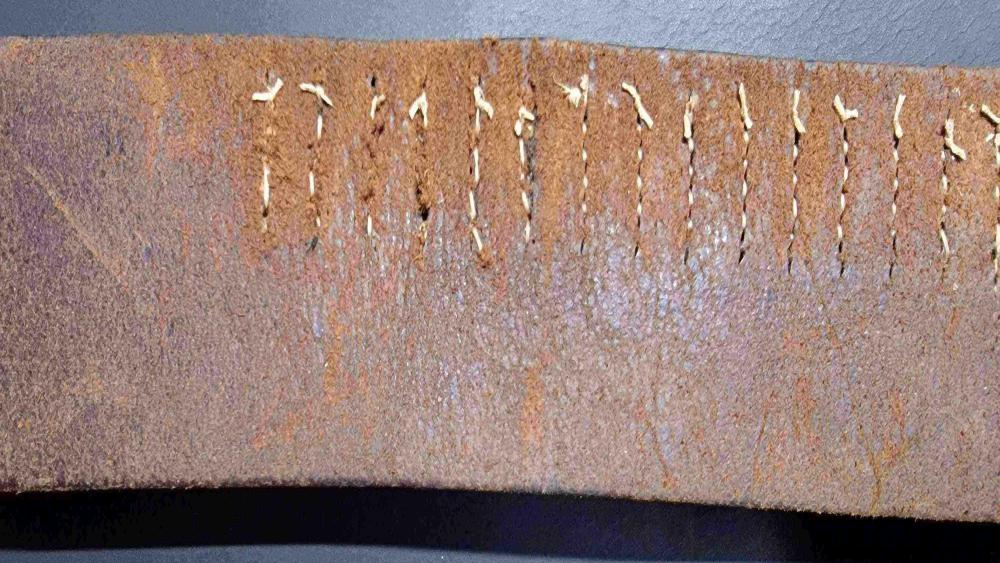
... my customer and his father from the 50s-60s. The owner is the boy in the photo, he's now in his 70s.
.thumb.jpg.49cef7967e2e3a1359e4d1658f7cb0e2.jpg)
-
Every now and then, I get a request to do a job that means more than leather and firearms. A couple months ago. I was contacted by a fellow that wanted the cartridge loops on his father's old duty belt replaced. The loops had been replaced at least once, at least on the ends. I don't do much hand stitching, but this one was ALL hand stitching.In the attached pictures, you will see the before and after.I appreciate making attractive, functional gunleather for people. I am honored when someone sends me a family heirloom!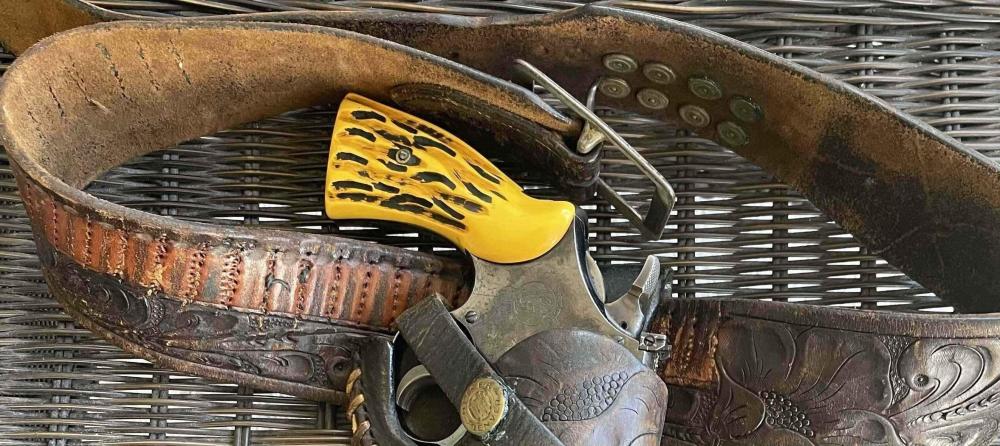
-
On 8/3/2023 at 4:31 PM, reinajk30 said:amazing work, how much time were spent on this...?
I don't know how much time was spent, and I know there is a pattern that can be bought. The thought and effort was the biggest surprise. As a "machine" guy, I appreciate the hand work people put into leather projects.
-
13 hours ago, JLSleather said:not sure what trounble you're having. I sometimes dye a holster after constructing it, but far more often I dye the leather and THEN cut out the parts. There's a reason for that, another time.
I haven't had any issues with the dyed leather not taking water, the exception being some drum-dyed HO I ordered exactly ONCE
") and for exactly that reason.
and for exactly that reason.
I like that contrasting look, and many other people seem to, too.
Still, I sometimes let the thread go in BEFORE the dye, as in the last pic.

The pre-dye is what I ended up doing. You second pic is more what I'm looking for. Oil is always nice because the thread doesn't discolor, at all. I always appreciate your input!
-
17 hours ago, Brooks125 said:I have not tried nylon, but I may be, shortly. If that is as resistant as you suggest, that may open things up a bit, Thanks.
I have tried the pre-dyed leather. It molds a little, but not to my liking. It has too much of a "vinyl-y" feel for what I do. But thanks.
... and sorry if this post went a little off the rails.
I have no idea where my head was on this response. YES, I use bonded nylon and it does maintain some of the "antique" look with completely changing color when I use white and then dye the leather. I just finished a holster that matches my question here. The long soak seemed to be the answer.
-
4 hours ago, caressofsteel said:Have you tried nylon thread? I have not personally tried to dye it, but nylon thread is supposed to be terribly difficult to dye.
I have seen other people's projects where the leather is stitched with white nylon thread and then dipped dyed black.
4 hours ago, JustPete said:Have you tried black pre-dyed holster leather? It seems to mold well enough for my needs, but I do mostly knife sheath work and its not always AS reliant on a tight friction fit.
The thread stays white. Seems you could test this on some scraps to see if it would be a possible solution.
I have not tried nylon, but I may be, shortly. If that is as resistant as you suggest, that may open things up a bit, Thanks.
I have tried the pre-dyed leather. It molds a little, but not to my liking. It has too much of a "vinyl-y" feel for what I do. But thanks.
... and sorry if this post went a little off the rails.
-
I typically Cut, Stitch (with lining), Wet mold, Dye, Finish. This has changed to Dye, Cut, Stitch, Mold, Finish.
I thought about the slave stitch, but with the lining, I can't get it in the machine for the open portions. I think I'll have to stick to a longer soak and more elbow grease on the boning process, similar to using waterproof exotics.
Thanks
-
I'm sure there is a fairly simple answer that I'm not seeing. How would I go about stitching a lighter, contrasting thread on a dark (black) holster, belt, etc., but still have deep, wet molding ability?
I have a couple hurdles to cross.
1) I dye my holsters, usually, after they are stitched and done.
2) I suede line my holsters, except for exotic veneers, which I build finished side-in to improve absorbency. This makes a nearly waterproof side on the panels.
I am working on a tan thread on black holster. On my first go around, I dyed the veg tan leather before starting and the color held up well and didn't bleed, but the leather didn't take the water well to wet mold it, almost like an exotic. Any of the pre-dyed leathers seem to be just as water-resistant.
Is there a way to get better wet molding detail and still keep the contrasting colors?
Thanks
-
On 3/23/2023 at 9:14 PM, Burkhardt said:You forgot to finish the edge on the one on the right and is the ostrich a veneer or did it cut really bad?
I don't finish interior edges, and the Ostrich is a veneer. Normally I would burnish the interior edges, but the OL doesn't cut well with and edger. That was all by design.
7 hours ago, Bert03241 said:I think they look pretty good.
 Personalty I'd stick with the heavier leather. I think 5 to 6 is to light for gun holsters
 ")
I did the heavier one first and didn't like the weight, particularly on the front bend. With the Shell being about a 4+ (and not that absorbent) it gets pretty stiff to fold over. It turned out OK, but the lighter one is just about right. Shell Cordovan is certainly picky in some ways. I don't know that I would use Shell voluntarily, but the customer "loves" it and supplied the material. I was happy with it in the end.
Thanks for the input!
-
I probably should have asked ahead of time but, is there a trick to working with Cordovan on holsters? I did find that using the 8/9oz cowhide base was pretty thick. The second piece used a 5/6oz veg tan and molded much better. My biggest concern came with the wet molding and losing the bright finish on the Shell. I was mostly able to get it back with a standard polish/brush/buff, but wonder if there's a better way to work with this stuff? (By the way, that's an Ostrich Leg top strap)


.jpg.5a4e1f7159ba00a27cddbbb9a3e1bc5d.jpg)


Man With No Name rig!
in Show Off!!
Posted · Report reply
I thought I would give you all an update. The rig was delivered ... and the customer loves it! I must say, sending out an order like this is sometimes akin to sending your kid off to college. You put a lot of work and emotional capital into them, and then send them off and wish them the best. He did ask for a shorter version of the trouser belt, as he's on the 2nd to last hole (long distance sizing is always a challenge), which means I'll have a nice piece for the gun show table!