


GatoGordo
-
Content Count
130 -
Joined
-
Last visited
Posts posted by GatoGordo
-
-
Just a reminder. If you do use neatsfoot oil, check at your local feed store. They also sell Fiebing's 100% Pure Neatsfoot Oil, but often at a lower price than the leather supply store.
-
Nigel Armitage dropped a new three hour series on saddle stitching last week. It was really interesting so I gave it a try and it does work.
To get a good bump on both front and back he suggests a cast on the front and a tug on the back.
Here is my first try.
For the front, the thread is driven high by the cast.

While for the back, the thread is pulled low by a simple tug.
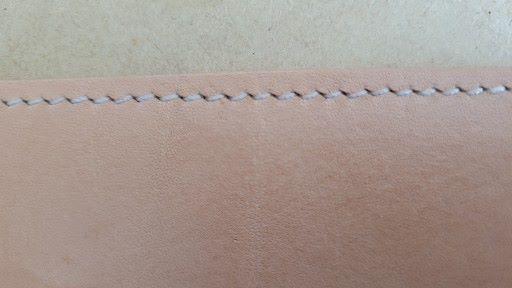
I suggest you view the new videos. They are listed as saddle stitch - modern style by Nigel Armitage. I know someone posted on this forum that everything about hand stitching can be learned in 10 minutes, but that is not true.
-
The technique is called block dying. Here is a video showing the process.
-
2 hours ago, kgg said:I think the grocery store would be considered a commercial / business not a home residence so would have different rules.In North America you can be considered trespassing and charged with trespassing at your local business under certain circumstances. Does it help with the dirtbags robbing stuff???
Proper thing.
kgg
In this case, this was a business. In your words "she had a client do a pick up earlier this month." This was a customer invited into her place of business to pick up merchandise. Same as a grocery store.
2 hours ago, fredk said:In legal theory, yes
Unless you are 'invited' in. You are 'invited' in to trade by open doors and posters offering items for sale
The woman was invited in by being asked to do a pick up.
-
3 hours ago, fredk said:In the UK, at least in N.I., all visitors are 'trespassers' in law except 'legal visitors'*
I am not sure I understand this correctly. Are you saying that if you walk into the local grocery store that you are trespassing?
-
Clean the threads, then apply some petroleum jelly before reattaching the lid. It lasts a surprisingly long time.
No need to reapply each time you open the jar.
-
They work well for the gussets on bags.
-
Here is a better video showing the laser engraving and the use of gold leaf.
This video is by a member of this forum. Perhaps he will step in and comment.
-
You can use gold leaf as shown in this video.
Use the laser to print the design, then fill the design with the glue, and finally apply the gold leaf.
-
14 hours ago, fredk said:1. Blue guns, or any other colour, are banned in N.I. I've tried to buy them and import them but I can't
I am curious as to the reasoning behind blue guns being illegal.
-
I, also, like the spacing, but I think it would look better with a finer thread.
-
I have to agree with Montana Leather. While, in my experience, they all bleed, they do it to a different degree. While some are barely noticeable, others are more pronounced.
Just this week I was making a stock shell holder using a piece of gold suede that I purchased just over three years ago. While sewing my thread turned yellow from the dye!
-
I did a Google image search to see similar bags with rivets. In my opinion the rivets cheapen the look. They may be appropriate for Harley Davidson but the OP's bag without rivets looks far classier and more refined.
-
You can download an STL file of the PPK from thingiverse.com. Printing that would be easier than trying to create a wooden form from a picture.
-
4 hours ago, WalterF said:I am having a hard time finding the video of where I learned it or it would be posted.
Don Gonzales made a video showing the technique.
-
40 minutes ago, chuck123wapati said:they would have to be wrapped well for sure for casting, i wonder what the cost of 3d would be just in the plastic needed from what i have read its kind of costly also.
I have 3D printed a few guns. The cost is around $2.00 to $2.50 for a Glock 17. Smaller guns will be less, larger guns more.
-
2 hours ago, toxo said:If I were to make a holster this way I would wrap the gun in plastic film, lay it down and prop it up level, then using some kind of moulding clay I would press it all around the gun to make a mould. Then using something like resin I would pour it into the mould to make a form that I could use again and again using the normal wet moulding techniques.
While I have made one (almost) flat-back pancake holster, that is not the standard.
Here is an image of an Avenger holster. You can see that the leather is not flat, but wraps around the gun. The leather is then molded to the gun both front and back. There is also the problem of the reinforcement panel. I have no idea how one would stitch the reinforcement panel in place after molding.
.thumb.jpg.9976fca3f50e2ab92a5e2150a93d5247.jpg)
-
2 hours ago, AlZilla said:That's not what he's saying. In the 10th post down, OP says "Dye, Cut, Stitch, Mold, Finish. "
He'd like to dye after stitching and molding but doesn't want to muck up his contrasting thread color.
I was questioning the fourth post where toxo states:
Why not just wet mould - dye - stitch - two coats of 50/50 Resolene?
I don't understand how to get and retain any detail if the stitching occurs after wet molding.
-
5 hours ago, GatoGordo said:I don't understand this method. Are you saying that you create some kind of mold, then shape the two halves of the holster, then dye, and finally sew? How do the halves fit together? Can you point me to a video of this method so I can actually see it?
The method I use is: Dye, cut, sew, wet mold, finish.
Just to clarify: I understand this type of procedure with a pocket knife or something with little detail, but with a handgun that has lots of curves and indentations, I don't understand how wet molding before stitching can capture and maintain that detail.
-
3 hours ago, toxo said:We're all different I guess. A blue gun would assume not a one-off. I think I'd rather make a slightly smaller mould and do it the easier way.
I don't understand this method. Are you saying that you create some kind of mold, then shape the two halves of the holster, then dye, and finally sew? How do the halves fit together? Can you point me to a video of this method so I can actually see it?
The method I use is: Dye, cut, sew, wet mold, finish.
-
@blueduck thanks for the information. I did as you suggested and cut off a small spot and gave it a try. The dye and oil worked fine, but I do not have any wax for the final step. I will figure out something to try tomorrow.
-
I recently purchased an ostrich leg crust and am not sure how to process it.
Do I dye with regular leather dye? If so, then how? Dip dye, dauber, block dye, or something else?
Do I need to add some kind of conditioner or oil?
-
1 hour ago, TomE said:Thank you kindly! The direction of the halter snap is debatable. In my experience, the outward facing snap will catch on hay nets and on woven wire fencing. We don't normally turn out horses with halters on, but we do use a few grazing muzzles with break away halters (leather crown piece on a nylon halter) for ponies. These inexpensive halters have an outward facing snap. I had a pony leave their broken break away halter clipped to the fence today (she was scratching an itch no doubt), and I just finished making a new crown piece for tomorrow's turn out. So, I think the outward facing halter snaps can be dangerous. A properly sized throatlatch is roomy, allowing 4 fingers to be inserted between the horse's jaw and the throatlatch. The snap should rarely touch the horse.
Thank you for the explanation.
-
Beautiful as is all your work, but I have a question. The opening of the swivel snap is facing inward. Doesn't that present an opportunity to harm the horse?
.jpg.dcc972526761cdb048cc51fe252a5c41.jpg)
what type of glue to finish linen thread saddle stitch?
in Sewing Leather
Posted · Report reply
I use white glue. I use a precision tip applicator bottle to place a small drop precisely in the stitch hole, then cut the thread as close to the leather as possible.