


JazzBass
-
Content Count
262 -
Joined
-
Last visited
2 Followers


-
That’s a really good first try…mine didn’t look that good! I don’t know what leather you used, but I can say that after I started using Hermann Oak veg tan, I got better results in the depth and smoothness of cuts/bevels, and it takes dye better than almost anything else. As to the dye, stick with the Fiebings PRO dye, if you’re not using that already. Hope that helps… the rest is just practice. Your cuts and bevels will get better in time. Keep going! Do the same pattern multiple times, instead of immediately jumping to something else. It’ll pay huge dividends later, as you can compare each version, and improve all the way. Again…it’s really a very good first attempt!
-
Good job! You might consider skiving the edges of the accent piece on the front, so there’s less of a ridge. I like the red thread on the black bag. The “Batman” combo is a winner on lots of things. I found that using cream colored, or beige, works well when you want a bit less white, but it looks good as is. I also agree completely regarding oval holes, but they take a lot more care to get them straight. I found that if, instead of just trying to line up the tool, I’ll punch a hole through a small piece of poster board to use as a template. You place the template over your mark, and when it’s straight, use hand pressure on the tool to mark the oval on the leather, then remove the template, re-index the tool, and punch through. The nice thing here is that you can see all the ovals in a line before punching, and make small adjustments if necessary, before punching them out Nice job!
-
That’s quite good for your first belt! Belts are great, because there are SO many choices in making. The only problem is that you’ll want to try them all! LOL. Congratulations on #1. Face it- you’re hooked now. (Haha,)
-
I agree with the others- you took the leap and worked through to completion. Good job! Kudos for the groon…haven’t yet tried that myself. Keep going… you’ll surprise yourself with how quickly your work will improve, as you have fun along the way.
-
Thanks for all the wisdom, folks! Maybe I am a bit paranoid, as it is true that the stitch line is not required to support lots of tension, as in a cinch strap. I’m sure you can see my concern though, as that stitch line is meant to be a hinge, that will be repeatedly be folded on BOTH sides. I’ll just have to make a few, and see how the thickness and temper effect the long term durability. Thanks again for the insight.
-
We’ve all probably seen the card wallets with a money clip in the center… Although it does indeed seem like a wonderful version of a “minimalist” wallet, the tube of the money clip is affixed by sewing the barrel/spring ACROSS the width of the card wallet- twice. Hmm… These two stitch lines then become the hinges upon which the wallet is opened and closed. Double hmm… isn’t that a recipe for splitting, craking, and ultimate failure over the long term? Isn’t that why we sew along the length of a strap, instead of across its width? Opinions?? I like the design, but have serious misgivings as to the “engineering”. No, I haven’t yet made/tested one, but have had a few requests. My inclination is to believe that a lifetime guarantee would have me replacing every one I make, every 3-5 years. Am I wrong or just paranoid?
-
Absolutely - Sometimes we sweat like we're in the gym. I personally have no problem with staining on the back side from sweat - it beats the heck out of having dye come off on clothing. The natural colored pig skin I've been using does stain, but feels great and won't bleed dye.
-
Man, that looks incredible!
-
 Wonderful! The rolled edge of the deerskin over the opening of the sheath is a REALLY nice touch that I don't believe I've seen before....and done so cleanly! Beautiful!
 -
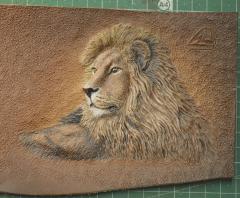 Wow....and such detail on such a relatively small scale. Magnificent work, sir!!!
 -
Nice...it seems to hold its shape, despite the soft temper.
-
OK - Which one of you are responsible for THIS? HAHAHA!!
-
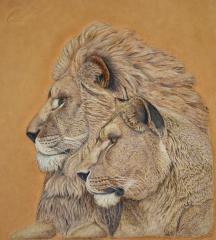 Amazing!
 -
Fear not, and don't give up. My first "experiments" looked similar. My first mistake was to "practice on something cheap". No, Tandy "craft sheets" are not cheap in cost, but trust me when I say that you can get top quality, Hermann Oak tooling leather, in specified thicknesses (not offered by Tandy), from Springfield Leather, for similar prices. This alone will take leather quality/consistency out of the equation. Casing, for me, was also the most frustrating at first, as it is so subjective. I found that, relatively speaking, I want the leather damper when carving, and noticeably drier on the surface for tooling. This allows smoother, deeper cuts when carving, BUT - you MUST wait for the surface to return to near its original color, with good moisture under the surface, to see the burnishing that you want. I think your cuts are a bit narrow and shallow, probably due to casing, knife sharpness, and/or pressure. A wider "trench" to bevel will really help as you learn the beveler. JLS mentioned the 90deg mis-orientation at the bottom left. On the rest of it, and in general, the visibility of individual tool strikes, means that you're moving the tool FAR too much between strikes. You're also trying to get the bevel in a single pass...yeah, I did that too. Try this - Cut a single, straight line in a fairly damp piece. Wait till the surface dries to near its original color. Now take your beveler - make SURE that the toe is in the groove, and tap it as lightly as possible. Move the tool a QUARTER of its width, and again, tap as lightly as possible. You're creating a small shelf, that will make indexing the tool on subsequent passes MUCH easier. It's my impression (no pun intended), that you tooled too wet (no burnish), struck the beveler too hard, and moved it far too much between strikes. Believe me...the guys who can do it in a single pass and make it look smooth and easy, have been doing it for decades! You and I need to go a little deeper and a little smoother with each of several light passes.
-
@mikesc - A belly laugh for your brilliance, and a tip my hat to a man who understands the difference between true sarcasm and infantile "snark". I have occasionally had folks who came up to me and said, "You make it look so easy!". to which I respond, " It IS easy - you just didn't get to see the 40 years of blisters that made it easy". To be "hip" enough to choose the dichotomy of Hendrix and Coltrane, then your "btw...", reminds me of the old Dean Martin Roasts, where revering the genius of of men could be done while taking all the power out of stereotypes by laughter. Ah...the good ol' days! Meanwhile, you of course made a great analogy to the leather business. You sir, are a steely-eyed missile man.