AaronR
-
Content Count
33 -
Joined
-
Last visited
Everything posted by AaronR
-
Samples of my work
-
-
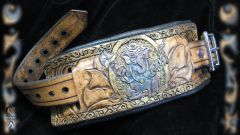
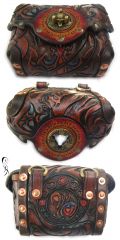
From the album: Portfolio
One of my first multi-integrated pieces, mixing laser etching & filigree work with brass and gemstone inlays. The blue goldstone on the flap and paua shells on the back turned out perfect for the "cosmic" theme of this piece! fully lined in red pigsuede for a lush interior. -
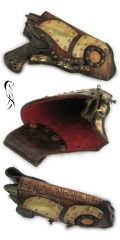
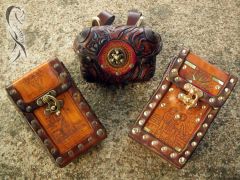
From the album: Portfolio
Interesting digression into holster-making. Crazy steampunk ray guns provide no end of challenge for design work! Wanted to avoid brass inlay so the metal be easier to clean/polish/maintain. -
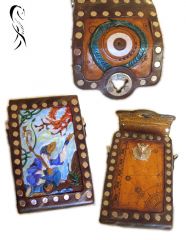
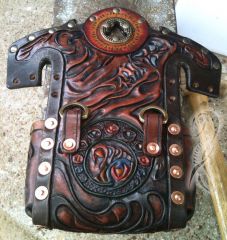
From the album: Portfolio
Pretty pleased with how the laser designs turned out on the front. The tooling/etching integration on the flap was a trick, but turned out not so hard to orchestrate. -
From the album: Portfolio
Final version of this case. Layered alcohol-based dyes built up under a rich mahogany stain give it its colour. Minor laser etching around the clasp was a trick. Silk-lined. -
Ahoy Sam! I'm interested in setting up a leather workspace/classroom in Austin, and Clay Miller gave me your name as someone who was looking to do the same not long ago. Care to connect and talk more about this?
-

Sure. I am usually off on Fridays or the weekends. Give me a ring or text 512-663-4142 or email at KingsAustin@gmail.com
Thanks for asking! Sam
-
-
Clever skiving and gluing... Quite slick, but I wonder how they hold up in the long run. Regarding the earlier comment on bull's scrotums I'm reminded of an old European shoemaker who succeeded in making a truly seamless shoe. No stitches, no glue, but it perfectly fitted the client it was made for. His trick was to use the skin from a calf's leg cut off latitudinally from the body and then shucked off like a snake. It was this he tanned and shaped to make a seamless creation.
-
Hey Joe, As an avid headband wearer one of the pet projects on my backburner is something much like this. Vegtan leather used for a headband shouldn't shrink too bad. On the contrary, it will actually shape itself to your wife's head for a more comfortable fit (consistent sweat & heat = consistent casing). The tightening feeling comes not from leather shrinking but the human body expanding when placed in a situation of greater heat (we are mostly water after all). A simple way to accommodate this is to use a lace tie to keep the headband on, or to attach the veg-tanned portion to an underlying material which can be easily tied/adjusted. What should be more concerning is how you line it, how frequently it is sweated in, and how long it's exposed to sunlight. You mentioned using terry cloth. A chrome-tanned leather or other soft cloth like cotton should work as well - anything to keep the rough flesh side of the veg-tanned leather from leeching oils where it meets the skin. The sun and sweat means you'll regularly have to clean and condition the piece since those factors are actually baking it.
-
Thanks for the photos John. If I read this correctly you're asking about using a 1.5 oz suede to repair a 4 oz item with one of the rips across a seamline. That's gonna be tricky since it's in one of the highest stress point areas for trousers. First off conditioning. I haven't done much with suede myself but from digging around I can offer you a few leads. For cleaning and general fluffing you can use a suede brush or a pencil eraser. For conditioning I've found reports on Neetsfoot Oil, Scotchgard, wiping it with a rag soaked in a one-part vinegar to three-parts water solution, using a sponge with liquid silicone, taking it to a dry cleaner, or rubbing cornmeal into the material before brushing it off. Regardless of what you do test any process out on a spare bit or material, or lacking that a small inconspicuous spot on the item itself. Personally I'm intrigued by the cornmeal suggestion and am tempted to do it with a friend's also hardened vintage pair of lederhosen myself. The last stages of buckskin tanning requires you to work [knead] the material over to break down the hardened fibers and I wonder if a similar process with a softening agent might result in revitalization with suede. Next, the material itself. 1.5 oz leather - suede especially - is fantastic for lining. I wouldn't use it for the sole lynchpin of a repair other than as a cosmetic fix though. If you can get a 2-3 oz suede that matches the lederhosen use that, otherwise I'd suggest doubling up the 1.5 oz. The long tear on the front should be the easier repair - you'll be able to patch it up like one would a pair of jeans. And since glue sticks extremely well to suede be careful when applying it so you don't get any where you don't want it. Once the patch is glued in place a baseball stitch in a matching color upholstery or waxed thread should secure the rip nicely. The hole in the back however... If this was my own project I'd be sorely tempted to replace the welt entirely. Since it's in a relatively hidden location you might be able to get away with a smaller adjustment. I'd tear out the stitches for about one to two inches on either side of the rip, patch up the holes like on the front (one patch for each side of the seat), then re-sew the seam back together with a new welt overlapping the old cut from a matching material out of at least 4 if not 6 oz suede. Barge would be the way to go; you'll get the best tack for your buck. I'd avoid the Toluene free glue since it's not as strong unless you can't get the other stuff. If neither of those are available and you're using Tandy's go with their Contact Cement over the Rubber Cement - it'll last longer. In checking through my lederhosen reference library I didn't find much regarding traditional embellishment in the regions you're looking at repairing. Some varieties of leather pants have ornate embroidery going on - which could be used to hide and even fortify patchwork - but almost all examples of this I found were around the waist and on the outer thigh portions (see pics). Also, check out the hosenträger for rot and the like. It looks like the backing has rubbed off in a few areas. If they're dry and cracking on the grain side I'd encourage you to consider replacing them.
-
Something important to remember about carving & tooling interlocking lines is carving depth and tooling force. However deep you're cutting the leather where one ribbon intersects and crosses another needs to be more shallow than where the ribbon edge cut meets the background. This helps build levels into your carving and makes it take more work to beat the ribbon down into the background level. When beveling I treat the full knotwork as one unit. I begin inside and start tooling all the lines lightly where the ribbons cross over each other. There should be enough definition at this point to see that one strand "passes over" another but not so much that the underlying ribbon is flattened. Once that's done I go back and start beveling the background down with more gusto (a backgrounding tool could be used here to similar effect). Lastly I go around the outside of the unit and use a modeling tool to round any harder, linguini-like edges where one line intersects another.
-
Hey Baum, pictures of various sizes are permitted here as well as links to external photo-hosting sites, and a picture or two would really help with addressing your challenge (if it's still on the project board)! How dried out the leather is and what you intend to do with them will most directly affect what you can or shouldn't do with the pants. If these are to be showpieces a careful conditioning and patchwork should do the trick. If you're intending to use them your repairs may need to be more creative.
-
Thanks for the detail shots on the bear. I was re-reading Stohlman's Embossing book and figured that's what he was talking about with his cougar (p. 37-8) but wasn't fully certain.
-
Hey folks, I stumbled across this website while searching for resources on bookbinding: http://www.philobiblon.com/bonefolder/ For anyone remotely interested in exploring the art of making their own books I recommend checking it out if you haven't already. The Journals are peer-reviewed open access full of information ranging from history to recipes and "How-To's" and offer several magnificent binding examples from ancient to contemporary masters and artists. The Book Arts Website it's hosted on goes further offering a plethora of links to suppliers, online tutorials & exhibitions, papermaking, calligraphy, networking, groups and classes around the world. Another nice thing about the Journal is that it's held under an Attribution-NonCommercial-NoDerivs Creative Commons license, so you can download all the issues free!
-
Excellent-looking resource, I look forward to engaging it further. Thanks for sharing!
-
Cheers for the lead. With nearly two million hits for "leather" alone that makes for quite a reading list! Jim M posted a link to http://archive.org/details/texts earlier. Only 700+ there for "leather".
-
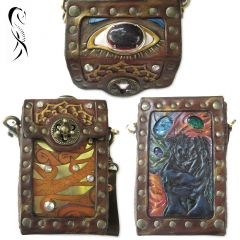
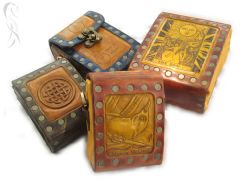
From the album: Portfolio
Detail shot of another organic case. Silk lined, dyes & stains with a hint of acrylic.© © Aaron Rathbun Enterprises
-
-
From the album: Portfolio
One of the badges designs developed for an experimental product line.© © Aaron Rathbun Enterprises
-
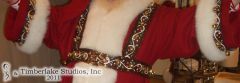
From the album: Portfolio
Suspender belt and cuff job for Santa appearing in the 2011 Macy's Thanksgiving Day Parade. Santa got a full two minutes and forty-five seconds of screen time on national television with a number of good close-up shots where you can see some of the leather detail. There's also a music video shot at that time with Bieber and Carey singing "All I Want for Christmas is You" in which Santa appears wearing the harness combo, but I'm pretty sure they used the previous version which mine was based on. I'm sorry to say the micro-glitter I used on the white parts didn't photograph at all; it truly adds a subtle magical effect to the piece. Side note: when using fingernail polish to seal a piece know that it will crack on anything larger than 3/8" in diameter, so be sure to keep your project flat at all times before adding the stain or antiquing!© © Timberlake Studios
-
-
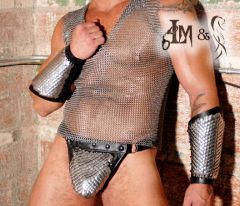
From the album: Portfolio
Collaboration with Leather Masters: scale work by myself; sewing, finishing & product carry by them. Chainmaille shirt is another guy's work but they're not too hard to throw together, just tedious.© © Leather Masters & Aaron Rathbun Enterprises
-
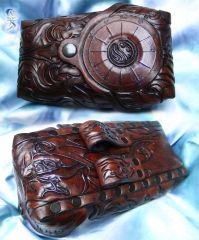
From the album: Portfolio
One of my first fully carved "soft edge" cases.© © Aaron Rathbun Enterprises
-
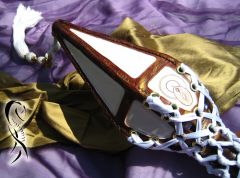
From the album: Portfolio
Six-sided cork-lined case for a spear. Tassel uses a Chinese "good luck" knot". I believe the client has trimmed much of the lacing off at this point for accessibility, heh.© © OTO
-
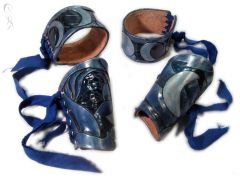
From the album: Portfolio
One of my first bracer & armband sets made back when Tandy's carried Fiebing's Royal Blue and I didn't realize the black "dye" I was using was really a stain. I miss that blue.© © Aaron Rathbun Enterprises
-