


LionCrownLeather
-
Content Count
40 -
Joined
-
Last visited
Posts posted by LionCrownLeather
-
-
18 minutes ago, HondoMan said:Goodness.... Pricking irons are to be used in conjunction with an awl. One simply makes wee 'pricks' or marks on the leather and then using an awl, sews the two pieces together. A diamond chisel is ment to combine a pricking iron and awl. One can punch through both pieces of leather (depending upon the combined thickness).
You need to spend time watching Nigel Armitage videos to get a better grasp on this topic.In nigel armitages video he demonstrates with these irons and punches all the way through.
-
4 hours ago, HondoMan said:What exactly did you buy for chisels? Either tell us or post photos. From your photo, it appears more pricking iron than chisel.
https://crimsonhides.com/products/french-style-crimson-irons
4 hours ago, HondoMan said:What exactly did you buy for chisels? Either tell us or post photos. From your photo, it appears more pricking iron than chisel.
What is the difference between the french style Irons and diamond chisen exactly?
-
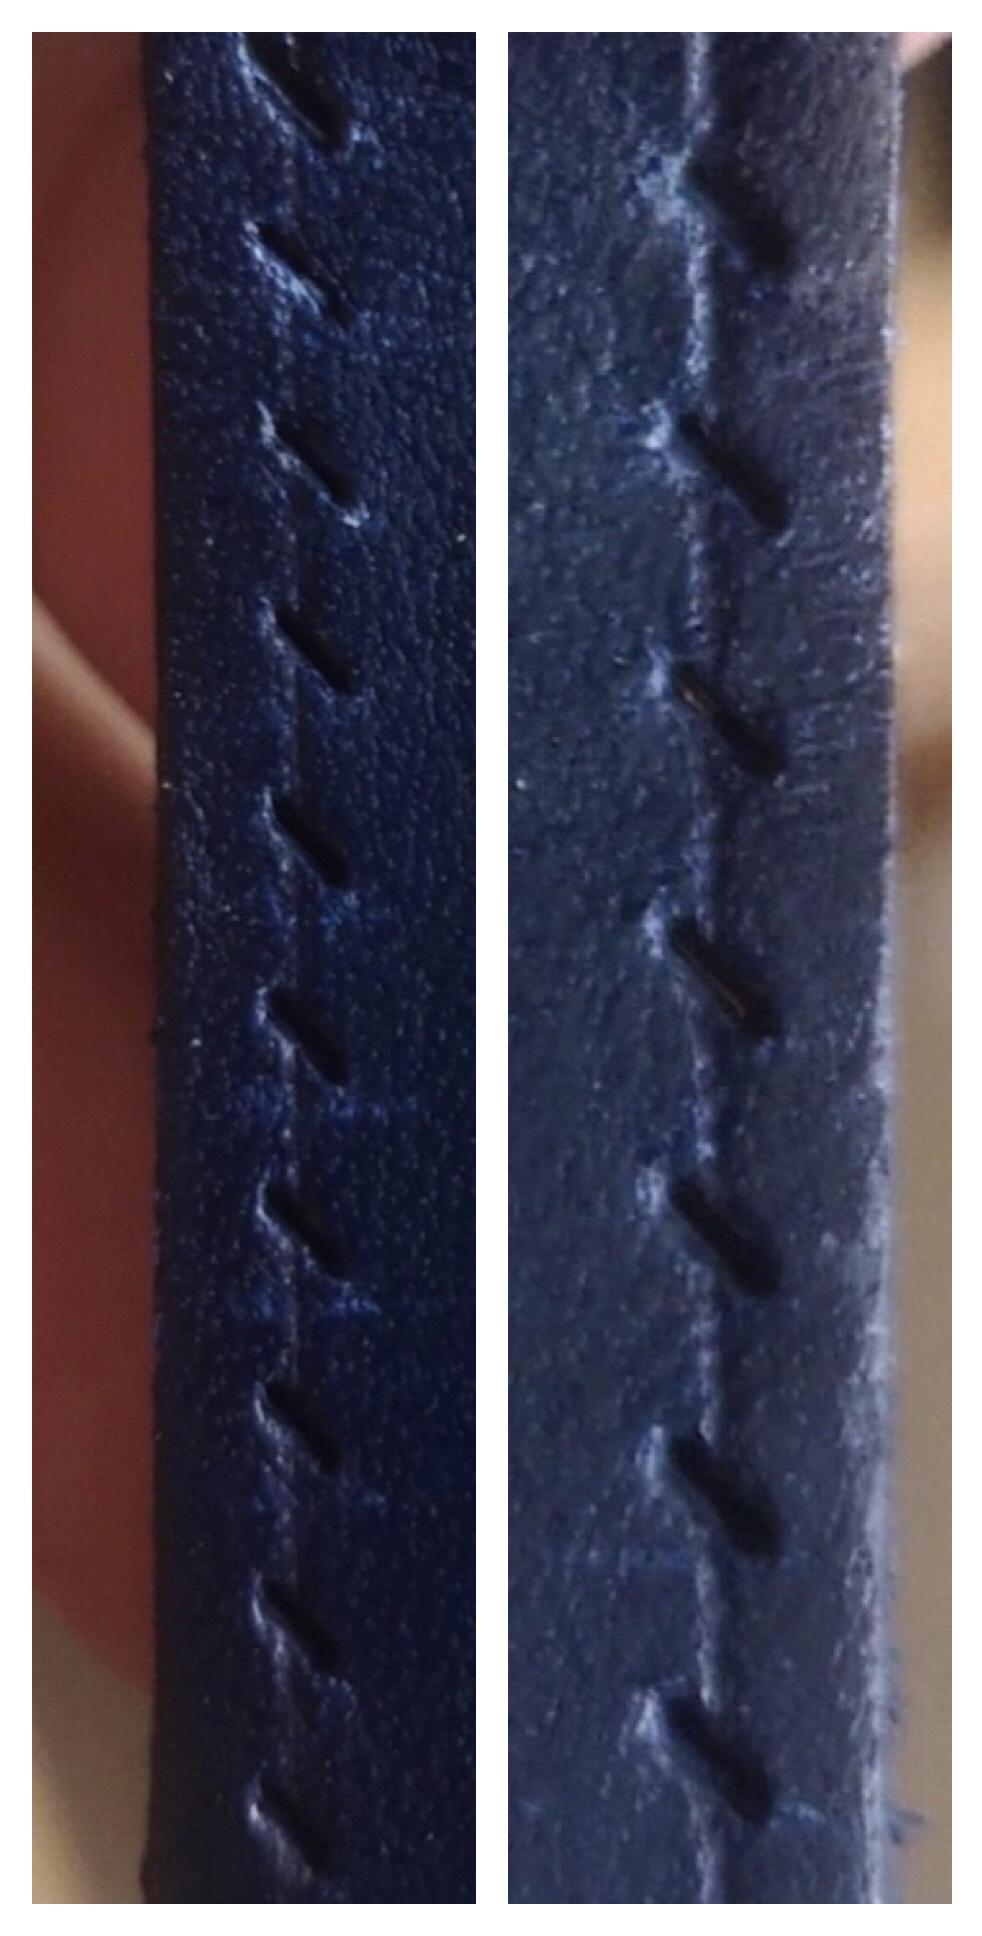
6 hours ago, Retswerb said:@LionCrownLeather, I think it’s just an optical illusion. Here are your two edges next to each other, the angles look consistent. Ignore the spacing difference, I just zoomed differently on the two sides.
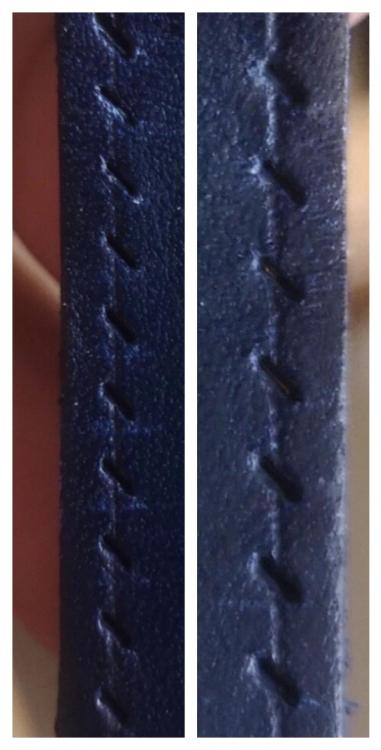
Thank you for taking the time to do this! What I have learned from the comments here so far: start punching holes from the bottom center and work my way up one direction and then start from bottom center punching holes towards the other direction.
I got to say having consistency in angled holes like these around corners requires good skills, I used a two prong diamond chisel around the corners but to get that slow turn to look professional a one prong would maybe be ideal but then again the risk of punching bad angled holes increases as they number of punches increases.
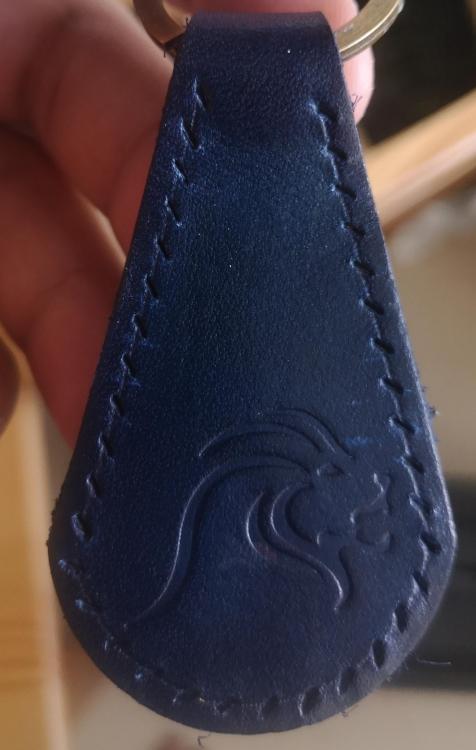
Now my keychain consists of two pieces of 4-5 oz leather folded and glued on top of eachother. I punched through both pieces directly and the back side did not turn out any good, a quite common problem.. Probably need to punch through each side seperatley and then fold on top of eachother.
-
Hi
I just bought a good quality diamond chisel set but I am facing some troubles, not with the quality of the chisels but instead how do I get a consistent look.
I will attach an image, I started on the right top side and worked my way down and then I used a 2 prong diamond chisel at the lower right round edge and continued to the left top angled edge (half a circle) and then I used my 9 prong chisel and punched a straight line to the top left part. Now would you have done the same? Is this a good consistent look regards to the diamond chisel punch holes? I feel like I am doing something wrong here.. The angled holes dont look consistent, on the left side they point more down compared to the right side the holes are almost vertical
-
On 8/24/2020 at 1:11 PM, LionCrownLeather said:Interesting, I will try purchasing Fieblings Deglazer and see if it will do the work in removing those stains. Thanks!
Once the neatfootsoil dries the stains are not as visible. I purchased fiebing deglazer and rubbed gently in circular movements on the leather but without any success. Conclusion: Got to be careful with Tokonole!
-
14 hours ago, Northmount said:Quoted from a site selling tokenole "
Note: Use caution when applying Burnishing Gum on leather that is going to be stained, antiqued, or dyed as it may resist or block penetration."
Also take a look at this post.
So the best thing is to be careful and avoid contaminating the surface so you don't have to clean it up. You might find that Fiebings Deglazer will work for you where needed to clean up these spots.
There are many posts here about burnishing and applying various edge coat treatments here if you want to take a little time to research them.
Tom
Interesting, I will try purchasing Fieblings Deglazer and see if it will do the work in removing those stains. Thanks!
-
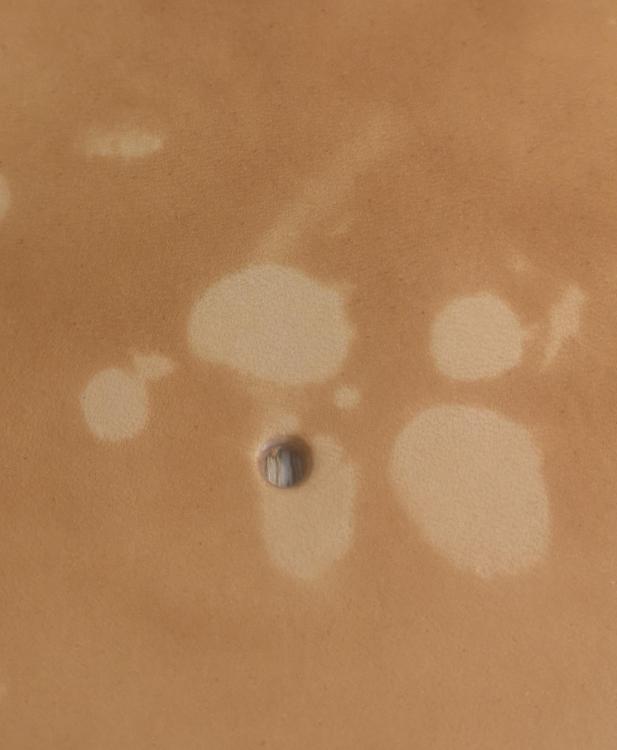
32 minutes ago, Northmount said:If you don't get the lemon juice (acid) evenly spread over the leather, you will have blotchy spots where the acid was stronger or left on longer. So are you complaining about the lighter areas, or the dark spot I see in one of the bleached areas? I'm not sure from your description.
You can also use oxalic acid to bleach the leather. Mix 1 teaspoon per pint of water. Rinse the surface off after with fresh water. That applies to lemon juice too!
Tom
Hi
I am complaining about the lighter spots. I did apply the lemon juice evenly :/ I noticed now it might be the Tokonole, I applied it to a piece of leather, waited ten minutes and started rubbing some neatfootsoil and I got the same spots, the lighter spots do not absorb anything. I now have another question, how do you apply tokonole without it getting on your leather? I only use it for the edges but it can sometimes get on your fingers while you rotating your piece and applying. This is veg tanned leather but I assume on predyed /prevaxed leather tokonole wont have the same effect. I tried to rub the spotty tokonole off using lemon juice but without any results. Maybe if I let the neatfootsoil dry into the leather the unoiled areas wont be visible..
32 minutes ago, Northmount said:If you don't get the lemon juice (acid) evenly spread over the leather, you will have blotchy spots where the acid was stronger or left on longer. So are you complaining about the lighter areas, or the dark spot I see in one of the bleached areas? I'm not sure from your description.
You can also use oxalic acid to bleach the leather. Mix 1 teaspoon per pint of water. Rinse the surface off after with fresh water. That applies to lemon juice too!
Tom
43 minutes ago, Alaisiagae said:It could be the tekonole (tokonole?), isn't that a waxy kind of substance? It would definitely affect dye penetration. If I may ask, why do you clean the leather with diluted lemon juice?
If you have more of that leather that has not been lemon-juiced or had any products applied to it, you might test out a piece and dye it, to see if those spots appear. If they do not appear, then perhaps either the tokonole or lemon-juice is the culprit. You could experiment, by purposefully putting tokonole on the grain and then dye it to see what happens. Good luck!
-
Hi
Since I bought this leather is has been very hard to work with, reason is when I apply dye or oil suddenly all transparent stains become visible. I dont know if this is tekonole which by accident gets on the skin before I rub it off or if it is the dilluted lemon juice I clean the leather with but I wonder if this is not a manufacturing issue. All my projects have been affected by this issue with this leather. Any ideas what might be causing this?
-
On 3/21/2017 at 12:42 PM, slipangle said:I just received my set yesterday. Haven't even had the chance to use them except a quick trial.
Since I only dabble in leather work I only got the 5 and 2 tooth chisels, in 3.85 mm spacing. Got tired of using my Craft tool punches. My initial impression is very favorable. While the pictures on their site make the teeth look like they'll make big holes, they don't. Very nice diamond shaped holes, which may have to be opened a bit with an awl blade during stitching. But I tried them out on 7/8 ounce veg tanned.
They're beautifully made tools. And reasonable compared with others. And Sherlyn was a real pleasure to deal with.
Hi, putting some life into this thread.. I want to order a couple of irons from crimson hides. How have they worked for you so far? I dont understand why do they offer 3.85 and 4 mm? the difference is so small.
-
On 7/24/2020 at 7:58 PM, johnv474 said:Nigel Armitage's great trick on Youtube is to use a scratch awl and mallet to make one round hole right where the two lines cross. You sew it the same but the result is tidier.
When i don't do that, I straddle the lines evenly, so each of the two prongs are the same distance from the corner, leaving one stitch right about 45 degrees betweem the two lines. I don't have a reason why I pick one approach over another on a specific project.
Thank you, I will try this.
-
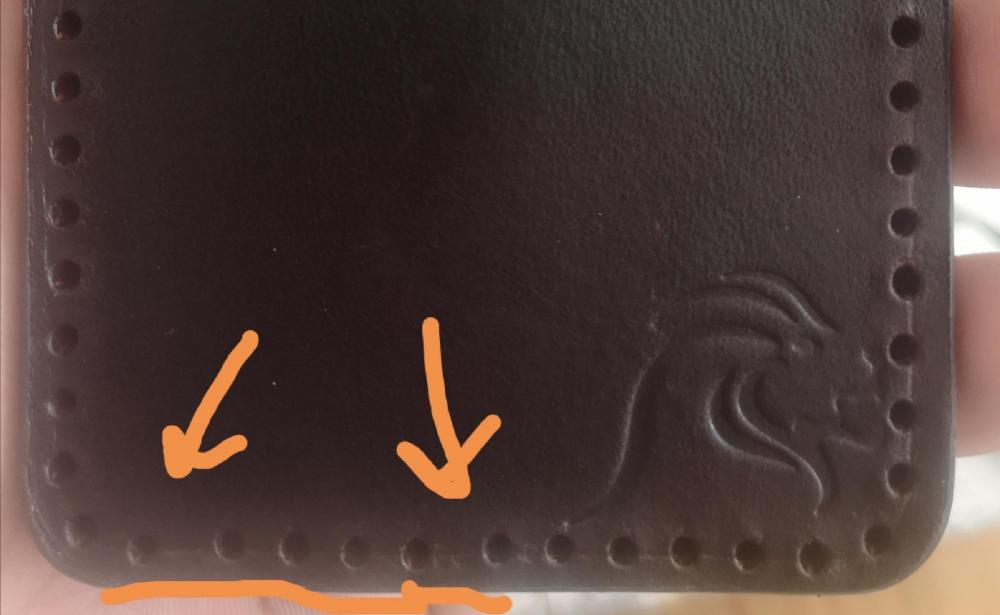
1 hour ago, fredk said:I use a single-tooth chisel to make one hole on the apex of the corner. I then work from the corners to the centre of the side or bottom, making a row of holes alternately, so that the last few holes are at about the centre of the side
At the moment I cannot see your picture. It might have somat to do with the present site problems
Hi,
Maybe there is a problem with the website. My question is if you have a corner and the corner radius is not so much and you intend to stitch with 4 mm spacing. When the template is finished you notice that on the bottom left and right corners of the card holder you don't have a stitching hole, you have one on the line going straight up and a hole on the bottom going horizontally, meaning there is no hole to connect the vertical and horizontal stitching line. After punching the holes from top to bottom corner do you rotate your project 90 degrees and then punch holes on the bottom from top to down? I feel like the connection of stitching is important here, I don't want the stitching to look unnatural between side and bottom of my card holder, maybe it is recommended to use a stitching hole at the corner between the two lines to make it look more consistent?
-
On 7/17/2020 at 7:56 PM, johnv474 said:You can get good results with any of them.
Many people have strong opinions about what is best or right, but they are mostly opinions. Some looks are liked by more people, and some approaches can look more finished or consistent to a customer. But some crooked stitches or uneven stitch spacing does not really affect anything except looks and resale value. This is a cardholder, not a parachute (an example where certain details do matter).
In order for your holes to turn out right, there are some things you can do. Rotate your project so you are looking along the line of stitching. Take your punch and hold it straight up and down. Pick up your mallet. BEFORE YOU HIT THE CHISEL, rest the head of the mallet on the top of the chisel. THEN, raise or lower the mallet's handle until it is going straight out, horizontal. NOW, raise and lower your hand/arm to hit the chisel, and when you swing down try to retrace your steps so the mallet goes right back to where it was.
If your mallet hits with the handle higher or lower than horizontal, or if your chisel is not straight up and down, then the chisel will exit higher or lower than you want it. The thicker the leather, the more precisely you must hold the chisel.
When it comes to stitch spacing, ideally this would be figured out ahead of time on a pattern/template. If you work straight onto the leather, as many of us do, we run the risk of more errors and also run the risk of having to 'bluff' a bit more with our stitch spacing.
When you reach a corner with the diamond chisel how do you place the chisel? for example I have a card holder I am doing right now. The holes begin from straight up to down and when I am going from the top line to the bottom I'm not sure how to hold the chisel here? see attached image

-
On 7/17/2020 at 7:17 PM, johnv474 said:Tokonole contains a small amount of adhesive that the glue sticks to. CMC is a very mild adhesive as well, perhaps on par with envelope glue. It is a very thin layer that does not seal anything. Most adhesives will seal the fibers once dry.
Cutting the pieces after being glued, as Paloma mentioned, is also very effective and can help eliminate fibers crossing the centerline.
To eliminate fibers crossing over you can use thinner leather (fibers are looser the deeper in the skin they were), or from a denser part of the hide (butt then shoulder then back then belly), or skive / sand the back smoother, or compress the fibers on the flesh side.
When cutting the pieces after gluing what I like about this idea is that you can decide which color you want the edge to be. In my case I always dip dye, and if I want the edges to have the natural leather color I simply cut after I have dyed, but if I want the edges to be dyed I simply cut before dyeing. thank you
-
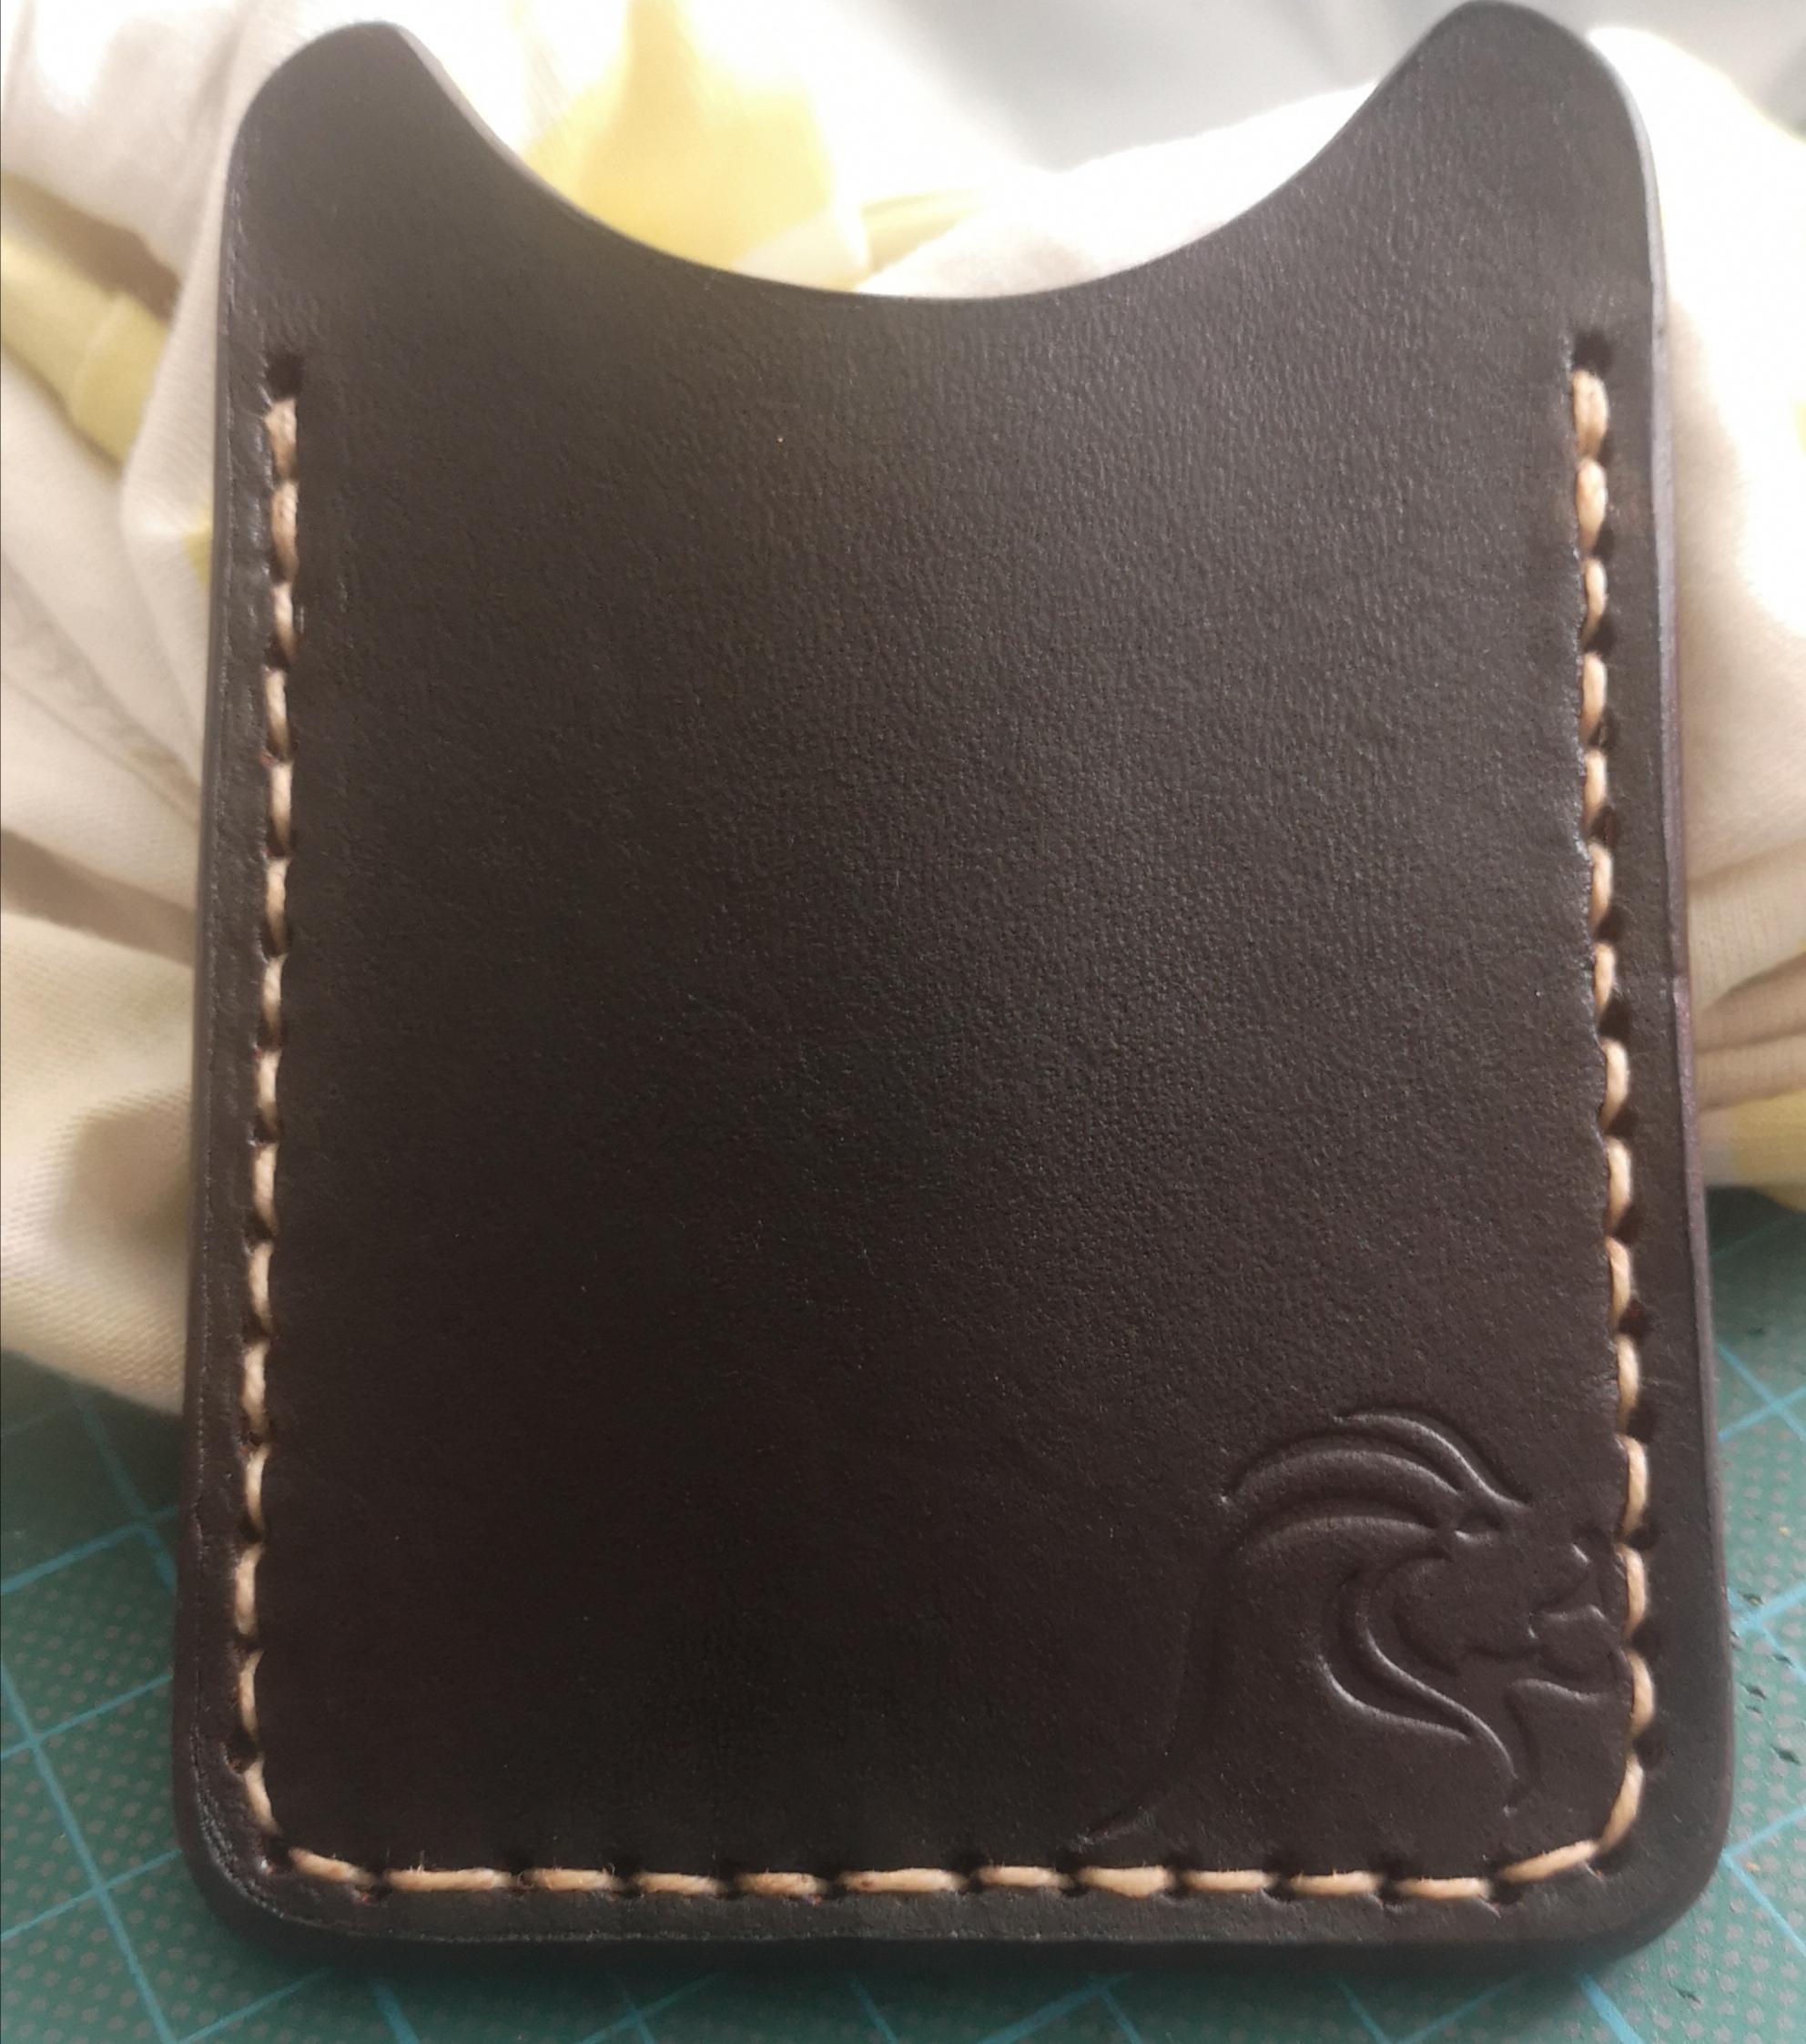
1 hour ago, Retswerb said:Looks nice! I like the lion stamp as well, but I think it would be more natural if he was on the left looking toward the center instead of facing away. Keep up the good work, looking forward to seeing more as you experiment with stitching.
Thank you, I will definatley think about putting the lion on the bottom left so that it will face inwards towards the center, good point!
-
Hi
I just finished my leather card holder with my logo stamped. It is made by a thick 2.5mm veg tanned leather from italy. I dyed the leather by myself using fieblings pro oil dye. I already recieved some feedback on the thread I use and spacing between my stitching lines for this project and it turns out it can look neater if a smaller pricking iron is used (I used 5mm for this project) also many recommend the diamond chisel.
I experimented on a piece of leather using a groover to cut out and mark where I wanted my stitching line. I used a 4 mm diamond chisel and punched through in the grooved line and hand stitched using saddle stitch, it looks much more professional, the groover helps the stitches to lay down, the diamond chisel offers a much more beautiful look on the stitches and the 4mm distance is perfect. I will continue making my card holders with this new method.

-
On 7/5/2020 at 1:24 PM, johnv474 said:Something that can help with the line between layers remaining in the center is to paste/flatten the back near the edge. Tokonole (better) or CMC (far cheaper) are both good for this. After applying, wait a few seconds and then compress with a bone folder or something else smooth. Obviously, don't bevel the backside.
By compressing the fibers, some of the loose small ones won't want to cross the centerline.
If I compress the fibres wont that interfere when I apply glue to hold the pieces together? Because tokonole closes the fibres and I think those asisst in making the piece glued harder together?
-
6 hours ago, toxo said:Nothing wrong with using a round punch. Yours look little large for a card holder. As for spacing, start at each corner and work out the difference in the center where it won't be noticed so much. If using a multi prong make sure you have at least one (two is better) prong in the last hole you punched. can't go wrong that way. Make your pieces oversize an cut to size after stitching. Will give a nice sharp edge for finishing.
I bought mine on Internet from China. I didnt know the diameter of the pronges but I can tell you this: the diamond chisels I got from China I always fail with, they dont cut through very well and the handle is not thick so hammering it causes the chisel to go through at an angle. If you are using round head chisels which ones do you use and if you by any chance use diamond chisels which one do you recommend?
-
On 7/15/2020 at 2:23 PM, Tugadude said:I see you are using a round chisel. That's OK, but not preferred. Most have success with the diamond-shaped or slit-shaped chisels. There's a "sticky" note on the options in the Sewing Leather part of the forum. Check it out.
In addition to spacing, make certain to keep the chisel square to the reference line. I see you have wobbled a bit. I wonder if that is because of the size of the round punches deforming the leather as they go through?
How many round punches are on the tool you are using? That makes a difference in how to proceed.
What I generally do is begin in a corner and work from there. That might not work as well with your iron. If there are going to be irregularities in the stitch spacing I always try to make sure it happens in an inconspicuous location on the project. Sometimes that isn't possible. You should, however, not have two "bad" spacings in the stitching line along the bottom, only one.
Try lightly pressing the chisel into the leather to gauge where the holes will end up and then you can make adjustments. Call it a "dry run". If it isn't working out to your satisfaction, at least you haven't created any holes.
I use the round chisel because I always fail with the diamond chisel. The diamond chisel is beautiful on the front but the back even when I go through all the way it always ends up inconsistent. The round head is a safer choice for me but ofcourse the diamond chisel if used correctly gives beautiful stitching lines. I have different sizes for the punch tool I am using, 6 tooth, 4 tooth and 2 tooth. I usually go with the 6 tooth and then with the 2 tooth at the corners.
-
When I stitch my card holder I marked the with a line using a wing divider, then I punched holes using 5mm pricking Iron. I started from the top right to the lower corner and then top left to lower left corner. I did the bottom last and realized that the spacing will be inconsistent... How do you usually do here? I tried to add some spacing between two holes to fix this but I am not happy with the result. Do you mark with your chisel before punching? Corners have one stitch at an angle and it has to be in that place for it to look good.
-
Hi
Whenever I work on the edges of my leather projects after dyeing my projects I sandpaper, burnish with water, sandpaper burnish with water, sandpaper burnish with tokonole e t c. I can sometimes by mistake get some of the tokonole (fingerprints) on my project after turning it around to burnish all the edges. I used some neatsfoot oil to rub it off, it looks better but I was wonder if you guys ever tried using some leather deglazer or lemon juice before applying the finisher to make sure it is free from all kinds of dirt? Usually this is the first part of every project but have you done this the middle of the process? I am afraid maybe the dye will come off? I use pro oil dye maybe the dye would come off if I use water based dyes? because once the finisher is applied its hard to go back I guess. I am not a fan of drying out my leather so I think lemon juice dilluted with water would be preferable?
-
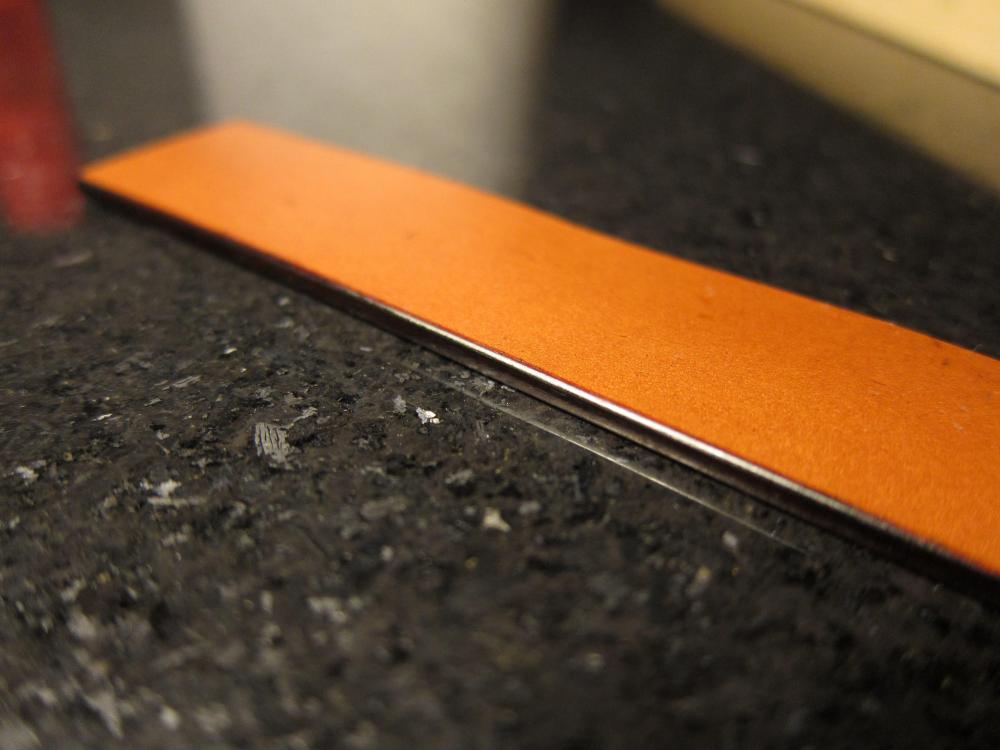
On 7/2/2020 at 8:10 AM, Danne said:Hi LionCrownLeather, one of the reasons I never use a slicker is that my edges are rarely thicker than 2mm. (In some cases 3mm on watch straps) For really thick edges I can see the benefit of a slicker, even though I would probably use a cloth. I don't even like canvas, I prefer something a little less rough.
I'm certainly no expert on burnishing dyed edges. But here is how I have done it the few times i've tried it. (Include a photo of a dyed and burnished edge with this technique.)
1. Sand edges flat, the choice of grit depends a little bit on the type of leather, a stiffer leather and a rougher sandpaper like around 100-200 grit works good. For medium soft and softer leather I prefer 400 grit (wet and dry, I use Mirka) Don't put to much pressure on the edge when you sand, then you "mush" the edge, if you do, just lay it flat and burnish the edge transition from both sides (to push down the edge) Also try to sand "across the egde" and not along the edge. (Finer sanding I do along the edge, rougher sanding across the edge.) Sand until you have a relatively flat edge. (Flash cut your edge and you don't need to sand at all.
2. Burnish the edge with water. (I use a brush and just brush on a small amount of water.
3. slightly sand the edge with 400 grit.
4. Dye your edge (Why did I burnish with water before dying? to avoid dye seeping over the edge to much, especially if the leather is not lined)
4. Burnish with tokonole
5. Sand with 400 grit
6. Burnish with tokonole
7. Keep doing this until you have a relatively good edge. And keep doing the same but with a higher grit like 800-1200.
(Optional) 8. Melt bees wax or paraffin on the edge and burnish.
But there are a lot of ways to burnish edges, both techniques and agents like with Tokonole, Saddle soap, Arabic gum or Funori.
Thank you for this useful information
-
On 7/1/2020 at 3:08 AM, Spyros said:I think edges is one of those things that only other leather workers notice. I've decided to keep mine somewhat reasonable and focus on the important things, which is pretty much everything else except edges LOL
Having said that, the best tutorial I've seen is on edges was by another Swedish member, Danne:
Interesting post. He does not use any slicker which is quite odd to me. I have seen other posts where they dont use a creaser but also get great results. Apparently every person seem to have their own way of treating the edges.
-
11 hours ago, RockyAussie said:Most of the answers to these questions and a whole lot more you can see within this post I did awhile ago. Although this is about making croc belts the same procedure is applied to most of the other products as well normally. https://leatherworker.net/forum/topic/86675-how-i-make-crocodile-skin-leather-belts/
If you care to go to my profile section and have a look in the about me section you can find a lot of other projects that will show you a bit more here and there.
Thank you. While I have you on the thread I have a second question. If I dip dye my projects and want to dye my edges with another color compared to the primary dye I used for dip dyeing my project how do I do that? I always dip dye because when I dye my projects with a dauber I always get dye on the edges giving the piece an unconsisten look. Maybe I should bevel after dyeing?
-
7 hours ago, RockyAussie said:I think that you may be mixing up 2 different processes here. You either burnish or you edge paint. The edge paint is the split lines I think you are seeing which is a pretty common thing to experience with a lot of the edge paints types. You did not mention which type of dye you are using and that could also be having a detrimental effect on the edge coat as well. I generally use an iron to smooth out my edge paint and sometimes a little sanding and grey scotch bright pads and follow that up with some wax polishing. I never try and burnish in any way when doing edge painting. If you burnish before the paint then the paint will peel off easily. If you burnish after applying the paint you could easily make the paint go all over the place and it will not shine up well. Note: many of the edge paints available are not thermo mouldable any longer and these require more of a sanding process unfortunately.
I used fieblings pro oil dye, the same dye I used on my project.
What do you use for polishing the edges?
You mention Ironing the edges, how do you do that?


How do you finish water based dyes?
in Dyes, Antiques, Stains, Glues, Waxes, Finishes and Conditioners.
Posted · Report reply
Hi
I am planning to try out water based dyes. I do not want to continue with fiebings pro oil dye, It just isnt my taste, especially after I apply the Resolene afterwards which makes the entire project look syntethic so I am leaving Resolene as well.
Now my procedure is going to look like the following:
* I dye the project and let it dry
* I apply neatfootsoil and let it dry
* I condition the leather (is this required if the neatfootsoil is applied in previous step?)
* Now...How do I finish the leather? Since I dont want to use Resolene I am thinking of a good quality leather wax. Any recommendations? I have heard water based dyes have more rub off then oil based dyes and since I live in a rainy climate I would really want to use a good wax that seals and makes the leather shine, rather no darkening since neatfootsoil already darkens the leather.