


ThatTallChick
-
Content Count
34 -
Joined
-
Last visited
Posts posted by ThatTallChick
-
-
2 hours ago, Hardrada said:Rocky Mountain Leather Supply splits the leather you buy from them to your chosen weight. For wallets, I get their chevre split to 2 oz or even 1 oz.
Okay this is absolutely fantastic! I'm not sure what sort of border fees it would accrue to ship to Canada but I'm really really struggling to find a canadian supplier that offers the amount of options as Rocky Mountain Leather Supply does. I will definitely keep them in my back pocket, thank you for the recommendation!
1 hour ago, Tugadude said:I don't think you want to use garment leather. It is likely to be too flimsy. You want the leather to have a little stiffness to it. Supple, but stiff.
Oh that's good to know, thank you! I'll email a few of the Canadian suppliers and see if anyone can split some hides for me to be that light!
-
1 hour ago, Hardrada said:Thinner leather. Don't go over 2 oz.
Alright, I'll keep looking around for some then, thanks!
43 minutes ago, Sheilajeanne said:Yes! Can't believe they'd recommend 4-5 oz. leather for a wallet!
I am currently working on a Tandy wallet kit, and nothing in the kit is thicker than 1 mm!
That's SO odd that they would sell leather that thin in a kit, but not as a hide-- or maybe I'm thick in the head haha I feel like I have clicked on every hide they sell and the smallest any of them go is 2-3oz, this is so frustrating haha
15 minutes ago, Tugadude said:Everything is relative. There are some on this forum that would consider that just fine or even a little skinny. They frequently recommend 4/5 for the outside and 2/3 or 3/4 for the inside. Chunky doesn't bother them I guess.
I'm with you. That needs slimming. So yes, thinner leather is the way to go. Depending on who you are buying from, they might offer splitting service. They can then give you exactly what you need. I think Weaver does it.
As far as the lines, part of it is probably just lack of practice, but there is also techniq
Gosh really!? Man I don't think this would even fit in my husbands pockets (I won't even bother trying to put it in my own pocket) haha I suppose to each their own though!
Oh very good, it does look like weaver has some apparently it's called "garment leather" or "upholstery leather" though it's unfortunate that it's already dyed
54 minutes ago, Sheilajeanne said:I would place my stitching lines BEFORE assembling any of the parts. That would solve your problem...
I agree, the one time I did that I ended up with my best stitching
")
-
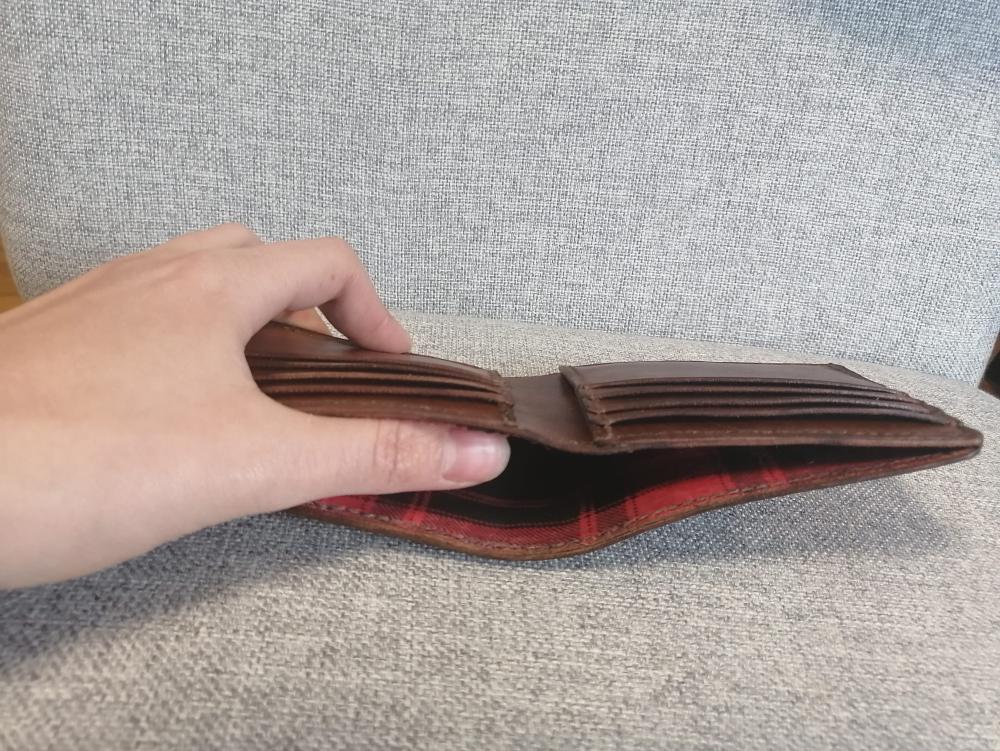
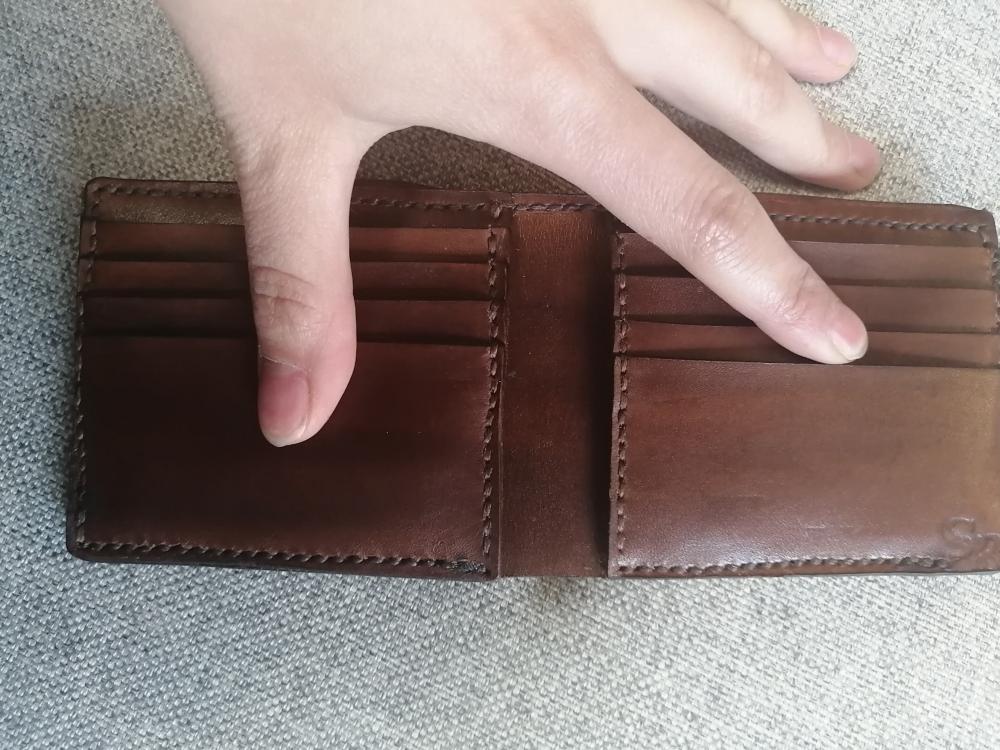
I made this bi-fold wallet using this pattern and following the video tutorial but it's SO thick it's not even usable. I skived the 'T' pockets the same way it's done in the video, and I even skived the outer sides of the Pocket Cs. The website recommended 4/5 oz. leather for the exterior and 2/3 oz. for the interior, I used 2-3oz leather for the entirety of the project and it's still too thick. What can I do about this? Should I just skive it more, or is this just the nature of hand made leather wallets? I'm thinking of just getting some 1-2oz leather but I can't seem to find 1-2oz leather very easily.
Also, when etching the line for the stitch holes to go, all the pockets are already secured in place and I found the line was really difficult to make straight since it was going over all the "bumps" of the tops of the pockets. I used an adjustable edge creaser for this and it was just really difficult. The easiest way I found to crease or groove the lines was to make the lines and punch the holes before assembly, but it was really hard to get the holes to line up when I did it that way. Am I doing something wrong or is this just supposed to come with practice? Or better tools?
There's no cards or cash in this at all and it feels like it's fully loaded, how can I make this thinner?:
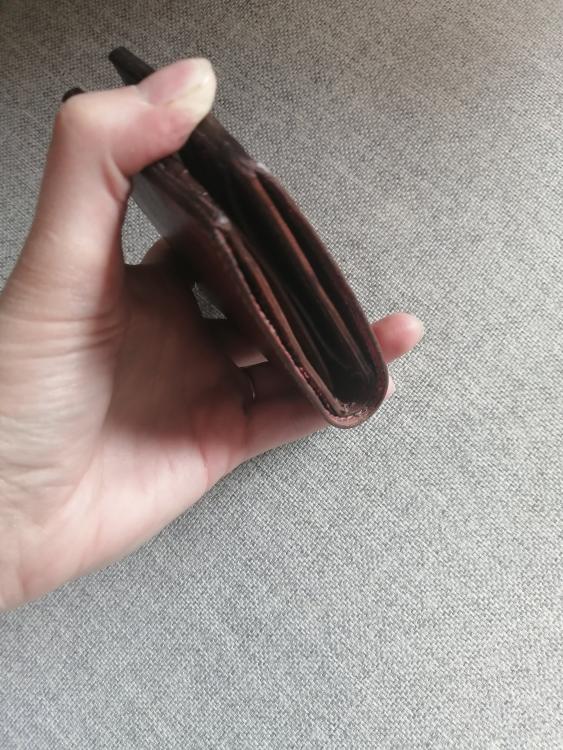
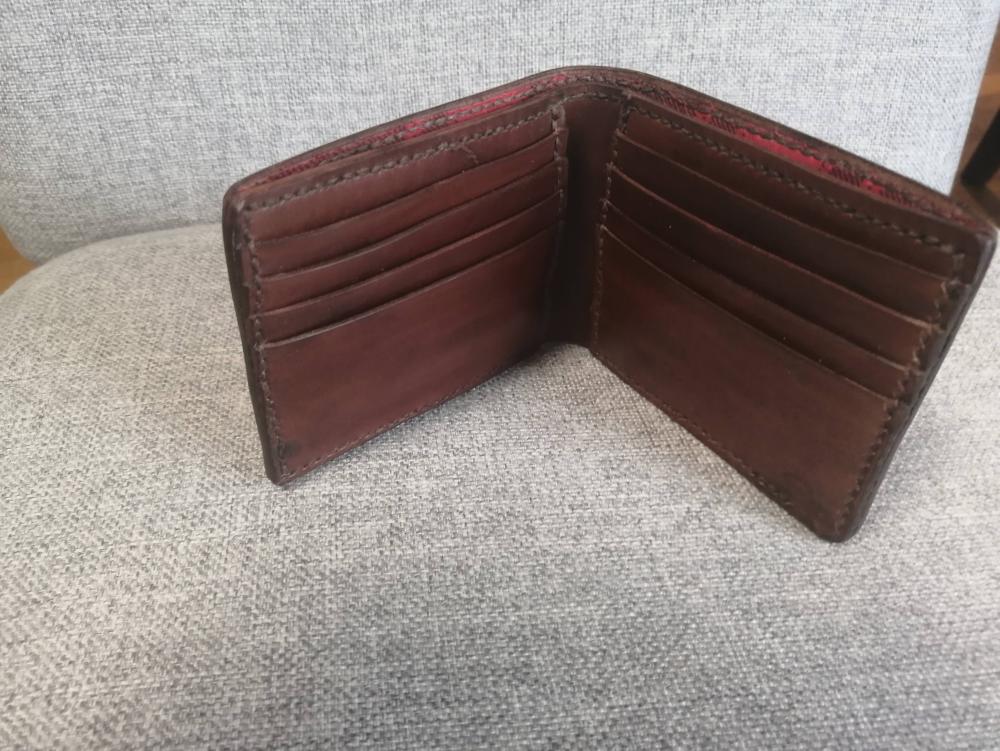

I know there's a lot else wrong with this project- the stamps, the stitching, the edges, etc but it's the thickness that I really don't know how to solve...
-
16 hours ago, DJole said:I took a look at the Amazon kit you mentioned, and it appears that you have a set of diamond chisels, which make a diamond shaped hole in the leather. Pricking irons make an angled slit in the leather, rather than a hole. Pricking irons are meant to MARK the holes that you then pierce with a stitching awl. That's the traditional standard, and many people aspire to that. But the diamond chisels are much more forgiving, and easier to make good stitching lines with (since getting straight lines with the awl takes a lot of consistent practice).
The stitching chisels should be strong enough to drive through two pieces of leather of the thickness you are using. If they are bending, then they are made of bad metal, or you're driving them into something hard.
Good advice given above, to change the thing you're using underneath the leather when making the stitching lines. And if they keep bending, then the tools are bad, and you should look into replacements.
I second the advice on using the wing dividers to make a stitching line (or a light, shallow stitching "groove"). I found that I can get a much better line with the wing dividers than with the groover I bought years ago. The groover sits alone, unused for a few years now.For choosing thread: take a look at some YouTube videos to help you match the thread (which will involve choosing the right size of needle and the size of stitching/pricking iron also) to the project.
https://www.youtube.com/watch?v=Uc_4cZp9JDshttps://www.youtube.com/watch?v=XYT9Rc2YRAk
https://www.youtube.com/watch?v=X3BwpAkQlgg
All that being said, that's pretty good work, and you've learned a lot! Keep it up!
Thank you for all the help and advice! It seems to just be the one tooth on my 6 pronged chisel that is bent, perhaps I dropped it at some point... I might get my spouse to forge me some new ones. I've tried using the wing divider and I can't say I'm terribly fond of it, just because it seems to fall all over the place- I find the groover is really easy to rest on the side of the leather and use the edge of the leather to make the line straight, but I'm sure using the wing divider just takes practice.
I'll definitely keep watching some more videos; that last one was especially helpful, it was helpful to see the varying thicknesses actually stitched out. It sounds like the general consensus in choosing thread thickness is based on whatever you think looks best, and maybe a little bit of strength but I'm not making saddles or anything.
All in all, good to know, thank you!
17 hours ago, sbrownn said:" are awls supposed to be sharp?"
Yes, they should be sharp on the edges and pointed as well. Different sized awls are used for the different sized holes needed for the different sized threads.
That's good to know! I have one sharp awl, it looks like I could thread something through it though so I figured it was for actually stitching with, also it's huge- I'll need to get myself a set of good awls once I'm better at the craft.. or maybe sharpen the ones I have or something.
16 hours ago, Hardrada said:Get yourself a #1 and #0 bevelers, and maybe a 10 mm corner punch. The edges will look more refined and withstand wear and tear better.
Keep at it!

Addendum: have you tried Zelikovitz? https://www.zelistore.com/
I've got some bevellers- not quite sure on the size but I find they just tear apart the leather- I'll sharpen them and try again though and if all else fails I'll add it to the ever growing list of new tools I need
Thank you!
-
5 minutes ago, acope said:A lot of folks will use the term pricking iron for both pricking irons and stitching chisels. There are different. The pricking irons are intended to just put a mark on the leather that you then make the hole with a stitching awl. Stitching chisels are heavier and are used to actually make the holes. So that could be why the tines our your pricking iron are looking worse for wear.
Take a look here for more information: https://www.goldbarkleather.com/sourceblog/chisel-vs-pricking-iron
You are off to a good start, keep at it!
Allen
Okay well this just opened up a whole new world-- I definitely have chisels, so I'll use the proper terminology from not on, thank you for clearing that up but... Now I feel like I'm using an awl wrong? I use mine to help open holes that I'm finding difficult to poke through with my needle... I didn't know people used an awl to create the holes from the beginning-- are awls supposed to be sharp? Mine are maybe as sharp as a saddlers needle so...not...
4 minutes ago, CastleLeatherWorks said:I too bought a kit from amazon when i first started about 2 years ago. the only thing i still use is the block of beeswax and the wood burnisher lol. i still buy some tools from amazon just for the sheer convince. for my leather i go through rocky mountain leather supply, district leather supply and occasionally Springfield leather. you might want to look into a poundo (rubberized) board or even a thicker scrap piece of leather. instead of running your pricking irons into your cutting mat.
so the 0.45mm i was referring to is the diameter of the thread and thats my most commonly used size for the goods i make.... theres a whole bunch of different diameters but you will find what works for you. i have several spools of thread i wont ever use because i didn't know what i was buying when i ordered it.
pricking irons range from 2.7mm for small goods like watch straps all the way up to 6mm for bigger items and thats the distance between the holes it will make. then there's the different types of irons you can get diamond, french or round style are all popular. if you do a search on amazon you can see all the different types available.
Yeah the cutting matt is getting pretty rough from the pricking chisels, I'll definitely look into getting a rubberized board instead
Oh that's good to know about the thread thickness- I just checked and I've been using 1mm which is a lot larger than 0.45mm haha I'll purchase a smaller size and see how I feel about it! I don't know what I'm buying right now either so knowing all the different things I should try is awesome, thank you!
I know the ones I have are diamond shaped-- I had no idea they come in different shapes... I feel like the more I learn, the more questions I have haha what do the different shapes get you? Does your stitch line look different?
-
4 minutes ago, CastleLeatherWorks said:Its really all personal preference. some people like a more rustic look while others want something that looks super refined and higher end.
i dont know what size pricking irons you used but i would just suggest thinner thread for now untill you figure out what look you want. i use 0.45mm for most of my projects spaced at 3.38mm but with tighter stitch spacing like 3.0 or 2.7mm i think i might step it down 0.35mm.
take care =)
I honestly couldn't' tell you what sized pricking irons I use, I got this kit from amazon and ... I mean it's not amazing but it got me into the hobby. The pricking irons are getting a little rough already though (the pricks are actually bending... Which is weird because I use a self healing mat when I use them) so it looks like I'm in the market for some new ones soon anyway. I'll have to look into more of these measurements- is the 0.45 mm the size of the prick, and the 3.38mm is the size of the space between each prick?
QuoteFor being a new at leather work you're doing the right thing by constantly making things and asking a lot of questions. as for the leather youre using it looks like utility grade which is fine for prototyping. i went thru a whole side when i first started. it was split horribly with some parts being 2.0oz and the rest somewhere around 6/7oz. this is when i started looking into skiving and splitters.
Yeah I'll definitely keep using the rest of the...entire...cow... I have... of the veg tanned leather I have already haha until I'm a little bit better at this whole thing- right now I feel like everything I make is just me experimenting and I don't want to do that with something terribly expensive
Also when i first started i bought a bunch of dyes thinking i was going to hand dye all my projects and soon found out that wasnt the best route for me. Now i buy single shoulders or panels of different colors already split down to the thickness i like which is around1.0/2.0oz. makes my life easier and i always get a consistent color and finish. you will find out what works for you the longer you're in the trade.
QuoteAlso when i first started i bought a bunch of dyes thinking i was going to hand dye all my projects and soon found out that wasnt the best route for me. Now i buy single shoulders or panels of different colors already split down to the thickness i like which is around1.0/2.0oz. makes my life easier and i always get a consistent color and finish. you will find out what works for you the longer you're in the trade.
Hahah that's good to know. I was introduced to leatherworking when I came across prince armory's youtube channel-- and he does dying, painting, etc, so initially I thought that was the norm which is why I picked up the dyes and resolene and the like-- I do like the texture it gives me, and it's fun to be able to pick whatever colour you want for each individual project (instead of buying a specific colour for each project) but when your wallets pop up on this site I'm always just dumbfounded.. I think the solid colours really help make them look so professional and clean. I'm sure I'll grow out of they dying, especially once I've moved up to higher quality leather.
3 minutes ago, sbrownn said:BuckleGuy is an online store. In my experience, you don't have to be afraid of buying leather from them sight unseen.
Right! I just like to buy from Canada so that I don't have to pay import fees and the like
-
3 minutes ago, sbrownn said:Well, it does allow you to make really nice looking things before you learn how to do professional level dying but the main reason I like it is because it has allowed me to concentrate on other aspects of my leatherwork like edges, and stitching and still end up with a nice looking piece. I usually don't bother to apply a finish to the projects I make out of bridle leather either; not that it doesn't make them look "shinier" because it does, but I don't see enough gain to bother anymore. The "stuffed" leathers are pretty weather resistant as they come from the tanning process so I leave it up to the customer to apply a finish if they so desire.
Ohh, that's all good to know, thank you so much! It doesn't look like Tandy sells bridle leather (unless it goes by another name) and we don't have TheBuckleGuy in Canada but I'll definitely have a look around and see what's available.
-
4 minutes ago, sbrownn said:You can buy panels of bridle leather in a variety of colors and weights from Buckleguy. My suggestion would be to try using some pre-dyed, high quality bridle leather for your wallet project that has already been split down.
I'll have to see if I can find bridle leather Is the only reason to purchase pre-dyed leather just because it looks nicer than dying it myself? I'll definitely look into purchasing higher quality leather when I'm not so terrible at this haha I didn't realize that veg tan is no good, but it's definitely fun to play with
-
11 minutes ago, CastleLeatherWorks said:I like the design and i think with some refinements it could look great. the main thing i notice is the way the gusset comes together at the bottom. It looks like you used 3 pieces (left,right and bottom) or maybe im wrong.
Or if you do it your way maybe use some thinner leather and pre punch the panels so you can glue together and sew as opposed to trying to get inside the gusset with your pricking iron.
Also i would recommend some thinner thread but thats just my personal preference.
Keep it up !
Oh I wasn't aware I could get thinner thread for hand stitching-- I'll definitely have to look into that-- would I buy smaller pricking irons for that?
As for the rest of your points, I definitely used 3 pieces- I originally made the pattern with just one but the leather was too thick to pinch into a proper square if that makes sense? So I cut it into threes- I purchased the lightest hide I could though.. maybe I should be using a lining leather to make wallets like that instead?
QuoteIf that's the case i think it might look better if you were to integrate the bottom gusset into the main outside wall of the wallet and you would only need 2 side gussets so it wraps around if that makes since.
I think that's a great idea, and when I re-do this wallet I'm definitely going to try that out- I think it would look awesome!
Thanks so much for your advice, I really appreciate it!
-
3 minutes ago, mike02130 said:I don't know which corner is bottom right corner. When I make a wallet, I glue and the sew the complete perimeter. One piece of thread. I never felt the need to do any overwrapping. It looks like cheap leather which makes your work more difficult and affects the outcome. I suggest some nice pre-dyed leather. The stitching distance to the edge looks close. I suggest 2.5 to 3mm. Did you use an edger? The corners are too sharp. The stitching is inconsistent. Not knowing your technique I can not suggest how to do better. The edges are thick and need to be skived. Always hammer down your stitching holes before and after stitching. Rocky mountain Leather has a great Japanese skiving and cutting knife for $60.00 U.S..
The edges really need a lot of work. I suggest that you cut your pattern out a bit larger and after gluing the pieces together, trim everything to size with a sharp knife. That way your edges will be nice and flush and will need little to no sanding. Then prick your holes and sew and edge bevel then smooth if needed and burnish.
I must say, it is a strange and difficult pattern to practice on. I believe that type of gusset is called a Mexican gusset. I suggest that you make a more simple wallet or card holder to practice on. Something with a T-slot.
You seem to have potential. Make another.
My spouse has been using it for a few days and also mentioned the corners were too sharp- I liked the look of the sharp edges but I learned that it's definitely not practical. I'm not sure about the quality of the leather, I don't know how to check for it and I can't buy the leather in person as the nearest store is 8 hours away-- I just purchased it from Tandy and actually got some really dry, cracked stuff first that I had to send back and the manager said he hand picked this replacement for me. Admittedly I really really love dying the leather myself, it's one of my favorite parts of it-- I know that might sound stupid and I can't exactly explain why it is; I'll just have to work on my dying technique I think. The next wallet I will definitely Skive the edges, I only just learned about that technique but my tools aren't sharp enough so I'll have to wait for my sharpening supplies to come in but I will definitely be doing that next!
The distance from the edge was a lot further before I started sanding it, perhaps I'll make the groover deeper-- I just didn't know I would be sanding off so much! On the last project I made I had hammered down my stitches and was asking about the more difficult to reach places (it's hard to hammer down the stitching in the corners because I can't get enough pressure on them) but a few people I asked said I don't need to hammer the edges so for this project I didn't... I think I prefer the look of it being hammered down though... may I ask why you hammer the holes before stitching? Wouldn't that make it more difficult to put the needle through? I think the stitching ended up so inconsistent because I pricked the wholes once it was all together which was hard to do because of the shape I guess? It's not flat on the table so I couldn't just prick and hit, I had to do this weird... bending... yoga thing with it and the pricker kept falling out of the groove I made for it.
I'm not totally sure what a T-slot is, I'll be making a normal bifold next which might be what you're referring to?
I know you said my edges need a lot of work already but what are your thoughts on the top flap edges? I personally thought they turned out nice other than the corners being too sharp.
Thanks so much for all your advice! I'm striving to get better and I appreciate the time you took to type out your answer
-
Last time I posted it was recommended that I practice on something smaller so I gave wallets a go! I'm not entirely sure what kind of wallet this is, I used my spouse's old wallet as a template since his had gone through the wash too many times and I thought I should replace it. My main focus this time was trying some new techniques I learned from you guys, and focusing on making my edges really nice. I used 2-3oz veg tanned leather on this project, and Dark Mahogany Eco-Flo Leather Dye.


One thing I also tried was using a 3D punch I had purchased. Unfortunately while I was hitting it, it seems to have moved a bit resulting in a shadowed "effect". I had heard that there are ways of "erasing" a punch or mark that you put on your project mistakenly, but I had already worked that part of the leather a lot due to a mistake in the grooving that I had to burnish out, so I left it... I'm particularly fond of the edging I did on the front flap- I sanded the edge down first as I had seen recommended on this site quite a few times, and then used tokonole on it and it seemed to work like a charm.


My letter stamps also left a lot to be desired, I'm not sure if I wet the leather too much, or just didn't hit it hard enough with the mallet or what. I'll need to practice! I also learned that I need to burnish the outsides of the pockets before assembling everything, good to note for next time.

Oddly enough I noticed that the resolene seems to be wearing off on the bottom edge of the front flap there, just from general use. I'm not sure what to do about that.

You can see that some of the thicker edges I packed with beeswax (after a lot of sanding) and then burnished with a cloth, and sometimes some added tokenole (before the beeswax and after). I have no idea if this is the right way or not, and it didn't turn out really well, so my next attempt I will use a knife to thin out the leather on the edges so that they come together more readily.


The bottom front and back edges turned out okay. I was skeptical because it is three layers of leather because of the money pocket but after a lot of sanding I managed to get it to look semi uniform.
This time I also tried gluing my project before punching the holes. I also purchased some better needles (saddlers) on you guys' recommendation and by golly were they ever nice!! I made the mistake of assembling the project with contact cement before dying the leather, so after punching the wholes I took the wallet apart, dyed it, and re-glued it together however some of the pieces didn't line up the same which was unfortunate while hand stitching- but the ones that did line up the same were so easy and seamless.
Previously I had been tying off my stitches and then cutting them. I learned from you guys that it's more typical to just back stitch a few times and then cut and burn the ends of the thread. I did that this time and it was a great recommendation. It looks so much better.
The main question that came out of this project for me was: When hand stitching, when I get to a corner (say, the bottom right hand corner) should I cut the thread before starting the next edge, or should I wrap the thread over the edge and keep going, or should I feed the needle through to the next edge by going through the inside of the project instead?
Otherwise I would appreciate some constructive feedback! I'm just learning, and kind of just winging it, trying out different things so I would love all of your thoughts and ideas !
-
On 4/6/2021 at 10:54 PM, Buttons said:Amazing!
I made one like that only it was tooled.
you’re gonna love working with leather.

That's quite stunning. I always thought "tooled" was the process of using tools to cut, shape, etc the leather, now I'm assuming it refers to the engraving process so that's good to know!
-
On 4/9/2021 at 10:49 PM, Chief Filipino said:Nicely done
on your edge bevelers making gouges and feeling like you're using it wrong I HIGHLY recommend you sharpen/polish your cutting implements. I too bought many of my first tools from Tandy and just went to town, then I finally started focusing on learning how to sharpen my tools and WOW! sharps tools make a HUUUUUUUUUUUUGGGGGGGGEEEEEEEEEEEE difference!
Definitely! I just purchased a "stopping block" and some compound.. mind you my tools are all from a $150 kit from Amazon so I am not expecting much from them. I was told cheap tools won't sharpen but I'll give it a try and go from there...wish me luck
-
Hey everyone! A friend just sent this challenge to me: https://www.instructables.com/contest/leather2021/?utm_source=newsletter&utm_medium=email&fbclid=IwAR0S9VxSf2PlgThaqZa4mW_W0pqqcN-VpxgBmXZn3yWGWZLnFP2M_4Meitk (This is an educational site for helping people learn various crafts)
It's a contest or challenge where you post your work along with instructions on how you accomplished it. I know a lot of you are super helpful and have a lot of advice and I think it would be awesome if you contributed to the competition ...plus you might win some money! I am in no way affiliated with this website but I will definitely be keeping an eye on what's posted in case something interesting pops up that can help me learn more!
-
On 3/26/2021 at 11:20 AM, chuck123wapati said:Great job a very ambitious start to the craft.
Thank you! It was a lot of fun and taught me a lot
-
On 3/27/2021 at 12:17 AM, KenJWan said:Thank you. The black harness boots are my fifth pair. The brown engineers were my second. I have a pair of black engineer boots that were an evolution and my favourite.
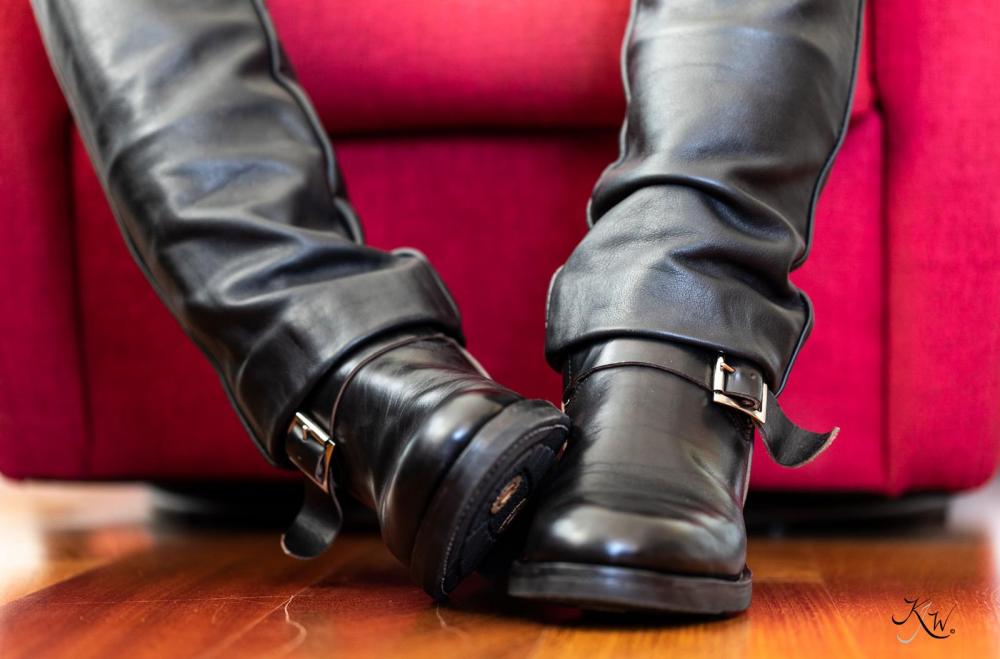
Wow, Those are some sexy boots! Jeez! Tell me you made those pants too? haha
-
On 3/24/2021 at 11:00 AM, JayEhl said:You did all that stitching by hand? And here I am complaining about my stitch work on simple and much smaller projects! Man, that's something I would be proud of, let alone the magnitude of such a project! Great job!
Thank you! I find it really relaxing if I'm being honest haha I guess it's probably similar in sensation to crocheting or knitting; I just set up in front of the TV and had at 'er! I admittedly had a few times where I needed to put the project down for a few days out of frustration- from breaking needles and such but I quickly learned that an awl is my friend... as is a pair of needle nose pliers wrapped in leather (as without the leather it was really marking up my needles).
-
On 3/24/2021 at 6:08 PM, KenJWan said:I actually started because I realized how much I was willing to spend on decent boots and thought, "I'm handy! I wonder what it would take to make my own?" I then looked for some resources online to understand the process and once I understood the basics from start to finish, I just decided to try it. There was one decent post I found on Imgur https://imgur.com/a/VGPyZ where a guy basically did something similar that I found very helpful in understanding the process.
I basically looked at the nicer boots I owned (the style I wanted to tackle) and mentally dissected the components, figuring out how the parts were put together. I got a few basic tools to get started. Hand cut the pieces and just started assembling. A must-have tool would be lasting pinchers. You'd also need a leather sewing machine (most importantly, a post bed machine... which I had access to).
You don't need to wet the leather for lasting (shaping on the last). The top is a skived strip of leather, sewn and then rolled over the top. These are Horween CXL but with a bit of research, you can find out what types of leather are typically used for good boots. Weight would be 5-6oz (or a bit lighter or heavier, depending on the type of boots you are making (dressier vs work).
Hope that helps.
By the way, these are the second boots I made. Each time, I've refined a bit more.
What?! This is only your second pair? That's amazing, they look really really good! Are they comfortable? Do you find them to be cheaper, and of better quality than those you were purchasing (excluding the cost of time)?
That imgur post was super informative. Honestly it looks really tedious, but it must be super rewarding! I definitely want to try this at least once in my life-- maybe I'll start with a simpler pair of shoes, like some flats or something. This is absolutely just the coolest thing.
Thank you so much for your response, you were super helpful!
-
22 hours ago, Tugadude said:Springfield Leather Co. now stocks Tokonole and they are a very good supplier. Check their website out. Plus, they support the forum, so that is a plus.
Oh that's pretty awesome! I was looking for something in Canada so that I didn't have to pay duty and the like but the "support[ing] the forum" point is really selling it to be honest.
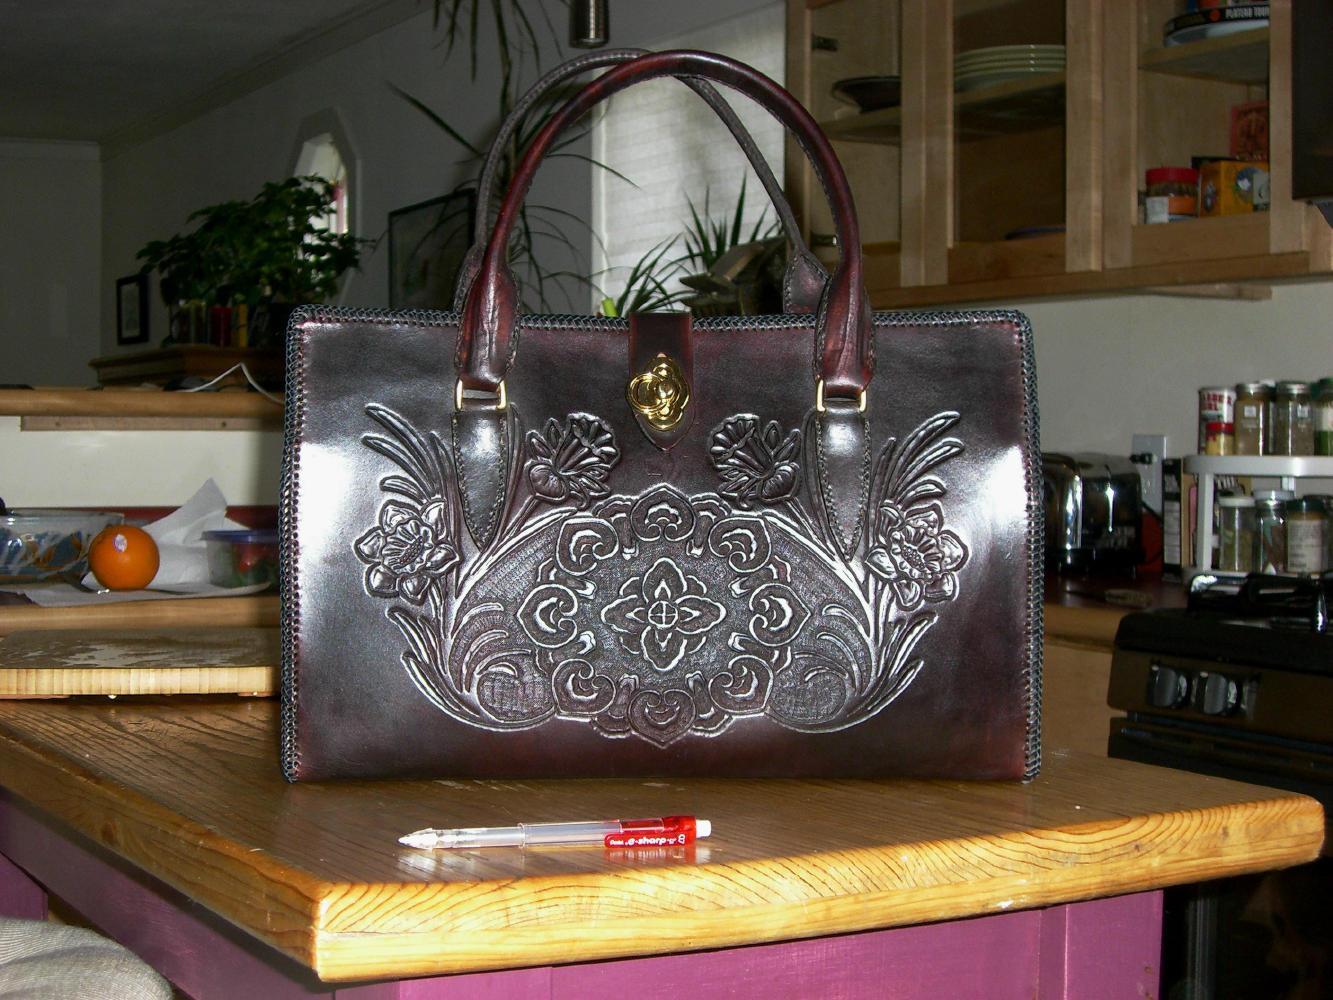
22 hours ago, CastleLeatherWorks said:Great job for a first project and quite ambitious i would say. i think you did very well.
if you cleaned up the edges and the little bits of nap i cant see anything major or that needs work.
i like the dyed color and stitching looks good although the thread is a little heavy for my liking.
im sure this bag will last for a long time and develop a nice patina.'\
Keep it up

Thank you! I've picked up some tokonole and I'll burn off the stray hairs then burnish the edges again and see what happens!
I recently heard how much a leather piece will change over it's lifetime-- I had no idea! It'll be exciting to see how the bag changes... so far I'm already finding the buckle easier to open and close.
19 hours ago, kiwican said:Great job! Nice to see someone else from Ontario here
Thank you! And hello fellow Ontarian
-
WOW! This is amazing! I have so many questions but I don't know where to begin-- how did you start making shoes, and how did you learn? This is so cool! Are there special types of tools that you need to make these outside of the normal leatherworking set? Do you wet the leather and shape it into the boot shape before working with it, or does the shape just come as you build it? Is the opening at the top burnished? What kind of leather did you use for these? Sorry for all the questions I just... I'm just in awe honestly this is so cool!
-
48 minutes ago, CastleLeatherWorks said:very carefully and with a Q-tip.. if you're not careful the dye will seep over the edge so practice is recommended.
so after i worked my way through the different grits of sand paper making sure my edge is as smooth and flat as possible
i re-sand with 2000 grit and apply the dye to the open grain before re applying the tokenole and burnishing with a canvas to seal it up.
there is probably a better way to do it..
i seen some makers on instagram finishing their edges with dye so this was my attempt... i think with some more practice i can refine and simplify it

WOW! Okay I had no idea buttero just came that colour, so I got a bit confused- that's really neat, I'll have to look more into this buttero stuff, it comes in so many colours and I have so many questions- I wonder how they get it these vibrant colours, they're so solid!
Your edges look great, I definitely have to pick up this tokenole I keep hearing so much about, and try burnishing with canvas instead of the wood edge slicker. I was using pieces of jeans for a few test pieces but found it was dying my leather blue (I feel like that may mean it wasn't authentic denim but who knows). Very awesome, thank you so much for answering all my questions!
-
14 hours ago, tsunkasapa said:That is an incredible first project. And a great job for your first. I actually like the way the paw print is "highlighted". I won't add anymore to what the others have said, except keep it up, you are doing fine. You will learn and improve each time you do another project.
Thank you! Yes I think I'll start doing smaller projects- wallets maybe. I really want to work on my edges! I think that the big box wasn't a terrible thing to start with, I certainly got a lot of practice stitching and I learned what I really really lack haha.
15 hours ago, Hardrada said:Use an anvil and a cobbler's hammer. But do choose a curved, smooth edge of the anvil, because a sharp edge can cut into the leather and ruin your project.
https://www.lonsdaleleather.com/tools/leather-anvil-tool
https://www.lonsdaleleather.com/tools/cs-osborne-shoemaker-hammer
You can use their fitter's hammer too.
Ouch: glover's needles. Don't use those: worse than stabbing the leather is stabbing your finger, and it will inevitably happen. Even blunt needles can give you a nasty stab; so I'm wondering that glovers may even go all the way to the bone, depending on the force you're using.
Saddler's needles (blunt): https://www.lonsdaleleather.com/tools/cs-osborne-harness-needles-5-pack
Use #2 for thread that is > 0.8 mm and spi that is >6, and #4 for thread that is < 0.8 mm and spi < 7.
Yeah I bled a LOT during this project. Each time the needle went in my finger I'd have to stop sewing for a bit to stop the bleeding. You wouldn't think you could bleed so much from such a tiny little hole and I'm sure a forensic analysis of this bag would raise some flags at the bureau. Thanks so much for sending the blunt ones my way, I just purchased some. I ended up with the glovers needles initially because I had purchased a selection of needles and, while playing with scrap leather, found that the needle that had the flat/triangular point was my favorite to work with-- but it was also dull like the saddler's needle. I have no idea what it was, I wasn't able to find it anywhere but I got it from amazon so it could very well have just been a really crappy glovers needle.
I will also definitely pick up an anvil and hammer! My spouse does blacksmithing so our shops are about to look very similar (with a little less fire in mine I suppose)
16 hours ago, battlemunky said:Yeah, what you did isn't a simple project and you did it pretty ok, especially for a first project! Congrats. As Tuga mentioned, your stitching look really good compared to a lot of folks' first attempts. While you have some hiccups here and there you executed pretty well.
If you want to feel like an infant in the world of what you just made, I recommend a youtube video by Nigel Armitage on box stitching...he's a master and his work will make you want to cry but it'll help you see what you want to do next time. Just plop that into your search in YT and enjoy.
Thank you! I started stitching along the back bottom... and you guys can't see those stitches in the photos
") haha I had a lot of issues with the stitching with the glovers needles too so hopefully when my saddler's needles come in I can practice on some wallets and small hand bags.
haha I had a lot of issues with the stitching with the glovers needles too so hopefully when my saddler's needles come in I can practice on some wallets and small hand bags.
Also, thank you for sending me to these videos, this guy is GREAT at explaining things. So far I've just watched video's of people working with the actual leather so I find it's a lot of guess work because you can't see everything you need to see in the videos but this guy is drawing these huge, blown up, simple, drawings and explaining why he is and isn't doing things and what is better but more difficult. He is going into my watch list for sure!
16 hours ago, Bert03241 said:Wow I think it has a great distressed look. I know thats not what you were going for , it it looks great as it is.Take a lighter and burn the hair off the edges then give a quik burnish with water or something of your choice. But hey all in all I like it. Great first project.
Ahahah you know... it's er, "rustic" or something; Thank you! I had no idea I could burnish after I had finished the project, I thought it was before dying and resolene and if you mucked it up the you're SOL so I will 100% try that, especially burning the hairs off haha it's er... a bit of a mess and I just figured it was a mistake I made in the beginning that I would now have to live with.
16 hours ago, buzzardbait said:harness needles are the needles you want. I usually punch holes after I dye the leather, to avoid a darker area where the dye penetrates deeper at the holes. that's a great job for a first project.
Yeah punching the holes after seems to be the general consensus in this thread. I had read that anything removing leather needs to be done before dying but the thread hides the undyed innards of the leather anyway if you do it right I'm sure. Thank you!
17 hours ago, Tugadude said:Talk about an ambitious first project! Actually, many here would be proud to say that was their first. Most probably practice on small stuff first to get the basic techniques down. I admire your decision to just go for it!
Dying is something that takes time to master. Sure, there are some basic things you need to do, but it is a learned skill like anything else. And there's always options, for example you could dip-dye smaller pieces. I usually dye a large piece first and then cut the sections out of it, but you don't have to do it that way. You could do them individually and that might help to keep things more consistent. Experience will tell you.
Your stitching is way better than most people's first attempts in my opinion. So good job on that. As far as tapping it down, on something like this I wouldn't bother.
Edges and burnishing is something that again will take some time to work out. Everyone has their own personal method. I think there are some "sticky" topics in the "how to" section dealing with edging and burnishing techniques. You will also find the topic discussed all over the forum in other threads.
Some cut and then sand then burnish, some don't sand much at all. Everyone is different. Some use plain water to burnish, some saddle soap, some gum tragacanth and still others Tokonole. Gum Trag and Tokonole aren't too expensive, so maybe try them both. They should help to get rid of the "hairy" look on some of the edges. What I'd do now is use beeswax on the edges and burnish again.
Did you use an edger on the leather before burnishing? That might also help you.
You asked about pulling the thread. It depends sometimes on the leather. On some leather you can pull very tight and not deform it while on softer leathers if you snug it up too much it distorts the leather. Just pull firmly and stop if it seems to be causing the leather to go out of shape. That's the best I can do with a description.
Keep up the good work! Maybe do some small stuff to keep sharpening your skills and then attack another bag. I'll bet it is even better the next time!
Thank you! I figured I would get some use out of it if it ended up being capable of holding anything, and it would give me (and did give me) a lot of practice hand stitching; now I know a few things I really want to spend time working on (like edges) and will start making wallets for my friends and family to feel obliged to use
I am really surprised I hadn't come across this dip-dying technique sooner- I definitely have to try this once Tandy has their bigger bottles of dye in. I wanted to dye just the whole chunk of leather I had cut off the hide for this project but these tiny 4.4fl oz bottles of dye I get from Tandy right now don't go far at all... I used a bottle and a halfon this bag alone. I'll definitely have to keep playing with dying techniques and I want to try leather paint at some point too!
Thank you so much! I never know if I'm doing the stitching right. I watched a few videos and just make sure to always pull the right side thread up, and left side thread down... and I spend a lot of time finicking with the the needle trying to get it through the holes. I have needle nose pliers that I use to get a better grip on the needles when they're being particularly stubborn... it all feels probably more "brutish" than it should probably be-- everyone in the videos make it look so easy haha I'll learn I'm sure
I'll definitely look at the sticky topics for burnishing. I really enjoy the motions of burnishing, it's oddly satisfying watching the edges become smooth and shiny.. and then very much not so satisfying when it starts to go from slightly shiny to fraying again.
I think I'll try Tokonole next (though I can't seem to get it from Tandy so Amazon it is I suppose); I have heard good things about it! I also had no idea I could burnish again after dying and applying resolene so I am very excited to get back at this, I thought the bag was just forever "rustic" looking (well I mean the bag still is but maybe the edges can be cleaner).
I did not use an edger before burnishing. I had tried doing so on some scrap pieces and it just seemed to make awful gouges in the leather so it was no longer a seamless transition from the surface of the leather to the edge... maybe I'm using the wrong tools or I'm using them wrong, I'll need to watch some videos.
I think that was a helpful description, thank you! I wasn't sure if I should be pulling tight, or just pulling through with a little tug and then moving down the line. With the bag I often pulled and held it tight until the next hole was done, like tightening shoes if you will, but that was mostly because of how I was connecting the edges together.
Thank you so much. I will definitely start working on some smaller projects; I see many wallets in my future before I tackle another bag!
Thank you so much everyone for your advice feedback, I really appreciate all the time and patience you have all given to me! I have a lot of new things to try on my next project, as well as lot of new videos to watch, and new forum threads to read- but I'll be diving into my first wallet, and am just now waiting on the oil to even out on my first piece before cutting out the wallet pieces and starting the process again.
-
15 hours ago, CastleLeatherWorks said:please ask as many questions as possible. my knowledge very is limited as im self taught and i pretty much just regurgitate what i see online lol...
yes when i say fully lined i mean that its 2 pieces of leather glued together so no flesh is showing.
the bottom center is just glued (as well as the rest of the wallet) with weldwood contact cement. i haven't had any problems with my wallet panels coming apart on this section
although i have been think about stitching all the way across so i might have to start just as a fail safe.
Okay good to know, thank you! Also, how did you apply your dye? It looks so clean and solid, like one solid colour!
-
Absolutely stunning piece!
Please pardon my ignorance, I am new to leatherworking. Two questions:
- When you say "fully lined" is it lined with more leather, or else, what have you lined it with? It's just so seamless, the only thing I can think is that you've placed two pieces of leather, flesh side together and sewn them to be "one piece" so that you can't see any of the flesh, only the grain; is that correct?
- If that is correct, how did you get the bottom center to stay as one without stitching? Is it just glued there, and then burnished?

Bi Fold Wallet Flop, Looking for advice
in How Do I Do That?
Posted · Report reply
Oh interesting! It most certainly does stretch when I punch it, I have never heard about using this tape before, I'll give it a go, thank you :D