


fonzman357
-
Content Count
7 -
Joined
-
Last visited
Posts posted by fonzman357
-
-
By the way, what are "T-nuts with screws and trim washers", and do you know where I can find them?
-
Your work will improve with time and practice. Ditto on the sharp corners; not only are they likely to become worn/dogeared/pulled apart, they are also best avoided for the comfort of the user.I think everyone hear has made a few that ended up as chew toys. Don't worry about it, every one is a learning experience that will improve your next effort.
By the way, your snap-on clip isn't a bad idea, but a standard snap is not likely to take the stresses applied in use. I would suggest T-nuts with screws and trim washers.
Best regards.
All good points, thanks. I'll get a copy of that book. Also, I've been using the dowel rod technique for the sight channel. It seems like the top would cave in after after I removed the dowel rod, giving just one place that would catch the front sight.
The problem with the color was the ugly waterstain on the red one near the back edge.
What about the stitching lines? Any advice on making them look cleaner? Most other holsters I see seem to have longer lines, with the holest spaced farther apart. Unforunately, the largest overstitch wheel I have is a #7, and I haven't seen any 4-prong chisels that a spaced that far apart.
Maybe that book covers this?
-
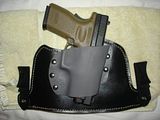
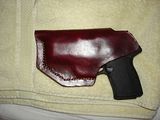
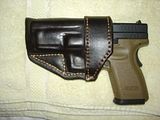
Here are some holsters I've made recently. All are quite functional, none are beautiful. I'd like to change that. If anyone has any advice to offer, I'd really appreciate it.
1) XD45 Tuckable (using Crossbreed clips I bought). This is the first holster I completed, and, unfortunately, the best to date. It features a Kydex front and a leather backing.
2) Kel-Tec PF-9 Tuckable-- The most recent attempt. It turned out okay, but the oxblood color around the clip draws the eye a little too much. Also, there was a faint waterstain near the edges that still shows through the dye.
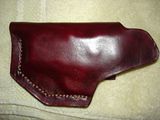
3) XD45 IWB-- This one was going great, and then I realized I had made it a tad too tight, and the snap on-clip would actually unsnap during a draw. I cut the stitches and re-stitched them more loosely, but that made the lines a little ugly. It helped the tightness problem, but I'll end up having to cut it open one more time and sew on an IWB clip like I have on the Kel-Tec (red) holster.
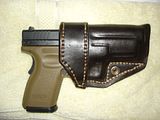
Any tips would be appreciated. I believe my main issues are:
1) Getting the stitching lines straight and more consistent
2) Dyeing techniques
-
So can anyone tell me why the rattle can product (Fiebing's Leather Sheen) keeps making white streaks on the leather? I make very short burst of spray. They are visible even when I spray very lightly. Please help.
-
Actually, what you need is acetone. I think it runs about 7 bucks a qt at lowes or Home Depot or wherever, and that's about all Deglazer is. And you get a qt instead of 4 oz for too much money. It would be good thing to condition your leather after you get it stripped tho.Best wishes!

Kevin Hopkins
Thanks, I'll give that a shot. I had a feeling the deglazer would be similar to acetone anyway, but it's good to have another opinions as well.
-
I've been working on a holster for my dad. Everything was coming together great until the last step.
I applied some Eco Flow Leather Sheen with a cloth, and it came out okay, but I wanted a glossier finish, so I bought some Fiebing's Leather Sheen in a rattle can and applied a few coats.
Disaster.
It dried unevenly, leaving ugly splotches all over the blace. I buffed on it with a rag a few times and reapplied. Same problem. Then, being a newbie, I sorta panicked and tried to wipe the coating off. Some came off easily, some didn't, and now I have a massive acrylic mess all over the holster.
1) Is there any way to remove that stuff and start over without damaging the leather?
2) How do I keep it from happening again?
Thanks!


Newbie Holster Pics, Please Critique
in Gun Holsters, Rifle Slings and Knife Sheathes
Posted · Edited by fonzman357 · Report reply
One some, I use an adjustable edge groover, then run the #7 overstitch wheel over the groove, then hammer each indention with my awl. A couple problems I have with this:
1) The holes end up appearing too close together compared to other holsters I've seen.
2) I can't see the indentions made by the overstitch wheel very well, but a guy at Tandy recently told me that wetting the groove will help make the indention deeper. Will this cause waterstains on the leather though? How do I deal with that?
3) When I make the holster from folding over a single piece of leather, I prefer to have the holes perfectly aligned, but the only way to do this seems to be to fold it over, glue it, then hammer the awl through both sides of the leather in a single punch. However, I have problems with the awl going through the first layer straight, and coming out the other side crooked, which makes my stitching lines look kinda raggedy. The other option would be to punch the holes in each side separately, but again I'm concerned they won't line up perfectly when I fold the leather over. Another guy recommended using a drill press to make my holes, so there's no danger of getting it crooked.
Anyone have any tips on any of these issues?