Search the Community
Showing results for tags 'custom'.
Found 82 results
-
I want to build my son a saddle. He's about 5 years old. I have experience building saddles. I've built about 12 now but only for adults. Just wondering what size of tree should I order how much leather I can expect to use a good tree style any other tips would be appreciated. Thanks.
-
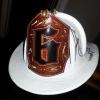
Hi everyone, I've been a member for awhile now, but haven't posted anything, mostly because when I signed up I was very green in the leather world (still am). I am a 17 year veteran firefighter in a major city, and decided to combine my career and my hobby. Six months ago I made a custom leather fire helmet shield for myself, when I put it on my helmet I immediately got questions about it. That turned into a flyer, which turned into a website. I have now built over 120 shields, having them in departments from California to New York. It has been a whirlwind experience to say the least. I felt like now was the time to finally post some pictures here, where I got a lot of great tips and inspiration. If you would like to see more, you can go to bighammershields.com Thanks, Ryan
-
 Hello, I was wondering if anyone could point me in the right direction as far as dyeing leather with indigo goes. I love the color it produces, and I am not a huge fan of using oil based dyes. I'd like to dye leather with actual indigo. Has anyone had any experience with this?
 -
I made this after seeing Rawcustoms post on making a new Awl blade holder. I used his idea for the blade holder and bought the double collet pin vise from EBay. I don't make my own blades, I buy them. The handle is turned out of Cocobolo with a brass ferrule turned to flush itself with the Cocobolo. The business end of course is the pin vise. I struggled with how to handle the reference point on the handle. I've read where folks sand down a flat spot for reference. That would serve to keep the handle from rolling around too. You would not have to look either but in my case I've been sewn back together enough to know I'm not real found of that. I prefer to watch myself stab myself so I went with an orientation inlay so I have to watch. The inlay is Ivory from a late 1800's piano that went to the scrap yard, I harvested the keys and soaked the ivories off to use as inlays. Figuring out how to cut the ivory was interesting to say the least. I am about three weeks into leather work and this site has helped me greatly. What drove me to leather work is unprotected sharp pointy things. My friends have a hard time not cutting themselves when they visit. I warn them if it's meant to be sharp and I own it, well it's sharp. I'm forced to either make sheaths for my sharp pointy things or get new friends. I see it this way, if you pick it up, unsnap the sheath strap, pull it out of the sheath and proceed to insert the sharp pointy thing into you body all by yourself you must have wanted it there. Thank you all for helping to protect my friends from themselves.
-
 hi guys, i am hoping someone will be able to let me know how the designs in the example images are created. i am a novice leatherworker but most of the tools/techniques i have seen for tooling leather involve mainly stamping. but in these examples a tool is being used to remove some of the leather, kind of like a stitch-groover, but i imagine it must be different somehow since the ends of the lines all taper nicely to a point, which i don't think you can achieve with a standard stitch-groover. also i would like to point out (in case there is some confusion) these examples are *not my own work*; they are from 'wasteland oddities' vendor on etsy.com, linked here: https://www.etsy.com/ca/shop/WastelandOddities?ref=l2-shopheader-name i would have liked to reach out to creator directly but i don't have a facebook account and don't want one. anyways, any advice on how this tooling effect is achieved would be greatly appreciated. thanks!
 -

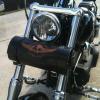
New custom tank bib for a 2013 Harley Road King.
Spinner posted a gallery image in Our Leatherwork Galleries
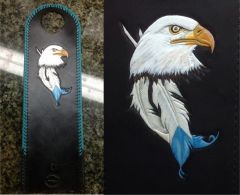
From the album: Three Mutts Customs pics
New custom tank bib for a 2013 Harley Road King with eagle and feathers. Hand tooled and painted with Citadel & Vallejo acrylics paints. Turquoise lacing from Australia in triple loop for the edges.© Chris Wright - 2014
-
Hi everyone, I have two very beautiful head knifes for sale. My brother made them based on designs found online. They are extreemely sharp. I can provide more pictures and videos per request. Details: Custom 5" head knifes for me. 15n20 steel from an old lumber mill saw. The top knife has exotic Bocote wood from Central America Bottom handle is from Chechen (Caribbean Rosewood) found in Cuba. Custom copper mosaic pins. 60-61 HRC (hardness). Asking $115 each w/ free shipping around USA. Paypal only. Please PM. Head Knife by Tolik Pugach, on Flickr
-
Hi there, I am looking for a custom collar for my german shepherd dog... and possibly my two dogs not far down the road. I am looking for a craftsman that is able to do something like this: I want a different concept, but I mean in terms of leather working type. I'm really not all that creative, so I'm not entirely closed to a style like that. I want an arthurian legend themed collar so if you think you can nail the concept I give you whether by that type of work or something even that is more simple without all the etching and just... like... pendants on it or something. Before we start collaborating I would like some sort of references or if you have some sort of shop to link me to it so I know my money is going into what I asked for haha.
-
I have searched the forums but havent found any good answers. I like oil dye, as I haven't had any problems with it, and I havent tried any water/alcohol based dyes yet. I use cut resolene as a finish, and I heard people have had issues with water/alcohol based dyes coming off when using it. Anyways, I would like to create my own custom colors of dye, whether that requires making dyes from scratch or mixing two existing dyes. I am looking to make colors like indigo/navy, maroon/dark red, and dark green. What is the best way to achieve this? I use feibings pro oil dye now, but I am completely open to suggestions. Thanks Zayne
-
I have a guy that's asked me to make some boots for his girlfriend. I don't make boots. I'm a wallet and bag kind of guy. He has a picture of what he wants. It appears to be a custom pair that someone else has made. Anyway, if anyone is interested in this, I'd gladly pass your name and information along to him.
-
I've got a round bar with a threaded countersunk plate on one end made for my drill press hoping it would convert it to a dedicated embossing press but the impressions are very weak. So far I can only get it to make a okay impression on veg tan if I wet the surface. Any suggestions would be appreciated to try and get a better result from it. My housemate said drill presses don't really exert pressure, so I guess that's my issue. I've tried to put different sized bricks underneath to see if the spring will compress more but it doesn't. I wanted it to do quick stamping jobs.
-
I am in the process of designing a logo for my leatherwork. I will most likely have three different designs, for the first two, I have figured out that I want to hot stamp, so I will be purchasing through a company that will design them for me, and supply me with the appropriate heating device. But as for the other one, I want it relatively large, about 3 1/2 inches in diameter. How would I go about stamping leather with something that big, and have it be even? What would it be made out of? I really like the results from using heat to stamp leather, so I would prefer that method with this large stamp, if at all possible. Thanks Zayne
-
I know that custom stamping as a general topic has been covered in a couple dozen threads already. But it seems like nearly all of the suppliers mentioned in those threads only do (or only advertise doing) makers stamps, and the rest do variations on standard designs like really nice basket stamps. What I'm looking for is a spoon stamp. Just a good old simple piece of silverware spoon that I can stamp about a dozen times each into about a hundred bracelets for a good cause, and then probably never use again. I've searched a few times, but any search query involving leather and spoons just brings back results for modeling spoons, not spoon stamps. And I'd happily try to make it myself as is often mentioned, but my hands are laughably unreliable right now, so it's just not that plausible. Jeff Mosby / Grey Ghost has "sample graphics" on his site, though he doesn't say what they're for, so I'm guessing he does this sort of thing. Is he my best or only bet? Or do all the stamp makers do this sort of thing, and just don't advertise it as openly? (I think Infinity looked promising, too, but that's $160 right off the bat, and if this thing gets funded I have $300 for the entire project, so I can't really blow half of it on the stamp.)
-
So I finally caught a break from all the pancake and paddle holster orders I've had and got an order for a Glock 22 IWB holster with clips. While I was at it, I made this one for my Glock 27 with straps. I've been wearing it for a few days now and really wish I had made one sooner. We'll see how orders for these go.
-
 A few of the local MSHP Troopers got together and had me make a retirement gift for one of the retiring Troop Lieutenants. When I was a city police officer (some years ago), this Lieutenant was a corporal in the zone that covered my town. He is a very good man and I was thrilled to have the opportunity to make this for him. It is a right hand pancake in burgundy/black and has his collar brass attached to the stiffener.
 -
Here are a couple of pics of a belt case I made recently. Also a link to about a 20 min YouTube video I put together while making it.
-
Atlantic City, New Jersey Seeking Leather Worker with basic skills to assist in new shop / gallery located at The Walk in Atlantic City, NJ. Assist with product developement and the hand making of unique leather accessories and artworks. Please send samples of your work and a brief bio of your experience to ronrosscohen@gmail.com Great opportunity! Thanks.
-
Here are a couple of my latest. The first is for a Glock 22 and it is for a Missouri State Highway Patrol Trooper. He wanted his collar brass attached to the stiffener, so I JB Welded a Chicago screw on the back and attached it as well as stamped and beveled his number in it. The second is for a customer that needed a holster for his new Baby Glock 27. I swear I never intended to do initials and/or numbers on every single holster I do when I started this, but ever since I did the first on request, that is all anybody wants...I guess as long as I keep getting orders for them, I'll keep makin em:) Been having a hard time with the lighting in my photo box as of late, so the colors are just a bit off. Think I'm going to see if I can remedy that soon.
-
 So a couple things happend during the construction of this wallet that I thought I might ask for help. Its my first real rolled edge wallet and Im really happy with how it came out but it could be better. Im hoping the links above worked to show you detailed photos of the wallet on my photobucket page. I will post my questions below... 1. Does anyone provide Skiving as a service or know where I can shop and buy a mechanical skiver in the Portland, OR area? (I wrecked 4 pieces of veg tanned to get the one that worked with a safety skiver) 2. If I wanted my top-stitch on the outside of the wallet I cant see what I'm sewing... so? I prefer the look of the top stitch on the outside so I don't get those "blowout punctures". 3. In this pic it shows the "bridge" of the wallet. I like the way it encourages the bend in the wallet but I am curious if it should be sewn or just rolled like I did. Please let me know what you think good and bad. Please be strict. I want to make them better in every way.
 -
I really appreciate the information and help I have received since joining this forum. I have had several requests from members about different things in private messages, and I sat down and outlined my process in one of them. I figured that while I was sharing, might as well post it for all to see. Please understand that I have only been doing this for 3 months and I'm sure there are things in my process that will change...this is just how I currently work. And please, if anyone has any suggestions for improvements, let me know. Well, here it is in a nutshell... First of all, all of my holsters are my own design. They look similar to other pancake style holsters out there, but the first thing I do when I get a new model handgun is to set down and design a pattern. I make sure that as I am drawing it out that I am not looking at someone else's pattern that might influence me. Instead of going through that process, I'm going to give you a link to a video by Andy Harlin. His YouTube channel was a great source of information when I started 3 months ago.https://www.youtube....user/revelcraft is his YouTube channel. His particular video on pattern making is (part 1) and (part 2). One particular thing to pay close attention to is how the front panel of the holster is slightly wider than the back. You can make a fine holster without that, but I have found that this is my preference. Another common mistake is to not allow enough clearance between the top of the holster and the grip to get your fingers in between, so keep that in mind as well.My step by step holster process is as follows, but I want to give you one more video link that was also a good source of info for me...Eric Adams at Adams Leatherworks. The link ishttps://www.youtube....rticlerealities. In particular, these videos are VERY similar to my process ( , and ). He also has some subscription videos you can pay to watch if you're interested, but these will give you an overview.1) After developing the pattern, I usually digitize it (optional) on my computer with a free program called Inkscape. This allows me to just reprint the pattern at any time. I scan in the drawing and then digitize it in layers so that I can print individual components as needed (ie. front panel, back panel, stitch lines, belt slots, stiffener). There are many videos on youtube about digitizing drawings and you should be able to get a lot of results with a search. Again, this is purely optional. 2) Lay the patterns on the leather, mark them and cut them out. I use a utility knife and try to stay either right on the line or just to the outside. I always sand the edges flush so I'd rather have too much as not enough. 3) Run a stitching groove around the stiffener. 4) Case the stiffener and then carve/bevel if needed. 5) At this point I either use my overstitch wheel around the groove or use my stitching chisel (pricking iron) depending on what method I will be using. Lately I've been using the diamond stitching chisel (pricking iron) a lot. 6) Run a groove all around the front panel of the holster. After that, I mark and make a groove for the double inside stitch lines. 7) Overstitch wheel or pricking iron on the inside stitch lines. 8) Case all of the leather parts and apply dye with my airbrush. I use Fiebing's spirit dye, it works really well in my airbrush and allows me the do the "sunburst" effect. For the sunburst, I spray the whole panel and after that dries a bit, I fade in the outside with a darker color. I believe this is shown in Eric's video. 9) Allow that to sit for a full day. 9a) Carefully rough up the leather on the front panel and glue the stiffener on. Go ahead and stitch the stiffener on before continuing to the sides. 10) Glue together one side with contact cement and let it sit for an hour. If using a pricking iron you can go ahead and punch through the second layer with the iron, or use an awl to finish the hole as stitching. 11) Prepare thread, place in stitching pony and stitch up the one side. Note that I concentrate a LOT on my stitching. Ian Atkinson and Nigel Armitage have a lot of good videos about stitching on their YouTube channels. IMO it is worth it to really study the information on stitching and practice this a LOT. 12) Repeat 10 and 11 for the other side...but if you made the front panel slightly bigger, you have to take great care to bend the holster and line up the edges well. 13) Cut belt slots. I use a 1 1/2" slot punch to cut the belt slots after the stitching is done. 14) Sanding. I use a oscillating spindle sander to sand all of the edges and flush them up. Many use a belt sander which is good as well. If you don't have either, a trip to Harbor Freight may be in order:) It is WELL worth the money. 15) Soak the stitched holster in WARM water for around 30 seconds to a minute or so. It needs to be good and wet, but it doesn't have to soak for 30 minutes like some people say IMO. 16) take out the holster and lay on a towel. Blot off the excess water and let it rest for a little bit. While it is sitting, heat up the oven somewhere between 150 and 170 degrees. Mine will only go to 170 and it works fine. 17) Now, if using the real handgun, you will need to spray it down with some oil and wrap it in Saran Wrap or stuff it in a ziploc bag. I have done this many times and it works just fine. If I am using a bluegun, I normally go ahead and wrap it as well, just to make sure none of the blue comes off on the inside of the holster. You can scrub your blueguns with denatured alcohol to get the finish off of them, but I have always been extra cautious and just wrap them. 18) Stuff the handgun into the holster. Make sure the it is even on both sides and look it over really well to make sure it is all lined up the way you want it. Sometimes they are a real bear to get in, but if you work at it, it will eventually go in. The harder it is to get in, the tighter the fit will be when it is done. There are a lot of variables, from the stitch line to the temper of the leather that determine how tight it will be, but even though some are tighter than others, I have not had a holster yet that didn't turn out well in the end. 19) Molding or Boning. Now it is time to start molding the holster. There are different opinions on this, but I will tell you mine. If I wanted every piece of detail in my holsters, I would start using Kydex. This is just my personal preference...a lot of people are making fantastic holsters with a lot of detail in them. When I first started, I used to use a modeling spoon and all kinds of different tools to mold it. Now, I use nothing but my fingers. I pay a lot of attention around the trigger guard as well as down the front and back of the slide. I'll push and rub with my fingers for probably 10-20 minutes, and then take out the gun. 20) Baking. Now I take an old wooden cutting board, put the holster on it and stick it in the oven for 20 minutes. After that, I go back to step 18. Re-insert the wrapped gun and start molding and shaping with my fingers for another 10-20 minutes. I stick it back in for another 20 minutes. I then repeat. I usually do 20-20-10-10 depending on how the holster is looking. if it is looking like it is drying out on the inside I may only do 20-15, 20-20 or 20-20-10 and leave off the last bit of time. You just kind of have to get a feel for it. 21) At this point, I'm pretty well done with it for the night. I test fit the gun 1 more time and then take it out and leave the holster alone for at least 24 hours. 22) After it is thoroughly dry, I apply tan-kote to the inside in one direction and kind of wipe it down to burnish it a little. I used to use gum trag followed by resolene. Since then I have started buying better quality leather and don't really need to "glue" down the fibers on the inside anymore. 23) Apply neatsfoot oil to all the outside surfaces with a foam brush. Wipe off any excess after it has sat for a bit and then walk away and leave it alone until the next day. 24) Edges. I apply black dye to my edges and let it sit for a bit. I then chuck up a wooden wheel in my drill press that I made and burnish all the edges. If there are areas I can reach, I use a wooden slicker to burnish them. I then chuck up a 1/2" dowel that I sanded down to a long point in my drill press and burnish the belt slots after black dye as well. I spend a lot of time on the edges...to me the first thing I look at to see quality is the stitching, followed by a close second, the edge treatment. 25) Finish. I spray all my finish with an airbrush. I have used resolene a lot and like it. I usually cut it 50/50 with water. It tends to leave a shinier surface. LIGHT COATS...and you only need 2 or 3. You don't want it to look like a big glob of glass. Lately I've been using Mop n Glo cut 50/50 with water. Yes, the floor polish. Search for posts by Katsass on here and you will find what I am talking about. Again, 2 to 3 LIGHT coats. It leaves a mellow shine, but it still looks like leather and not glass which is something I appreciate more and more as I gain experience. 25) Finally, whether using resolene or Mop n Glo, I heat up the holster gently with a hair dryer or heat gun on low. I then rub in neutral shoe polish all over with my fingers. I then heat it a little more and buff with a soft cloth. If I'm using resolene, I don't do this until it has had a day or more to cure. If using mop n glo, you can wait 6-8 hours. Just make sure the finish isn't tacky at all before you use the shoe polish...you want it to be fully cured. That's pretty much my process as it is today...Again, if anyone has any comments or suggestions, I'm an open book and I really appreciate everybody's advice I have received on here. Jack
-
Hi, Any recommendations for custom stamps? I'd like to stamp each piece that I make with my own design. Thanks, Mike
-
Just finished my first fairly large order. The one I made for the Chief Deputy really paid off. I already have two more in the queue and probably more to come once the other departments get a look.
-
I just published a website that includes my contact info and a nice gallery of my work. Please take a moment to look it over and if you are on Facebook give a like and I'll do the same. http://facebook.com/lousfineleather http://lousleather.weebly.com Thanks everyone!
-
Howdy, I'm getting married this summer and I would like to give my groomsmen custom name belts. Specifically, I'm looking for the fairly simple vintage-y western style belts that were popular in the 70's and 80's. Oak leaves or dogwood with white lacing. See pictures below. I was hoping to not spend much over $50 per belt. I used to be able to order these from my local western shop but no one and no companies seem to be making these any more. I have found a few folks online but they are making them a bit more fancy and asking pretty steep prices. If anyone is capable and interested in this job, I am VERY serious and ready to order them! :D Thanks for your time. Rick