Search the Community
Showing results for tags 'knife'.
Found 106 results
-
 I had a custom karambit made for my big ol' meaty hands by a local knifemaker, I made a vertical sheath for it when I first got it but I've come to prefer/love horizontal carry. I also love/prefer friction fit sheaths for ease of access and don't like straps for retention. While perusing the interwebs I came across the idea of magnets for retaining a blade that kydex sheath makers have been using, I also read a topic here on this forum too. So I decided to try my hand at using magnets and so far I love the results! So far it is holding very well for my use, I don't think it would hold should I fall down a mountain but that would be the least of my problems if that came to be . I used 8/9oz leather, 2/3oz for the inlay ring, rattlesnake skin, Fiebings Oxblood dye, acrylic resolene and Tandy's super waxy 1mm thread (which I prefer for sheaths to add some life-length to the thread in my sheaths). I cut a circle from the 8/9oz, filled with rattlesnake skin and 3 neodymium magnets, and covered it with 2/3 oz leather on the inside to hold the magnet and protect the blade. I tried with 1 magnet which didn't hold, two did but I found that three fit the width better (and perhaps holds stronger). I jogged in place and jumped up and down with the sheath and didn't really feel it shifting or coming out so I think that it will work for my lifestyle. Feel free to critique my work too (I haven't figured out how to get my stitches to look great when saddle stitching two layers together and NOT going over the upper layer instead going off to the side to not cross over the upper layer and having the thread cut into it, if that makes sense). Oh and the edges in many of these pictures were taken before finishing the edges. The last picture is of the original sheath I made at first. All thoughts and comments welcome
 -
Fairly new to leather working and opted to make a sheath for a knife I've had since I was about 12. Came out serviceable but quite a few things went astray in the process. Was also my first go at doing saddle stitching.
-
Selling a like new Doldokki leather cutting knife with the right-handed single bevel. Nothing wrong with the knife. I just like my Chartermade knives a little bit better. These are ~$100 with shipping from Fine Leatherworking. Asking $85 shipped. Willing to negotiate on price.
-
Anyone have anything they’d be willing to part with? Old or modern.. thanks!
-
Haven't posted for awhile and thought I'd share this. I did this sheath for a custom knife maker that had a customer wanting a leather sheath with tooling.
-
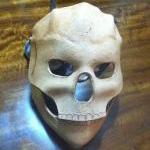
Some time ago I forged a small blade. Then I put in the drawer where it spent a lot of time. Since I need a present for friend o' mine, I pulled the blade out its hideout, assembled the knife and also made neck sheath for it. Hope, she will like it.
-
I made this a few months ago but haven't been very active on this forum (something I look to remedy). I had Rich Greenwood, a local bladesmith, custom make me a karambit for my gigantic hands. I then made the sheath for it, going for a friction fit. I feel like the tooling is my personal best (I know there isn't much tooling) but I don't do a lot of tooling so my growth is slow. I am a big guy with ham-sammich hands so the handle/knife is big. To many it may be a weird looking knife but I love it and Rich did an excellent job meeting my specs. While the tooling came out well, I ran into an issue when putting the knife back in the sheath. The shape/design and thickness made it very difficult to get a smooth re-sheathing. I still have to fiddle with it when trying to return it, but it draws fairly smooth. I think that I will make another sheath for it someday, perhaps using a combination of wood and leather. I know this is the show off section and people feel a little uncomfortable adding critiques, but I have improved so much because of your input. If you see something you would like to add your two cents on feel free! I appreciate it!
-
Haven't posted for awhile, so thought I'd throw these up here. I was asked to do a couple knife sheaths for someone making custom knifes, so thought I'd give it a try. I was happy with the way they turned out, hopefully the customer is as well.
-
 Here's a sheath I made for my knife. The patterns you see on the knife were done all by hand. If you want to see how I did it, click here. You can also check out my channel where I do all kinds of different leatherworking if you're interested. Let me know what you think!
 -
I have a collection of old leather knives and would like to add more to it. If anyone has any of this type of knife they are willing to part with please let me know. The only one that I do not require is the one at the bottom L'indespensable from France, which I have(2). Some of these knives were originally used as marking or striking knives, but easily converted by sharpening to either left or right hand use. In the first photo I am looking for the top two and the third from the bottom, the second photo I am looking for either of these the top one I believe to be a Norris from the UK. Any unusual mill knife with adjustable blade ( brass & rosewood ) Thanks Keith keithandco@shaw.ca
-

Rattlesnake Knife Sheath
Rolandranch posted a topic in Gun Holsters, Rifle Slings and Knife Sheathes
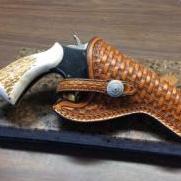
Hello, all! My older brother gave me a nice Damascus steel knife for Christmas and I decided to make a sheath that it would look good in. haha! Just kidding... that's the cheap sheath it came with. Here's the real thing... Thanks for looking! -Ryan -
Hi, my brother works for a wilderness NGO and needed a new sheath for hie leatherman. the color and the wolf was choosen, since it is part of their logo. The wolf is more bad than good, but my first carving experience. this is my 5th project. Enjoy! I first cut off too much of the upper part, therefor I had to add an extra layer :-)
-
 Hi, i am completly new to working with leater, so I might post my very first projects - I have done a lot of mistakes and please critisiue whereever you can! 1) The Mans Purse .. veg leather with a homemade vintage coloring (attempt) and firstwetforming ever (bottom) the seam fell appart and I had to renew everything. I learned that "carving" the Letters isn't so easy in already dyed leather :-) 2) old Kukuri Knife .... the wooden part was covered with sheep leather and the loop was veg leather where i glued the sheep leather as outer lining ... to match the color... At least the wetforming with Alc/shampoo/water worked.. What I learned: contact glue is a bit** .. once the parts touched the stick together like hell... so the whole wet forming didgn't wor anymore : -) Hope you like them, and esp. with the knife I will add the progress pics
 -
 It started as a damascus blade blank from a local knife show (1095 & 15n20), 5" blade: Then I added leather scales (horse butt?): Then wrapped in alligator and fastened the scales, and started the sheath with 5.5oz leather: And N52 magnets: I designed the sheath so the knife could fit in facing either direction: Wrapped in alligator: And stitched together, attatch strap, and done: The strap is attached with a chicago screw and it swivels, so I can wear it IWB or OWB. Yes, it took a very long time, but if I did it again it would be much quicker next time, now that I have some clue what I'm doing. This was my first knife handle, and first sheath.
 -
For sale in Continental USA only. This is a used Ellegi model SKS 8” wide Stationary/Straight Knife Splitter. Please take note that this is a 3 Phase Power machine. Can be converted over to be powered by a 110v motor by replacing motor. This machine I believe was imported by American Shoe Machinery Company. This machine is in excellent condition as well as the blade and feed roller. Splitter has forward and reverse switch. I have upgraded to a wider machine and selling this one. Manual/instructions included. Machine stands about 45” tall and is 18” x 18” on the base. Shipping weight is about 247lbs and 265lbs on pallet, I will palletize and pack this machine, you will need to arrange a shipper to pick it up. $1300 Reply through this forum or you may call the shop at 602-two69-zero202. Thanks for looking.
-
Two more...one is "almost just like" the first two, the last is because the guy wanted two, and I thought I'd try out the new airbrush. Hey, he should have been more specific. The airbrushed one is actually my trophy wife's fave. Once again, the "club colors" of the VFW Warriors club are black and yellow... you guessed, right? The pic shows the nasty-a$$ed sheaths they knives came with, and my "new and improved" sheaths. Keeping in mind that the blades didn't really deserve any more than the aforementioned N-A sheaths shown.
-
Continuing with the downsizing of my shop, I'm selling some of my lesser-used tools. I purchased all of my Vergez Blanchard tools from VB themselves. Vergez Blanchard Pricking Iron Sets: #9 (9 teeth per inch, 12 teeth and 2 teeth) - BARELY USED - $239 #6 (6 teeth per inch, 10 teeth and 2 teeth) - $219 (The 10-toothed iron has a bum tooth on the end that I haven't taken the time to sharpen out, because I rarely use it. Otherwise it's in excellent shape. Two Vergez Blanchard scratch compasses / Wing Dividers - I use these to mark my stitch lines. The two are slightly different sizes, but hardly noticeable. $59/each Vergez Blanchard "Couteau a Pied Demi-lune" No. 7 (200mm) - $109 I've sharpened this on my buffing wheel - it's big and as a sharp as a razor! Vergez Blanchard "Fer a Filet Maroquinier" (filleteuses, creasers and folders) - would like to keep them together, $149 for the entire set. Lastly I have a large, round, 64oz Barry King Mallet - minor dings, in excellent shape - $75 PRICES INCLUDE SHIPPING (to continental USA) AND PAYPAL FEES. Willing to ship elsewhere but will have to add additional cost! Here is a link to a Google Photos album if you'd like to look at the pictures full size: https://goo.gl/photos/vDfx17xTdqSzSHrH7 Thanks for having a look - let me know if you have any questions! - Ross
-
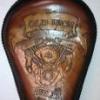
 Second sheath. It looks a lot like the first sheath, because the first sheath showed up at the Harley riders VFW club. Next request for one was immediate. That's a good thing, right? Second request was for one "just like the first one". Not as much fun for me, it was like I'd been there before. It was a different knife though, so that was nice. First pic is the first sheath, second pic is today's completion.
 -
I am hoping to buy a l'indespensible knife, but I cannot find them online and I definitely cannot find them locally. Are they still available for purchase? Can somebody please let me know if they are, and what they are worth either with or without a blade.
-
Made another one this time longer and scout carry. This one is a retirement gift that come with a shinny nickle.( not pictured )
-
Hello I'm new to tooling, but have been a knife/sheath maker since 1966. When I make a sheath, I know I need to " back " the leather before casing and tooling, Here's my dilema, in order to make my stitch groove I need to have a good sanded edge to follow. Without putting the sheath together first, I can't get that perfect edge? If I put it togerther first I can't tool it because there's no solid backing behind the blade area? I can't tool the front first, or the edges of the layers may not line up? Has anyone else run into this " catch 22 " situation? At the very least, this is a hard problem to explain, but if anyone "gets it"??? I'd appreciate any help you can offer? If I'm not giving enough information, please let me know. Regards: Stoney327 owner/operator Pappy Dave's Knives Berwick, Pa. " In business since 1966 "
-
I'm a big knife fan, one of my favorite patterns is the Case Peanut. I currently have 4 of them. This is my second molded item...a pocket case for this small pocket knife..... This is a synthetic purple model....and the slip pays homage to that by being dyed purple inside. Dark green stitching. Pretty pleased with it. Started a work-carry molded shesth with my younger son today for his Leatherman tool. That'll be my most complex item yet.
-
An old Rose head knife I picked up for next to nothing. You can see why from the first picture, she was a little rough. That being said I'm a firm believer that if it's beyond repair you may as well try and repair it because it can't get any broker! I know that's not proper but broken won't work and broked ain't a word for that sentence either. The first picture shows the knife as it was when I got it. The second shows the handle removed. It's a 5/32" steel pin for those interested in knowing the pin size. Picture three shows it back together. Picture four is just closer so you can see I did not remove every pit down flush from the blade. It is also not sharpend yet. The inlays are Ivory from a late 1800's piano keyboard they are 3/8" and cover a repair to the handle. The pin holding the blade has been replaced by a 5/32" brass rod. The missing wood around the pin was replaced with epxoy mixed with sanding dust from the handle. The handle is walnut and I chose to repair it rather than replace it. I tried to keed everything as original as I could on this. Total time invested was about four hours. That's actually working on it, not drying time or breaks from sanding out rust pits. I have a lot experience with restoring old woodworking tools and I am a woodworker with all the tools to build whatever I need. I'm saying that because doing this sort of thing can overwhelm folks who are not prepared. It's also not a cheap way to get a tool if you charge an hourly rate for your time. Having to buy all the tools would really make the price jump. I used Ivory key from piano Two 1 x 30 belt sanders 120 through 2000 grit 1 drill press 4 sizes of drill bits Shims and scrap boards to level handle for drilling I 3/8" drill hole punch made from pipe to cut inlays Wet/dry sandpaper from 80 grit to 2000 grit Mineral oil for sandpaper lube Bolt cutter Dremel tool Dremel grinding stones 5/32" brass rod Buffer 4 different buffing wheels with different compound on each wheel Epoxy Bodied linseed oil/varnish/mineral spirits 1/3, 1/3, 1/3 mix Rubber gloves Lots of blue tape on edges ( even dull they cut flesh) Band-aids Safety glasses A bunch of other stuff I forgot Lots of patience The last one is the most important. Stop and leave it alone. Think through the problem and go back to it. I'm working on a few more. Each manufacture did things in their own way. I'm sure over the years the methods vary within the same manufacturer. The Dixon I'm working on has a rosewood handle that is simply driven on the tang. Two brass tacks hold the ferrule on and have caused the wood to split out over the years. You can see that handle in picture three in the background. I'm pointing that out so anyone who wishes to do this will take the time to figure out how to take the one they have apart.
-
I made one with a simple snap and then tried one with a Concho/Snap combo. I didn't know what to do so I created a leather "Washer" to fill the long shank space. I also made the mistake of positioning the Strap across the back instead of the front.
-
Recently made this for a family member. No patterns available, so had to come up with this on my own. There's some flaws, but over all I'm ok with it for a first try. Open to comments. Thanks