Search the Community
Showing results for tags 'suede'.
Found 34 results
-
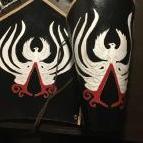
 custom designed and made by QueenBee1755
© QueenBee1755
-
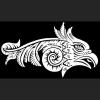
 made and beaded by QueenBee1755
© QueenBee1755
-
 custom designed and made QueenBee1755
© QueenBee1755
-
Hey guys. I’m trying again to make leather pouches and bags and am confused on how to sew them without the stitches showing. I sew then flip it inside out right? Is there an easy way to explain it to me or do you have pictures on it? (I could just look on YouTube but I don’t understand the videos sometimes.). I want to make some pouches for some of my hardware since I don’t have a tool rack yet.
-
Hello all, new to the forum and new to Leatherworking in general. I have a couple questions about making my own suede weightlifting belt. First is if sandwiching veg tan between suede what's the best edge treatment? From what I've read Fiebings edge coat, Giardini or Fenice is the route I want to go. Second is what variety of weights should I use? For strength and rigidity should I use 9oz veg tan and 2 layers of 3-4oz suede or do 2 layers of 5-6oz veg tan and 2 layers of 2-3 oz suede. General thickness should be 1/4- 3/8". Attached is a picture of what I'm shooting for! Thank you for your time and feedback!
-
Started donating guitar straps to veteran member of Soldiers, Songs and Voices non-profit. This is my first attempt. Female veteran musician requested I incorporate artwork from her album cover, leather from her late mother’s boots (used heel and toe from boot sole) and way to hold spare 9volt battery for powering guitar amplifier. She will replace AAA batteries with real bullets in the bullet holster segment. Disclosure: I read the very helpful “guitar strap tips” post AFTER completing the strap.
-
I’ve been making some stirrup style dice bags recently which require me to sew chrome tanned garment leather or suede to the veg tan strip in the middle. I’ve been using diamond chisels to make my holes in the veg tan, but it doesn’t work well on the softer leathers so I’ve been saddle stitching them together with glover’s needles. I go through the diamond chiseled hole of the veg tan and use the sharp glover’s point to get through the suede etc. Is there a better or easier way to do this? Sewing machine is not an option. Thanks!
-
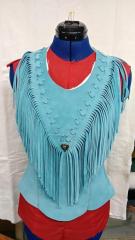
Hi everyone, Hope your holidays are going well. I know that trying to iron on patches with glue backing on leather does not work well, as they don't stick. But what about suede leather? I have some ladies western style fringe suede vest. I also sell Native American style patches with very good iron on glue backing, not the cheap stuff that never sticks! I assume since suede leather is very "fuzzy" that glue would stick well to it, but I don't want to ruin a vest trying to find out. Anyone know if glue sticks a lot better to suede leather than normal leather? Thank you.
-
Hi, I just joined this forum and hope to be a regular member. I'm self taught leatherworker (youtube videos, etc) for the past 5 years. I mainly make pocket watch cases. I'm trying to sharpen my skills and instead of having the inside of the case smoothed, I'd like to make it suede. So I've been searching for making the Reverse Side (Fleshside) of the leather into a dyed suede type feel, while my Grain Side is tooled on the outside. But everything I've tried has caused the dye to fade if I dye it before I roughing it up, or if I dye it after the fibers that I've roughed up to stick together. I've tried bonding suede to the inside of my cases, but I just haven't had any luck with the small size and I'd rather not add any more hand stitching that I already do to it. Does anyone have any good insight on how I could accomplish this?
-
Glue is not my friend! It's messy and too easy to ruin a piece with a rouge drip. It stinks and when I use spray adhesives outside, a wind usually comes up and blows the tacky surfaces into each other. If all goes well I often don't get the lining square with the leather and i have to glue in little patches. Sometime I line with fabric and the glue saturates the fabric is some areas ruining it. I have also tried water soluble cements, wood glues..all a huge PIA. I ran across HeatnBond at the Walmart sewing section yesterday. I tested it out with a hand Iron and it appears to be amazing! After cooling I was unable to separate either the fabric or the suede from the flesh side of some 5-6 oz vegtan. To that end, I ordered a 15" square heat press. If this all works out, this product could cut my production time down by 30%, cheaper than using glues, and potentially no ruined pieces. Has anyone used this stuff with a press? Short term tests indicate the stuff works great and withstands flexing, is inexpensive and the temperatures required don't damage leathers and fabrics. In fact, it appears to be easier to use a fabric lining then to dye the exposed flesh side of unlined products. (I use drum dyed leather from Wickett-Craig. I supply for resale to companies who have my products in their catalogs, so color consistency is critical) Thanks for your input, Bob
-
Hi all, I have leather for sale for $1/sf. Quantities vary based on color and type. Anything from single hides to 2000+ sq ft lots. Full Cow hides, lamb, goat, calf, suede, hair-on-hide, belt/holster leather, and everything in between. Off-cuts (at least 1sf) are also available by the pound. Let me know what you need, and I probably have it. Here is a very small sampling for photo reference: https://www.dropbox.com/sh/y2mkzc5wpavb9qv/AABifeDDbK4G5jIOAtIS_9V4a?dl=0
-
So I've just bought some pig suede for lining various veg tan leather projects (Card wallets, knife sheath, pencil case, etc) I've bought undyed natural because what colour I need will vary. I note the lil "do not use on suede" notice on both Fiebings Pro and EcoFlo leather dyes. As well that both companies do separate suede dyes. What actually happens? Do I genuinely need to restock with all suede dyes as well. I'd only just started to get over my addiction to buying my tooling leather dyes. Can I "make do" with the oil dyes for now or is it disastrous. Many thanks in advance.
-
Dear Members, You can see my double colored, washable suede work. I did it from splitted limed leather. I use splitted part (non-grain) and use "reactive dyes" for dyeing operation. There is not a surface operation, all processes wet tanning operations and leather has made in drum. Deliming, Bathing, Pickling, Tanning, Mecanial Operations( Sammying, shaving) Deacidification, Retanning, Dyeing and Fatliquoring. I use 2 different colors and "reactive dyes". So this suede is wasable. There is not a color contaminaion to other material during washing and after washing there is not a color fading. I did only 1/2 half side of leather for trial. So i will do whole leather. I know a lot of about leather making but leather goods making is very stranger for me. What should i do with double colored suede? Thank you for reading. Have a nice day.
-
Hi I am looking for a supplier that is able to produce a custom coloured suede suitable for use as the inner lining in a watch strap. The quantities would be small to begin with but I'd expect them to grow as our company evolves. Thank you Jonathan
-
I've just had a delivery of some lovely pigskin suede (suede both sides. It's beautiful and soft, I cant imagine a material that would feel better for lining wallets. My question is that I'm a bit paranoid that the edges of the suede will fray or go fuzzy over time? Will this happen or will the suede hold its shape? Do I need to do something like put glue on the top of the edges or treat them somehow or will it just hold its shape? Also when I burnish the leather edges wil this affect the suede as the burnishing tool may come into contact with it? Thanks for any advice :-)
-
Hi guys, I am just finishing making a suede maincure set out of suede leather, where I glued two layers of suede together and I was wondering what is the best way to finish off the edges so that they look nice. I know that you can burnish veg tanned leather, but I'm not sure if you can do it with suede, I have given it a go with some water but the results aren't much different from before. If it is possible to burnish suede edges can it be done with beeswax? Cheers
-
We have skill of manufacturing Turkish quality leather jackets and coats. Turkish leather is known for its quality. You can wear a Turkish leather jacket minimum 5-10 years without and problem while Indian, Paki, Vietnamise, Chinese jackets lose their form at first 2 years. Do not focus on price but focus on quality. We use top quality leather and chemicals in Turkey. We are an Istanbul Based several decades experienced shearling, leather, suede, nubuck jackets, coats and bags, hats, gloves and other accesories manufacturer manufacturer. We hold a prestigious place in Turkish & World leather tannery and leather and fur apperal making (garments) with responsible and enterpreneur approach with several decadess experience. Our Fur and Shearling tannery straegic partnerships turns us to a integrated leather and fur industry manufacturer. Our connections have sophisicated and specialised tanning skills and developed a new and innovative identity in the market and it is leading the trends in tannery industry. Our strategic partners in tanneries on Cow, Kangroo, Sheep, Sheerling, Tropical leather like pyton, crocodile also chincilla, mink, rackoon and fox. Our aim is supplying the best quality materials for international clients in leather and fur garment, shoes, bag https://www.facebook.com/niyazisenshearling?fref=ts Our ready to wear products are jackets, coats and bags and also other ready to wear apparels while our services: Desing, sampling, collection preparing, manufacturing, fashion consulting, material sourcing, tannery sourcing, manufacturing consulting, subcontracting, private lavel manufacturing, tailormade manufacturing, wholesale, retail sale,export. Strategic Partnership with Tanneries: Ready Made Clothes: We can prepare special collections in accordance with it's concept. We have our own designers and fashion specialists to chose the best material, accesories and fur. Our Company aim using unusual details as well as fashionable and functionality on products. Today we are creation and design oriented, confident and high quality leather&fur products manufacturer. We have 100.000 pieces manufacturing capacity annually and also we can enlarge this volume more over we can prepare small butique collections . Service quality policy: We follow business ethichs and moral issues with transparent and honest business approach and we give swift reply to market demands, always invest our business to be better in accordance with developing technology, high quality labour and services as a business culture. We would like to meet with you and speak about potential collobration areas either as subcontractor or manufacturer. You can see our some views from our production plant. https://www.youtube.com/channel/UCfyFTyk0TMNxUTDJyxKJ44w https://www.facebook.com/niyazisenshearling/?fref=ts I also attached our models below Kind Regards, Ahmet DOGDU EFN DERINIYAZI SEN SHEARLING Ziyagokalp Caddesi 35. sokak no 7. Kazlıçeşme/ZeytinburnuIstanbul/TURKEY Mob: 0090 538 455 74 69 Line: 0090 212 517 20 77 ahmetdogdu1981@gmail.com Skype: ringorunner https://www.facebook.com/niyazisenshearling?fref=ts
-
 Finally got brave enough to try making something besides bracelets with the Horween I have. Based off of figure 66 illustration on page 44 in the book Purses in Pieces, I made the sides suede since it's strong and flexible, plus I had just gotten a nice dark brown hide that matches the Horween pretty nicely. I cut the lacing with a straight edge and a rotary cutter, I'm definitely going to have to get a lace cutter if I keep doing this because my consistency was crap. Still, I think I did pretty well considering I couldn't find my calipers (where DOES this stuff go?!) and I was making each hole one by one with a nail that had been flattened out and filed to make the lacing holes. I think it will flatten out a bit as it's used, right now it's keeping the shape of being rolled up plus the tension from the lacing.
 -
So I kept hearing about the book Purses In Pieces, and I angsted over it enough that my guy bought it for me. While flipping through it I found something called a "rolled wallet" that had three pockets in it, and it looked fairly simple. At first I was worried about it being too fat with having veg tanned leather on the outside and for the pockets, but then I remembered I have some pig suede, perfect! This being my first rolled wallet, I pretty much made up all the proportions. In retrospect, I should have made it 1/4" wider so the middle pocket would fit business cards. The bottom most pocket is pretty much perfect for change, not too deep and not too shallow, and the topmost pocket (that needs the most flex since it bends around into a U shape) fits paper money folded in half just nicely. I dyed the veg tan with walnut hull dye I made from green hulls, it's a nice soft brown.
-
 I've finally brought the new red Geom bag to life. For the handle, I ended up using Angelus red dye and finishing it with Natural Carnauba wax creme (Fiebing's). I was really happy with the finish. For some reason I can't seem to upload the other photos so if you're interested here's a link to more... https://kymberlysteel.wordpress.com/2015/03/09/geom-red/ …
 -
It is so great to join this forum and get a chance to meet others with like interests. I love leather and my current hobby is upholstery and reupholstering old furniture. I've started my hardest project to date an old wing back chair I've attached a picture of the chair and will update on my progress!!! For all those interested I have listed on my Etsy site a number of different upholstery leathers and suede. All of the leather is of the highest quality and mostly of European origin. https://www.etsy.com/shop/LeatherCollector?ref=hdr_shop_menu
-
 Hello! Let me present to you my third work. My first work were these boots http://leatherworker...showtopic=45616, design Merrell Chameleon Wrap, and the second, running shoes, design Garmont Escape PRO 9.81, on photo bellow. And here shoes numbered 3, with my own design and own logo, which will be discussed here and manufacturing technology, which I would like to share with you. The first thing I began with - design, available materials and furniture. Despite all this, you can correct design subsequently as I did. I began the design with a clean sheet of paper. Sketched a few pictures I settled on this design, considering the design features and attachment parts sequence - this is important , otherwise it will be impossible to attach it properly. It is also important to think about where and how will shape the bend. To improve inflection, I used an extra pair of belt loops on the shoe vamp. Here demonstrated only one of many possible designs of shoes, the rest depends on your imagination. http://i-fotki.info/...031277.jpg.html "By approving the project" could begin. Put all materials on shoe last (except upper material) in the right amount and manner as they would be in the finished shoe. It is necessary to put a thickness of insole and middle sole. For further winding of shoe last, use masking tape 20-25mm wide, wider is not recommended. Masking tape should stick well, but not to be wax outside, otherwise it will be bad stick and when removing the shell it can lose shape. http://i-fotki.info/...031431.jpg.html http://i-fotki.info/...031468.jpg.html http://i-fotki.info/...031491.jpg.html Glue tape needs with a little overlap, preferably without wrinkling. After sticking enough thickness of tape, insert shoe last in the outer sole and outlines the level to the visible part, below which all will hide. http://i-fotki.info/...031619.jpg.html http://i-fotki.info/...031648.jpg.html We should also mark the axial lines, front and rear. Now we can begin to design. Draw is best with conventional ballpoint pen, using gentle pressure and instead of the eraser, use pieces of masking tape. Underway, you can change the design somewhat, if in dimension will not like something. Since the right and left side is not quite the same, move all lines using vellum, for example, you will not succeed. Help you centerlines and tailor measuring tape. After completion, you must draw harder all the necessary lines, to avoid confusion. http://i-fotki.info/...031709.jpg.html http://i-fotki.info/...031815.jpg.html http://i-fotki.info/...031845.jpg.html Using sharp knife, making slit at axial lines and lower edge, to divide into two parts. By dividing, cut along the contour, including the toe cup as the most convex part. Parts became more flat, but they still can not be cut, they must be glued on thick paperboard, while leveling and cropping. More detailed process describes here http://www.youtube.c... for shoes&sm=3 http://i-fotki.info/...032008.jpg.html http://i-fotki.info/...032046.jpg.html Now is necessary to make slits on lines for creating patterns. http://i-fotki.info/...032207.jpg.html http://i-fotki.info/...032235.jpg.html Creating patterns is most responsible for connection all parts. Using the main patterns make all external parts. It is necessary to consider all overlaps, overmeasure and mark centerlines. You should also specify the right and left sides, as well as the front to each side. http://i-fotki.info/...032285.jpg.html http://i-fotki.info/...032313.jpg.html http://i-fotki.info/...032340.jpg.html After making all patterns, you can begin to cut material. Also note, if were made some amendments to the upper, it is necessarily to make them on patterns. http://i-fotki.info/...032387.jpg.html I have a regular sewing machine (Singer copy), therefore the manufacturing technology reminds classic shoes, where is no need of a post sewing machine. I made some improvements for greater sewing accuracy and larger thickness. I replaced original hand driven mechanism and attached own lever directly on the wheel. Instead of three stitches per one revolution, now it makes one (used for hand sewing of large thickness). Undergone revision and presser foot, making it narrower and shorter, increased downforce, improved visibility and accuracy. Needle used conventional 110, although it is better to use reinforced for leather, thread polyester 40. http://i-fotki.info/...032557.jpg.html http://i-fotki.info/...032583.jpg.html http://i-fotki.info/...032604.jpg.html Before sewing, machine needs to be adjusted for a specific material thickness and test on a separate piece. My primary material is haberdashery suede 1-1.2 mm thick. http://i-fotki.info/...032654.jpg.html Should start with the basic parts, on which is necessary to mark those details, which will be sewn first. Because of the sliding effect and high downforce of the presser foot, one material slides relative to another, I found a simple solution for this problem, parts before sewing, I gluing together after what, concentrating on precision stitching. http://i-fotki.info/...032713.jpg.html Since suede is not for footwear, however, it is strong enough, to provide proper rigidity of some parts I’m using 1mm thick cotton fabric. http://i-fotki.info/...032779.jpg.html http://i-fotki.info/...032806.jpg.html Having measured braid using patterns, glue and sew them, then you can sew the side part. Do the same with the second half and then sew together both parts. Stitch on these parts is 2.5-3mm. http://i-fotki.info/...032978.jpg.html http://i-fotki.info/...033039.jpg.html After receiving a single piece (upper), it’s ready to make a heel cap. Since I did not have a proper shoe last (proper shoe last on pictured below), I made a separate billet for forming the heel, but with a normal shoe last is done directly on it. Cut two pieces of cotton fabric, stretching and gluing together with SAR 306. When dried, transfer lines with pattern and cut. http://i-fotki.info/...033091.jpg.html http://i-fotki.info/...033129.jpg.html http://i-fotki.info/...033381.jpg.html http://i-fotki.info/...033431.jpg.html http://i-fotki.info/...033457.jpg.html http://i-fotki.info/...033479.jpg.html Then glue it on heel in folded position on shoe last and sew it with stitch 2.5-3mm. http://i-fotki.info/...033535.jpg.html http://i-fotki.info/...033559.jpg.html http://i-fotki.info/...033593.jpg.html http://i-fotki.info/...033616.jpg.html Now you can begin with layer over the heel of polyurethane foam and lining. There are no patterns for these parts, so lay out on the shoe last, blank sheet of paper, draw around the top and cut. There no corrections for polyurethane foam, but lining must be recalculated - 1mm suede + 3mm polyurethane foam + 3mm wool interlayer + 4mm lining allowance = minimum 11mm total must be added to the upper contour, on which will be sewn lining. This is necessary to ensure that all will twist neat. http://i-fotki.info/...033673.jpg.html http://i-fotki.info/...033705.jpg.html http://i-fotki.info/...033735.jpg.html Sew need right by the polyurethane foam, for smooth edge, stitch 1.8-2mm. For insulation using natural wool, material thickness about 3 mm, the same material used on the first boots. Gluing with SAR 446, applying thin layer on wool and suede. The photo shows masking tape, 5-8 mm to the edge, where wool layer will be needed to cut. http://i-fotki.info/...033796.jpg.html http://i-fotki.info/...033827.jpg.html Then gluing lining with SAR 446, also applying thin layer. http://i-fotki.info/...033883.jpg.html http://i-fotki.info/...033921.jpg.html All excess need to be cut and sewn, on that edge, where the masking tape was. At this stage, the shoe begins to appear. As can be seen on the photo, it keeps form well, but the final forming will be at the very end. http://i-fotki.info/...033977.jpg.html When the upper is ready, next part you need to continue - tongue. There also no patterns, but you can estimate the length using upper, the width of the tongue I took from my sport shoes - 100mm. Gap width in the shoe vamp is 40mm, respectively adding 6mm allowance, will be enough for sewing. On a sheet of paper draw everything and make pattern, cut the mesh and lining without any overmeasure. Put some polyurethane foam (about 3mm) on the tongues top (for thickness and strength) and sew together mesh with lining face to face. Then glue mesh with wool layer and extroversion. http://i-fotki.info/...034032.jpg.html http://i-fotki.info/...034054.jpg.html http://i-fotki.info/...034191.jpg.html http://i-fotki.info/...034218.jpg.html http://i-fotki.info/...034262.jpg.html http://i-fotki.info/...034286.jpg.html Cut a piece of suede, glue and sew. Mark the braid and sew. http://i-fotki.info/...034383.jpg.html http://i-fotki.info/...034406.jpg.html http://i-fotki.info/...034426.jpg.html Connect together tongue and upper with clearance 40mm using SAR 446 and then sew together stitch to stitch. Mark border of the toe cap on upper and glue with SAR 446 along the edge, as well as toe cap, connect and sew, stitch is 2.5-3mm. http://i-fotki.info/...034718.jpg.html http://i-fotki.info/...034749.jpg.html http://i-fotki.info/...034859.jpg.html http://i-fotki.info/...034891.jpg.html http://i-fotki.info/...034918.jpg.html http://i-fotki.info/...034939.jpg.html Now put the upper on the shoe last, I leave allowance in 20mm for bend under the shoe last, only for upper, side parts, heel and toe cup should be in the slice with the bottom. After toke the upper, cut out the toe reinforcement from cotton fabric, glue with SAR 306, tighten in place. Once again, make sure that upper is in the right position, remove the staples and glue. Cut off all suede relief and glue suede center part. When it's all ready, it's time to form the shoe. We need to warm all shoe parts, that has inside cotton fabric and tap with a hammer, to complete forming. After that, shoe will keep the shape for a along time. http://i-fotki.info/...035595.jpg.html http://i-fotki.info/...035647.jpg.html http://i-fotki.info/...035683.jpg.html http://i-fotki.info/...035713.jpg.html http://i-fotki.info/...035741.jpg.html http://i-fotki.info/...035767.jpg.html Basically shoe are ready for gluing outer sole, but I would like to stamp on it own logo. To do this, take a picture of the shoe from the side, where logo will be, open the vector program Corel Draw, import photo, create a logo in scale and print on plain paper. Take sticky film Oracal, and cut out the logo with sharp knife, slot only to the film substrate. Unstick from the film unnecessary parts and glue masking tape over all parts. Cut and stick the logo in its place. Carefully remove the masking tape, leaving all separate pieces in place. Glue around with masking tape to avoid smudge of shoe. Preparation is completed and we are ready for rubber coating. As rubber coating I’m using SAR 306 and 30-40% of aluminum powder (for metallic effect). Using brush, apply thin layer and let it dry for a couple of hours. With precision knife cut glue on film edges for smoothness of the logo edges without rips. Due to a thin layer of coating it obtained fairly resistant to damage. http://i-fotki.info/...035832.jpg.html http://i-fotki.info/...035873.jpg.html http://i-fotki.info/...035901.jpg.html http://i-fotki.info/...035924.jpg.html http://i-fotki.info/...035950.jpg.html http://i-fotki.info/...035974.jpg.html http://i-fotki.info/...035995.jpg.html http://i-fotki.info/...036020.jpg.html http://i-fotki.info/...036039.jpg.html http://i-fotki.info/...036068.jpg.html http://i-fotki.info/...036089.jpg.html Finishing stage, gluing the outer sole. Left the upper on shoe last and insert it in outer sole, outline with pen about 1mm below the level of the outer sole. Apply SAR 306 on surface, coat over line and let it dry. The outer sole is made from thermoplastic and I need degrease it with special composition Satreat and only then glue it. When the glue dries, it does not stick at all, conversely it's slides. Insert shoe in the outer sole, heat bottom side with hairdryer and press for a few seconds. Then you can easy heat side parts and tap with hammer. By this way it’s easy to make clean connection between upper and outer sole. http://i-fotki.info/...036284.jpg.html http://i-fotki.info/...036312.jpg.html After a few hours, you can remove shoe from the shoe last. It remains only to make insole. For insole I am using - 2mm thick polyurethane foam, 3mm wool interlayer and 3mm lining. http://i-fotki.info/...036371.jpg.html Glue the insole on its place and do all the same with the second shoe and enjoy your work. When placing this article on other sites link to this forum is required. Sorry for not exact terminology and not perfect english. Good luck!
 -
Hi there guys, Just had a quick question about folding suede for a nice edge. I've had a quick look around and I can't seem to find any information on better/proper ways to fold edges over before stitching a piece of leather on top. I've attached two images of some bracers I'm working on with a suede liner, now I wanted to fold to suede over on the edges and glue/stitch the leather on top for a nice clean edge but I'm having trouble folding it around the curves and corners. Is there a 'proper' way to cut/fold the suede to get it around those curves, as it doesn't seem to stretch a huge amount. The white card is the template for the leather to go on top. Thanks for your time! -David
-
Hi, I've asked this question in the paints/ dyes forum but haven't had any luck. I'm interested in painting designs on veg tanned leather for use in making baby moccasins. I haven't ordered the leather yet and so have not been able to experiment with dye or paint options. The dye would have to withstand the elements (outdoor shoe) but most importantly it needs to be non-toxic, should it end up in baby's mouth. Some dyes/ pigments I've been thinking about - henna, annatto, indigo, walnut, pecan, beats. Has anyone had experience using these, or similar? I'm especially keen on the idea of using indigo. Since I'm using veg tanned leather, does this mean it would not have to be heat set? Any suggestions for oil to use? Obviously, I still have a lot to learn about leather. I haven't seen any walnut dye available commercially; only recipes for making it yourself. I'd love to be able to find something in powder form- just add water. Perhaps I am totally naive about how involved the process will be- hoping to just paint it on with a brush like water colour. Angelus leather dye and paint seems to be quite commonly used (I love that you can use it in a refillable pen). I can't find any information on the ingredients though. Would love some advice.This is the leather I'm using (I assume it's unsealed) http://www.vegetable-tanned-leather.com/ecopell-kollektionen/ecopell-nappa and the suede http://www.vegetable-tanned-leather.com/ecopell-kollektionen/ecopell-velour and a pic of my moccasins (chrome tanned) Thank you!
-
I had gotten this saddle when I bought my horse there are no marks on it that I can find except the silver button I wanted to see what type of saddle and how much it might be worth. any info will help Thanks!