ChuckBurrows Report post Posted June 24, 2009 After a long spell of sickness I finally got back in the groove so to speak.......now I just have to catch up on a multitude of orders! I got me a Tom Stroh flintlock smoothbore ready to shoot and a flint Rocky Mtn rifle I'm building on, so after 36 years of packing the shooting bag and horn I made back in 1973, I figured it was time to retire the old ones and build me a new set.........first thing I've made myself in a number of years (sometimes being a full-time maker stinks ) The bag design, size, and decoration are based on the shot bags (one of the actual names used for such bags in the literature of the times - they were NOT called possibles bags - that was/is a different item all together!) seen in the artwork of Alfred J. Miller who went to the 1837 Mtn Man Rendezvous. The bag is 7 1/2" x 9 1/2" approximate........the body and strap are made from heavy brain tan that was not overly softened....the beadwork is typical Northern Plains style of the period - color choice and size was based on what was available per the trade lists and other documentation of the 1830's era.......bag is 7 1/2" x 91/2" approximate The horn is an original dated 1791 and later 1825 - I added the rawhide repairs to make it usable and added the beaded strap - it's on a separate strap, but buttons to the bag strap when I want to limit swing.... The back of the bag - the thong and buffalo bone toggle slip under the waist belt and keep the bag from swinging freely, yet allows the bag and horn to be easily removed without having to remove the belt - what documentation there is for the 1830 era has bags at waist height and not the real high under the arm carry - besides due to a shoulder injury the high carry just doesn't work for me..........You can also see the gusseted bottom which allows a bit more room for my big hands Inside - lined with bed/pillow ticking, also documented to time and place - it has a small inner pouch made from leather to hold greased patches (most likely use), balls, or whatever.... Some new and old accoutrements to go along with the new bag... Top row below the main horn - from left to right: Cap horn for when I carry my caplock rifle, shotgun, or C & B revolvers - made it in 1973.....originally a priming horn it turned a real nice mellow yellow naturally (I've primed from my main horn for years)..... Antelope horn powder measure re-enforced with buffalo rawhide - horn is the tip from the first Wyoming goat I ever took back in 1973. It tucks into a small pocket on the back of the front bag strap, but is attached to the horn in case I choose to carry teh horn without the bag or with another one. You can see it tucked into the "pouch" in the second pic from the top. "Medicine" Bottle aka what one carries his beaver scent in - re willow covered with deer rawhide Second Row Original Ely Bros cap box circa 1840 - I carry a couple of spare flints in it! An original powder/shot measurer circa 1840 - use it for my smoothbore Bottom Row Hand Forged turn screw out of a mid-1800's rake tine "Bag" knife - re-shaped from an original Shear Steel table knife made by Robert F. Mosley, Sheffield (circa 1850-60's? - the basic style is older though ) - the bone handle is reinforced with buffalo rawhide - this will eventually get mounted on the back of the bag with a rawhide sheath...... Hand Forged fire striker from a piece of old wagon spring found along the Oregon Trail near South Pass in 1974.... Anyway hope ya'll enjoy the look see................. Quote Share this post Link to post Share on other sites
manfrommuc Report post Posted June 24, 2009 Hello Chuck, now I'am searching for words.......GREAT......Items!! ok, for me here in Bavaria Germany most of the things, I only see in old films and then only from a distance..... Thanks for sharing... Servus Johann Quote Share this post Link to post Share on other sites
MADMAX22 Report post Posted June 24, 2009 (edited) That is some amazing stuff, both in the workmanship but also in the attention to detail for the time era and construction. How do you get that distressed look to the leather. Looks like it has been worn for years. Edited June 24, 2009 by MADMAX22 Quote Share this post Link to post Share on other sites
badger Report post Posted June 24, 2009 Chuck, Lovely, lovely work. Such an eye for historical accuracy. Beautiful. Badger Quote Share this post Link to post Share on other sites
David Report post Posted June 24, 2009 Chuck, That has to be one of the most amazing posts I've seen on this site. Beautiful workmanship. Can you please recommend a book to learn the beading that you do? I'm really considering building myself another flintlock, and would love to be able to decorate a shot bag for myself. Thanks again, David Theobald Quote Share this post Link to post Share on other sites
megabit Report post Posted June 24, 2009 WOW, I always love your stuff. Quote Share this post Link to post Share on other sites
TexasJack Report post Posted June 26, 2009 Really nice, Chuck! (I wouldn't expect anything less!!) Quote Share this post Link to post Share on other sites
DCKNIVES Report post Posted June 26, 2009 Glad to here your feeling better my friend.As usual your works still inspires.Dave Quote Share this post Link to post Share on other sites
Romey Report post Posted June 27, 2009 That is truelly incredible Chuck. Anyone can take new materials and make new and shiney leather work but its a true master that can take something new and make it look old. Incredible. As I have said .. Chuck Burrows: Worlds greatest unknown leathermaster Quote Share this post Link to post Share on other sites
MBOGO Report post Posted June 27, 2009 Beautiful work, inspirational, thank you for sharing. Quote Share this post Link to post Share on other sites
Wyvern Report post Posted June 27, 2009 OH MY, such awsome work! Please do tell us how you distress that leather like that! Quote Share this post Link to post Share on other sites
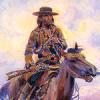
ChuckBurrows Report post Posted July 17, 2009 (edited) Sorry to be slow responding - got busy and lost track of where I posted this - too many forums too little time! Anyway glad ya'll enjoyed the view so to speak...........now to see if I can answer some questions... Can you please recommend a book to learn the beading that you do? Howdy David - I just got me another flint fowler and have a rifle in the works.... Books - there are in fact several and I recommend perusing as many as possible but if I had to nail it down I'd say my two favorites are: The Technique of North American Indian Beadwork by Monte Smith A Beadwork Companion: A Step by Step Illustrated Workbook for Beading Projects by Jean Heinbuch You can also garner some info on the www.nativetech.org site http://www.nativetech.org/glasbead/glasbead.html to look at a bunch of original work: http://anthro.amnh.org/anthropology/databa...orth_public.htm http://www.nmai.si.edu/searchcollections/home.aspx http://www.splendidheritage.com/nindex.html For fur trade era work I also recommend the pre-1850 beadwork article by Allen Chronister in the Book of Buckskinning VIII For this period I use 8/0 or 10/0 beads and like the French or German Old Time Color beads from Crazy Crow Please do tell us how you distress that leather like that! Howdy Wyvern - not trying to cop out but that's not easy to do since there is no simple 1,2,3 method or is it a quick one - it all depends on the materials used (type of leather , etc.) and the "look" you want........ On this particular piece I used a series of methods: 1) Actual smoking 2) Staining with coffee and black walnut dye 3) Rubbing and buffing to show wear 4) Greasing - using a mix of bear oil (pure lard is a good substitute) and beeswax 5) Hanging out in the weather to age naturally - hot sun, wind, rain all add to the patina....also rubbing it down with dirt.... 7) Bead aging - sorry but I have to consider that a proprietary method since it's taken considerable time and effort to develop it and I'm the only one doing it at least professionally that I know of..... Time wise this took several weeks to achieve the look I got.......basically you want to age it by using pretty much the same materials and methods that would naturally age it but you are accelerating the wear and tear....... Also some folks elsewhere wanted to see the bag I retired (it didn't stay retired long - someone made me an offer I couldn't refuse! it's on it's way to a new home with a few changes to make the strap fit) I've carried this rig from SE Alaska to Northern Mexico, and from the West Coast to Chadron, NE - like my ole bod it's got lots of mileage. The horn is buffalo with a deer antler and wood plug - it is courtesy of a friend from one of the first buffalo taken in the early 1970's with a muzzle loader. The bag body is covered with mink that I trapped - the body design was inspired by the Mariano Modena bag, which I got to see and measure firsthand in 1974. The beaded flap was based on an original 1850's era Crow Shot Bag. The interior has two compartments. The whole thing is lined with lightweight cow hide. The small beaded piece on the back strap is for holding a cleaning jag and the cap horn (the same one shown above) is attached via a forged iron hook on the horn and a D-Ring on the bag. The flap "tie" is human hair - back in the day a long haired buddy of mine and I used to bet hair locks in our shooting contests. The silver Kachina I picked up on my first trip through the Southwest in 1965. The toggle on the back is a piece of buffalo bone from the same buffalo as the horn. While most of it is based on original pieces it is my own style. The bead size, pattern, etc. are based on the historical knowledge base of the early 1970's - we've learned a bit more since then about details. Still it is a pretty good piece, but would be historically more appropriate for the late 1840's and early 1850's rather than the 1820's and 30's. and for a bit of humor - here is Himself with the bag on (though it can't be seen well) back in 1974 - 35 years younger and 60 pounds lighter (I'm 6' and weighed 180 at the time....)- pic was taken in the Big Horn Mtns outside of Buffalo, Wyoming at the 1974 NMLRA western rendezvous... Edited July 17, 2009 by ChuckBurrows Quote Share this post Link to post Share on other sites
SteveJ Report post Posted July 21, 2009 Chuck my man , you are my hero. That's the type of work I aspire to. I love the toggle idea that tucks under your belt and holds the bag against the body. So simple , I love it. Your bags and accoutrements are outstanding. So , you actually got to examine Mariano Modena's pouch? What a treat ! Thanks for sharing sir , and enjoy the new flinters Quote Share this post Link to post Share on other sites
David Report post Posted July 21, 2009 (edited) Chuck, Thanks so much for the great information and please don't forget to post pictures of those new rifles when you have them finished. Or better yet, some in-progress pictures. Best to you David Theobald Edited July 21, 2009 by David Quote Share this post Link to post Share on other sites
ChuckBurrows Report post Posted July 22, 2009 Steve - thank you for your generous words and if I can offer any advice feel free to ask. And yes examining old originals is a special joy........ David - You're welcome and I for one look forward to seeing some beadwork. BTW - the German Tan sold by Crazy Crow is an excellent substitute for real braintan and iseconds are currently on sale at a much reduced price, especially if you have a business license and can thus order whole sale. I use a lot of it for cost effectiveness for thos customers who can't/won't pay the price for real braintan, but then again there is nothing exactly like good real braintan. As for the rifle build - it will be a while since I need to get caught up on the bills. I do have a 45 caliber percussion trade style rifle that I'm planning on gussying up Indian style with rawhide repairs, tacks, etc and then age the whole thing. I also plan on doing something similar to my smooth bores as well but probably not to the same degree as the trade rifle. Right now I'm catching up on past due orders, but will plan on taking some ITW pics........ Quote Share this post Link to post Share on other sites