276ccm Report post Posted July 2, 2008 Started on a new seat yesterday... :-) I`m not quite sure where I`m going or what I will do with it next.. but I`m thinking to cut the leather at the bottom of the seatpan, and use lacing to add it to the bottom part.. When lacing, should the upper and lower part overlap each other or could it work just as well to put them side by side..? if you know what I mean :-) Quote Share this post Link to post Share on other sites
Gremlin Report post Posted July 2, 2008 I overlap the top over the bottom. Be sure to tamp the lace as you work your way around the seat. Quote Share this post Link to post Share on other sites
Scary Leatherworks Report post Posted July 2, 2008 I like the look of that seat, just plain and smooth. thought about doing one like it but couldn't visualize the end result. although from your post it sounds like you are not done with the seat and it won't be staying like that Scott Quote Share this post Link to post Share on other sites
276ccm Report post Posted July 2, 2008 Gremlin, I`m not sure what "tamp" means.. My english isn´t aslways the best when it comes to "special" words.. :-) But I guess "tamp" is to tighten it hard? or was it ment to be "damp"? Murse, thanks :-) I like it clean as well, but this is just made for practising, so I guess it wont stay this clean.. I hope it´s going to be cool at the end as well :-) Quote Share this post Link to post Share on other sites
Gremlin Report post Posted July 2, 2008 Definition of tamp Use a mallet and tamp the lace down flat. Quote Share this post Link to post Share on other sites
276ccm Report post Posted July 3, 2008 Definition of tampUse a mallet and tamp the lace down flat. Gremlin, I got this one.. which is already flat.. and very strong :-) Is this one supposed to be tamped as well, even if it is flat? Thanks for your advices! .-) Quote Share this post Link to post Share on other sites
Gremlin Report post Posted July 3, 2008 On anything you lace, it should be tamped. It sets the lace in place. Notice that when you lace something up, the weaving of the lace in, out, thru, over, etc, it creates hills and valleys. Tamping smooths and levels it out as well as setting the lace. Try it on a piece of scrap. Punch a dozen holes in a couple pieces of leather and lace them together using the lace pattern you are going to on the seat. Then tamp it down and note the difference. If your plan is to use a simple "X" style stitch, it won't make much difference but anything else will show. Good luck. The seat is coming along nicely. I'd be a bit concerned about that parallel (spelling?) scar on the nose of the seat tho. Adds an interesting chacteristic as well as natural charm to the seat but be sure the leather isn't weaker there. Quote Share this post Link to post Share on other sites
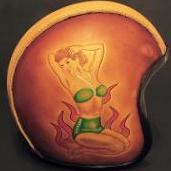
276ccm Report post Posted July 3, 2008 (edited) Thanks a lot :-) I`ll do a test piece and check it out! Preciate your help :-) I checked the scars, and it looks ok.. I dont know how they got there, but.. there they are :-) This is what I have done so far :-) Edited July 3, 2008 by 276ccm Quote Share this post Link to post Share on other sites
276ccm Report post Posted July 5, 2008 Almost done.. just need some polishing :-) Backside... Quote Share this post Link to post Share on other sites