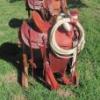
Josh Ashman Report post Posted January 25, 2013 A year and a half after saddle #2 was finished I started #3, here are a few progress pics. I only work leather in the early mornings before my "real" job and a little on the weekends so this represents about 2 weeks worth of work. The saddle is for my wife and I'm hoping to be done by Valentines day, we'll see how that works out. Anyway, it's on a Bowden tree with 14/16 HO. I'll post some more pics when it gets finished. Hope everybody has a good weekend! Josh Quote Share this post Link to post Share on other sites
EquusCustomLeathers Report post Posted January 25, 2013 Big Valentine points for you! Looks great so far Quote Share this post Link to post Share on other sites
Josh Ashman Report post Posted January 25, 2013 Thanks! Quote Share this post Link to post Share on other sites
BondoBobCustomSaddles Report post Posted January 25, 2013 Hey Josh, looks like you and I had the same mentors. Looks very much like it may have been sitting on my bench not yours!! I am sure you wife will be happy. Keep up the good work. Bob Quote Share this post Link to post Share on other sites
Josh Ashman Report post Posted January 25, 2013 Thanks Bob! I appreciate the kind words. Quote Share this post Link to post Share on other sites
keplerts Report post Posted January 25, 2013 Wow, very nice! Looks like you are doing a great job. The wife will be very happy. I'm new to the saddle making scene and was wondering if that is a flate plate rigging? I like the hardware, where did you get that? Also, how did you align the rigging plates? Did you use the Stohlman rigging gage. I don't have a gage so I've been dragging my feet to starting a saddle of my own. Again, it is really looking nice and I can't wait to see how you progress. Sorry for so many questions. Tom Quote Share this post Link to post Share on other sites
Josh Ashman Report post Posted January 28, 2013 Thanks Tom, That is a flate plate rigging and the hardware is from Weaver, it's the Jerimiah Watt brand. I think you can also get it direct from him at his website www.ranch2arena.com . I pretty much follow the Stohlman books but I haven't built his rigging gauge. I use a combination of strings, tapes and levels along with my "good eye". The Dusty Johnson DVD shows a fairly simple jig that looks like it would be easy to make and use although I haven't made me one yet. Best regards, Josh Quote Share this post Link to post Share on other sites
keplerts Report post Posted January 30, 2013 Josh, Thanks for the info. I did find the hardware at Weaver's. I have the Stohlman books and think the rigging gauge is quite the contraption. I saw the rigging gauge in Dusty's video as well. I don't have his book and was wondering if he goes into any detail of making the gauge or how to use it. Do you have his book and does he explain the gauge? I am repairing an old saddle and want to replace the rigging but I'm afraid I won't get the in equal positions when I install them. It just seems as there should be and easy method to line them up. I can't picture the "strings, tapes, and levels" method in my head. Thanks, Tom Quote Share this post Link to post Share on other sites
Goldshot Ron Report post Posted January 30, 2013 Josh, Your work looks good. I like your stitching and the fork cover looks good. One suggestion on your rigging would be to bring the leather up to completely cover the front of the bars. This allows you to attach the rigging with the rosette and front jockey nails, and you won't have the low spot that you have at the upper tip of the bars at the gullet. I, probably like you, have used the Stohlman's book extensively. I made the rigging jig, and use it when first setting my rigging plates. However, I end up using the old string and nail method for checking repairs to the rigging rings and usually during construction just to make sure that I'm keeping things even. The nail and string is just so much easier than the rigging jig, and doesn't get in the way when working. Keep up the good work, Ron Quote Share this post Link to post Share on other sites
Goldshot Ron Report post Posted January 30, 2013 (edited) Josh, Hopefully this photo shows you what I'm talking about in my first post. This photo is of Al Gould showing how to install a flatplate rigging during the Wickenburg Leather show. Ron Edited January 30, 2013 by Goldshot Ron Quote Share this post Link to post Share on other sites
Josh Ashman Report post Posted January 30, 2013 Thanks Ron, I see what you mean on the rigging coming up to cover the front of the bars. That's an excellent idea, I'll have to give it a try on #4. I appreciate you taking the time to give me the info and the picture! Tom, I do have the book that came with the Dusty video but I haven't looked at it or the video for quite some time. As best as I can recall it was a piece of plexiglass with a wood frame on two sides, think speed square with a window. The idea for using it was to set one side of the rigging then place the jig frame edges on the tip and bottom edge of the bar then mark whatever reference lines you wanted with a greese pencil on the plexiglass. Then you go to the other side, flip the jig around, place it on the bar the same way and use the reference marks to ensure the rigging is equal. Here's how I set my rigging plates, I'm not sying it's the right or best way, it's just the way I figured out to do it. It's also probably a good idea to keep in mind this is based on me being in the middle of my 3rd saddle, I've done similar measurements on 2 other saddles that I repaired/replaced the riggins on. 1st - I tack the rigging on both sides, this is the part where I use my "good eye". 2nd - I move my work stand up against my bench with the saddle facing and square with the bench. 3rd - I measure from a reference point (leading edge, center back edge, pick your fav) on both sides of the rigging to the front of my bench (I hold a 4' level along the front edge of my bench top and a shelf that runs under it, you could also use a wall or any other flat surface). 4th - measure from a reference point to the floor on both sides. 5th - I tack a nail dead center on top of the horn (I've also placed the nail on the back side of the fork just above the hand hole, just make sure it's centered) loop a string over the nail ans pull down each side to a reference point. Once I've made these measurements I'll adjust one side or the other until they are all close enough that I'm OK with them. Anyway, maybe that'll be helpful or maybe somebody else will chime in with a better way. I can tell you I've been riding the 2nd saddle I made for about a year and half and haven't noticed any issues with the rigging being out of balance. Best regards, Josh Quote Share this post Link to post Share on other sites
Goldshot Ron Report post Posted January 30, 2013 Josh, When I mentioned the nail and string method, I assumed that everyone understood what I meant. Before you start putting any leather on your tree, first mark the centerline of the tree. Set your tree up against a straight level wall (behind your workbench, table against a wall, etc.). with a long side of the bar against the wall and the tree setting flat on the table. Take a tri-square or a leather square and hold it on the wall with the other leg extending onto the cantle and make a mark on the cantle (say at 7 inches). Do the same on the horn. Flip the tree around to the opposite side and make your marks at the same measurement (say 7 inches). Now, determine the midpoint of these marks, and you will have the center of the cantle and the center of the horn. Of course, you should always check your work, and the horn is the easiest by just finding it's center by using a compass. After finding the center of the cantle, tack a nail into the centerline mark, and you can use this mark to determine locating your rigging by using a string looped around the nail and pulling it down to a reference point on your rigging (say the corner of the rigging plate). A good example of how to do this is on Bill Gomer's saddle tapes. This way you can put your work anywhere and still have a reference point on the saddle that doesn't change. Ron Quote Share this post Link to post Share on other sites
Josh Ashman Report post Posted January 30, 2013 Thanks for your description on how to set the string Ron. I'll have to try pulling from the center of the cantle as opposed from the center of the horn and see how they come out. Best regards, Josh Quote Share this post Link to post Share on other sites
Josh Ashman Report post Posted February 13, 2013 Well, it's not 100% done but it's very close. The wife is very pleased and can't wait to put it on a horse. Here are some pictures of how it looks now and a few i took along the way. I appreciate any comments and I'll be the first to note my cantle binding is horrible. Bad doesn't even come close and I know it, I'm not sure how to fix it on the next one but I need to figure it out. Other than that I'm fairly happy with it. Thanks for looking, Josh Quote Share this post Link to post Share on other sites
bison Report post Posted February 13, 2013 Nice looking rig! I like the rough out and the tooling. After five years of leather work I'm just about ready to move into making my first saddle. I appreciate you putting your photos up here and getting feedback from the experts. It helps me understand the process a bit more. Looking forward to seeing your next one. Dave Quote Share this post Link to post Share on other sites
JinxedDream Report post Posted February 13, 2013 Looks really great! I like the fact that its tooled but looks very practical at the same time. Quote Share this post Link to post Share on other sites
Josh Ashman Report post Posted February 14, 2013 Thanks Dave & Jinxed! I really like the combination of rough out and smooth out too. The border stamp pattern turned out really nice and it all seems to flow together. I'm pretty pleased with that aspect of this saddle. Bob (BondoBobCustomSaddles) took the time to give me a few pointers in a private message, which was really nice of him and I'll share one of the things he brought up. One of things I didn't do very well was the blocking on the skirts. I'm sure the experianced makers all see it straight away but the novices like me might not be picking it up. It's easy to see that the back jockys don't sit down on the skirts like they should. It's not so much that they aren't tight but that my blocking wasn't good enough. I did block around the back of the bars and even tacked ths skirts into the edges of the bars while it dried but I didn't go far enough and once the intial blocking was done and the skirts had shrunk a bit I didn't force them back to where the blocked edge matched the skirt. Add that to the previously mentioned horrible cantle binding and this saddle doesn't look near as good as it should from the backside. Neither of these is a "fatal" flaw or has any "structural" impact in my very humble opinion but they certainly do detract alot. Anyway, I shared that so maybe others could avoid these problems. If you go look in the "Makers" page cac just posted some pictures of an awesome roughout association saddle where he nailed the jocky/skirt fit up and cantle binding. Best regards, Josh Quote Share this post Link to post Share on other sites
BondoBobCustomSaddles Report post Posted February 15, 2013 Josh, the note I shared with you was strictly to point out a couple of points that would take your work to the next level. It must be noted that you already do a lot of things exceptionally well. If you were my student, you would get very high marks for balance of design, semetry of components and one of my pet items, edging. Nothing says "professional" like good clean, smooth, rounded and shiny edges of all the components. Horn, skirts, jockeys, rigging plates and so on. It's the perfection in the details that separates the good from the best. Keep up the good work! Bob Quote Share this post Link to post Share on other sites
Josh Ashman Report post Posted February 15, 2013 Thanks again Bob, I really appreciate that you're taking the time to share your thoughts. Quote Share this post Link to post Share on other sites
CWR Report post Posted February 19, 2013 Josh you did a good job on that saddle. I hope to finish up my third one in the next couple of weeks. I say that to let you know that I am far from being an expert. If I were going to change anything on your saddle, I would drop the bottom line of the jockeys down so that they would cover the rigging. This would also make you need to drop the line on your front seat jockey. This was pointed out to me on my second one and so I more aware of it now. CW Quote Share this post Link to post Share on other sites
Goldshot Ron Report post Posted February 19, 2013 Josh, Your saddle came out well. I like how your border drops down from the fork even with your rigging border. That shows some planning on your part, and it works well. I agree with CW about your jockeys being a little too high. But, that is not often realized until it's too late. I can't count how many times that I have remade rear jockeys because the original ones just didn't "cut the muster". The shape of your seat looks good; hey, this is a great looking saddle. Ron Quote Share this post Link to post Share on other sites
Josh Ashman Report post Posted February 20, 2013 Thanks Ron & CW! I appreciate the compliments and the good feedback. Best regards, Josh Quote Share this post Link to post Share on other sites
Aurelie Report post Posted March 2, 2013 Hey Josh i find that you're hard on yourself :D this saddle is good and it 's only your 3d one! ok stitching on the back cantle is not "nice" from the back but to me (at least) to do a neat and straight stitching on a straight cantle is one of the HARDEST thing to do on a saddle....(and i am at my 5th saddle and still have A LOT to figure out about a lot of things...) Have a look underneath some "cheyenne rolls" and tell me if all of them are as nice and straight as on the top side..... see what i mean? you can make "mistakes" on a cheyenne roll stitching and not showing it....but on a straight cantle = no way of hiding it! if you have a look there : http://leatherworker.net/forum/index.php?showtopic=45095&hl=saddles you will see that my cantles are not so neat (along with a lot of other flaws i am working on improving :D ) and here a pic of the back of my only straight cantle ( i am not in a hurry to make another one...but will have to if i want to improve it) so keep going, you're doing really fine Quote Share this post Link to post Share on other sites
Josh Ashman Report post Posted March 5, 2013 Thanks Aurelie! I appreciate the kind words. I may have to build a few with cheyenne rolls if I can't get a better handle on my binder stitching ! BTW, I really enjoyed watching your progress on the saddle pictured above! I finally completely finished this saddle for my wife. If the weather holds up we'll go out for a ride after work and see how it fits on a horse. Here's a picture of the complete package. I'll put a bunch more in a seperate post in the "show off" forum. Thanks for looking and thanks to everybody for the helpful advise. Best regards, Josh Quote Share this post Link to post Share on other sites
Aurelie Report post Posted March 5, 2013 looks good keep going Josh! Quote Share this post Link to post Share on other sites