MonicaJacobson Report post Posted January 27, 2015 Well... Mine is as done as it's going to get this month, though I wouldn't say it's *finished*, exactly. I should have resolened the inside - I did Aussie it, but I guess that wasn't enough protection - I got black smears all over it. Darn it. So. I'm considering sunbursting the inside with the airbrush my husband bought yesterday. Quote Share this post Link to post Share on other sites
rawcustom Report post Posted January 27, 2015 Wow! Way to set the bar on carving Monica! The contrasting white thread is a great touch. Quote Share this post Link to post Share on other sites
Wraith Report post Posted January 27, 2015 Wow, Monica that is amazing!! What did you use to block the Dragon? I can't get mine to block that well. Brian Quote Share this post Link to post Share on other sites
MonicaJacobson Report post Posted January 28, 2015 Thanks guys! I'd never tried a sunburst before, so that was fun. Brian, I used only one coat of resolene (with a paintbrush over just the dragon), and actually went over it afterwards and shaded it with yellow and a light coat of red. I don't actually have any resist, but if I were serious about resisting, I would do 2-3 coats of resolene, I guess. If I understood what you were asking.. Quote Share this post Link to post Share on other sites
Wraith Report post Posted January 28, 2015 Thanks Monica. That was what I was asking about. I'll have to give that a try and see how it works. Brian Quote Share this post Link to post Share on other sites
thefanninator Report post Posted January 28, 2015 Really cool piece Monica. Great colors. Quote Share this post Link to post Share on other sites
TRHLeather Report post Posted January 28, 2015 Well... Mine is as done as it's going to get this month, though I wouldn't say it's *finished*, exactly. I should have resolened the inside - I did Aussie it, but I guess that wasn't enough protection - I got black smears all over it. Darn it. So. I'm considering sunbursting the inside with the airbrush my husband bought yesterday. _MG_2971.jpg_MG_2964.jpg_MG_2977.jpg_MG_2979.jpg_MG_2981.jpg_MG_2982.jpg I really love that dragon pattern. I did something similar as one of my first carvings but it is nowhere near as amazing as that. Did you stamp the scales or are they all hand cut? The dye work is fantastic. Overall I love it! Quote Share this post Link to post Share on other sites
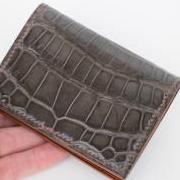
Charliewz Report post Posted January 28, 2015 Not much, but got it done. Only 3 oz. I had was some faux print that has been laying around here a long time. Quote Share this post Link to post Share on other sites
takitty007 Report post Posted January 28, 2015 This was my first wallet, it was a lot of fun to make. Thank you! Quote Share this post Link to post Share on other sites
MonicaJacobson Report post Posted January 28, 2015 Thanks, Chris and Tom - I cut them individually - it took a long time. I'm not sure how often I'd do it. Charlie, the croc print looks classy on the inside of yours. Takitty, you're pictures are too small, we can't see the details at all. Quote Share this post Link to post Share on other sites
MonicaJacobson Report post Posted January 28, 2015 By the way, TRH, I meant to comment on your sunburst purple wallet - super cool. We took a leaf from your book and went over the whole smudged inside of mine last night. I also like that you made the inside large piece black and pigskin. Gave some variation in texture. Here's the insides of mine after the sunburst job (compliments of luthier husband who has been dying to sunburst something). It's weirdly textured because of the Aussie we dyed over. I know... silly us.... but I kind of like the texture, and the dye isn't coming off. Quote Share this post Link to post Share on other sites
rosiart Report post Posted January 28, 2015 It's really hard to follow Monica on this one, but here goes. I hadn't signed up for these as I was unsure that I would be able to complete the project given that I was away for most of this month but since I got one finished before the deadline I thought that I would post it. The outer is from Tandy, one of the designer sheets they had on sale before Christmas, so I think it is cow. I made a mistake with the inner goatskin leather that I used. It's about the right weight but is too squishy, it should have been a firmer temper. It was a pain to sew when I got to multiple layers. I added the flap for security, although given the squishiness of the interior leather, I don't think anything would fall out. Monica, I love your wallet and I think the new interior colours are gorgeous. Your scales are incredible! Quote Share this post Link to post Share on other sites
thefanninator Report post Posted January 28, 2015 Monica the inside looks great. Nice job Rosiart. I think the goatskin looks great and nice touch with the snaps. Quote Share this post Link to post Share on other sites
MonicaJacobson Report post Posted January 28, 2015 Nice, Rosemary, I love the outside textured look. Also, the wrapover with snaps. Your interior is way better than mine. In fact, I'm just learning interiors, so it's nice seeing what everybody has done with them. Quote Share this post Link to post Share on other sites
TheLoudOne Report post Posted January 28, 2015 Jumped in yesterday and finished today. Only wish I had had more time to spend on it. Quote Share this post Link to post Share on other sites
texback Report post Posted January 28, 2015 (edited) Monica your wallet is beautiful both inside and out. Something you might try in the future if you have a small smear or drop of dye in an unwanted place is deglazer. I've had small drops or my hand "wandered" a little out of bounds when putting dye on backgrounds or letters and immediately cleaned it right off with a rag or qtip with a little deglazer on it. So far has worked well for me and you can't tell there was even a problem. Edited January 28, 2015 by texback Quote Share this post Link to post Share on other sites
rosiart Report post Posted January 28, 2015 Monica the inside looks great. Nice job Rosiart. I think the goatskin looks great and nice touch with the snaps. Thanks so much. I'd like to thank you for taking this on. I learned a lot from the process, and it wasn't something I would normally do. Also thanks to all the others for sharing their wallets. It's been great to see all the different takes on the same basic pattern and really showcases the amazing versatility of this group. Quote Share this post Link to post Share on other sites
rosiart Report post Posted January 28, 2015 Nice, Rosemary, I love the outside textured look. Also, the wrapover with snaps. Your interior is way better than mine. In fact, I'm just learning interiors, so it's nice seeing what everybody has done with them. Thanks Monica. I bought that piece just 'cause I liked it. I was glad to have a project to use it for :-) Interiors sure are a time consuming thing. I think if I was doing it again, I would do a binding on the edge of the card pocket section, like TheLoud One did on his. Quote Share this post Link to post Share on other sites
TheLoudOne Report post Posted January 29, 2015 Thanks Monica. I bought that piece just 'cause I liked it. I was glad to have a project to use it for :-) Interiors sure are a time consuming thing. I think if I was doing it again, I would do a binding on the edge of the card pocket section, like TheLoud One did on his. Hi Rose, nice wallet! I also used lightweight leather inside. It is so soft and stretchy I was worried about it tearing so I made a binding to stiffen and strengthen it. I also skived and folded the top leading edge. Quote Share this post Link to post Share on other sites
MonicaJacobson Report post Posted January 29, 2015 TheLoudOne - I wish I could work that fast. Nice work, especially in that limited time. texback - thanks for the tip! That's a great idea, and will probably come in on a regular basis. Quote Share this post Link to post Share on other sites
rosiart Report post Posted January 29, 2015 Hi Rose, nice wallet! I also used lightweight leather inside. It is so soft and stretchy I was worried about it tearing so I made a binding to stiffen and strengthen it. I also skived and folded the top leading edge. Thanks. I am not so worried about the tearing( in fact it never occurred to me ), but given it is machine stitched, I think the stitching line will hold. I just didn't really like the look of the edges after they were stitched and edgepainted. I like the finished look of yours. My leather was so stretchy I couldn't do any skiving without making a horrible mess so I didn't do any. Kind of figured thick was better than messy since that was all I was accomplishing. Quote Share this post Link to post Share on other sites
srtboise Report post Posted January 29, 2015 (edited) impressive work everyone is submitting. i can only strive to be as good. i have mine 95% done but my day job has been nuts this week and i'm not sure i will be able to get it done this month steve Edited January 29, 2015 by srtboise Quote Share this post Link to post Share on other sites
thefanninator Report post Posted January 29, 2015 (edited) I cleaned up my edges and painted them, not perfect but I'm ready to call it finished. This is about 4-5 coats of Fenice (Tandy Pro Edge Paint for those of you who may not know) and sanded with 200, 400 & 800 grit, then paraffin wax and burnished with canvas. Edited January 29, 2015 by thefanninator Quote Share this post Link to post Share on other sites
rawcustom Report post Posted January 29, 2015 That's a nice edge right there. Quote Share this post Link to post Share on other sites
MonicaJacobson Report post Posted January 29, 2015 Cool, Chris. Looks smooth. Quote Share this post Link to post Share on other sites