deloeracustoms Report post Posted June 12, 2015 (edited) Ok, so here goes... first attempt at an "Avenger" style holster. I don't think I've got my patterning down just right yet... The reinforcement/belt loop piece keeps wanting to occupy the same real estate as the stitching that follows the form of the pistol. This wouldn't be a problem except for the reinforcement/belt loop piece obviously has to be sewn on before the holster is stitched together... and it's a real headache trying to guestimate where the belt loop should be so it's not in the way when I go to do the final stitching (suggestions??) Any suggestions, thoughts, criticisms, experience, suggestions, or suggestions (did I mention suggestions?) you can offer would be greatly appreciated. Thanks in advance. Edited June 12, 2015 by deloeracustoms Quote Share this post Link to post Share on other sites
JLSleather Report post Posted June 12, 2015 (edited) How are you laying out the pattern? If you're tracing the gun, then just keep your "belt loop piece" inside the lines of the gun. The stitch line would of course (unavoidably) be outside of that. OH - - and I'd round that corner a bit (above your rear slot, under the grip) so it's not quite so sharp. But realistically, I don't think you're doing as badly as you seem to think ... Edited June 12, 2015 by JLSleather Quote Share this post Link to post Share on other sites
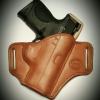
deloeracustoms Report post Posted June 13, 2015 (edited) Maybe I should have clarified...My first pattern used a narrower "belt loop piece". I always layout my patterns on cardstock, and the "belt loop piece" didn't overlap the stitch lines... all was well. However once I wet molded, the "belt loop piece" magically shifted. When I say that, I mean it seems crooked. I'm assuming it's got something to do with the way the leather stretches? I'll post a picture of what I'm talking about. The first pictures I uploaded weren't actually the "first" shot at this style...Anyway, the reason the "belt loop piece" overlapped the stitch lines on the 2nd attempt was because I was trying to make up for the "magic shifting" that takes place during wet molding.Clear as mud? Edited June 13, 2015 by deloeracustoms Quote Share this post Link to post Share on other sites
JLSleather Report post Posted June 13, 2015 That looks better. Not sure why you felt the need to pull that back (toward the bottom of the weapon). I like as much "bearing surface" as I can get, but in the end you can only keep just so much. And the only part that "counts" is the part that rides the belt. Beyond that, I would angle your stitch lines at the "belt loop piece". Angle it roughly the way you want the weapon to ride. It not only lays better in there, but also allows you a bit more "bearing surface" on the belt without widening the loop. Quote Share this post Link to post Share on other sites
deloeracustoms Report post Posted June 13, 2015 You like the second uploaded pic better? I thought the first much better... lol to each his own. Not sure what you mean about "to pull that back (toward the bottom of the weapon)"... could you elaborate? I like the idea about angling the stitching... definitely going to incorporate that into the revised design! Quote Share this post Link to post Share on other sites
JLSleather Report post Posted June 13, 2015 I thought we were talking about the belt loop -- or what I sometimes call the reinforcement (and sometimes "thingy"). In that case, the last pic is "better". If the belt is brown, then putting the stitch lines in (red) at the same angle is double benefit. It "locks" teh belt much more securely -- keeping the holster from "rocking" on the belt. Sucks to go to pull the gun, and have the holster move ... Plus, those math guys will tell you that angling the lines (especially the top one) allows more surface contact between the holster and the belt. LIke, say your holster is angled at 20° forward. Then the blue line is your original stitch line. Say that's 1.25" wide. Then the red, angled stitch line (which rides the belt) will be about 1.33" long (something about a cosine of 20° angles -- you'd have to ask a math person). Basically, that 20° line will be 6.5% longer than your "straight" measurment, without widening the piece. Doesn't sound like much... but a 1.25" strip would "grow" the line by nearly 3/32", or in other words, the safely the amount you're going to edge and burnish (in english - what was the starting size would now be the FINISHED size). Now, where did my life go? Not that I mind takin' a minute, but seems like I should be sitting with a couple girls while they discuss who's payin' fer breakfast .... Quote Share this post Link to post Share on other sites
deloeracustoms Report post Posted June 13, 2015 Are you a jean-e-us or sumfin?? No really, that's brilliant. Makes total sense... once I ignored that part about the cosine and focused on the pictures... lol. Can't begin to thank you enough for your time. I'll definitely update the thread once I've had time to make another (with those changes of course) Quote Share this post Link to post Share on other sites
Jon P Report post Posted June 16, 2015 Way better that my first attempt at an avenger, right JLS?? lol @deloera Listen and take notes for JLS. He's the man that can make you see things from a whole new perspective ..... Or pester him until he offers the pattern for the gun your working with! Quote Share this post Link to post Share on other sites
JLSleather Report post Posted June 16, 2015 Yeah, Jon talkin' bout "pickin my brain".. Ran RIGHT PAST that "enter at yer own risk" sign on my cap .... Quote Share this post Link to post Share on other sites
deloeracustoms Report post Posted June 20, 2015 @JLS— after our conversation the other night, I've probably drawn and re-drawn the entire design 10x. I think it's exactly how I want it just gotta sell the other 3 I made in the process so I can buy some more leather... lol @Jon— he's been a great help so far. Obviously knows what he's talking about! Quote Share this post Link to post Share on other sites
JLSleather Report post Posted June 20, 2015 I've had a few in the "needs improvement" bin myself. Well, that may be too fancy - I just call it trash can. Quote Share this post Link to post Share on other sites
deloeracustoms Report post Posted June 20, 2015 File 13... Quote Share this post Link to post Share on other sites