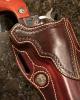
tclaridge Report post Posted January 8, 2016 Here is my first attempt at a fixed-blade sheath, for my father-in-law's hunting knife. The sharp point had poked through his original Buck sheath, so I thought one with a full welt ought to hold up better. I don't normally drill my stitching holes, but needed to in this case as it was about 5/8" thick. Any tips on keeping the back side holes straight when drilling through this much leather? There is a reason I didn't include a photo of the back! Thanks, Tanner Quote Share this post Link to post Share on other sites
Rohn Report post Posted January 8, 2016 That is an excellent job. Nice sheath, you can be proud. Quote Share this post Link to post Share on other sites
bloggs Report post Posted January 8, 2016 I haven't had the greatest luck with drilling well either, but I use a drill press with a fence and just try to make sure everything is getting pushed up against it. For curved edges, I turned a small cylinder that sits in the center hole of the drill press table and use that as more of a single point fence, if that makes sense. Quote Share this post Link to post Share on other sites
Peter Darby Report post Posted January 8, 2016 I also use a drill press. I make sure I elevate the stitching line with some leather or wood so it is perpendicular to the drill.<br /> Quote Share this post Link to post Share on other sites
tclaridge Report post Posted January 8, 2016 That is an excellent job. Nice sheath, you can be proud. Thank you, I appreciate that! Quote Share this post Link to post Share on other sites
stu925 Report post Posted January 9, 2016 (edited) I still struggle with stitching thick pieces like that. I used diamond hole chisels from Tandy but they won't go through that much leather so I have to finish the holes with an awl which is tedious but necessary. I have to really slow down and focus on this step to keep the awl straight so my stitching looks right. For really thick pieces I lay the piece on a piece of scrap leather on my cutting board and then rap the awl with a deadblow so that the awl goes straight through and doesn't pull the back side when it does. This method works well but you really have to watch that awl to make sure it's straight. I almost always end up waffling a stitch or two. By the way the sheath looks great. Stu Edited January 9, 2016 by stu925 Quote Share this post Link to post Share on other sites
retiredff Report post Posted January 11, 2016 I have the same issue with thick leather, so I use a stitching wheel to mark the holes then put the awl blade in my drill press with a fence. The blade is set at about a 45 deg. angle, this works great for me. Quote Share this post Link to post Share on other sites
tclaridge Report post Posted January 11, 2016 Thanks- that sounds like it's worth a try! The only awl blade I have is a 1-3/4" harness blade from Springfield Leather-- do you use something similar? What do you recommend? Quote Share this post Link to post Share on other sites
retiredff Report post Posted January 11, 2016 If that is what you usually use it should work fine. The drill press keeps the holes perfectly straight. Quote Share this post Link to post Share on other sites
Wicked Welts Report post Posted January 13, 2016 (edited) I like it, nice job! I often struggle with all the thickness near the top so I'm trying different designs to eliminate any layers that stack up beyond what is needed for the sheath body (front cover, welt and back cover). Which brings me to a question about yours - could you give me a break-down of your leather stack? You did such a nice job finishing the edges it's hard to be sure but I think I see this - 1 - Front cover 2 - Liner for frt cover (to conceal rear of strap fastener?) or first welt layer? 3 - Welt 4 - Welt or rear spacer? 5 - Back cover 6 - Front of belt loop (with strap end tucked in?) 7 - Rear of belt loop I'm probably wrong about some of that but it looks awful thick to deal with using regular stab n' steer stitching. Heck, I struggle with just the three front/welt/back layers! Edited January 13, 2016 by Wicked Welts Quote Share this post Link to post Share on other sites
BigRiverLeather Report post Posted February 3, 2016 (edited) Beautiful. That should last him forever and a day. I'm curious, how/where did you attach the retention strap on the back side? It appears it's sandwiched between 2 of the back pieces but from the side angle it looks flawless. Edited February 3, 2016 by BigRiverLeather Quote Share this post Link to post Share on other sites
tclaridge Report post Posted February 3, 2016 Beautiful. That should last him forever and a day. I'm curious, how/where did you attach the retention strap on the back side? It appears it's sandwiched between 2 of the back pieces but from the side angle it looks flawless. You are correct-- it is sandwiched between those layers. It was skived down quite thin, glued in the proper spot, then fastened with one rivet through the back layer (pretty much in line with where the snap is on the front piece). Have a good one! Quote Share this post Link to post Share on other sites
Dwight Report post Posted February 4, 2016 Did you ever think about buying actual sewing needles for a leather sewing machine? I have needles for my Tippmann, . . . I sew through 3/4 inch leather with them, . . . never a problem. Using a drill press with them would be not really different from my machine. And I don't mean to sound mean or anything, . . . but I do not think I've ever seen a knife sheath that thick, . . . May God bless, Dwight Quote Share this post Link to post Share on other sites