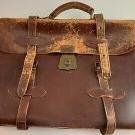
olenawills Report post Posted May 25, 2016 Another handbag just finished. This is my first serious work, all leather and hand stitched. Took me about a month (evenings and weekends) to finish it. Birthday gift for my sister. Red cows leather, black lamb lining, ecru linen thread. Some mistakes are learned. Going to re-make it later for myself. Quote Share this post Link to post Share on other sites
particle Report post Posted May 25, 2016 Wow! I'm certainly impressed. Very nice work! Quote Share this post Link to post Share on other sites
dirtclod Report post Posted May 25, 2016 Really nice work ! Your sister is going to have a very nice birthday ! Quote Share this post Link to post Share on other sites
LederRudi Report post Posted May 25, 2016 Great design, professionally executed, reminds me of some handbags I've seen in Milan recently which cost about a thousend bucks each. You've put many hours and very much attention to detail into the production of your sister's bag, as one - in my experience - only does when it's about a present for a loved one. Quote Share this post Link to post Share on other sites
olenawills Report post Posted May 25, 2016 Thank you very much. Every comment is appreciated. Quote Share this post Link to post Share on other sites
Frederiek Report post Posted May 26, 2016 Brilliant! Very cool design. I'm not going to show this to my own sister Quote Share this post Link to post Share on other sites
olenawills Report post Posted May 26, 2016 Bag is somewhere in London now. My sister have already left with it. Very happy person. When she came to visit, she brought 3 rolls of yellow aluminum oxide sandpaper in her suitcase for me . I couldn't find it here in a rolls, so I ordered it in UK. So, my work is appreciated Quote Share this post Link to post Share on other sites
JMWendt Report post Posted May 26, 2016 What material did you use for the lining, pockets, etc (inside)? Really very nice work. Quote Share this post Link to post Share on other sites
BillyBuck Report post Posted May 27, 2016 Your right that's some serious work! I'm sure your sister is really proud of it and of you. I've been looking everywhere (swap meets etc,) for little irons, like the two you have pictured with handle for the your purse. Do you have a source for them or just pick them up some where. So much nicer then chunk of cast iron to weight patterns / leather down. Keep up the good work! Quote Share this post Link to post Share on other sites
olenawills Report post Posted May 27, 2016 Old cast irons I have purchased from the local estate sales. They usually very cheap, because they heave and difficult to re-sale them, because of the weight and postage costs. 3-5$ per piece enough to pay. I have 3-5lb to work with patterns and one heavy 15lb ( I think) for some occasional work. Quote Share this post Link to post Share on other sites
olenawills Report post Posted May 27, 2016 (edited) 22 hours ago, JMWendt said: What material did you use for the lining, pockets, etc (inside)? Really very nice work. All leather. Black lamb. I work in garment district in Manhattan and very often can go to the local leather shops and dig in discounted leather piles. Red leather was a discounted piece, good enough to work around the imperfections and still make two large bags. For the lining this time I couldn't find anything like this, so had to go for somethings at the full price. I think goat would be better for this job, but I couldn't find any there. Body of the bag backed with the thin red lamb leather as well for additional stability. Handles have 10mm round leather cord. Bottom and the closing strap have 1mm bonded leather insert for additional stability. Edited May 27, 2016 by olenawills Quote Share this post Link to post Share on other sites
5 Spice Report post Posted May 29, 2016 Beautiful bag! Quote Share this post Link to post Share on other sites
RockyAussie Report post Posted May 29, 2016 Very very nice for a first serious work. One thing I learnt to do and I'm not sure in the end you didn't, is where the handles attach to the bag to put a leather piece right to the edges over the inside part covering the cord area. When the handles in time drape downward they start to open up and pull the stitching open. With the leather cover piece the pressure is highly more resistant to folding back. Arn"t they fun to stitch? Hope that you find this useful. Quote Share this post Link to post Share on other sites
olenawills Report post Posted June 1, 2016 Useful tip. Thank you very much! Handles were difficult to punch, stitching was easy Quote Share this post Link to post Share on other sites
JMWendt Report post Posted June 1, 2016 On 5/29/2016 at 3:04 AM, RockyAussie said: Very very nice for a first serious work. One thing I learnt to do and I'm not sure in the end you didn't, is where the handles attach to the bag to put a leather piece right to the edges over the inside part covering the cord area. When the handles in time drape downward they start to open up and pull the stitching open. With the leather cover piece the pressure is highly more resistant to folding back. Arn"t they fun to stitch? Hope that you find this useful. Can you further explain this? I think I know what you are saying, but I can't quite picture the solution. Quote Share this post Link to post Share on other sites
RockyAussie Report post Posted June 2, 2016 To picture the solution is probably the only way I guess. I am at the end not good with words. I hunted around until I found this old prototype. As you see when you pull the handle out it puts a lot of tension on the thread and handle. By putting a leather cover over it it makes it a lot harder to pull away from the bag. In the yellow cardboard pattern the red line shows the finished size about of the reinforcing piece. Once put on it makes it also a lot easier to attach and sew to bag. As you can see by the other 2 pics of some croc bags, they sell for many thousands of dollars and it takes a lot of time to fix if you don't do it well, let alone your reputation. Hope that help in answering your question. Nearly forgot, The pink piece is a plastic piece which I cut out of the covers like the black one underneath it. It is a folder for holding A4 sheets in plastic sleeves from office supplies. Inserted between the lid layers it allows the lid to spring back into shape without any creases and wrinkles. It works brilliantly in these type of flip open and shut lids. Quote Share this post Link to post Share on other sites
olenawills Report post Posted June 2, 2016 My handles have slightly different pattern and I sew them all way around a "leaf" , there is no way I can see any reverse side of the handle with cord. In my bag for reinforcements I use bonded leather glued between the layers. For the top flap in between flap and the back side of the bag I added a narrow folded leather piece. I saw it in Hermes bag. Just go into a Hermes shop, ask to try a bag and look inside under the flap or examine a details photos from eBay. Some sellers add good detailed pictures to their listings. Quote Share this post Link to post Share on other sites
olenawills Report post Posted June 2, 2016 About handle attachment. This is the Piter Nitz Instagram photo. I tried to follow the same steps. Stitches are all way around, starting from the bottom. Quote Share this post Link to post Share on other sites
RockyAussie Report post Posted June 2, 2016 Thanks for the time you went to in your answer. I checked out Peter Nitz and am truly humbled. I wish I had competition close to that here in Australia. So very inspiring. Quote Share this post Link to post Share on other sites
Buttons Report post Posted June 7, 2016 Beautiful work, thanks for all the detail photos. Quote Share this post Link to post Share on other sites
olenawills Report post Posted June 9, 2016 I realized just now, that I made a mistake in handle construction. Cord has to be in between the layers. Next bag going to be better I hope. Peter's photos are the best guide for me. Learned a lot just from looking at them over and over again. Example: Quote Share this post Link to post Share on other sites
Colt W Knight Report post Posted June 9, 2016 (edited) Excellent bag. FYI - here is a link stateside for Aluminum Oxide rolls of sandpaper. http://woodworker.com/c-Abrasives/Rolls/ Yellow stuff here http://www.stewmac.com/Luthier_Tools/Tools_by_Job/Tools_for_Fretting/3M_Stikit_Self-adhesive_Abrasives.html Edited June 9, 2016 by Colt W Knight Quote Share this post Link to post Share on other sites