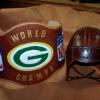
Bluesman Report post Posted August 3, 2016 Something I did a while back and never posted. this was a wedding gift. Quote Share this post Link to post Share on other sites
Ironcat4 Report post Posted August 3, 2016 Very nice detail. mike Quote Share this post Link to post Share on other sites
Tugadude Report post Posted August 3, 2016 Love everything about it. I'll bet it has a very pleased new owner. Curious how you did the innards. Quote Share this post Link to post Share on other sites
Bluesman Report post Posted August 3, 2016 Just now, Tugadude said: Love everything about it. I'll bet it has a very pleased new owner. Curious how you did the innards. Bought a cheap 3 ring binder, ripped out the guts and installed them with Chi Town screws in this. Quote Share this post Link to post Share on other sites
Tugadude Report post Posted August 3, 2016 Thanks, that is my plan too. Now to find the time..... nice work! Quote Share this post Link to post Share on other sites
OneCrow Report post Posted August 3, 2016 Wow! Great job! Did you use any materials in the covers to stiffen the leather or is the leather thickness sufficient? Quote Share this post Link to post Share on other sites
Sporty1 Report post Posted August 3, 2016 Very nice work! Looks great. Quote Share this post Link to post Share on other sites
Bob Blea Report post Posted August 3, 2016 Looks very nice inside and out. You've got that basket stamp running perfectly straight! Bob Quote Share this post Link to post Share on other sites
Bluesman Report post Posted August 3, 2016 Thanks all. I used 7/8 for the top, stiffener from Tandy and then 2/3 piggy on the inside. That basket stamp made my arm numb. Quote Share this post Link to post Share on other sites
Big Sioux Saddlery Report post Posted August 3, 2016 Very VERY nicely executed basket stamp. Good job! Quote Share this post Link to post Share on other sites
Colt W Knight Report post Posted August 3, 2016 Awesome What are you using to attach the binder mechanism? It looks cleaner than the way I do it. I drill out the posts on a binder, and attach it with some # 6 brass screws and nuts, or SS. Quote Share this post Link to post Share on other sites
Chief31794 Report post Posted August 3, 2016 Absolutely Beautiful!!! Excellent craftsmanship. Quote Share this post Link to post Share on other sites
builderofstuff Report post Posted August 3, 2016 Looks amazing. Chris Quote Share this post Link to post Share on other sites
Wedgetail Report post Posted August 9, 2016 On 04/08/2016 at 3:57 AM, Colt W Knight said: Awesome What are you using to attach the binder mechanism? It looks cleaner than the way I do it. I drill out the posts on a binder, and attach it with some # 6 brass screws and nuts, or SS. Look like Chicago screws mate. Quote Share this post Link to post Share on other sites
JLSleather Report post Posted August 9, 2016 Crisp stampin', even colors, clean uncluttered look, contrasting stitchin'.... AND you didn't drown it with that ant-streak crap! I like it One simple "fix"? Keep a piece of 3/4 or 4/5 ish leather next to yer machine - size of a belt keeper all you need. When you turn a corner (like in the middle of your binder spine piece), set it on the leather under the center presser foot and you won't git that 'booger' outside the stitch line. Just stitch to the turn, lift the foot like normal, slip the slip under there before setting the foot back down, and resume stitching. No booger Note there is another way, but that way is SO simple to do AND to explain ... Quote Share this post Link to post Share on other sites
Bluesman Report post Posted August 11, 2016 Thanks for the tip JLS. And yes I used Chicago screws. Had some fancy domed top ones. Quote Share this post Link to post Share on other sites
bland Report post Posted August 14, 2016 Very nice! Quote Share this post Link to post Share on other sites