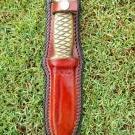
AussieMade Report post Posted September 12, 2016 Made this for a mates very large Pitbull. 10-11oz Full Grain. Ox Blood Dye. Not too happy with my punch for the holes, needs a good sharpen (any ideas on how to do this). For my 4th project, im getting better. The dog pulls like a freight train, so made a separate D-Ring section all hand stitched and riveted up top of the collar using a 5mm welded d-ring. hopefully this will last them longer than the store bought one. Quote Share this post Link to post Share on other sites
Halitech Report post Posted September 12, 2016 You say the d ring section is on top of the collar but the way I'm looking at it, the d ring is behind the main part of the collar and you have the added piece on the back of the collar to hold it in place. Personally, great idea and one I've used numerous times myself. However, 5 rivets and stitching on each side looks like overkill to me. I would have only used 2 rivets on each side, especially since the buckle end will have to actually let go before the d ring can come off. Other then that, great job. Quote Share this post Link to post Share on other sites
AussieMade Report post Posted September 12, 2016 51 minutes ago, Halitech said: However, 5 rivets and stitching on each side looks like overkill to me. I would have only used 2 rivets on each side, especially since the buckle end will have to actually let go before the d ring can come off. Other then that, great job. The dog I have made it for is known to kill collars lol, even broken heavy chains before, so they wanted extra support for the d-ring. Will see how it fairs up . Thanks Quote Share this post Link to post Share on other sites
Windrider30 Report post Posted September 12, 2016 Tip for sharpening hole punches. Or at least what I do. Get your strop cover a good distance in jeweller's ruse, take your punch put it into an electric drill ( I use a dewalt cordless) put punch at shallow angle on your strop, and run the drill back and forth at a LOW speed, I normaly go back and forth at least three times. You will find that this makes it so your punches are nice and sharp again. Don't ask me what angle because to be honest I do not know at what angle I am keeping it but always keep it at the same angle so you do not accidently miss shappen the punch. Quote Share this post Link to post Share on other sites
Wedgetail Report post Posted September 12, 2016 That should go the distance For the hole punch, I tried this with success: For the dog... try Cesar Milan Quote Share this post Link to post Share on other sites
RockyAussie Report post Posted September 12, 2016 For the sharpening if you have a belt sander or even a disc sander you can do something like in this link following, only difference I do is follow with a hit on the rag wheel and Tripoli polish. Round hole ones only of course.https://www.youtube.com/watch?v=eLHKVj6na6g Quote Share this post Link to post Share on other sites
Beret Report post Posted September 13, 2016 IMO, the most safest way to place a D-ring is on the buckle side. It's going to distribute the tension more reliably when a dog pulls against it and it going to warp your collar less after repeated strain. Quote Share this post Link to post Share on other sites
BubbaJon Report post Posted September 21, 2016 I just finished a collar for our new rescue pup. He likes to play in water so I rubbed it down with beeswax then hit it with a hot air gun. Finished it off by buffing. Worked great for waterproofing. Quote Share this post Link to post Share on other sites
AussieMade Report post Posted September 21, 2016 12 hours ago, BubbaJon said: I just finished a collar for our new rescue pup. He likes to play in water so I rubbed it down with beeswax then hit it with a hot air gun. Finished it off by buffing. Worked great for waterproofing. I have some good leather conditioner (Oakwood Brand) that has Lanolin, Beeswax, Emu Oil, Tea Tree and Eucalyptus Oil in it. I gave it about 3 coats rubbed into the stitching and collar and also hit it with a hair dryer between each coats, The gave it another coat and left it out in the sun to dry naturally. They live on a Catamaran so needed to be really water proof lol. Quote Share this post Link to post Share on other sites
1961Mike Report post Posted October 9, 2016 HI, Back in the late 1990's, I made a collar for a 3 year old Husky named Seminole. He got it Xmas day and had digested it by New Years. Not really sure how he got to it. Later Mike in Norman OK Quote Share this post Link to post Share on other sites