monicaj Report post Posted November 29, 2016 Looking for a few sweet souls to help me. I'm making bracelets, necklaces, and stick hair barrettes and I really don't want to put backings on them, I'd rather put color on the back but I'm worried about bleeding. I took a scrap strap and put fiebings black pro dye on the back, then tested these things for bleeding... Resolene, gum trag, angelus satan finisher, and edge kote. They felt a little rough to the touch, so I took a wood burnisher and burnished a little. Then I took a damp white rag and rubbed each spot (kinda hard), and some black came through on all 4 things. My questions are many. - I only used 1 coat of those, should I have used 2? - Should I have let the products sit over night before rubbing? - Should I use something else instead of black dye? - Maybe my rubbing is too vigorous, and the bracelets really won't bleed if sweated on or caught in the rain? - Or maybe I DON'T need to color the back? Does it look completely unprofessional? - Maybe I should try to burnish the edges in a way that keeps the black from getting on the back? My current method of burnishing isn't quite right, and I know it. What I'm doing is taking a lip gloss applicator and using it to put black dye around the edges (after I bevel), and then running a bit of beeswax over it while it's still wet, then using a wood burnisher in a dremel. It gets smooth, but I don't know if it will stand the test of time or elements. I know I'm going to have to do it a more correct way eventually. - But could I just find a way to make sure the black doesn't get on the backside, and then use gum trag to smooth it? A consideration: The necklaces are somewhat shaped so they fit snug around the shoulder, but they're shaped to my shoulders which are kind of small. I tried a necklace on my sister, and her shoulders were a little bigger, so it didn't lay flat as it does on mine. So I re-wet it and put it on her for a bit to get her shape, and let it dry and it worked fine. - If I find a way to color the back so it won't bleed, is it going to seal it too much for it to absorb water and be reshaped? Sorry for all the questions. I thought my test on the strap would clear things up for me, but it only put me at more of a loss as to a solution. Quote Share this post Link to post Share on other sites
monicaj Report post Posted November 29, 2016 (edited) Sorry for pic quality... stupid cheap phone... You can't tell it much but I'm so worried about bleeding, I used Angelus satin finisher around the edges where the black is, but it made it look a little sloppier because it discolored it... maybe I should have just used it over the whole back. Worried that it'll be harder to get the leather wet for adding some shape. The last thing I do to everything is wet it and shape it... it makes the bracelets the bracelets easier to try on when it's roundy rather than straight as a board. Thought about going the other direction and seeing if I can make things really soft and pliable with maybe pure neatsfoot oil. Would that be better than giving them shape??? And thanks in advance! I really appreciate the help! Edited November 29, 2016 by monicaj Adding thanks! Quote Share this post Link to post Share on other sites
TinkerTailor Report post Posted November 29, 2016 37 minutes ago, monicaj said: Thought about going the other direction and seeing if I can make things really soft and pliable with maybe pure neatsfoot oil. Would that be better than giving them shape??? I usually oil after forming to soften it up . Water forming will stiffen leather and it is advisable to get some oils back in after, If it is too hard, it may be uncomfortable and/or crack in use. It should still hold shape, just be softer. Careful with the oil, it can take a day or 3 to fully have an effect. It is much better to put too little oil on, wait a day or 2 and then see if it needs more. Over oiling can ruin leather and is really easy to do with neetsfoot. The leather will absorb way more than it needs. Now as to finishing the back and bleeding, Back finishing is one of those difficult things that can vary greatly with the tannage and the texture of the back. The flesh side of the leather absorbs a dye a whole bunch faster than the grain side and tends to collect dye particles caught up in the nap. Buffing will only go so far. It is kinda like getting sparkles out of shag carpet.....In addition, the water, oils and soaps,sweat and other stuff a wrist cuff/hair piece is exposed to will effect the leather and finishes. As far as finish, many use beeswax based finishes but be carefull, over application can cause them to be sticky. Others use thinned resolene, but this can make the back rougher and scratchier.... Short answer is, use the smoothest/firmest backed leather you can and only dye if you have to. Do some experiments on scrap to see what works for you. Edging is a whole other topic. There are many threads on here about it. One piece of advice to prevent bleed is to use several light coats. Don't worry if the first dye coat does not cover, you will get it the second time. Oversoaking the edge to get even colour the first application can cause bleed easy. Again, the edge absorbs product way faster than the grain, so go slow and sparingly. Quote Share this post Link to post Share on other sites
LatigoAmigo Report post Posted November 29, 2016 You might consider using an "edge paint" like Fenice. It will provide full, even coverage. Quote Share this post Link to post Share on other sites
monicaj Report post Posted November 29, 2016 TinkerTailor, thanks for the wealth of info. I'm really glad it's ok to leave the backs un-dyed. And I'm glad too for the info on the oil, I have wanted my leather stuff to be softer but thought putting oil on afterward would make them lose shape. I'll definitely start with a minimal amount of oil so I don't overload it. I'll give edge paint a try LatigoAmigo, thank you. It will be a lot less worrisome, to just work on making the edges nice and keeping the back clean. Relief... Quote Share this post Link to post Share on other sites
monicaj Report post Posted November 29, 2016 Getting sparkles out of shag carpet... lol great analogy. Quote Share this post Link to post Share on other sites
robs456 Report post Posted November 30, 2016 Hi, I'm just starting up a leather jewelry business, and have looked into this quite a bit. The best way to go is to use lining leather on the inside of the product, or even doubling the leather to have to grain sides, which I do with thinner leathers. This will of course affect your cost and effort and thus the price as well (I hope...) and if you're not going for the higher end of the market you may not want to do that. In that case my advice is to use quality leather with a smooth flesh side or sand/split it down so that it is suede like. Then use an edge paint like the Fenice mentioned for example, making sure the back stays spotless. Using dye on the edge only could work but it's easy to have it bleed into the back or otherwise make a mess. In my experiments coloring or dyeing the flesh side I have always managed to get color transfer some way, but there are ways to minimize it. The best way I found on some cheap(ish) leather was: Dye the flesh side, Rub out as much as possible after an hour or so, Dye it again, Rub after an hour or so, Apply Gum Trag, Burnish the entire back, Dye again, Let dry 24 hours, Rub, Gum Trag if necessary, 3 coats of Resolene/water 50/50 -let dry between coats. This still transferred when rubbing vigorously with a white T-shirt, maybe because of friction, but wearing it on my wrist for a week in the summer produced no transfer. Things I think about when designing are climate, where the product is worn, will it have contact with clothes, what kind of clothes (jeans, dress etc) and how it will be used. Attaching a pic of a few bracelets, these all have pigskin lining and Giardini edge paint, leather is Tärnsjö veg tan. Hope I could help some. Quote Share this post Link to post Share on other sites
monicaj Report post Posted November 30, 2016 Robs456, I hope whenever I start to line my backs that they look as nice as yours. And thanks for letting me know your steps when you dye the backs. I'm going to try to just keep the backs clean but it would probably be a good idea to practice a few dyed backs just to know how. Quote Share this post Link to post Share on other sites
robs456 Report post Posted December 1, 2016 Thanks. And yeah, keeping it clean is always a good way to go. Please post some pics when you get your process down pat. I quite like your artwork, especially on the hairpin. Quote Share this post Link to post Share on other sites
monicaj Report post Posted December 1, 2016 Thank you. I will. Quote Share this post Link to post Share on other sites
TinkerTailor Report post Posted December 1, 2016 As a note, In my opinion, A natural backside is better. It shows both the care and attention that you put into your dye job and edges, but also shows off the quality of your leather. Low quality leather is backed with paint and stuff to keep it smooth and uniform because it is far from it. Good leather does not need this. You can fake a nice grain side but it is really hard to fake the raw backside of quality leather. Part of the trick is to get it to look untouched, but actually have sealed it from badness without a fake look. And if you have a small dye bleed on an edge, Just call it a "Humanity Feature" and keep going. With every project your technique will refine and the humanity features will lessen, until the final stage, when you are a machine.......Happy dying..... Quote Share this post Link to post Share on other sites
robs456 Report post Posted December 1, 2016 5 hours ago, TinkerTailor said: And if you have a small dye bleed on an edge, Just call it a "Humanity Feature" and keep going. With every project your technique will refine and the humanity features will lessen, until the final stage, when you are a machine.......Happy dying..... This. I strive for perfection. But what is perfection? That every piece I make looks exactly the same like it was made by a machine? I used to think so, but not any more. Perfection for me nowadays is when everything looks professionally Handmade by a skilled artisan. If something is off, like the stitch on the leftmost piece I posted above (easy to see) I still sell it at full price as it is on the inside of the bracelet and not visible. If it was on the front and visible 'to the world' I might toss the piece, and if it was on the front but more to the lock and thus not very visible anyway I reduce the price, make the customer very aware that I have reduced the price and exactly why so that they don't 1. tell their friends I sell stuff real inexpensive and 2. show/complain to their friends about 'what shoddy work I do'. It seems to work but I read here that marking 2nd rate pieces as such might be a good idea also, may try that later. Quote Share this post Link to post Share on other sites
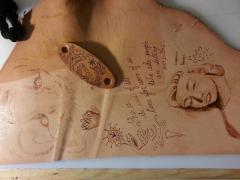
monicaj Report post Posted December 3, 2016 On 11/29/2016 at 10:49 AM, TinkerTailor said: As far as finish, many use beeswax based finishes but be carefull, over application can cause them to be sticky. Others use thinned resolene, but this can make the back rougher and scratchier.... On 12/1/2016 at 10:36 AM, TinkerTailor said: Part of the trick is to get it to look untouched, but actually have sealed it from badness without a fake look. And if you have a small dye bleed on an edge, Just call it a "Humanity Feature" and keep going. With every project your technique will refine and the humanity features will lessen, until the final stage, when you are a machine.......Happy dying..... If I use thinned resolene, and then lightly sanded to make it softer, would the sanding compromise the seal of the resolene? For some reason I thought that if it didn't have a lining or wasn't colored, then it was drastically unprofessional. So I'm super glad to hear that I can leave the backside bare aside from using some kind of protectant. Humanity feature... I decided to make a dear friend a surprise photo album, but I was having a real off day and ended up creating too many 'humanity features'. So I cut out more leather and started again... and dang if I didn't do the same mistakes (stamping letters backwards, upside down, etc). At that point I just decided to finish them both and send them, mistakes and all. She's actually the kind that would find humanity features enduring. So it was a win win. I'm still learning about the leather itself. I just found out that it seems like the shoulder part is easier to cut and work with than the scrap pieces that Tandy sells for $25 (I think it's the belly, not sure). But next time I go get some I'm going to look at the backside, because I'm just realizing how 'unstable' the leather is when the back is really hairy, like the fibers are real loose... seems more stretchy and less solid. Mushy like. How does this look? Is the leather quality good, and are my edges getting close to what they should be? (this is still black dye though... I ordered some edge kote and some paint to try out, waiting on it.) Quote Share this post Link to post Share on other sites
JenGranger Report post Posted December 10, 2016 Monicaj, your work is beautiful! I especially love the barrette. And I've never seen a necklace like that before! Quote Share this post Link to post Share on other sites
monicaj Report post Posted January 30, 2017 On 12/10/2016 at 11:20 AM, JenGranger said: Monicaj, your work is beautiful! I especially love the barrette. And I've never seen a necklace like that before! Thank you Jen! Sorry I'm responding back so late. I've been getting ready to move and I haven't been focusing on doing leather stuff and I haven't been on this site for awhile. Quote Share this post Link to post Share on other sites
wlg190861 Report post Posted January 30, 2017 (edited) As far as using black dye, make your own. Take a quart jar fill it with steel wool, fill with apple cider vinegar an let set on the counter for 2 weeks, strain with cheese cloth. There you go. Dye your leather with this and it will never rub off no matter how hard you try. Any other color leave the back un-dyed. Burnish the raw edge an dip in Sheps Neatslene harness oil from Weaver Leather. Pure neatsfoot oil its to harsh. Edited January 30, 2017 by wlg190861 Quote Share this post Link to post Share on other sites
monicaj Report post Posted January 31, 2017 15 hours ago, wlg190861 said: As far as using black dye, make your own. Take a quart jar fill it with steel wool, fill with apple cider vinegar an let set on the counter for 2 weeks, strain with cheese cloth. There you go. Dye your leather with this and it will never rub off no matter how hard you try. Any other color leave the back un-dyed. Burnish the raw edge an dip in Sheps Neatslene harness oil from Weaver Leather. Pure neatsfoot oil its to harsh. Much thanks wlg! I'll definitely try it out. Quote Share this post Link to post Share on other sites
Mattsbagger Report post Posted January 31, 2017 1 hour ago, monicaj said: Much thanks wlg! I'll definitely try it out. It's not dye. It's called vinegroon. Many spellings. Do a search on it. It causes a chemical reaction to veg tan leather and turns it black. Quote Share this post Link to post Share on other sites
monicaj Report post Posted January 31, 2017 1 hour ago, Mattsbagger said: It's not dye. It's called vinegroon. Many spellings. Do a search on it. It causes a chemical reaction to veg tan leather and turns it black. Vinegroon... I'll research it. Thanks. Quote Share this post Link to post Share on other sites
wlg190861 Report post Posted February 1, 2017 (edited) 19 hours ago, Mattsbagger said: It's not dye. It's called vinegroon. Many spellings. Do a search on it. It causes a chemical reaction to veg tan leather and turns it black. My bad ( VINEGROON ) / ( DYE ) Edited February 1, 2017 by wlg190861 Quote Share this post Link to post Share on other sites
Mattsbagger Report post Posted February 1, 2017 3 hours ago, wlg190861 said: My bad ( VINEGROON ) / ( DYE ) Yep just one of those terminology things. Lol Quote Share this post Link to post Share on other sites