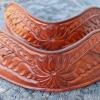
Double Daddy Report post Posted January 24, 2018 Goody, goody...more pics! Man, that thing is cavernous!...deceptive, even, in how much space it seems to have. Great material choices and design! Quote Share this post Link to post Share on other sites
awnova Report post Posted January 24, 2018 9 hours ago, YinTx said: Thanks for sharing so many more photos, it is certainly deserving. Easy to see a whole lot of work went into that! Neat design too, did you do the design work also, or is it modeled off of something? YinTx Thanks YinTx. I found a bag Pinterest from a maker in France... spent some time with graph paper and recreated it based on what I thought it needed to work for me. 1 hour ago, Peter Darby said: That is gorgeous. Use said the daubers tended to overdaub, although I think it looks great like that. A little trick I learned is to take a wool dauber and light it. Let it burn for a few seconds then use a paper towel and wipe off the burned part. It comes clean and then makes a great edge dyer. It will soak up the dye but when lightly pressed on your edges doesn't allow the edge to sink into the dauber and spread dye to the edges. Oh, thank you! I can't wait to try that! Quote Share this post Link to post Share on other sites
garypl Report post Posted January 24, 2018 You did a beautiful job on this project. Have you tried filling it up to capacity? Looks like it will stick out from your back about 2-3 feet LOL! Gary Quote Share this post Link to post Share on other sites
YinTx Report post Posted January 24, 2018 5 hours ago, awnova said: spent some time with graph paper and recreated it based on what I thought it needed to work for me. I'd say you did well with the graph paper then! YinTx Quote Share this post Link to post Share on other sites
awnova Report post Posted January 24, 2018 6 hours ago, garypl said: You did a beautiful job on this project. Have you tried filling it up to capacity? Looks like it will stick out from your back about 2-3 feet LOL! Gary This is the fourth backpack, the first one I kept since I needed to test the design (and because all the mistakes leap out at me) The top flap kinda limits how full you can go. 1st, 2nd and 3rd pics attached. Since I'm getting so much feedback here, what price would you put on one of these? I struggle with that, just as pretty much everyone does... Quote Share this post Link to post Share on other sites
garypl Report post Posted January 24, 2018 29 minutes ago, awnova said: This is the fourth backpack, the first one I kept since I needed to test the design (and because all the mistakes leap out at me) The top flap kinda limits how full you can go. 1st, 2nd and 3rd pics attached. Since I'm getting so much feedback here, what price would you put on one of these? I struggle with that, just as pretty much everyone does... With the amount of tooling you put into this I think it should sell for at least $600-700 Quote Share this post Link to post Share on other sites
kiwican Report post Posted January 24, 2018 1st gotta say I love your work! As to pricing I'd agree with the 6 to 700 range as a minimum. That bag in the right place I could see going for a grand. Quote Share this post Link to post Share on other sites
Double Daddy Report post Posted January 25, 2018 I agree with garypl and kiwican...nothing less than upper-3-figures for attracting the right clientele to appreciate the heirloom quality of your work and the time you put into it. Don't let the shallowness of some folks' pockets or the tension of their purse strings determine the value of your craft...for them, there's always Wal-mart. Quote Share this post Link to post Share on other sites
Treed Report post Posted January 25, 2018 If You don't mind answering a question..... how is the inside cut and attached? thanks Bobby Quote Share this post Link to post Share on other sites
awnova Report post Posted January 26, 2018 12 hours ago, Treed said: If You don't mind answering a question..... how is the inside cut and attached? thanks Bobby Hi Bobby. If I understand your question... the deerskin bag is a 32" diameter circle. Previous iterations have been two half circles depending on the hide. I either turn the edge over or add a contrasting strip to finish the edge. I then punch the holes for gathering the top, lay it on the tooled center, glue, then sew. Best situation is an oval so the pouch can expand side to side and not just front to back (learned that the hard way). Quote Share this post Link to post Share on other sites
kiwican Report post Posted January 26, 2018 Good hint on the Oval shape vs the round shape! Quote Share this post Link to post Share on other sites
Treed Report post Posted January 26, 2018 Thanks.... It is fantastic work Quote Share this post Link to post Share on other sites