Jump to content
Josh Ashman

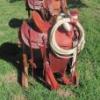
Progress pics of Threepersons with San Carlos borders

Recommended Posts

Couple of progress pics of two Threepersons style holsters I'm working on this week. One is strong side for a 45/8" Blackhawk, the other is crossdraw for a 6-1/2" Single Six. Both have what I call a San Carlos border. Both are 10/11 HO craftsman. 

003.jpg

006.jpg

009.jpg

011.jpg

013.jpg

Share this post


Link to post
Share on other sites

Nice work! I'm loving that border. I've not yet done a border on both sides of a folded holster. I'll have to give it a go. Can't wait to see it finished.

Jeff

Share this post


Link to post
Share on other sites

Thanks Alpha2! I could never decide where to stop the border, so I just started running them all the way around :)

All the best, 

Josh

Share this post


Link to post
Share on other sites

You just HAD to go and show a serpentine pattern again, didn't you!!:lol:

Damn, but you do nice work Josh!

Share this post


Link to post
Share on other sites

Really nice Josh!  When you stamp the serpentine border, do you alternate sides when you stamp or go down one side and then the other?

Gary

Share this post


Link to post
Share on other sites

Really nice work there! keep the pics coming

Share this post


Link to post
Share on other sites
On 6/15/2018 at 6:29 PM, dikman said:

You just HAD to go and show a serpentine pattern again, didn't you!!:lol:

Damn, but you do nice work Josh!

Thanks Dikman, it's nice of you to say so! 


On 6/15/2018 at 7:53 PM, garypl said:

Really nice Josh!  When you stamp the serpentine border, do you alternate sides when you stamp or go down one side and then the other?

Gary

Thanks Gary! As for how I stamp, it's been s bit of a progression. I started out going all the way around the "inside" and then filling in the "outside". I also pre-measured the spacing by laying it out with little tick marks. Then I went to alternating each side a stamp at a time, making the complete design as I went so I didn't need to pre-measure their locations so much. And now, since alternating sides requires me to twist and turn more than I care to, I've gone back to stamping all the way around one side complete and then doing the other and I just "eyeball" the spacing. 

On 6/15/2018 at 9:05 PM, noobleather said:

Really nice work there! keep the pics coming

Thanks noobleather! Will do!

All the best, 

Josh

Share this post


Link to post
Share on other sites

I appreciate you taking the time on the progress pics, Josh. It's always a pleasure to see your finished pieces...to see the goods as they are being made is very enlightening...much to be learned from the sharing! Such detailed stamping always seems intimidating in its final form...but when it can be viewed in-progress it's much less a monster for us amateurs!  Like the others, I anxiously await more pics and the finished holsters...many thanks!

Share this post


Link to post
Share on other sites
58 minutes ago, Double Daddy said:

I appreciate you taking the time on the progress pics, Josh. It's always a pleasure to see your finished pieces...to see the goods as they are being made is very enlightening...much to be learned from the sharing! Such detailed stamping always seems intimidating in its final form...but when it can be viewed in-progress it's much less a monster for us amateurs!  Like the others, I anxiously await more pics and the finished holsters...many thanks!

You're certainly welcome Chris!

Broke down into each step it's pretty easy to pull this border off. I'll also add that the more you get stacked in there the less each little flaw jumps out.

All the best!  

Share this post


Link to post
Share on other sites

As always: excellent work!

I'd like the holsters to retain their natural color.


Share this post


Link to post
Share on other sites
6 hours ago, LederRudi said:

As always: excellent work!

I'd like the holsters to retain their natural color.


Thanks LederRudi!

As for the color, these 2 will just get highlighter so they'll be mostly left "natural". It a big order and I cut and stamped the 3rd this morning. It'll get black antique. They would look nice with just a few light coats of oil and left in the sun for a day, but I'll have to save that for one of my own sometime!

All the best, Josh

Share this post


Link to post
Share on other sites

Josh thanks for the insight into your craftsmanship.  Looking forward to seeing the whole order completed.

Share this post


Link to post
Share on other sites

Josh, another quick question if you don't mine? In another post you mentioned when doing a serpentine stamping you cut first with a swivel knife and then use the knife to bevel the cut edge to act as a stamping guide - is that curved blade in the knife the bevel blade you were talking about?

Share this post


Link to post
Share on other sites

That is some beautiful workmanship right there!

Share this post


Link to post
Share on other sites
15 hours ago, dikman said:

Josh, another quick question if you don't mine? In another post you mentioned when doing a serpentine stamping you cut first with a swivel knife and then use the knife to bevel the cut edge to act as a stamping guide - is that curved blade in the knife the bevel blade you were talking about?

Hey dikman,

That first picture shows my swivel knife, which has a hollow ground blade and the other tool with the white nylon deal where the blade would otherwise be is the beveler I use. Basically, you cut the like then go back over it (with a fair amount of down pressure) to bevel it. It's doesn't do as good of a job as an actual beveler stamp, but it's quicker and you don't get the "choppy" look that you sometimes do if you're not great at beveling (I'm better now than I once was, but still have tons of room for improvement). I'm not sure that the swivel knife blade being hollow ground makes it any better, but it's the blade I always use. I've had it for a long time, probably about 30 years, although I didn't use it much until the last 7 or 8 years. It was purchased from Tandy in the late 80's when I was in grade school shop class and we did a little leatherwork for one of the school projects. I'm not sure that a Tandy blade purchased today would be the same thing but that one works well for me. 

14 hours ago, Lobo said:

That is some beautiful workmanship right there!

Thanks Lobo! I appreciate that! Hope retirement is treating you well sir! 

All the best, Josh 

Share this post


Link to post
Share on other sites

very nice.  Thank you for showing the progression and answering questions regarding your work.


Share this post


Link to post
Share on other sites
On 6/20/2018 at 12:34 PM, Scoutmom103 said:

very nice.  Thank you for showing the progression and answering questions regarding your work.


Thank you Scoutmom! My pleasure to answer a few questions!

19 hours ago, dikman said:

Thanks mate, now it makes sense. Something else for me to make.

I did a quick google search and came up with this video that shows a guy using them and how he made one. I guess it's OK for me to share a Youtube video? If not search "leather speed beveler" and you'll come right to it.

All the best, Josh


Share this post


Link to post
Share on other sites

Gotta love youtube! Excellent video, short and to the point.

Josh, I seem to be spending a lot of time thanking you lately :lol:.

Share this post


Link to post
Share on other sites
On 6/21/2018 at 6:24 PM, dikman said:

Josh, I seem to be spending a lot of time thanking you lately :lol:.

Happy to be helpful :)

All the best, Josh

Share this post


Link to post
Share on other sites

I have liked the San Carlos border since the first time I saw one of your holsters all tooled up.  I have since made a few holsters with that border.  Your work is nicely done, and I look forward to seeing these holsters completed.  Thank you for sharing.  

Share this post


Link to post
Share on other sites
On 6/26/2018 at 10:22 PM, Steve75 said:

I have liked the San Carlos border since the first time I saw one of your holsters all tooled up.  I have since made a few holsters with that border.  Your work is nicely done, and I look forward to seeing these holsters completed.  Thank you for sharing.  

Thanks Steve!

all the best, Josh

Share this post


Link to post
Share on other sites

This is a pretty big order for me and I've had a few other things come up that have kept me away from the bench the last week, but it's still moving along OK. All the pieces and parts are built and everything is dyed and ready to start assembling! 3 - Threepersons holsters, an Avenger type holster and 3 ammo slides. I'll post some more pics once they're all done.

Have a great Friday and weekend folks! 

Josh

012.thumb.jpg.a88e15fd05c9b4de644f272e81fc2b80.jpg011.thumb.jpg.5920e97accf84e360fc9238a3340d01f.jpg008.thumb.jpg.c0c2e64bc98e2a0999812b8b2231a253.jpg5b365123701b5_013(1).thumb.jpg.0bed88e2b87e65d8e8e23a4611f54dc3.jpg

Share this post


Link to post
Share on other sites

Very nice, awesome work. one day maybe i can stamp like that. keep up the good work. 

Share this post


Link to post
Share on other sites
19 minutes ago, GATORHEAD said:

Very nice, awesome work. one day maybe i can stamp like that. keep up the good work. 

Thanks Gatorhead! 

Share this post


Link to post
Share on other sites

Join the conversation

You can post now and register later. If you have an account, sign in now to post with your account.
Note: Your post will require moderator approval before it will be visible.

Guest
Reply to this topic...

×   Pasted as rich text.   Paste as plain text instead

  Only 75 emoji are allowed.

×   Your link has been automatically embedded.   Display as a link instead

×   Your previous content has been restored.   Clear editor

×   You cannot paste images directly. Upload or insert images from URL.


×
×
  • Create New...