Willbury Report post Posted July 23, 2019 Hello, I can't see how you would machine sew this type of seam (other than by hand) on both sides of the bag and wondering if I'm missing something? Quote Share this post Link to post Share on other sites
mikesc Report post Posted July 23, 2019 (edited) Which seam ? There are multiple seams visible on that bag. Edited July 23, 2019 by mikesc Quote Share this post Link to post Share on other sites
Willbury Report post Posted July 23, 2019 25 minutes ago, mikesc said: Which seam ? There are multiple seams visible on that bag. To clarify I meant the main u shaped seam which is mirrored on the front and back of the bag. It appears to be a simple lap seam. Quote Share this post Link to post Share on other sites
mikesc Report post Posted July 23, 2019 (edited) Nothing hard about that with a machine..looks like a 1/8 th inch edge..either use edge guide on the machine ( swing down or mounted on the bed / arm ) or guide built into the foot..Go slow..Go carefully..The same method will also allow you to do the seam that is all around the top..Also the stitching on the straps. Easier with a cylinder arm machine than with a flat bed..Possible with a flat bed , but you'll be fighting the leather and manipulating it a lot, with not a clear sight of what you are doing, and that may show in the final product as creases. Best not use a flat bed if you want to avoid throwing the bag and the machine out the window :) Brian ( RockyAussie ) has posted a few videos and threads that show how to do very similar techniques.. edit : Thinking about it a little more, I think a "spring edge guide" on the foot would be easier than a guide on the machine. Edited July 23, 2019 by mikesc Quote Share this post Link to post Share on other sites
Willbury Report post Posted July 23, 2019 Maybe I’m missing something here. So this bag is made essentially of three pieces the front the back and the one piece sides and bottom. I can see how you could sew the front to the bottom sides. Once that’s done though it seems impossible to repeat the operation sewing the back face on in the same manner. Quote Share this post Link to post Share on other sites
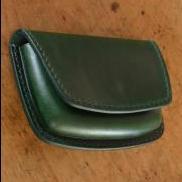
RockyAussie Report post Posted July 23, 2019 2 hours ago, Willbury said: Maybe I’m missing something here. So this bag is made essentially of three pieces the front the back and the one piece sides and bottom. I can see how you could sew the front to the bottom sides. Once that’s done though it seems impossible to repeat the operation sewing the back face on in the same manner. You are right ....they can be tricky to impossible to do on a normal cylinder machine. If the pattern is big enough and the gussets can flare outward enough it is not too bad. If they are like the little one i make rarely (about 6 across) as in the picture below several steps are necessary. Firstly the gussets are only stiffened after the outer sections are sewn. On the second side it can sometimes be easier to start 1/4 way down the bag from the top in order to allow room for the cylinder arm to have room to go into the opening at the finish. It then can be easier to manoeuvre the bag to do the top down start. Notice in your picture that the bag has a separate lining and the stiff look to it can be deceptive, it is probably quite pliable. Some sewing machines like a patching machine would do it easily but they don't do a very nice job normally and some like this side wall stitching machine may be an easier way as well. There is a member @robinindustry that has a variety of these machines for sale out of China. On the second page in this earlier post you can see a video of a sidewall stitcher in action. Follow that back on the you tube and more can be seen as well. Quote Share this post Link to post Share on other sites
Willbury Report post Posted July 23, 2019 24 minutes ago, RockyAussie said: You are right ....they can be tricky to impossible to do on a normal cylinder machine. If the pattern is big enough and the gussets can flare outward enough it is not too bad. If they are like the little one i make rarely (about 6 across) as in the picture below several steps are necessary. Firstly the gussets are only stiffened after the outer sections are sewn. On the second side it can sometimes be easier to start 1/4 way down the bag from the top in order to allow room for the cylinder arm to have room to go into the opening at the finish. It then can be easier to manoeuvre the bag to do the top down start. Notice in your picture that the bag has a separate lining and the stiff look to it can be deceptive, it is probably quite pliable. Some sewing machines like a patching machine would do it easily but they don't do a very nice job normally and some like this side wall stitching machine may be an easier way as well. There is a member @robinindustry that has a variety of these machines for sale out of China. On the second page in this earlier post you can see a video of a sidewall stitcher in action. Follow that back on the you tube and more can be seen as well. Thank you, very informative! I hadn't really considered how pliable that leather might be before the lining is added. Also those Robin Machines are rather interesting. I've managed to do this style seam before with my patcher but as you mention the stitching quality/consistency really isn't there and I abandoned the idea. I recently added a narrow 17" post bed to my shop, so maybe I should give that a shot too with a more pliable leather. To confirm, you are sewing this black bag entirely on a cylinder bed? Quote Share this post Link to post Share on other sites
RockyAussie Report post Posted July 24, 2019 1 hour ago, Willbury said: To confirm, you are sewing this black bag entirely on a cylinder bed? Yes that is correct. Note where I said that the stiffener for the gusset area is put in after the stitching and I have to admit that i have to sort of walk the stitching around sideways a bit on 3 or 4 stitches as well. This is not to hard with my machine as it has a variostop motor where it enables me to lift the foot enough to step sideways and not loose my thread tension in the process. Make sure that your thread tension discs don't open when using your foot or knee lift. This is the machine I would have used in the making and it is a Pfaff 331 but a 335 walking foot type could do it as well. Quote Share this post Link to post Share on other sites
Willbury Report post Posted July 24, 2019 17 minutes ago, RockyAussie said: Yes that is correct. Note where I said that the stiffener for the gusset area is put in after the stitching and I have to admit that i have to sort of walk the stitching around sideways a bit on 3 or 4 stitches as well. This is not to hard with my machine as it has a variostop motor where it enables me to lift the foot enough to step sideways and not loose my thread tension in the process. Make sure that your thread tension discs don't open when using your foot or knee lift. This is the machine I would have used in the making and it is a Pfaff 331 but a 335 walking foot type could do it as well. Very nice, also a good tip on the tension disc front, never thought of that. Any pics of the gusset area stiffener you used? Quote Share this post Link to post Share on other sites
RockyAussie Report post Posted July 24, 2019 55 minutes ago, Willbury said: Very nice, also a good tip on the tension disc front, never thought of that. Any pics of the gusset area stiffener you used? I don't have any on hand but I will take a few shots of a prototype one I made and some further shots to explain better after I catch up on some of this work today. Quote Share this post Link to post Share on other sites
RockyAussie Report post Posted July 24, 2019 OK these pictures should show things a little better....the first pic shows the bag style a more to the side and this one more on to the gusset side. Note that the gusset from 1/2 way up can close up. the gusset stiffener in pink cardboard shown next to its clicking knife would have be done originally with .6mm strawboard but now I would use 1mm heel grip felt as the stiffener. This would give a less defined ridge where it presses into the gusset edge. As I said earlier the bag outside pieces are stitched together first and by using the middle markers to line up with, the gusset stiffener is glued into place correctly. The knives are made with the checked in middle lines as shown in this picture This is a picture showing all of the knives that go into the making of this little bag. The back and lid flap could be done as one but as this is for exotic leathers the smaller pieces are better to get the best feature pieces showing. One of the inside in case that helps. Quote Share this post Link to post Share on other sites
Willbury Report post Posted July 24, 2019 12 hours ago, RockyAussie said: OK these pictures should show things a little better....the first pic shows the bag style a more to the side and this one more on to the gusset side. Note that the gusset from 1/2 way up can close up. the gusset stiffener in pink cardboard shown next to its clicking knife would have be done originally with .6mm strawboard but now I would use 1mm heel grip felt as the stiffener. This would give a less defined ridge where it presses into the gusset edge. As I said earlier the bag outside pieces are stitched together first and by using the middle markers to line up with, the gusset stiffener is glued into place correctly. The knives are made with the checked in middle lines as shown in this picture This is a picture showing all of the knives that go into the making of this little bag. The back and lid flap could be done as one but as this is for exotic leathers the smaller pieces are better to get the best feature pieces showing. One of the inside in case that helps. Very interesting. Do you flip the bag to apply the stiffener or just put it in as is? Thanks again for sharing. Will Quote Share this post Link to post Share on other sites
RockyAussie Report post Posted July 24, 2019 5 hours ago, Willbury said: Do you flip the bag to apply the stiffener or just put it in as is? No after some glue is applied at the base inside I just curve the stiffener and push it down and in. The top folded edge is left until after the lining is put in and then starting at the front I have stitched across and around over the gusset over onto the lid flap and around and finished back at the front. Your welcome . Brian Quote Share this post Link to post Share on other sites
fasn8ya Report post Posted February 16, 2022 a post bed machine. Quote Share this post Link to post Share on other sites
Samalan Report post Posted February 16, 2022 9 minutes ago, fasn8ya said: a post bed machine. That's what I was thinking Quote Share this post Link to post Share on other sites
RockyAussie Report post Posted February 17, 2022 7 hours ago, fasn8ya said: a post bed machine. Not a hope on the little structured bag I showed above but yes On the op bag it should be possible. Quote Share this post Link to post Share on other sites