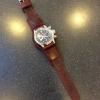
Gregspitz Report post Posted February 10, 2020 Where to start and end. I have made straps similar but how would you stitch this? Can it be done continuously? The original maker uses an old roller foot. thank you. Quote Share this post Link to post Share on other sites
Gregspitz Report post Posted February 10, 2020 Quote Share this post Link to post Share on other sites
Tugadude Report post Posted February 10, 2020 I can see how it could be done in two operations quite easily, but a single operation would involve sewing over or back-stitching fairly large areas. it is kind of a puzzle. I looked at it and visualized it a number of ways, but I can't see how to do the entire thing in one pass without going over some of it twice. If you can live with that, then you could begin at the top nearest the lug, go around the "U"-shaped portion, then straight down and around the strap end and back up the other side, then cross over horizontally under the "U"-shaped piece and terminate. It will be fun to see other approaches. Quote Share this post Link to post Share on other sites
Gregspitz Report post Posted February 10, 2020 Yes it is a puzzle. That is the way I thought to do it but I hope someone has another idea also! thank you Quote Share this post Link to post Share on other sites
Tugadude Report post Posted February 10, 2020 Quote Share this post Link to post Share on other sites
LatigoAmigo Report post Posted February 11, 2020 (edited) 7 hours ago, Gregspitz said: I hope someone has another idea also! 9 hours ago, Tugadude said: It will be fun to see other approaches. This is my take on the topic. I've created a little demo showing where to start, where to finish, and when the "trick" happens. In the PDF I've attached here, when I say "over and under," I mean like Al Stohlman demonstrates in his book "The Art of Hand Sewing." Any feedback will be appreciated. Watchstrap step by step 2.pdf Edited February 11, 2020 by LatigoAmigo Quote Share this post Link to post Share on other sites
mikesc Report post Posted February 11, 2020 (edited) Ok just saw this...if you look at the photo magnified..you can see where the stitches are "doubled" ( where there are two stitches ) ..So I quickly hooked up a wacom to this computer and drew over( the wacom is nowhere near in a comfortable place in front of my screen so the lines are more than a little shaky..but ) ..Start at "top left" near the watch face..run down the entire side of the strap and around the bottom and back up the entire right side to the watch face..then come back down that line ( see the double stitches there which drag the holes just slightly out of the straight alignment ) until the curve that is nearest the watch face..stitch that curve ( right to left ) across..When you get to the left hand line of stitches, make one single "double stitch" towards to bottom curve of the strap..and then stitch back across the watch strap ( left to right ) to make the second curved line..when you reach the right side stitch line..finish ( tie off )..Red line shows what I mean.. I didn't open LatigoAmigos pdf..but I'm presuming it will show the same thing..You could also start from the right hand side and just do each line in a "mirror fashion".. HTH Edit..Now that I've looked at LatigoAmigo's pdf..I think his way would be neater..But from the look of the stitches in the photo, and the way the holes are pulled out of a straight line on the right hand side near the watch face..I think that at least the strap in the photo may well have been machined the way I describe..or not :) Edited February 11, 2020 by mikesc Quote Share this post Link to post Share on other sites
Gregspitz Report post Posted February 11, 2020 Thank you for all of the work and hand sewing would work great that way. These are done on a roller foot sewing machine with no hand sewing. I think some of the sewing is done before the “flap” near the watch is put down and sewn in. Quote Share this post Link to post Share on other sites