ButtonLady Report post Posted December 2, 2020 (edited) There are two ways to load a spot (rhinestone, round, etc.) into a die. The way you do it depends on your machine and/or die brand: 1. Right side UP into the top die Pro... You can see what you're doing (your work is always visible). Con... Your fingers will be sore after pushing lots of sharp little prongs upwards into the die. Con... Rhinestone spots must be pre-assembled (= convenience, but at a cost). 2. Right side DOWN into the bottom die Pro... Your fingers will thank you. Pro... Rhinestone spots don't need to be pre-assembled (= potential cost reduction), although pre-assembled rhinestones can be used. Con... You need to keep flipping your work. So, before I get any deeper into The World of Spots... which setting method do people tend to prefer? As far as I can tell, the biggest benefit to top loading dies is always having your work in front of you, but does that outweigh the disadvantages? Thoughts and opinions are greatly appreciated! Edited December 2, 2020 by ButtonLady Forgot a word (it's late and my brain hurts). Quote Share this post Link to post Share on other sites
ButtonLady Report post Posted December 2, 2020 Oops... didn't cite the images. First is from Allstarco; second is from Standard Rivet. Quote Share this post Link to post Share on other sites
ButtonLady Report post Posted December 8, 2020 So, to clarify my question regarding machine dies for spots: Top Loading vs. Bottom Loading Do people (who set spots with machine dies) have a preference? Does it depend on the application? Help? Quote Share this post Link to post Share on other sites
ButtonLady Report post Posted December 12, 2020 A spot can also be called a "nailhead" (or "nail head") or "stud" —different names for the same thing! Based on the number of responses I'm getting... I'm guessing people here don't tend to use machine dies for application. Do folks in general prefer setting spots (nail heads, studs, etc.) by hand? Quote Share this post Link to post Share on other sites
tsunkasapa Report post Posted December 12, 2020 3 hours ago, ButtonLady said: A spot can also be called a "nailhead" (or "nail head") or "stud" —different names for the same thing! Based on the number of responses I'm getting... I'm guessing people here don't tend to use machine dies for application. Do folks in general prefer setting spots (nail heads, studs, etc.) by hand? That is the way I do it. Quote Share this post Link to post Share on other sites
ButtonLady Report post Posted December 13, 2020 10 hours ago, tsunkasapa said: That is the way I do it. tsunkasapa, that is gorgeous work! Your spacing and application is absolutely perfect, and the finished effect is stunning —stitching is nice, too. Do you set spots (nail heads, etc.) with them facing you, or do you have to keep flipping the leather because you're setting them upside-down? Quote Share this post Link to post Share on other sites
tsunkasapa Report post Posted December 13, 2020 After I lay out the spacing, I poke all of the holes with a chisel I made from a screwdriver. Then I set all the spots from the top, flip it and bend the prongs with another small screwdriver. Quote Share this post Link to post Share on other sites
ButtonLady Report post Posted December 14, 2020 21 hours ago, tsunkasapa said: After I lay out the spacing, I poke all of the holes with a chisel I made from a screwdriver. Then I set all the spots from the top, flip it and bend the prongs with another small screwdriver. That's a clever way to do it. I assumed some spots would work their way loose "in progress" if not set one at a time. Clearly that's not the case. Are you using 2-prong or 4-prong spots? Quote Share this post Link to post Share on other sites
tsunkasapa Report post Posted December 14, 2020 They are 2 prong. I also have a block of high density foam that I push the prongs into so I can keep the leather flat and do several before turning the project over. Quote Share this post Link to post Share on other sites
ButtonLady Report post Posted December 14, 2020 23 minutes ago, tsunkasapa said: They are 2 prong. I also have a block of high density foam that I push the prongs into so I can keep the leather flat and do several before turning the project over. Also clever! I wasn't even thinking about keeping the leather flat while you space the spots. The foam no doubt also prevents prongs from slipping out before they're set. Do you also use a foam block to cushion the spot fronts while you're bending the prongs? —or just a workbench or table? I apologize for all the questions, but this is fascinating and I'm thrilled you can share this information. Thank you! Quote Share this post Link to post Share on other sites
tsunkasapa Report post Posted December 16, 2020 No support on the front. I do put a piece of leather down to not scratch them, but other than that, no. Quote Share this post Link to post Share on other sites
ButtonLady Report post Posted December 19, 2020 Thank you for sharing your technique and experience, tsunkasapa. I think I'm most impressed by your specially adapted screwdrivers! I have a lot to think about as I move forward with this project. Quote Share this post Link to post Share on other sites
ryano Report post Posted December 22, 2020 I have an Standard Rivet Automatic spot machine that loads into a raceway from a hopper that I load. I also have a Smith single shot spot setter that I can load down from the top,(prongs down), or up into the bottom (prongs down), the die pivots to be able to load it from the top. Lastly, I have a few Standard Rivet No. 2 machines I load up into the bottom of the die with prongs down so I can see my work. Oh, I also load spots up into a rivet press, prongs down so I can see my work. I am sure there are some harness makers on here that use stops. My auto is used mainly for round spots and the single shots for some round, but mainly not round. Quote Share this post Link to post Share on other sites
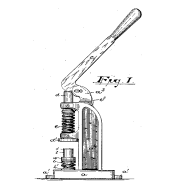
ButtonLady Report post Posted December 22, 2020 Thanks so much, ryano! This is really helpful information. We're developing a spot die that fits Osborne machines, which was originally designed for making fabric-covered buttons. Die will be single loading. I'm trying to figure out whether people prefer top loading to bottom loading (pros and cons above). 13 hours ago, ryano said: I also have a Smith single shot spot setter that I can load down from the top, (prongs down), or up into the bottom (prongs down), the die pivots to be able to load it from the top. If I have this right: you can load spots into the top (prongs DOWN)... or into the bottom (prongs UP) but you can pivot the die to the top so that the spots are in the prongs DOWN position (?). That's pretty cool. This might be the 1911 patent (it describes a "rotating bottom plate"): https://patents.google.com/patent/US1041884A/en 13 hours ago, ryano said: I have a few Standard Rivet No. 2 machines I load up into the bottom of the die with prongs down so I can see my work. 13 hours ago, ryano said: I also load spots up into a rivet press, prongs down so I can see my work. Okay, seeing the work in front of you when setting by machine is preferable to flipping over the leather. If you're loading spots individually by hand, are sore fingers a problem? —this is my primary concern. Quote Share this post Link to post Share on other sites
ryano Report post Posted December 22, 2020 (edited) 1 hour ago, ButtonLady said: Thanks so much, ryano! This is really helpful information. We're developing a spot die that fits Osborne machines, which was originally designed for making fabric-covered buttons. Die will be single loading. I'm trying to figure out whether people prefer top loading to bottom loading (pros and cons above). "So you work for CS Osborn? I just responded to a post that lists a few tools that CS Osborne should bring back out, that I think would sell pretty good" If I have this right: you can load spots into the top (prongs DOWN)... or into the bottom (prongs UP) but you can pivot the die to the top so that the spots are in the prongs DOWN position (?). That's pretty cool. This might be the 1911 patent (it describes a "rotating bottom plate"): "When I load into the bottom, the prongs will be down. All work is done so you can see your work and where the spot is going to be placed, this holds true for every machine I listed." https://patents.google.com/patent/US1041884A/en " This is the correct patent of the FE Smith spot setting machine. " Okay, seeing the work in front of you when setting by machine is preferable to flipping over the leather. If you're loading spots individually by hand, are sore fingers a problem? —this is my primary concern. "Correct on seeing the work in front of you when setting the spots, any other way you would be blinded. They are hard enough to get right when you can see where you are putting them. Yes, you do get sore fingers when loading from the bottom and gloves just do not work, so your poor index finger gets sore loading. I actually super glued a thin piece of leather on my finger one time and used acetone to take it off." When designing the spot setters, the dies should be thin as possible and be parallel to the driver (perpendicular to the work piece) for at least the height and combination of an angle to clear the neighboring spots so the setter will not hit them. So what I am trying to say, for instance, is the setter does not have to be thin for the height of the spot, it can be thin for half the height of the spot and shot away at a 45degree angle to clear the neighboring spots so you would have more material on the setter. The FE Smith setters are mainly stamped out and formed, so tooling would have to be made and you would have stamping machines and lathe work or screw machines for the drivers and anvils. Any other designs could be made on a lathe or screw machines. Some mill work would also be needed. If you are not familiar with screw machines, check them out. They can really spit some parts out very fast.There is a small.screw machine shop near me that does a great job. Edited December 22, 2020 by ryano Quote Share this post Link to post Share on other sites
ButtonLady Report post Posted December 22, 2020 I am seriously geeking out here... THANK YOU! Technically, we are an Osborne distributor, but very honored to be working with them to develop adapters for their machine. We're also working with SX Industries to develop our own line of dies (including spot). Leatherwork is still a little new for me; I'm a lot more comfortable with the button side of things! I took a look at the post you mentioned. I can certainly bring your suggestions to them. Yay! My mad patent searching skillz are up to the task. Allstarco sells a bottom loading spot die. Its advantages are (1) rhinestones + settings don't need to be pre-assembled; and (2) your fingertips don't get sore. This style appears to be the exception, with top loading dies being preferred (sore fingers notwithstanding). 1 hour ago, ryano said: When designing the spot setters, the dies should be thin as possible and be parallel to the driver (perpendicular to the work piece) for at least the height and combination of an angle to clear the neighboring spots so the setter will not hit them. So what I am trying to say, for instance, is the setter does not have to be thin for the height of the spot, it can be thin for half the height of the spot and shot away at a 45degree angle to clear the neighboring spots so you would have more material on the setter. Ah... another one of those things that makes perfect sense that never occurred to me. Thanks! 1 hour ago, ryano said: The FE Smith setters are mainly stamped out and formed, so tooling would have to be made and you would have stamping machines and lathe work or screw machines for the drivers and anvils. Any other designs could be made on a lathe or screw machines. Some mill work would also be needed. Dies I currently use, in various capacities, are all turned. I'm not sure what a screw machine is, or maybe I do and didn't know the name (?) Quote Share this post Link to post Share on other sites
ryano Report post Posted December 22, 2020 45 minutes ago, ButtonLady said: Allstarco sells a bottom loading spot die. Its advantages are (1) rhinestones + settings don't need to be pre-assembled; and (2) your fingertips don't get sore. This style appears to be the exception, with top loading dies being preferred (sore fingers notwithstanding). I do understand setting upside down on straps or belts, but I rarely just set spots on belts or straps in a linear line. The crystals and stones I use do not fall apart??? One other thing is the setters I use are nominal in size, so if the spot is 1/2" , then tje setter is .50" The are oversized/ sprung on the prongs to stay in the setter without falling out. Quote Share this post Link to post Share on other sites
ButtonLady Report post Posted December 23, 2020 3 hours ago, ryano said: The are oversized/ sprung on the prongs to stay in the setter without falling out. A machinist had to explain this concept to me. I iz dumb... Quote Share this post Link to post Share on other sites
ButtonLady Report post Posted December 23, 2020 3 hours ago, ryano said: The crystals and stones I use do not fall apart??? Somehow my response evaporated. I'll try again... The biggest advantage of bottom loading dies is that rhinestones don't need to be pre-set into a rim. Top loading dies require a rhinestone–rim assembly: Quote Share this post Link to post Share on other sites
ButtonLady Report post Posted December 23, 2020 14 hours ago, ButtonLady said: The biggest advantage of bottom loading dies is that rhinestones don't need to be pre-set into a rim. Missed the edit window (there's a reason I'm not a computer engineer). Loose rhinestones still need a rim when set with a bottom loading die. The advantage is that the two components don't need to pre-assembled —you drop the up-side down rim into the die, then the up-side down rhinestone into it: At least, I *think* it's an advantage. You don't need to purchase pre-assembled spots; you can just assemble them as you go along = cost savings. But... you would need to handle two separate (tiny) components per set instead of one. Hmm... Quote Share this post Link to post Share on other sites