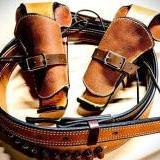
Brooks125 Report post Posted December 30, 2020 A few months back, I gave a photographer friend of mine my entire stock of holsters to do some nice photos. He did, and I'm sure they looked good, but he couldn't find them on his computer after he took the pics. Frustrated, I commandeered my son's CoolPix camera, got some black posterboard from the dollar store ($1 for 3) and did my own. After taking each photo on the seemless background, I pull them up in the download file, click on the "crop" option, crop it to my liking and hit the "Adjustments" key. "Clarity"- all the way up. "Vignette" - all the way up. VIOLA! right arrow next photo, repeat. Cheap and very nice for the price! It feels like I'm cheating! Quote Share this post Link to post Share on other sites
keplerts Report post Posted December 31, 2020 Looks great! I'd say they turned out very well. I always struggle with product pics. Quote Share this post Link to post Share on other sites
JLSleather Report post Posted December 31, 2020 Always took my own pics - just never trusted anybody to do it the way I wanted it, then sometimes the pace just didn't allow "outsourcing". These days with camera prices dropping and fancier toys coming out, my customers sometimes take better pics than I do Quote Share this post Link to post Share on other sites
AzShooter Report post Posted January 1, 2021 Nice job on the pictures and the holsters. That Coolpix camera is a very good way to do your own work. It takes great pictures and your layout an composition is very good. It's easy to edit and display with the right software. One hint, if you can, use a tripod and set the shutter for delay so that you don't get any shake from your hand or finger. Once I started using the tripod my pictures started coming out much better. Quote Share this post Link to post Share on other sites
CapnCohen Report post Posted February 6, 2022 Very nice photos and leather work! I have a background in photography and use a homemade light box to avoid harsh shadows (to build your own for a fraction of the cost of buying one, go to https://digital-photography-school.com/how-to-make-a-inexpensive-light-tent/). I then create composites in Photoshop. The lack of harsh shadows makes my product look more polished and my compositing task much easier. Also, by using at three or four soft lights depending on the project, I avoid glare and overexposure on the leather and metal fittings. For maximum clarity, set your Coolpix's ISO to 100 (200 maximum), use a tripod, do not use direct flash (cover with gauze or translucent plastic), and shoot with a timer. I like the use of the dark background for dramatic effect. But be aware that it will show dents and other imperfections (as in the revolver photo) much more than a white posterboard. Good luck! Quote Share this post Link to post Share on other sites