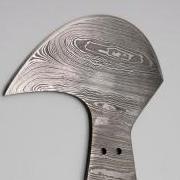
Munday Report post Posted July 29, 2021 I'm a woodworker and I'm building a stitching pony (I'm starting leather working). I'm looking for advice about a couple design features. How big of a clamping surface is recommended? Should I add a piece of leather to the clamping surface? I'll be adding a pair of magnets near the top. I think a needle will find a natural alignment on the magnet. Before I glue the magnet in I want to align it so the needle is in a convenient position. Is there a preferred alignment such as angled at 10 or 2 O-clock off the front or rear; maybe straight out the side (I'm guessing it is s personal preference but I want to avoid stabbing my hand grabbing for it). I'm test fitting the maple parts in the picture. It is designed to work on a chair or clamped to a workbench and rotated off the side 100 degrees. Quote Share this post Link to post Share on other sites
rleather Report post Posted July 29, 2021 Yes you definitely want to line the clamp area with scrap pieces of leather ( flesh side to the wood). I would not attach needles to the horse, I have never seen it done , just something to get in the way,IMO. Quote Share this post Link to post Share on other sites
zuludog Report post Posted July 29, 2021 Yes, line the jaws with leather, that is usually done with sewing ponies, saddler's clams, and similar devices Have a look at relevant videos, and of people sewing up finished items, and you'll see the sort of clamps and the area of leather they use Quote Share this post Link to post Share on other sites
Hasbeencowboy Report post Posted July 29, 2021 Just a thought but on the 2 ponies I have made, I put a spring between the jaws just to help opening them. I agree that you will want to put leather on your jaws. As far as the width of the jaws, one of mine is 3" and the other is 6". Your design is very similar to mine and mine works for me. I do not have any magnets but have never felt the need for any. Quote Share this post Link to post Share on other sites
dikman Report post Posted July 29, 2021 That looks very nice, Munday. You definitely want to line the jaws with leather, the size of the jaws is a personal thing, mine are about 4". As mentioned a spring fitted on the bolt between the legs is a good idea and replacing the handscrew with a cam-operated toggle will make life easier when repositioning things in the jaws. As for the magnets I wouldn't bother, wherever you put them will probably work out wrong! If you really want somewhere to put your needles stick some cork on there so you can stick the pointy end in. Quote Share this post Link to post Share on other sites
Klara Report post Posted July 30, 2021 Leather on the jaws like everybody said. I would also put a strap of leather over the upper bolt (vertically, and loosely enough so you can reach in to work the bolt/nut) to avoid having the thread catch on it while sewing. The lower bolt you can saw off or take out altogether and replace with glue or wood screws as you have a hinge for movement. As for the clamping surface, horizontally it looks fine to me. Vertically you could reduce the size, that might make it easier to clamp things when there's hardware in the way. Though I have a similar surface area and it has not caused enough trouble for me to do something about it. I have never felt the need for a spring, either to open or close the clamp. I don't quite understand what you want the magnet for. It almost sounds like you thought a magnet would somehow help with sewing. It won't. You don't want to have anything dragging on the needle in any way. Besides, your leather won't always be clamped in exactly the same position either... I'd say leave it as it is, just add the 3 pieces of leather. Once you've used it you will realise what improvements are needed, if any. Quote Share this post Link to post Share on other sites
Munday Report post Posted July 30, 2021 Thank you all for the feedback. I'll be skipping the magnets and adding leather and a spring. I'll be cutting the threaded rods to size. I'm thinking of epoxying the nuts to the bolts on the left side. The spacer is a little awkward but it does reduce the amount of threading needed with the knob; I might add a tether to the spacer. Quote Share this post Link to post Share on other sites
toxo Report post Posted July 30, 2021 For normal sewing the hinge isn't needed. Just angle the center piece so you have around 1/4 inch gap after you include the leather. The biggest problem is coming up with a clamping method that won't be forever snagging the thread. Quote Share this post Link to post Share on other sites
chuck123wapati Report post Posted July 30, 2021 (edited) one thing i had to re-do when i built mine was make the jaws narrower so my fingers could grip the needles while stitching and i could use my awl without the handle hitting the vice. and you may have a problem with your thread snagging up on that tee handle. It is a good looking vice! Edited July 30, 2021 by chuck123wapati Quote Share this post Link to post Share on other sites
Spyros Report post Posted July 30, 2021 I've made a couple of those smaller ones to be honest in the end they just don't work for me, unless I'm making something really small like a wallet. The problem is the depth of the opening, like if I want to put a bag in there it just doesn't fit. I've also tried a traditional clam design and that doesn't work for me either, I just can't get comfortable with that thing. So last weekend I went ahead and I made this giant clothes peg LOL That works. Fast opening/closing action, very comfortable height (for me anyway), and it fits pretty much anything. And easy to make if you have a decent bandsaw. Definitely keep the one you're making, it will get used, but I think sooner or later you'll also want something bigger. Quote Share this post Link to post Share on other sites
Spyros Report post Posted July 30, 2021 Also, IMO don't worry about "recommended", there's really no such thing. Make the tool that suits you. Quote Share this post Link to post Share on other sites
Munday Report post Posted July 30, 2021 I like the designs by Spyros (nice wood too). I wanted to make a quick release but I hadn't worked out how I wanted to do it. I'll have to use the stitching pony to see how it really works. I plan on replacing the T handle (it was what I had when I test fitted the parts). Quote Share this post Link to post Share on other sites
fredk Report post Posted July 30, 2021 I like magnets on mine. Somewhere for the needles to hang whilst I move the project in the jaws or just when I want to have a break from sewing. Also, a handy place to hang the awl, spare needles, if required. Never had thread hang up on them Quote Share this post Link to post Share on other sites
dikman Report post Posted July 30, 2021 Mine is not as classy, being made from whatever wood was handy, but it works for me. It' swivels on the base so it can be angled and I can put my feet on the base when seated to hold it steady. Quote Share this post Link to post Share on other sites
mike02130 Report post Posted July 31, 2021 You're going to catch the thread on the handle. Being a woodworker you know that a cord or air hose is always going to get caught on something. If you're going to sew bags or large items then you'll need a clamping bolt lower. I like the jaws to be sharp at the top where they meet. When adding leather it will round them over more. Your jaws are pretty rounded making the clamping point lower than the top. I take a lot of breaks and I would put a magnet on the jaws somewhere. If you want to be trick, get a round magnet, bore a hole slightly deeper than the magnet. Glue it in then glue a thin wood plug over it and sand it flush. Quote Share this post Link to post Share on other sites
Spyros Report post Posted July 31, 2021 (edited) 3 hours ago, dikman said: Mine is not as classy, being made from whatever wood was handy, but it works for me. It' swivels on the base so it can be angled and I can put my feet on the base when seated to hold it steady. Very nice! I'm still undecided if I should add a base or not on mine, for the time being I kinda like it that I can tilt it in any direction between my knees, and it stands up on it's own anyway. The timber on mine is literally the cheapest I could find, a $20 "mixed hardwood" sleeper from Bunnings. It's kind of a secret between woodworkers in Australia, if the "mixed hardwood" is cypress it's usually really pretty inside, some guys have built whole decks out of old fence posts and garden sleepers. Tassie oak is about 30 times more expensive, and pretty boring visually. I know I'm taking some chances with the wood, it has a couple of hairline cracks and it's not kiln dried obviously. Long term it might end up developing a twist or a bow as it dries and I may or may not be able to adjust it. But I've been lucky before and it's a quick project anyway, worse case I'll lust make another one. Edited July 31, 2021 by Spyros Quote Share this post Link to post Share on other sites
Klara Report post Posted July 31, 2021 This is mine. Not beautiful, but it does the job, didn't cost me anything and was made very quickly. You see what I meant by putting a strip of leather over the handle... Quote Share this post Link to post Share on other sites
toxo Report post Posted July 31, 2021 You beat me to it Klara. I like Dikmans one but I was going to suggest making the cam lock wider and incorporating a piece of bungee similar to yours to stop the snagging. Quote Share this post Link to post Share on other sites
Munday Report post Posted July 31, 2021 18 hours ago, dikman said: Mine is not as classy, being made from whatever wood was handy, but it works for me. It' swivels on the base so it can be angled and I can put my feet on the base when seated to hold it steady. The toggle looks like it is made of wood, did you make that? Quote Share this post Link to post Share on other sites
dikman Report post Posted July 31, 2021 Yep, another piece of scrap, the pivot is a piece of steel rod with a hole drilled and tapped and the hole in the toggle is offset so it acts as a cam. It can be adjusted for the leather thickness by rotating around the screw thread. And yes, it does catch the thread!! The whole thing was made in a hurry. I'd like to build a much nicer looking one but since I bought a 441 machine it doesn't get used much. Quote Share this post Link to post Share on other sites
Handstitched Report post Posted August 1, 2021 I have a ' traditional' saddlers clamp about gazillion years old, , plus a few small home made ponies , but nothing as fancy as yours , just the regular ' T' shaped jobs, with a bolt & wing nut, but they all do the job just fine. . I just put a few pieces of scrap split pieces on the jaws. But I really must change them every so often as they do get a bit dirty over time, wax etc. don't want that spoiling anything. But I do love the fine examples shown on here, I quite like them HS Quote Share this post Link to post Share on other sites
Klara Report post Posted August 1, 2021 Incidentally, my design hit its limits yesterday, when I wanted to sew a bag. The bolt is too high up and the inserts for the jaws are much too big. I'll try making a new French style clam (already have one, but the jaws don't close straight)... Quote Share this post Link to post Share on other sites
Spyros Report post Posted August 2, 2021 21 hours ago, Handstitched said: I have a ' traditional' saddlers clamp about gazillion years old, , plus a few small home made ponies , but nothing as fancy as yours , just the regular ' T' shaped jobs, with a bolt & wing nut, but they all do the job just fine. . I just put a few pieces of scrap split pieces on the jaws. But I really must change them every so often as they do get a bit dirty over time, wax etc. don't want that spoiling anything. But I do love the fine examples shown on here, I quite like them HS Only tried this style clamp once, it felt like trying to stitch while wrestling a crocodile LOL Other people love them though so I guess it's one of those things you have to try before you buy (or make). Quote Share this post Link to post Share on other sites
plinkercases Report post Posted August 3, 2021 Springs to open are a help to me and the less stuff sticking out to catch the thread loops the better. Nothing more frustrating then getting in t a good rhythm and snagging a wheel or clamp or bolt head or.... Here is mine, the base sites under my thighs when in a stool near the bench or the "tab" slip into a slot in a chair I modified if I want to sit in it for back relief OR the base can be clamped to the bench or work table - jaws swivel on base. spring opener with ratchet strap tensioner. ratchet it down at the lowest it can go and even that catches occasionally and I still mean to put a flap over it some day. Made from oak flooring boards in a rush as a prototype and never felt the need to do another. Quote Share this post Link to post Share on other sites
Handstitched Report post Posted August 3, 2021 23 hours ago, Spyros said: Only tried this style clamp once, it felt like trying to stitch while wrestling a crocodile LOL It did take some getting use to, but I use it a lot mainly on large or awkward stitching jobs. I got it at a farm clearing auction /sale not far from me ,( love those) . I'd like to make a slotted block/foot thingy for the narrow bit down the bottom to sit in as it does slide about sometimes, apart from that , it works fine. I gave it a good clean up as it was covered in a gazillion years of gunk @plinkercases thats a great example . I hear ya about the thread getting caught. Thats one good thing about my saddlers clamp, the thread doesn't get caught. Quote Share this post Link to post Share on other sites