


meg1517
-
Content Count
24 -
Joined
-
Last visited
Posts posted by meg1517
-
-
Hi...
We are having trouble with our dye colors fading. Has anyone used a UV protectant spray for leather? If so what kind of success have you had....
Does anyone have any success making their own custom colors that stay stable over a long period of time.
Last question....what are some good water based pigment dyes?
Look forward to hearing anyones experiences.....we are at a loss right now.
Thanks
Meg
-
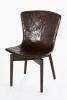
those are great LOVE them
i also would have them in my home
thank you for checking them out and the kind words. I just checked out your work and it is beautiful. The motorcycle seat is amazing! And I LOVE those pens that you make.
I would love to get one as a gift for my brother. He would totally appreciate the uniqueness of them and be blow away by the fact that they are hand made! I will email you from your blog about pricing if that is cool. Nice work on everything I saw!
Meg
-
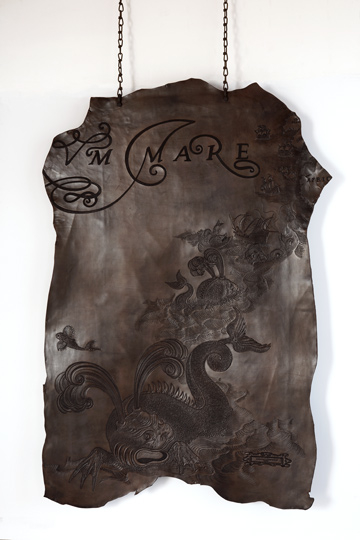
Wow Meg those are very nice I love the wall hanging
Clair
Thanks so much Clair,
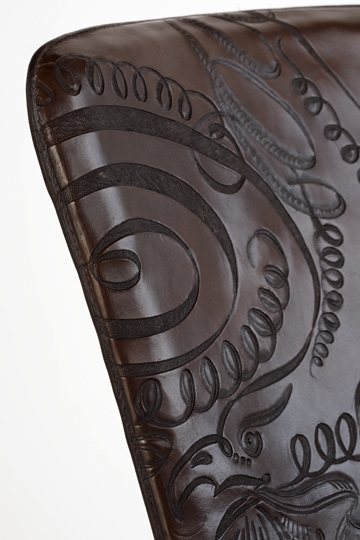
the wall hanging is actually cool in person because it is about 7 ft tall. We tooled it on the biggest dosset of leather we could get.
I wish we could have added more to the design, but we were under a time constraint....
Thanks so much for taking the time to check it out!
Meg
-
Meg, your wall hanging is a beautiful piece of work, no matter what the color.
In regards to your questions, you don't need to re-oil the leather to "seal" the color. A light coat of oil lubricates the leather fibers, but does very little to color (other than darken it). You might consider switching from oil to Lexol, which conditions as well or better than oil but darkens less.
Regarding cutting alcohol-based dyes with denatured alcohol, I believe you can mix it any way you want. It's all alcohol one way or the other -- the liquid is simply the suspension mechanism for the dye pigment.
As for another resist with a matte finish, you might want to take another look at the acrylic-based Satin Shene. Put several very light coats on with a sponge or cut 50% and apply with an airbrush. Either way should give you a nice satin finish.
Although you didn't ask this question, I'd take a look at Tandy's Eco-Flo line of dyes. They're water-based, which means they're not the best choice for outdoor gear that's exposed to lots of moisture, but they're plenty durable and color-fast. And I've found the right custom color is easier to achieve, maintain, and reproduce time and time again. I gave up on spirit-based dyes because every color I tried to create ultimately ended up black or very dark brown. (Which seems to be your experience, as well.)
One more tip -- don't experiment with dyes, conditioners and finishes on a finished product. That's what scrap's for!
Good luck, and I hope the above information helps a bit! -Alex

Hi Alex,
thanks for the reply. I have read about the eco-flo dyes and will try them out. I want to try the Satin Sheen out as well......what do you cut that with if you want to spray it?
Will that help with dye ruboff if we have antiqued the leather as well? In the event we use it on a chair....
Thanks again....as always this forum and it's members are so generous with their advice.
Meg
-
Love, love, LOVE it!!!

Kate
Thank you so much!
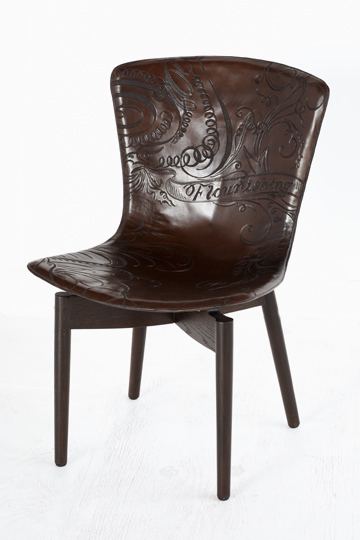
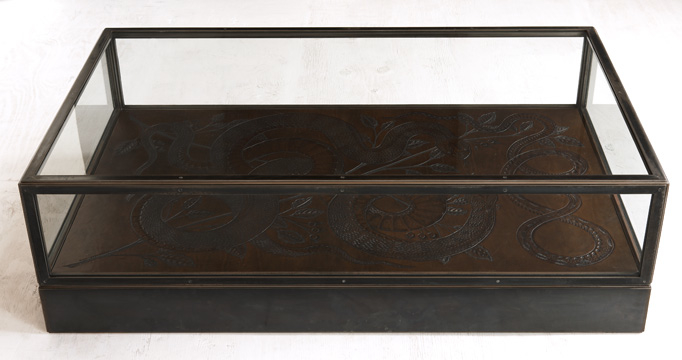
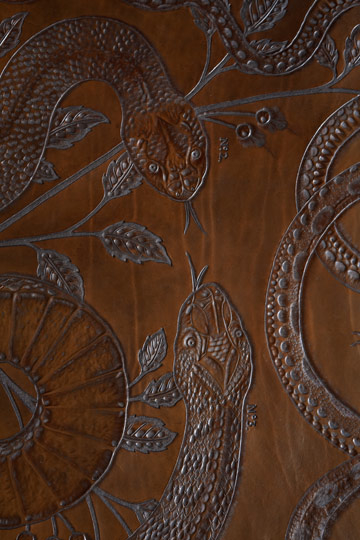
Really killer work! I'd love to have either of those pieces in my house!
thank you.....I actually kept the snake table for my house.....we'll see how long it lasts with 4 kids

-
wow, beautiful work, good luck with the furniture business
Thank you so much for taking the time to look at the images. Have a great weekend!
Your work is awesome to me!
So creative and artistic!
I like your style very much.
Thanks for sharing~
thank you so much....we have learned so much from this forum. It has been a life saver for many problems we have run into.
Meg
-
I have been so excited to post these because we have learned everything about our leather work from the fabulous people on this site.
Many thanks and we continue to throw questions your way and you continue to help us along....
Thanks
Meg


-
Ok I have been reading and rereading about the different ways to dye leather....Here is my problem I keep having.
I have been trying to make custom colors. The colors NEVER end up the color we began with.
Here is how we apply:
We have our finished tooled piece
We lightly oil it with neatsfoot oil and let it dry.
I then dye the leather.....at this point the leather is the color I want in....
I let it dry and buff the leather
Here is where it usually goes awry...
I oil it again to seal the color.....is this always necessary?
At this point the color darkens and start to bring out some browns....
Before we antique we use bag kote as a resist because I don't like the sheen with the acrylic top coats
After the bag kote is applied the leather is then really dark and doesn't dry lighter.
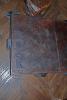
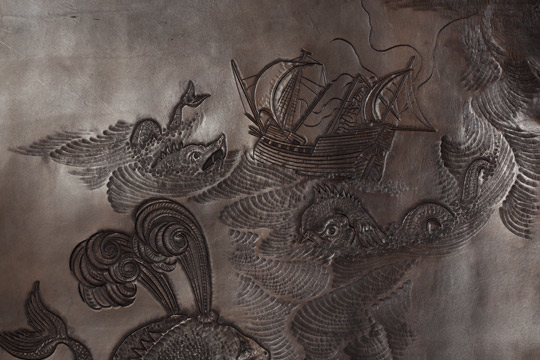
We tried to dye a recent project, that I attached, a large wall hanging we tooled an old map onto.
We initially dyed this a beautiful grey/blue.....
After the steps we usually use the wall hanging ended up very brown....
So my questions... do I have to oil the leather after I dye the leather and before I antique, to seal the color...
Are there any other resists that have a more matt finish that will not darken leather?
And last can you cut the dye w/ denatured alcohol up to any amount.....will the denatured alcohol ruin the leather?
Sorry for the long post.....really need feedback!!
Thanks so much
Meg


-
Thank You for the suggestion I will definitely check that out.
Meg
With holsters Ive heard of alot dip dying there holsters, you may try asking this question in the holster section not sure if alot of those guys read other sections to often.
Also do a search in that section, there have been many discussions on dying holsters.
-
Hi Tim
I am looking for different ways to dye our leather. Something that is really uniform. I thought I had read about one of the members who made holsters and he dipped his holsters to
dye them and then he said he sometimes dyes them by 'flooding' I might have read it wrong.....So I would love to know more about the process od dipping leather to dye it...if there is such a
process...and if so what is the process and the drying time and benfits etc.
Thanks so much for the help I really appreciate it.
Meg
Meg
I've never heard of Flooding leather. What are you want to 'dip' leather? What do you want to dip your leather into?
Give me some more info on what your trying to do.. I'll help where i can
Tim
-
Hi Tim
I am hand tooling leather to be installed on a bedroom wall. The overall piece when stitched together will be 12' x 8'. We are using a 5/6 oz leather and we do seem to have a problem getting our tooling to 'pop' more.
I was thinking that maybe our cuts were not deep enough. Maybe we are oiling it to much or to rough....we'll see. I'll have to experiment more. I am pretty new to tooling, but I have to say this forum has been a GODSEND!
Thanks
Meg
Meg
What kind of project did you do? I have always dyed first then oiled. Rub the leather gently . If you tool the leather, anything more than gently oiling with a piece of sheepskin WILL cause your tooling to be pushed down. I found out the hard way. I personally would never use a buffing wheel or any kind of machinery on any part of my piece other than the edges.
Good luck Happy tooling
Tim
-
This is GREAT. Thanks for posting it!
Meg
Introductory Carving Class Part One
Tools
Swivel Knife - Used to cut the outline of the pattern into the leather and for decorative and accent cuts.
Blade Styles
1.) Straight Blade - Used for general duty work. Has 2 cutting points ready
2.} Angle Blade. Usually used for fine detail and figure carving or filigree work.
3.) Hollow Ground Blade - A type of straight blade, the difference being in the way the blade is formed. There is a hollow formed in the center of the blade so that the cutting edge is much thinner at the center of the blade, allowing a sharper edge
4.} Hair Blades - come in two sizes (1M" & 3/8") ,and are generally used for "hair" textures in carvings.
5.) Double Edged' Blade- A straight blade that has twin cutting edges separated by 3/32" to allow cutting parallel lines.
Materials
1.) Steel- Can be sharpened and stropped so are easy to maintain. Requires more frequent attention, but can be rehoned if the edge is damaged. Is available in straight, angled and hollow-ground configurations.
2.) Ceramic.. Edge bevel is determined at the time of manufacture and can not be rehoned or shaped by conventional means. Can be stropped to true the edge. Since it is a ceramic, it is susceptible to chips, cracks and breakage if dropped or hit.
3.} Ruby.. As far as I know these are no longer manufactured because of cost, but can occasionally be found. They have the same disadvantages as the ceramic blade, but are a little tougher to damage and, with proper stropping, can carry the keenest edge of all materials that I've used.
Sharpening
Honing - Shaping the blade. Done with a fine grit whetstone. Since the angle of the bevel is critical and must be perfectly straight down the center of the blade, this will be discussed at a later date. Most blades should not need honing unless there has been damage.
Stropping - This is actually polishing of the cutting surface to remove slight burrs and to remove striations that build up friction and cause the blade to drag. Stropping is always done by pulling the blade across the strop and dragging it away from the cutting edge. NEVER strop into the cutting edge because this will destroy the edge.
1.) Strop - Using contact cement, glue a piece of leather, flesh side down, to a piece of wood. Once glue has completely set, wet the leather thoroughly with honing oil and set it aside to soak in overnight. After the oil has had a chance to penetrate the leather, rub the grain side down well with jeweler's white rouge. Don't worry if the rouge appears to clump or doesn't seem to coat the strop evenly. Once you start using the strop, the blades will even this out.
2. Strop the blade whenever you can feel any drag, or hear a noticeable "crunch" while cutting.
Use
Hold the knife in a way that is comfortable, but will allow you to roll the barrel between the thumb and fingers. This rolling motion is what enables you to cut curves.
Downward pressure from the finger lying in the yoke is what controls the depth of cut so the usual fashion is to lay the first knuckle of the index finger in the yoke. If your knife has a height adjustment for the yoke, use this until the holding posture is comfortable.
The actual cuttng is done with the point of the blade and a small portion beyond the point, so the shape of the blade that you are using will determine the way that you hold the blade. A straight blade will require you to angle the knife away from you, while an angled blade will allow you to hold the knife perpendicular to the work.
Always hold the knife straight. Don't allow it to lean left or right as you cut or you will "undercut" the leather. This is a shallow cut that will cause a thin raised edge. It will create a loss of depth in the pattern and can even deform the pattern. Undercutting is usually the fault of unconsciously leaning the hand to improve your view of what you are doing. Install good lighting, and turn the leather; notyour hand.
Never try to force your wrist or forearm into an unnatural position or motion. These joints were meant to move mostly in a straight line or slight, slow curve. If you need to make sharp curves or angles, hold the knife still and turn the leather with your free hand. The resulting cut will be more even and tight.
Once you start actually start cutting the pattern, CUT the leather, don't just scratch it. I usually cut at least the depth of the blade's bevel if the leather is thlck enough to allow that without weakening it, Then cut from the foremost objects and work toward those design elements that are more detail oriented.
Bevelers - Used to bring the pattern into relief and create a 3-D effect. The bevelers come in several styles and textures, but the use is essentially the same for all of them. The tool is wedge shaped and the point of the wedge is called the toe, and the rounded higher part is called the heel. The part that is perpendicular to the toe is called the face.
Textures
a. Smooth - the beveling surface is polished smooth to create a polished looking unbroken surface.
b. lined - Has a series of lines etched into the polished surface (available either horizontally or vertically) and are usually used to create a special effect.
c. Checked - The surface is checkered and is used to give a darker burnish to the leather and for slightly textured effects.
Styles
a. Regular - Available in smooth, lined and checked.
b. Undercut- Smooth only. This is a special purpose beveler designed to undercut the leather and forcing the surface upward. This gives a slightly embossed effect as that portion is raised above the plane of the project.
c. Pointed - These are especially designed for figure carving to allow access to tiny areas to bring them into sharp relief. They are available in all three surface textures.
d. Matting - These were designed for figure carving. The purpose is to mat large background areas fading away from the central figure element to give the illusion of greater depth. The can also be used to remove a ridge around a design that doesn't have a border line.
Use
a. All of the bevelers are "walked"; tap & move, tap & move.
b. The toe of the beveler is placed against the cut line, with the handle held straight up, but leaning slightly away from the direction of travel. This will reduce the tool marks in the bevel and minimize the point of the toe from digging into an unbeveled portion. The toe of the beveler is placed against the cut line, with the handle held straight up, but leaning slightly in the direction of travel. This will reduce the tool marks in the bevel.
c. The face of the beveler should always be against the cut line. It is easier to control and judge how your work is progressing if you turn the project as you work so that you are always looking at the tool face.
d. Depth of the impression is determined by the shading required by the project as would be determined by light and shadow. The depth of the impression is controlled by the impact of the mallet.
Notes
a. Tool marks can be smoothed by lightly running a modeling spoon over the beveled area. However, the best cure for tool marks is to practice so you don't generate them.
b. There is a smooth nylon blade that can be used in a swivel knife called a "beveling blade".
Backgrounders - Used to depress any background area and so enhance the prominence of the design and give the illusion of greater depth. They are available in a number of sizes and textures. There is another type of tool called a matting tool that can also be used for uniform texture backgrounding. In addition, other tools can be used to create unusual or special effects.
Use - These are usually walked to avoid a choppy or repeating pattern, and care must be exerted to insure uniform impact of the mallet for an even depth of impression.
Some styles of background tools
a. Backgrounder - Usually a checkered tool with a small tooling area having sharp points to the checkering. This insures a deep penetration with minimal impact on the tool.
b. Bargrounder - These tools have a series of tiny holes in a straight line and are perhaps the most difficult to use. Proper use requires exact alignment of each impression along a perfectly straight line. Due to the structure of the tool's pattern, you can not overstrike if the design deviates from the direct line.
c. Seeds - These tools actually look like tiny seed pods. There are half seed tools that are exactly half of the seed impression for use in tight areas or along cut lines.
d. Matting tools - These are textured figure carving tools that can be used for interesting or unusual backgrounds.
ModelingTools
Spoon - Used to smooth out hammer marks in beveling and as a beveler in tight areas.
Ball- Used mostly as an embossing tool from the rear of the leather.
Stylus - Pointed tool that can be used to scratch in accent lines or to trace carving lines.
Deer Foot - Beveled rod that can be used as an undercut beveler or to lift cuts for contour effects.
Leather - Only vegetable tanned feather is suitable for carving and stamping.
A. The tanning process doesn't destroy certain proteins in the skin that are used in making glue, nor does it fill the interstitial area in the fiber. These open areas allow the absorption of water that essentially reactivates these proteins and creates a kind of cement within the leather. When an impression is made upon the leather, that impression is in effect glued in place. That's why the water content of the 1eather is so important; too dry and no glue, too wet, and water has filled the interstitial gaps.
To achieve deep clear impressions, it is necessary that the work surface is non-yielding. (No bounce!) If it gives way under the impact of the mallet, the leather will move away from the tool's surface. This can have several consequences. One is the possibitity of a tool bounce giving a double impression, end a second that the tool mark isn't deep enough to give a good effect. The best surface upon which to tool is a good thick slab of smooth marble, or stone.
Casing Leather - Applying water to vegetable tanned leather to prepare it for carving or molding is called "casing". There are several ways to accomplish this, but the best results are achieved using a spray bottle. This allows an even application of the water without water spotting. Spray the flesh side of the leather evenly and heavily, after you see it penetrate the leather, turn it over and spray the grain side.
After several minutes, the leather will look as though it is beginning to dry. It may be, but the water is also penetrating deeply into the fibers. When the leather is nearly its original color, it should be ready to carve.
The leather may look dry, but dry leather will feel warm the touch. Properly cased leather should look dry but feel cool to the touch.
Because this leather, is made to absorb water, it requires finishing to seal it after the project is complete.This is accomplished by the application of a finish or sealer.
Pattern Transfer - There are several ways to accomplish this.
Tracing film. This is a thin translucent film of plastic. The pattern is drawn or traced onto the film, then the film is placed over the cased leather with the marked side up. Once it is positioned properly, the pattern is traced over using a ban point stylus. This transfers an outline onto the cased leather. Tracing paper - Used in the same fashion as tracing film, but is much more fragile. If tracing paper is used, it should be covered, front and back, with clear packing tape. This reinforces the paper and may allow more than one use before it is cut through.
"Craftaid" (trademark of the Tandy Leather factory) is a plastic template having the design elements formed by raised ribs of plastic. It is positioned on the leather, then rubbed briskly with a spoon to transfer the design to the leather.
John L. Henry 1998 Macon Georgia
-
What is fllooding leather? And how is it done? Does it give better dye coverage than an spraying dye?
How about dipping leather? How long does that take to dry?
I look forward to hearing more about this process...
Thanks so much
Meg
-
Hi Meg,
You have to get all the leftover dye off by rubbing/buffing before sealing. Rub with a dry soft cloth or I do mine with a 10 inch loose wheel at 3600 rpm, you have to be gentle if you do it that way and don't stay in any one place, it is just faster, not anything you can't accomplish by hand. Bag-Kote will give you a subdued finish that I prefer, and Tan-Kote will give a little more gloss, you probably have enough neatsfoot on board after 2 applications, just finish with the top coat.
Art
Hi Art
Thanks so much for the response that's what I'll do.
Meg
-
Hello All
I have another question about dying leather....I tooled some leather and them I oiled it with Neatsfoot oil. I let that dry and then I dyed the leather with
Fiebings professional oil dye, let that dry and oiled the leather again with Neatsfoot oil. After the leather was dry, the color wasn't dark enough so I dyed
it again.....so here is my question: Do I need to apply another coat of Neatsfoot Oil to seal the fibers again or is it ok to just finish it with Bagkote. I just don't want any of the dye to rub off.
Thanks so much
Meg
-
Meg, I love the design - WOW! But it looks like there are some issues to resolve with the execution. I'm glad you shared it because of how different it is from the usual thing we see. Can't wait to see more of your work. What did you end up using for a finish?Kate
Hi Kate
Thanks so much. There are many issues to resolve with the execution. I would love to know what you see that needs to be worked on....I know the dying was an issue and I am running many experiments now, but please share what else you see as
I could you a lot of guidance from people who have been doing this longer.
On this piece we used bag kote as a finish....but the problem I think we had is I didn't allow enough drying time between
steps...so nothing really had time to set. Anyway I am running a bunch of tests and hopefully I will nail down a system.
Thanks for you input and I truely welcome more as I am soooooooooo new to tooling and I love it!
Meg
-
Well there are lots of ways to do this. The method that I use is I tape the backside of the project with the strongest packing tape that I can find. I tape it using overlapping applications and I do this in both directions. I then case my leather and slick it to help adhere the leather to the tape as I am compressing the fibers, kind of a two for one deal on that one.I know of a few people that will glue the project to a peice of heavy tight grained cardboard using rubber cement.
I know that a few people will glue to a piece of acrylic usning rubber cement.
I am sure that more people will chime in and help you out but these are the ways that I do it and a few that I know of.
Good luck and Happy toolin'
Tim Worley
TK-Leather
Thanks Tim, I will try this. Our piece is big so this is probably the best way to go.
thanks for your help!!
Meg
-
Meg,This is a copy of a recent post I made in answer to the same question:
Casing is a very important step in preparing you leather to be tooled. Years ago, saddle shops would have a "Casing box" which was usually a wooden box lined with galvinized steel sheets to prevent moisture from escaping the box. Needless to say these boxes were anything BUT airtight and you could put a pretty wet piece of leather into the box and remove it next day and it would be ready to tool.
Today, people use plastic trash bags, zip loc bags and ice chests, all which prevent ANY moisture from escaping....especially the plastic trash bags and zip loc bags. When you put your overly soaked leather in that sealed bag it did what it was meant to do....it preserved it....moisture and all! Your leather was not cased...it was just soaked!
When I wet my leather, I pull it through a pan of water. I want to see bubbles coming out as it passes through the water.....but waiting until all the bubbles are gone is way too long. Once you start casing you will learn how much is enough. The same holds with learning what the leather should look like when properly cased. Almost it's natural color.....a cool feel to it when touched to your cheek....you will get the hang of it quickly once you get started.
If you are going to utilize plastic bags to case your leather, you need to allow much of the moisture to evaporate BEFORE you put it in a bag. I let my leather begin to turn back to it's natural color before bagging it. I want it a little wetter going into the bag than what I want to begin tooling. The idea is for the moisture to be evenly distributed through the leather. Not wetter on the top than on the bottom. Properly casing your leather will result in cleaner, crisper and better colored tooling. In addition, properly casing the leather will allow you to tool a little longer than than just wetting it with a sponge and starting to tool. Wetting the leather with a sponge IS NOT casing!
Additionally, the more you have to re-wet the leather, the more definition you lose in your tooling! The colors fade, beveling begins to raise and the piece doesn't look nice and crisp because it isn't any longer. If you can wet your leather once and get the whole thing tooled then that is fine. It will look nice. But you won't get the nice burnish produced when beveling and shading that properly casing your leather will give you. Nor will it cut as nicely! When I am tooling a piece that I know I can't finish without re-wetting several times, I break the tooling down to sections and keep everything I'm not tooling covered with plastic wrap until I am ready to move on to the next section. I am not saying you can't add moisture as you go...it's just that the more you do it, the more you will lose.
I do not know one single professional tooler who does not case his leather. Give it an honest try...once you get the hang of it I think you will be sold.
I hope this helps....
Bobby
Hi Bob
Thanks for taking the time to repost this about casing. It is VERY helpful and something I wasn't doing before...so that answers a lot of questions for me.
Thanks for your time and sharing your knowledge. I really appreciate it!
Meg
-
You all are sooooo fabulous! Thanks for the suggestions. Another quick question and excuse my ignorance, what does it mean to CASE the leather.
How do you case the leather.
Thanks
Meg
-
Hi..
I have a tooling question. I am tooling a large piece of leather that needs to be as flat as possible when I am done. What is the best way to keep the leather from stretching and
cupping while I am tooling it so it lays flat when I am finished. Thanks so much sharing!
Meg
-
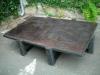
Thank you for your help. I will post my results!
I have attached a picture of our first piece of furniture...it is a tooled octopus on a hand made metal base.
Our dye was rubbing off when we stretched the piece of leather....we have some experimenting to do. Thanks so much!
-
yes you can- and welcome!That's the way it is normally done. oil the piece when you have finished, let it dry, dye the piece, let it dry, and apply a resist, let it dry, and apply antique. (let it dry!)
then buff and apply finish- I like neutral shoe polish for many things.
pete
Hi Pete
thanks for your quick reply...can I apply neatsfool oil after we antique and will that seal the leather? What finishes do you recommend for us to start experimenting with.
Again thank you very much!
Hi meg, welcome to LeatherWorker!Yes, you can use a resist over your dye job to resist the antique. In fact, that's what a lot of people do.
The basic choices for both the resist and the finish are acrylic (such as the *shene products), wax (such as shoe polish, bee-natural, or carnauba creme), or lacquer (which is hard to find, these days). Some finishes also make good resist agents. They all do a good job of sealing the dyes and antiques and preventing bleeding, fading, and rub-off. Some are more moisture-resistant than others. Wax and lacquer are more moisture-resistant than acrylic.
I'm sure others will chime in here, presently...
Kate
Hi Kate
Thank you tons!
What products work well as a resist and a finish? I have read a lot of people use neatsfoolt oil to seal the leather after it is dyed and antiqued...unless I totally misunderstood.
Thanks so much
Meg
-
I am very new to hand tooling and hand dying leather. I would greatly appreciate any suggestions on my question.....
Can you dye leather and then use a resist over the dye to antique the leather. I use Feibings Prof. Oil dye and then we use the Feibings Antique paste. Using the paste
darkens the leather I have already dyed, which makes sense, so I am wondering if I can use a resist on leather that has been dyed?
Also, the leather I am tooling is being used for furniture can anyone suggest a finish that is matte but will seal the leather and the dye.
Thank you Thank you for any suggestions and advice...this is my first post, but I have learned tons from this forum and am grateful to all of you for sharing your knowledge!!


Randal Model 132 Strap Cutting Machine For Sale
in Old/Sold
Posted · Edited by meg1517 · Report reply
I have a used Randall Model 132 Strap cutting machine for sale with a base. Blades are spaced to 1 5/8" straps.
I have no extra blades or spacers.
The machine works great! Has not been used in a while and was not used a lot.
Will not ship. Located in Chicago, Illinois area. Please contact me for more info.
$950.00
Meg.
m.mcguinness@mac.com