


ultimind
-
Content Count
18 -
Joined
-
Last visited
Posts posted by ultimind
-
-
Any update on this SV71 servo? How has it been working for you?
-
12 hours ago, shoepatcher said:I think the 335-G hook will work in your machine. Not positive. We found the Cerliani hook to be the best price for generic hooks. Hirose also makes great aftermarket hooks. That is the route I would take. Where are you located. If in the states, I would contact Yamata in California and see if they can help with a part number and if the hooks are compatible with Pfaff.
Thanks for the info! This gives me much more to go on. I am in Ohio. The Cerliani hook looks like what I've seen on YouTube for an aftermarket bobbin case. https://www.youtube.com/watch?v=KQihrdtPIxE
-
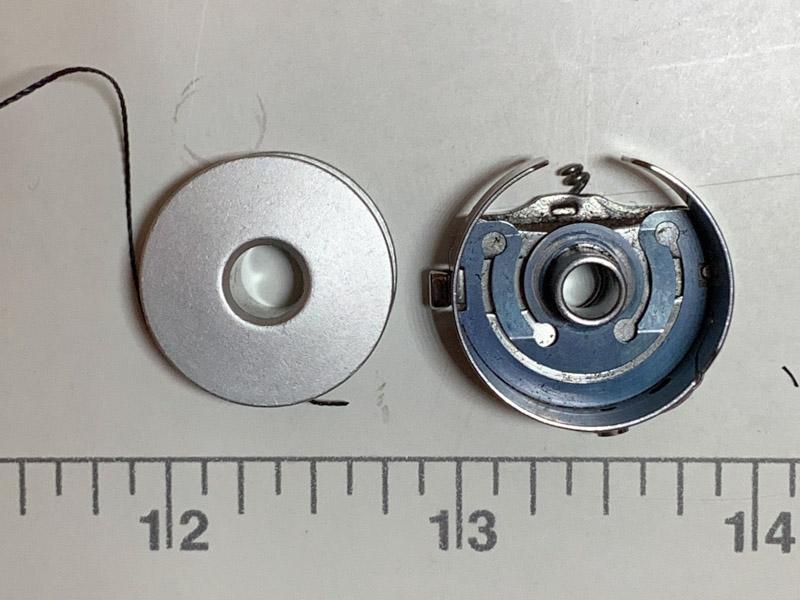
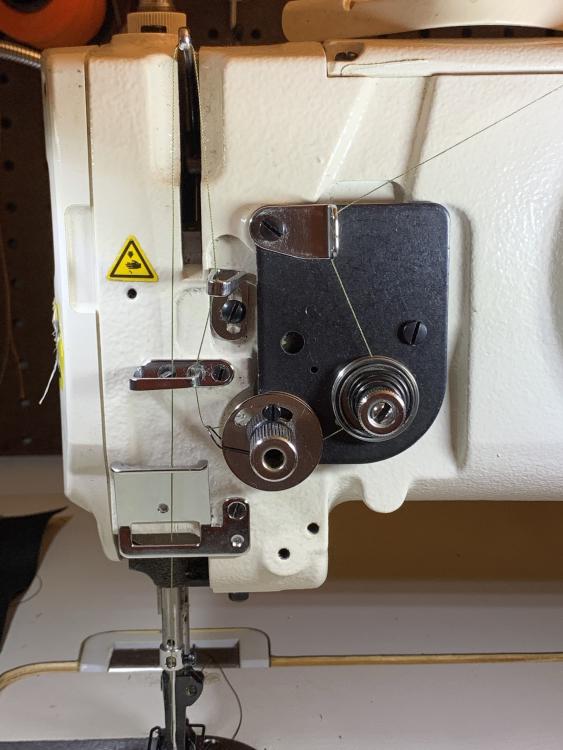
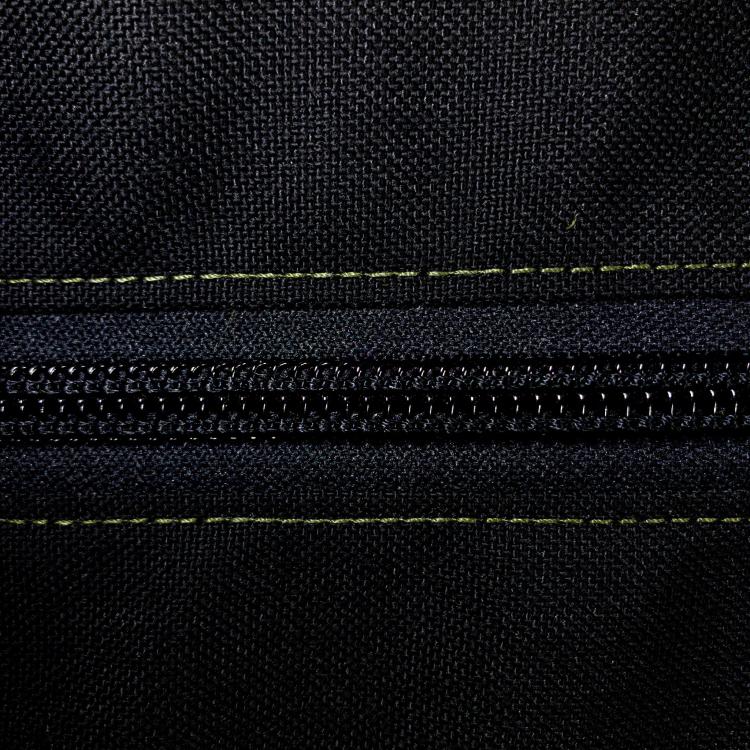
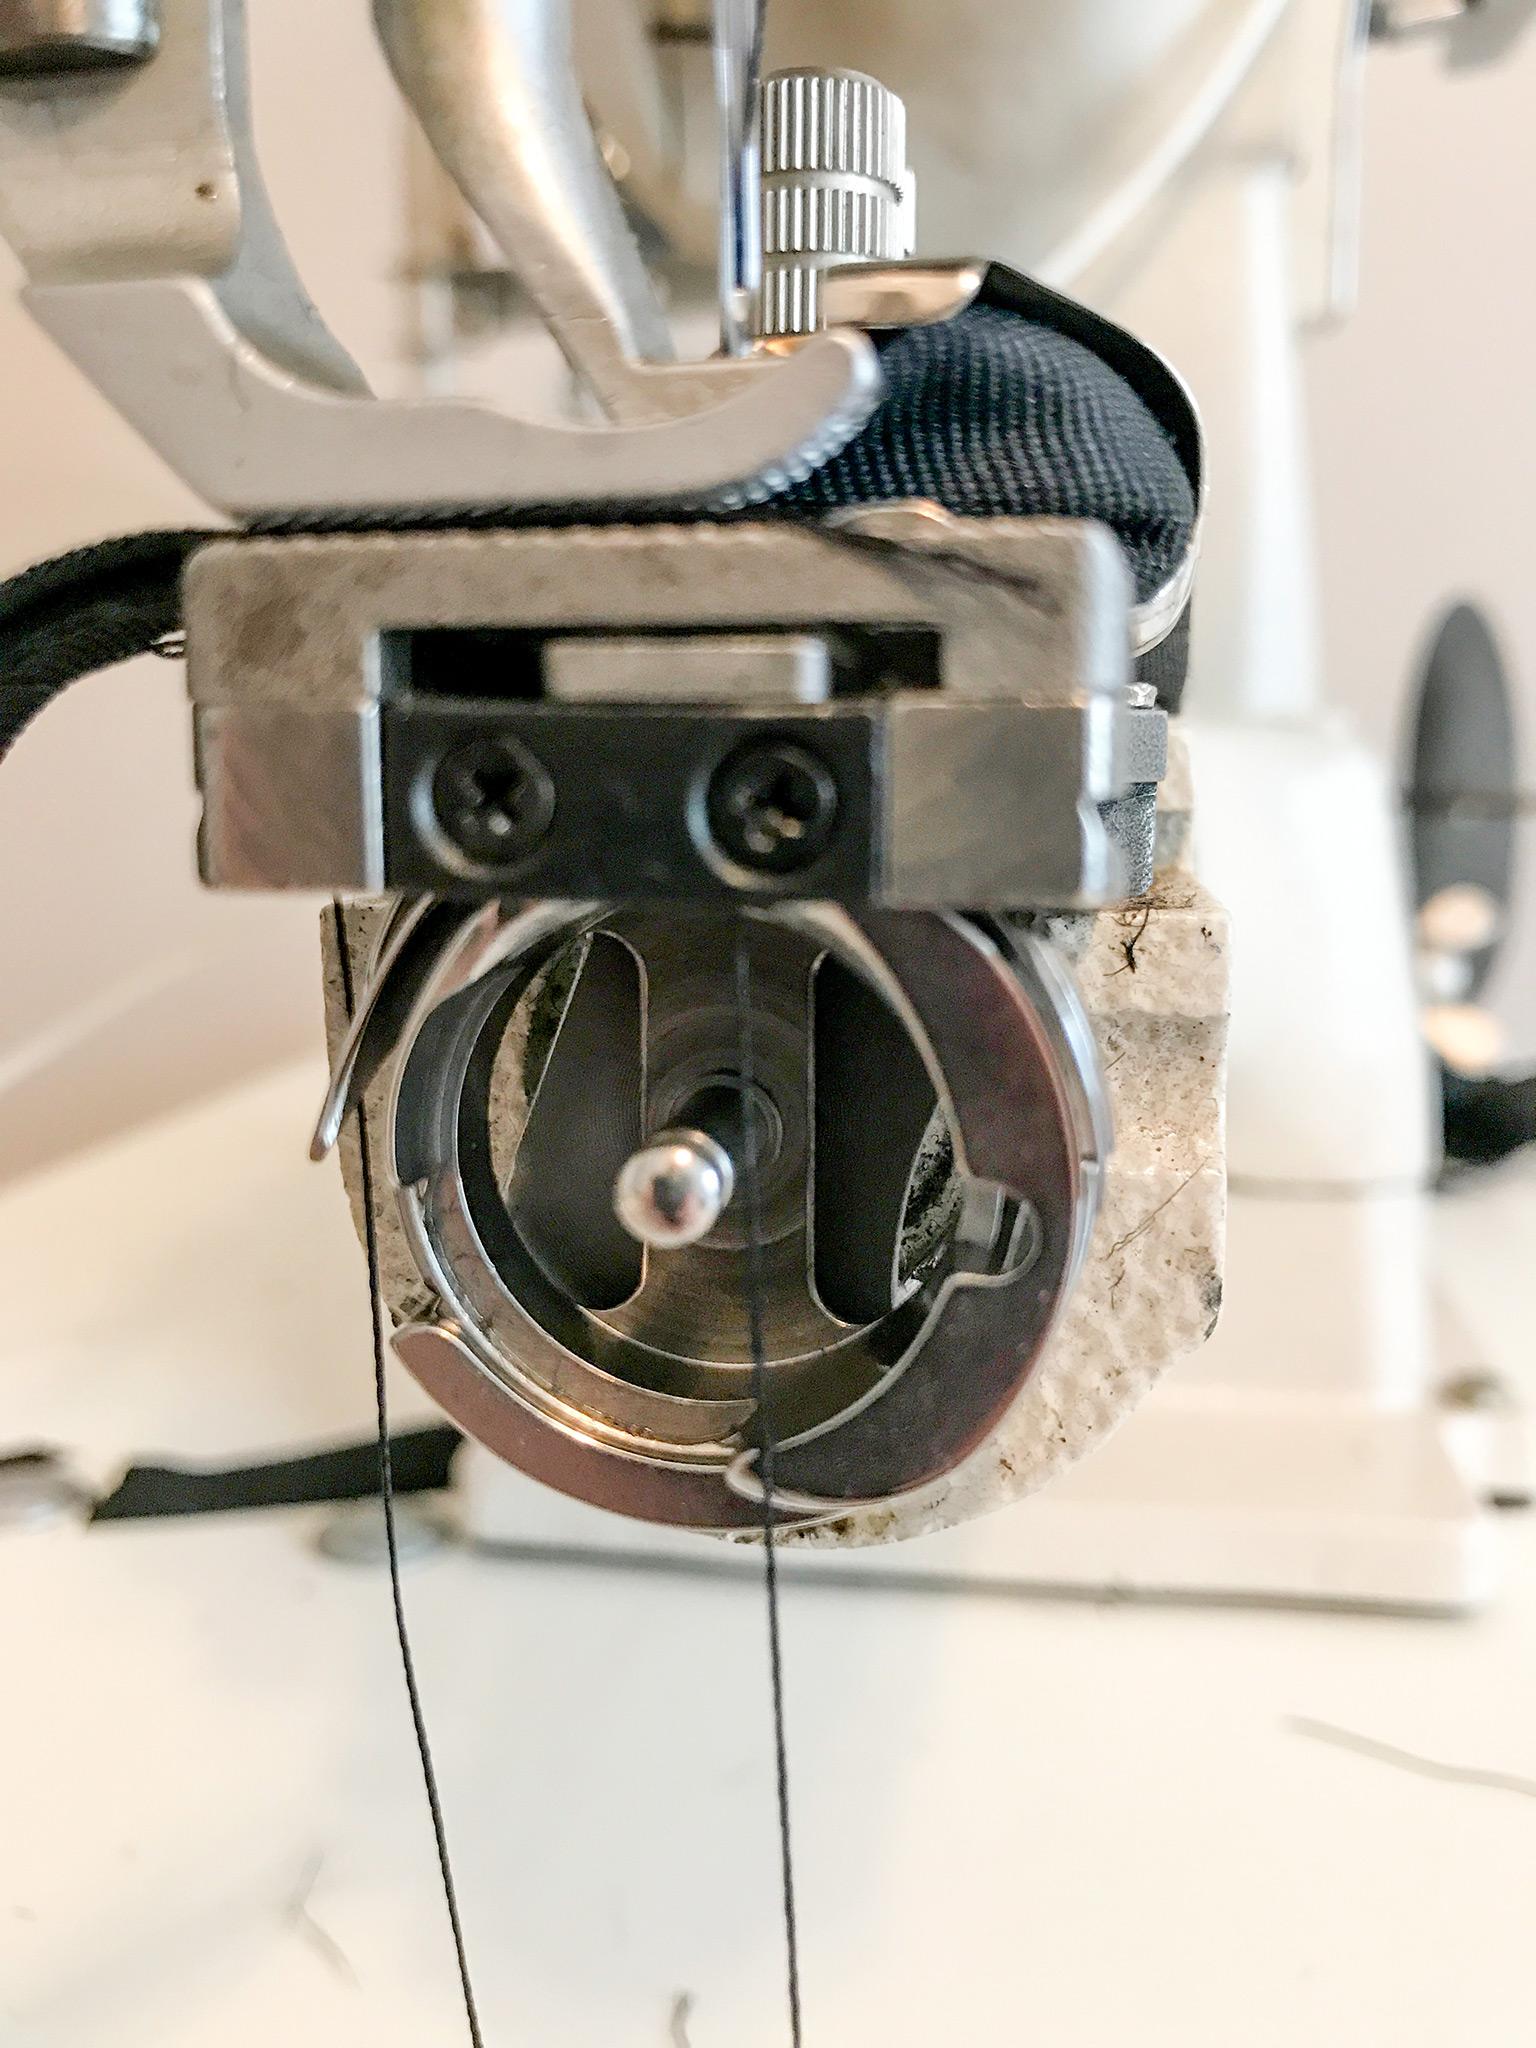
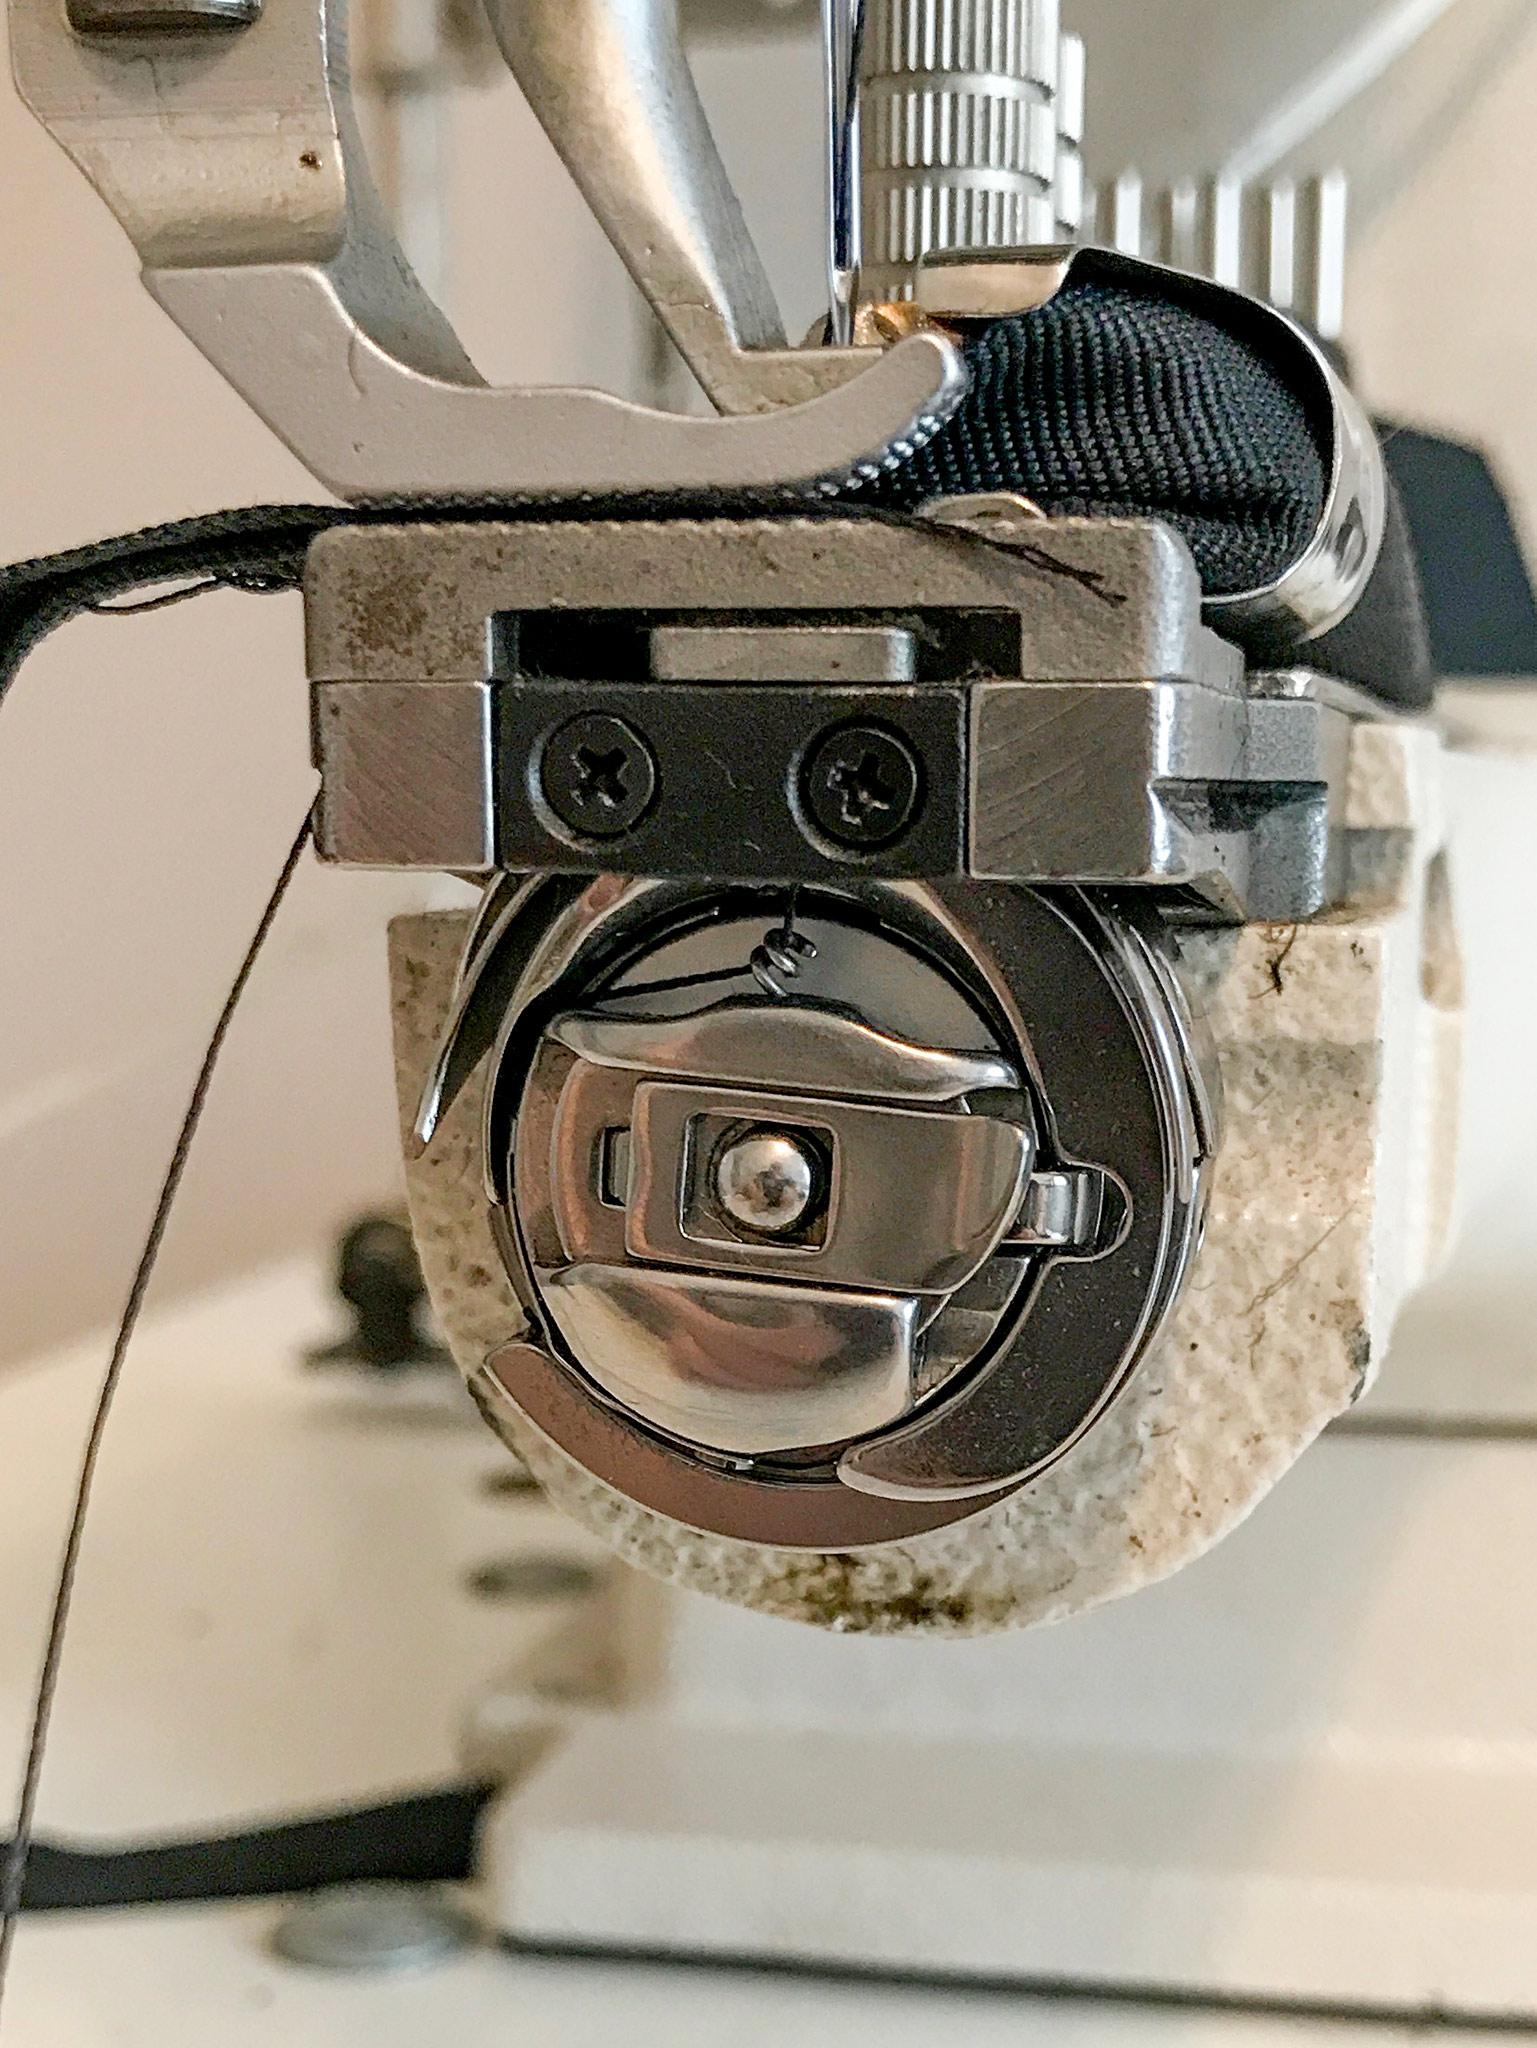
Here's the bobbin and bobbin case out of the machine. The machine works wonderfully but any increase in bobbin capacity would be welcomed.

-
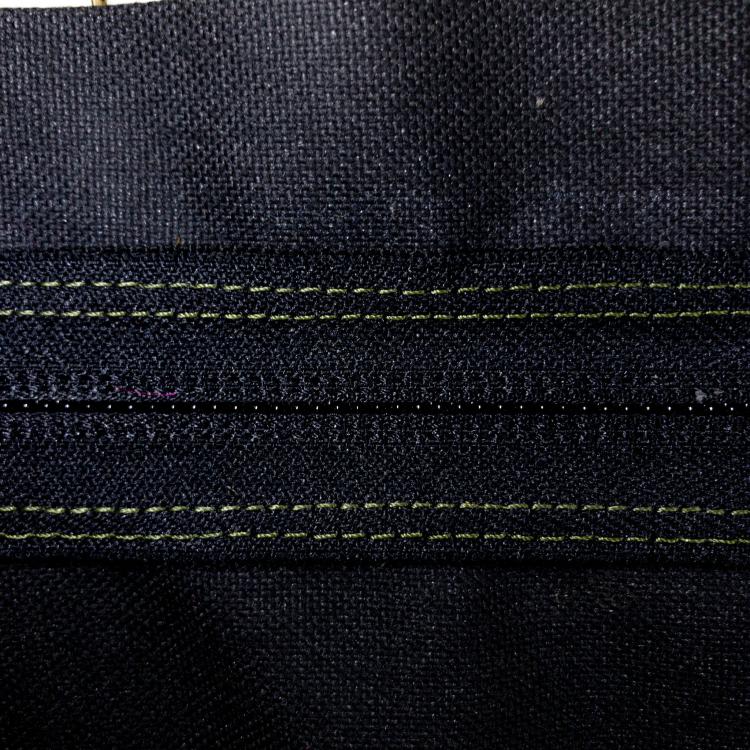
On 5/14/2019 at 5:14 AM, shoepatcher said:sounds like the old hook and bobbin that used to be in the Pfaff335 before they came out with the 335-G which has the larger bobbin. Hockey mender and I have switched out the old hook for the larger G bobbin size hook with no problem. Send us some pics of the hook and bobbin in the Yamata.
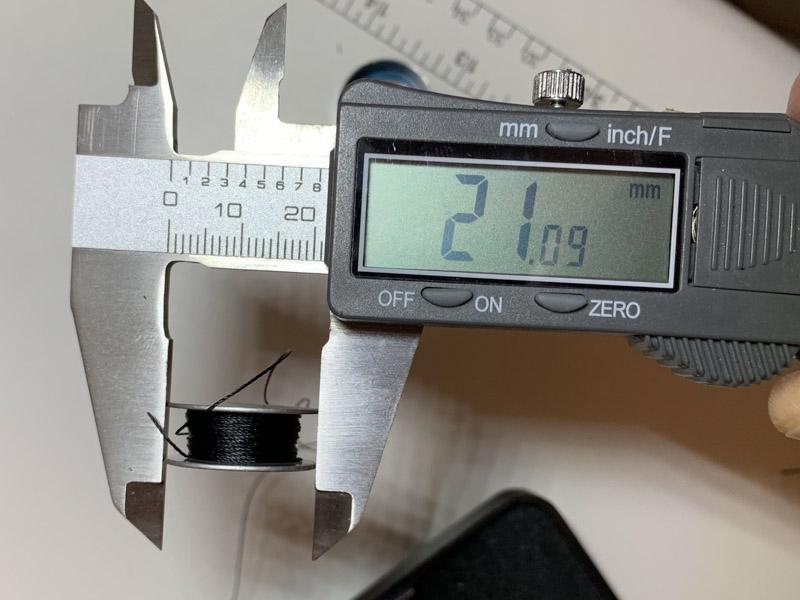
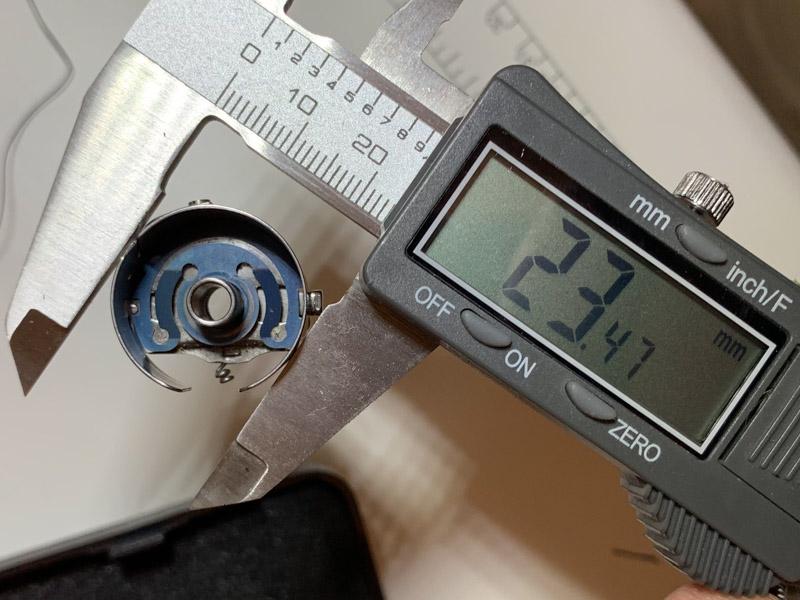
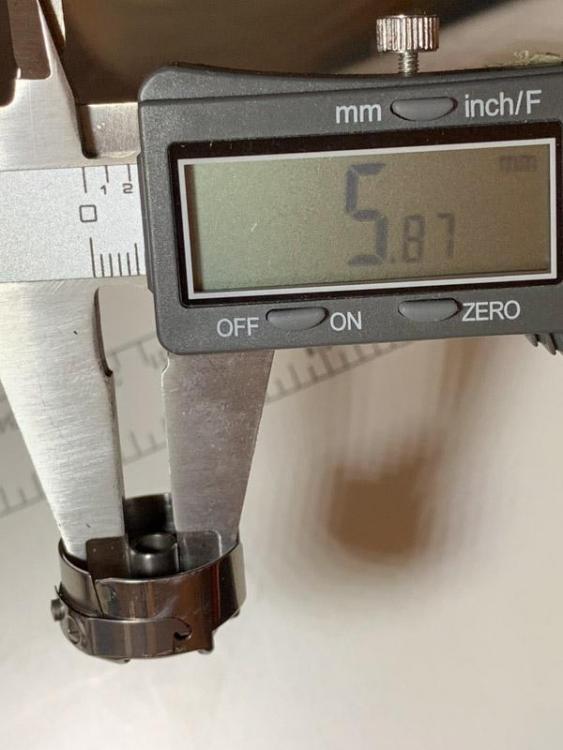
Whoops! Sorry for the late reply. Missed seeing this. Here's the hook and bobbin as it sits now.


-
I picked up a Yamata FY335A cylinder arm and was surprised that the bobbins are ever so slightly smaller than the standard G size that I am used to working with on my Singer machines. My question is whether this type of machine can have a (slightly) larger hook and bobbin basket/bobbin case assembly to take standard G-size bobbins? I've seen some anecdotal evidence of some aftermarket larger bobbin case/basket assemblies on YouTube but haven't found any parts that state this can be done explicitly. Thx!
-
Quick update - What "seems" to have solved my inconsistent tension issues is winding my bobbins on a different winder. The common variable previously was that all bobbins were wound on the onboard winder on the 1541S. I tried winding them on my 111W's side mounted winder and have had several hours of successful sewing with consistent tension.
My 111W side mounted winder does seem to have more tension on the disks than what the 1541S disks are able to apply. I've tried maxing out the 1541S bobbin winding tension spring and it still isn't as tight as my 111W's. Would this cause a significant difference in the quality of the wound bobbin?
-
44 minutes ago, DDahl said:I bought a 1508NH that had a similar uneven stitch problem. It turned out to be the surface finish on the tension disks. The quick solution was to use a piece of leather and jeweler's rouge to polish the contact surfaces of the tension disks to a mirror finish. Problem solved! These machines are designed for course thread. However the thread that I typically use has different friction characteristics. This creates a jerking because of the change between static and dynamic friction on the threads. Polished disks solve the problem. I find that I have to polish the disks periodically when the stitch quality starts to decline.
Dave
Dave- I'll have to give this a try. They feel smooth to my touch but that may not be as smooth as they can possibly be.
-
23 minutes ago, dikman said:What type of needle are you using? It's generally recommended that for nylon etc a "standard" round point garment needle is best.
Groz Beckert round point. I have been using Size 21 needles for the past year with great success on my 111W and on a shared 1541S at another workshop. I have a feeling that stepping down to 18 or 19 is going to be problematic when stepping over thick assemblies or sewing over zipper tape. I may have to swap needles depending on what operation I'm working on.
-
7 hours ago, R8R said:Nylons are tricky sometimes. You definitely want to use the smallest needle possible, and adjust the needle and bobbin thread tensions in very small increments. Never hurts to back the tension way off, then add it back slowly (both needle and bobbin threads, little by little).
As DonInReno mentioned, cheap bobbins can be problematic, especially when trying to find a fine balance of tensions. Also, too high tension when winding a bobbin can make the thread hang up in spots. Makes for mystery stitches where suddenly the bobbin tension goes wacko for just a few stitches.
Like others said, 69 thread typically calls for 18 needles, maybe 19 if it's tough nylon and you need to punch many layers.
Where you have the thread snaking through the guides, make sure the thread is winding through "clockwise". You have it going one way through the first guide, then the other way through the next. The thread may hang up a bit from this from un-twisting then twisting back. (or maybe not but consistency helps rule out other issues)
I'm going to try some prewound bobbins and see if that helps at all. From what I've seen they're wound at the factory with much more consistent tension.
I will be sure to double check my twist direction as it's going through the thread path - I hadn't thought of twist direction as being critically important. Muscle memory serves to make me do it the same each time but I've not really paid attention to the orientation.
-
7 hours ago, DonInReno said:I’d also check every edge that the thread passes over for grooves or burs. The only part you apparently physically moved is the needle plate - I’d take it off and look closely at it as well as how the bobbin case interacts with it.
Have you taken off the tension disks to look at their condition?
Have you grabbed the thread coming out of the tension assembly and pulled out a few feet looking for changes?
With the bobbin in the machine and fed up through the feed dog pull the lower thread to feel for binding on a number of bobbins. Cheap bobbins are famous for being inconsistent in almost all dimensions and I recently had to toss out a handful of new ones that would bind in the bobbin case.
I hope you figure it out - it’s always fun solving a mystery!
I've removed and cleaned the tension disks and there are no obvious defects - they are smooth and clean.
Pulling the thread coming off the tension assembly seems to be fine as well. Every different type of thread feels a bit different. Some bonded nylons come off in a silky smooth fashion (Coats Tex70 Bonded Nylon is smoother than A&E) but the same problems creep up regardless of thread vendor or thread age. I have some old spools of Coats Tex70 bonded nylon from 2008 that are significantly smoother than stuff from November of 2017. FWIW... Running Tex90 bonded polyester with a size 21 needle has far less issues - still not perfect, but the results are closer to being acceptable. Not sure what this means.
I'm going to attempt to source some Juki OEM bobbins and a OEM bobbin case as well.
-
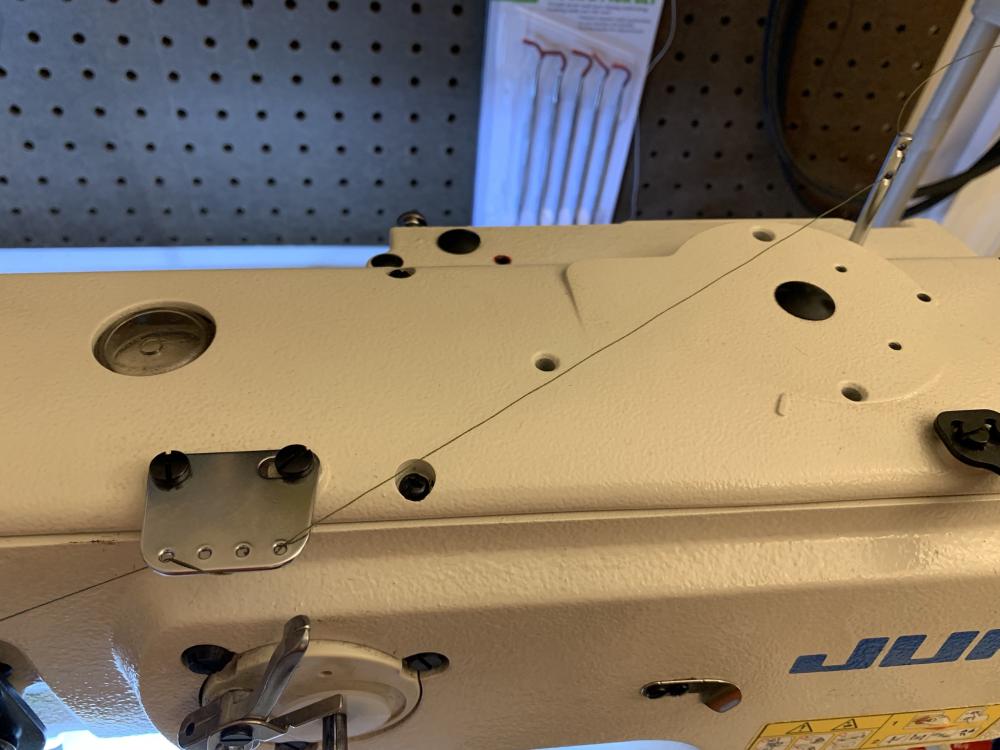
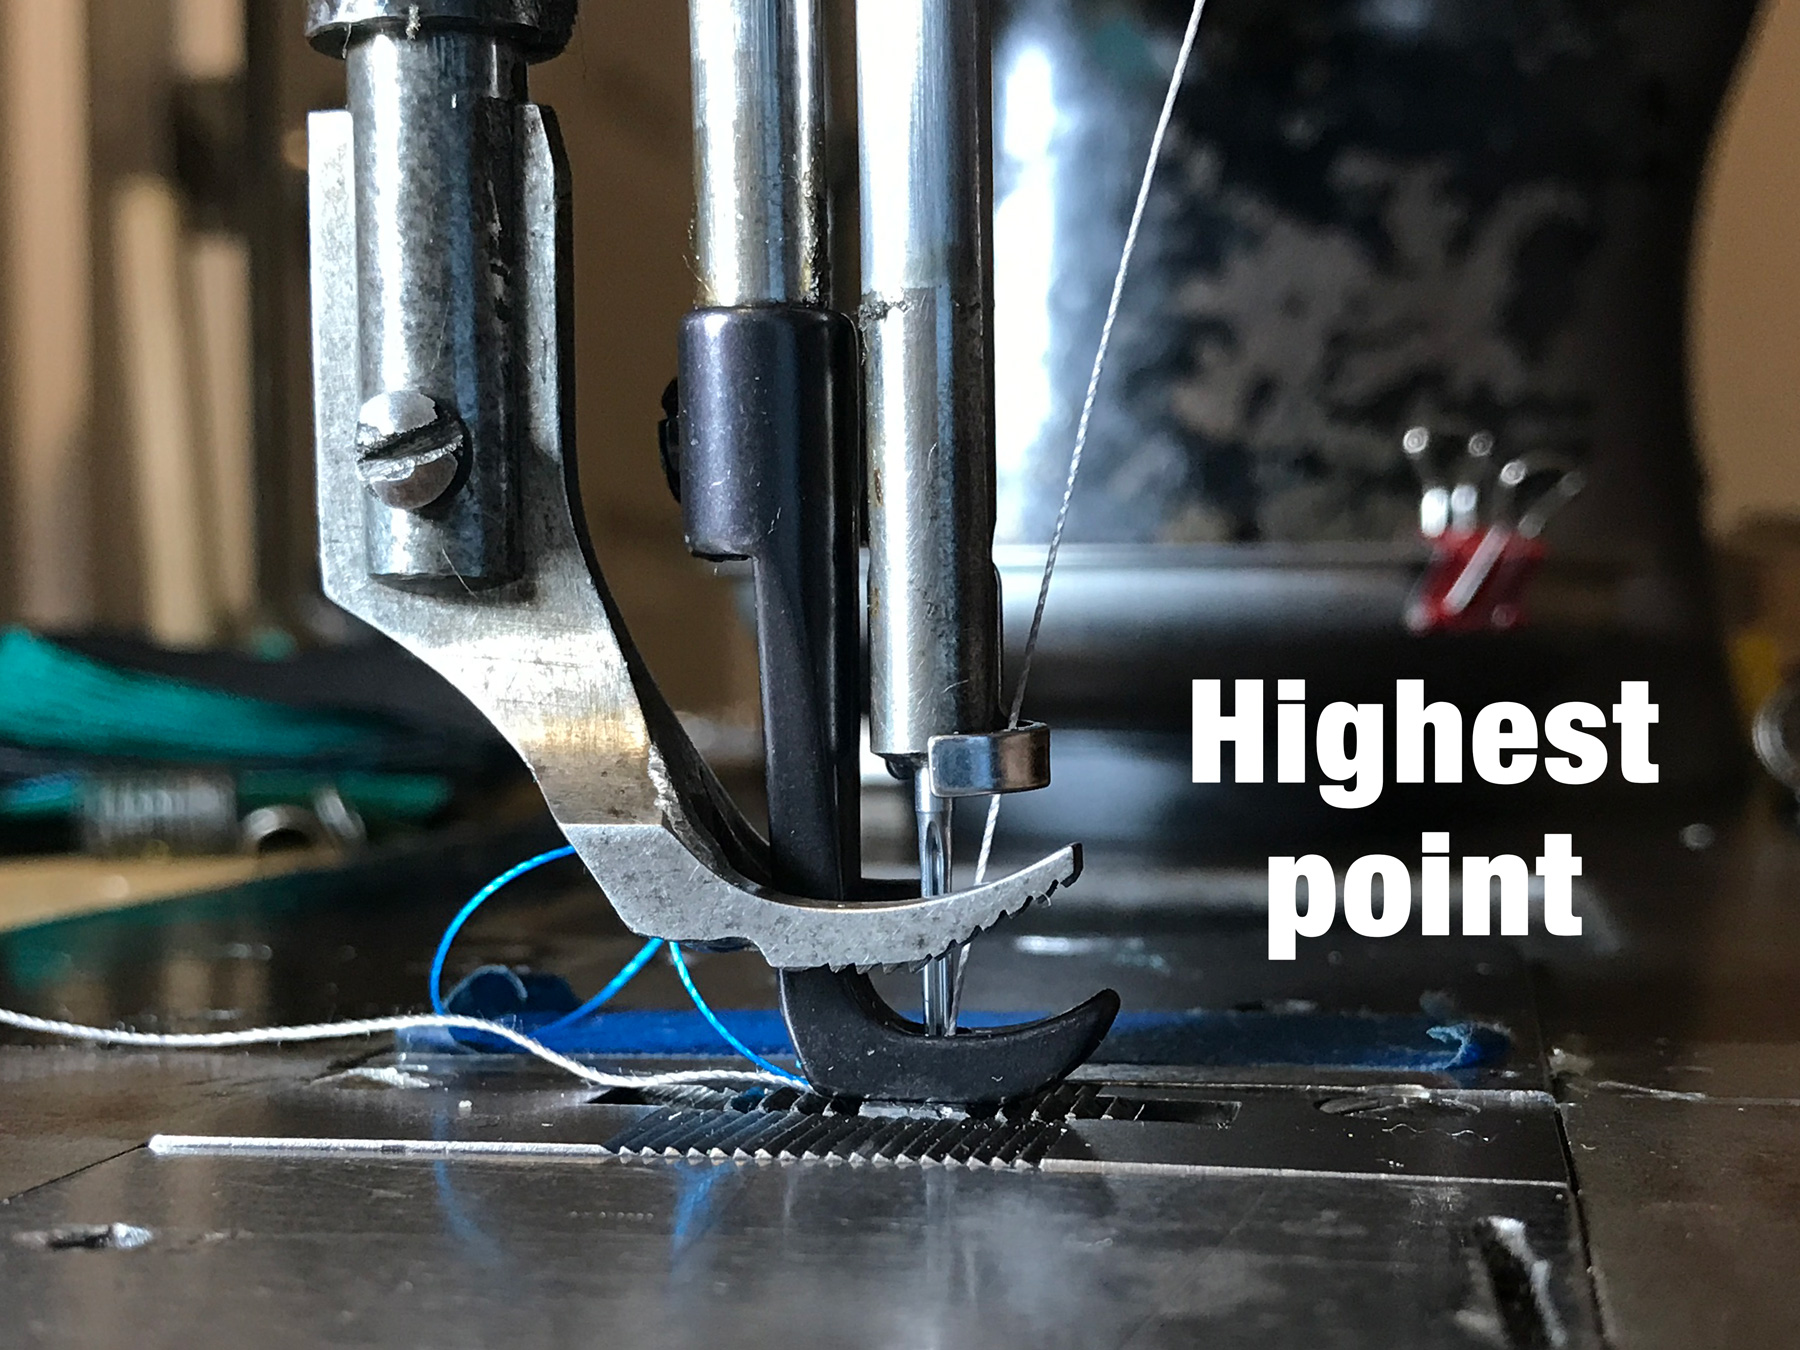
33 minutes ago, kgg said:In your last photo there is a thread retaining screw, spring and flat plate that is missing in the last large guide before the needle (where there are two threads). This holds the thread flat against the guide before the thread goes through the guide hole just above the needle. I think this is to keep the thread in a consistent position during up and down stroke of the needle so it don't flap around.
It was interesting I noted this part missing from nearly all the machines in the factory where I got this from. Perhaps removed for a reason or it's easily damaged in production. Looks like it's ~$25 in parts to get that piece replaced. Certainly won't be seeing the daily grind in my home shop that this machine saw for the first few years of its life.
-
57 minutes ago, kgg said:A couple photos of your top threading may help to spot something.
Here's the top threading. The guard in the last photo was removed to better see the thread path.
-
45 minutes ago, brmax said:In closing I wouldnt do anything without changing the needle size first, to at least close as possible to 18.
Changing down to a Size 18 did help with consistency to some degree.
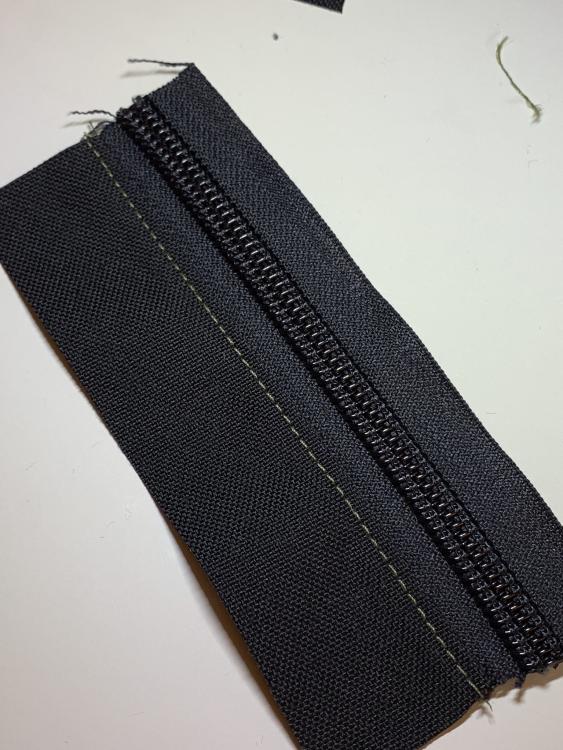
There's still a few spots where it it gets tight for a single stitch.
-
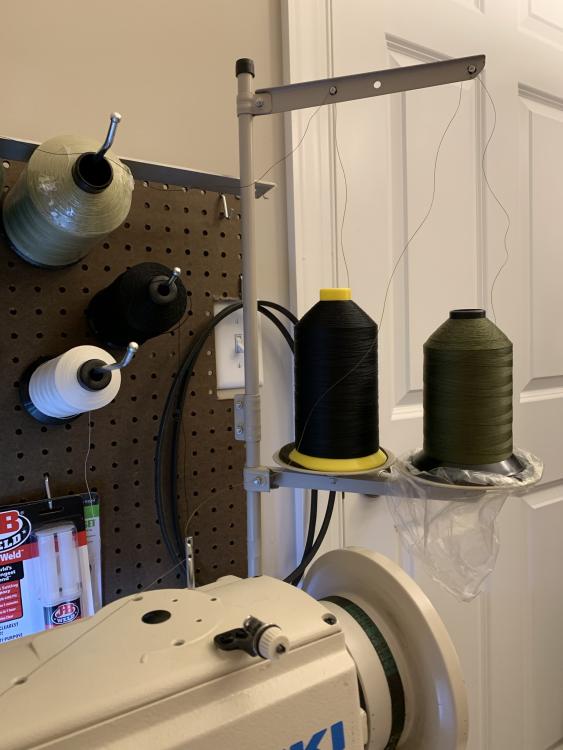
Picked up a new-to-me Juki 1541S and initially it sewed wonderfully. Machine was very dirty from being used in a factory environment. I'm afraid my good intentions of cleaning and oiling everything has caused some serious inconsistent tension issues. Oiled all indicated points per the manual, removed needle plate cover and evacuated all the old factory lint. Cleaned out bobbin case area with compressed air and a brush.
For this project I'm sewing nylon with Tex70 bonded nylon thread. Visually, it appears that the top thread goes from having too much tension, to too little tension. This happens at all sewing speeds. Whether I'm crawling slowly or ripping through at max speed. Bottom side fares a bit better but is also not entirely inconsistent. Any thoughts or recommendations would be helpful. I've ripped my hair out all day over this!
• I have checked all the thread paths and they are clean and clear, no snags.
• Needle is fresh - Size 21.
• Bobbin case holder is not Juki OEM - it's made by Haya (problem?)
• Bobbins were cheap $0.50/ea from Amazon in a 20pk (problem?)
• Hook timing appears to be correct
• Check spring path is clean and clear
• Tension disks are clean and clear
-
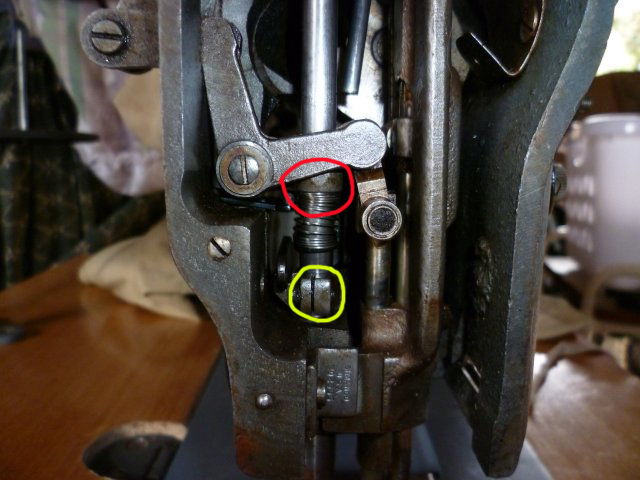
6 hours ago, dikman said:I had the same issue with my 111W117, it looks like the innards are the same. I loosened the screw at the back (photo 1) and adjusted the bar down that the presser foot is attached to (slides in collar in red, photo 2). You may need to adjust the locking collar in yellow, which the presser spring pushes on.
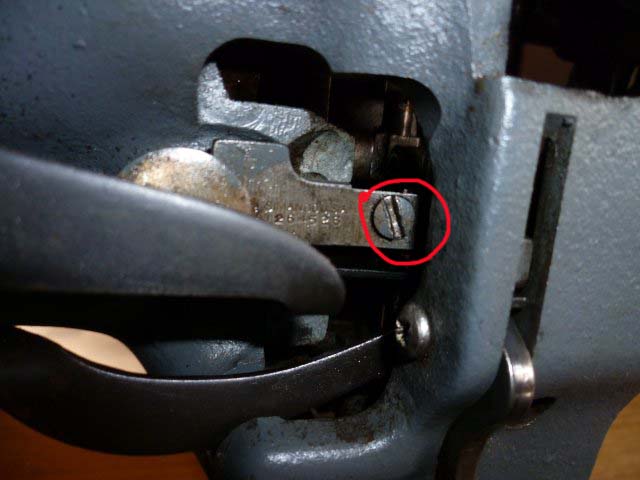
Be aware that it is probably going to require a bit of adjusting/readjusting of these screws, in conjunction with the one you've already adjusted, to get it working right. Be careful that the crank arm (above red circle) doesn't bind on the edge of the housing where it goes through the slot. By doing this you will reduce the height under the foot a little. IF you decide to do this and you get in a mess don't blame me, you've been warned!
This adjustment seems to do the trick. The long presser spring wasn't under quite enough tension to press the outer foot down to where it needed to be for thin fabric. I'm now sewing as thin as 2 layers of 500D Cordura as well as 6 layers of heavy canvas and have grip from the outer walking foot while the needle is advancing.
Thanks all for your insights! So many screws that seem undocumented in the original manual or any clone manuals of later machines.
-
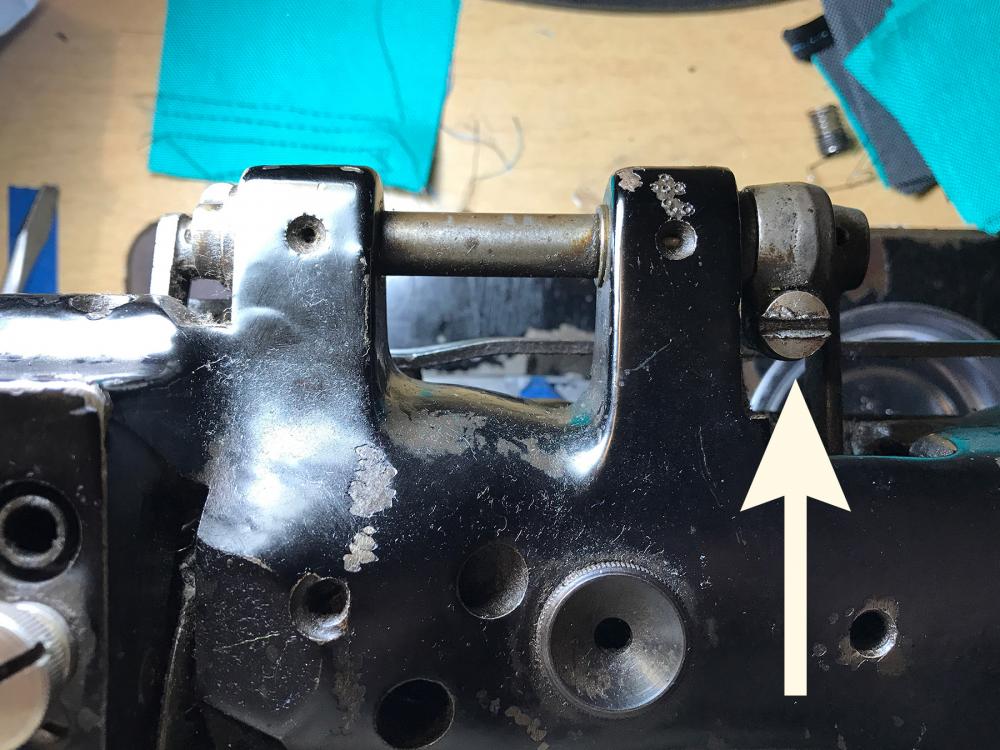
1 hour ago, dikman said:Which screw are you talking about? The screw that adjusts the rocking arm at the back is the usual way of adjusting the feet. The height of the bar holding the foot can also be adjusted from inside, but it can be a bit fiddly because, in my experience, all these adjustments tend to be interlinked.
This is the screw I've been fiddling with to adjust the feet. I've noticed they're very much interlinked and I have only had luck moving things up but not further down beyond where I've got them now.
-
I'm relatively new to the world of sewing and I've begun to get my Singer 111W113 back in working order after having it in storage for the past two years. When I bought the machine back in 2014 everything was aligned and the outer presser foot operated properly. While putting everything back together I'm realizing that the outer foot has far too much clearance, especially when sewing a few layers of material. I'm currently working with a lot of Cordura and heavy canvas for making bags. 6+ layers of Cordura are thick enough to make contact with the outer foot and provide pressure. Less material just slides around freely.
I've made attempts to adjust the height of this bar but it seems to be in it's lowest possible position. Is there more to adjusting the outer foot pressure / clearance than just the screw on the top rear of the machine? Thanks in advance!


ISM SV-71 Motor
in Leather Sewing Machines
Posted · Report reply
Fantastic to hear! Gives me more confidence in trying one out now.