


Shelly
-
Posts
328 -
Joined
-
Last visited
Content Type
Profiles
Forums
Events
Blogs
Gallery
Posts posted by Shelly
-
-
6 hours ago, Oxbo said:
Amazing stuff ! ! ! ! ! ! !
Thanks!
5 hours ago, YinTx said:Just wow!
YinTx
Thanks!
-
3 hours ago, MikeRock said:
Which style of ground seat does Cary build in the video? The steel strainer type or the built up Stohlman style?
Thank you and God bless.
Wade, metal strainer
-
Another excellent video to add to this list is Saddlemaking: The Ground Seat, first published on DVD in 2012, where Cary Schwarz, a founding member of TCAA, leads you through the process of building and installing a ground seat in a custom saddle. I got mine through the TCAA, not sure if it's still being produced. The ground seat is probably the most important part, and then equally important is the rigging choice and placement of them for horse and rider. Great thread!
-
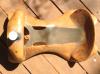
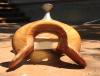
This is a custom reining saddle, should be done by end of this week.
Features Mincer conchos and hardware, border stamped with oak tooling, on chocolate Wickett & Craig skirting.Black Elephant inlaid seat, Roo buckstitching, and Orrell 3" flatbottoms in curly cedar to finish off. Already designed, made and delivered - matching breastcollar, headstall, spur straps. New chaps will also be made to go with the set. Now, if he can just get back in the show pen... Covid has no friends!

-
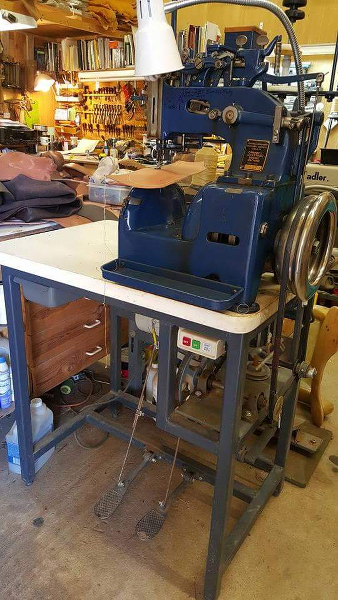
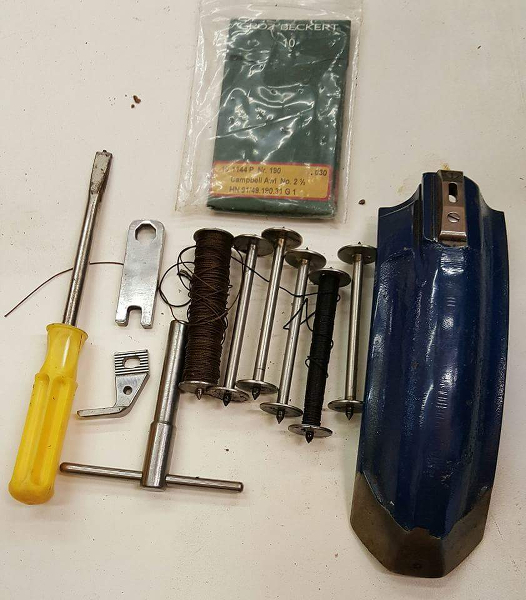 AVAILABLE FOR SALE - Campbell/Randall Lockstitch Sewing Machine- $5500 OBO. Located in Mineral Wells, TX.
This is a really good machine - makes great stitches, very pretty work. #7852 - this heavy stitcher has stitched saddles that have won top awards at Big Bend, and contests in CO, etc. This machine includes everything shown - 7 bobbins, speed reduction wheels, various tools, a pack of needles/awls, a book, table, bobbin winder, and an extra arch cover for the various attachments that can be added. I love this machine, but I am trying to et a bit more room in my shop. Pick up in Mineral Wells, (50 miles N of Ft Worth). Call or email for more info - 940-682-5657, mjliggett@gmail.com
-
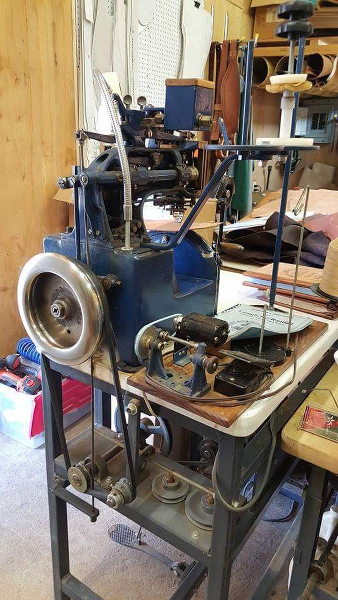
AVAILABLE FOR SALE - Campbell/Randall Lockstitch Sewing Machine- $5500 OBO. Located in Mineral Wells, TX.
This is a really good machine - makes great stitches, very pretty work. #7852 - this heavy stitcher has stitched saddles that have won top awards at Big Bend, and contests in CO, etc. This machine includes 7 bobbins, speed reduction wheels, various tools and a pack of needles and awls, a book, table, bobbin winder, an extra rear arch cover for the various types of attachments that can be added, etc. I love this machine, but I am trying to get a bit more room in my shop. Pick up in Mineral Wells - PM for more info - mjliggett@gmail.com, or call 940-682-5657


-
Hermann Oak has buffed hides. I think you can get them buffed from Wickett and Craig also. Costs a bit more. You can use an orbital belt sander on the parts you need to take the fuzz off as well. Just do what needs done, what is seen. I'm not sure what grit to rec as I only buy buffed hides for rough out saddles...
-
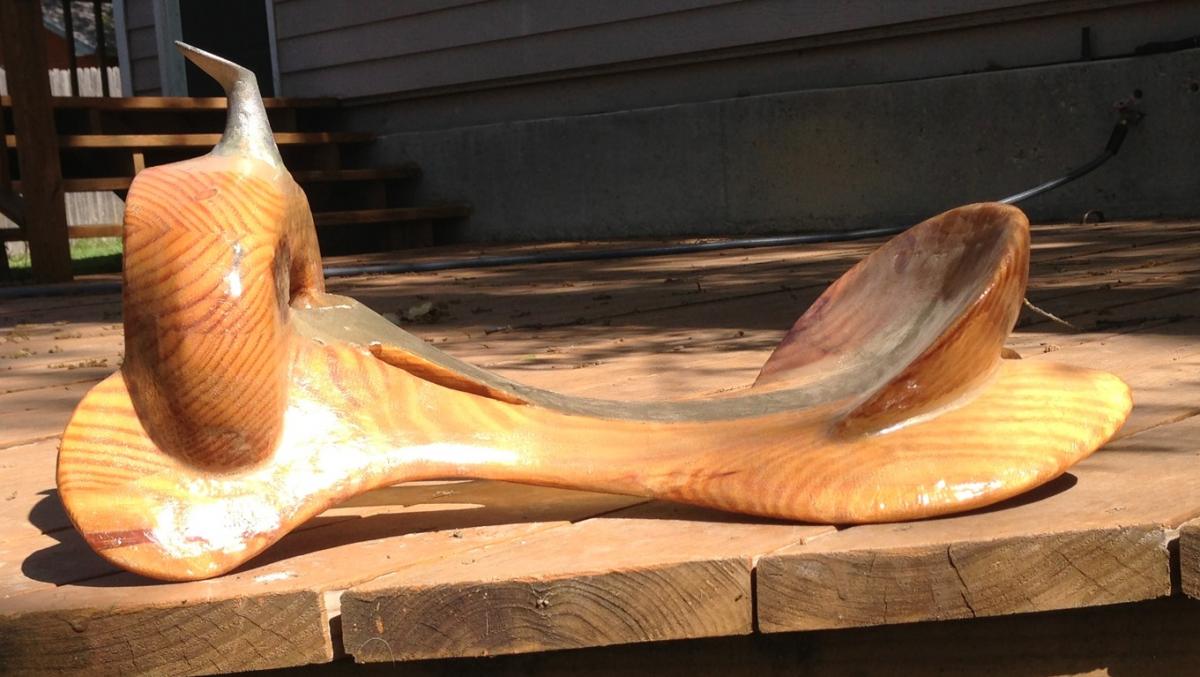
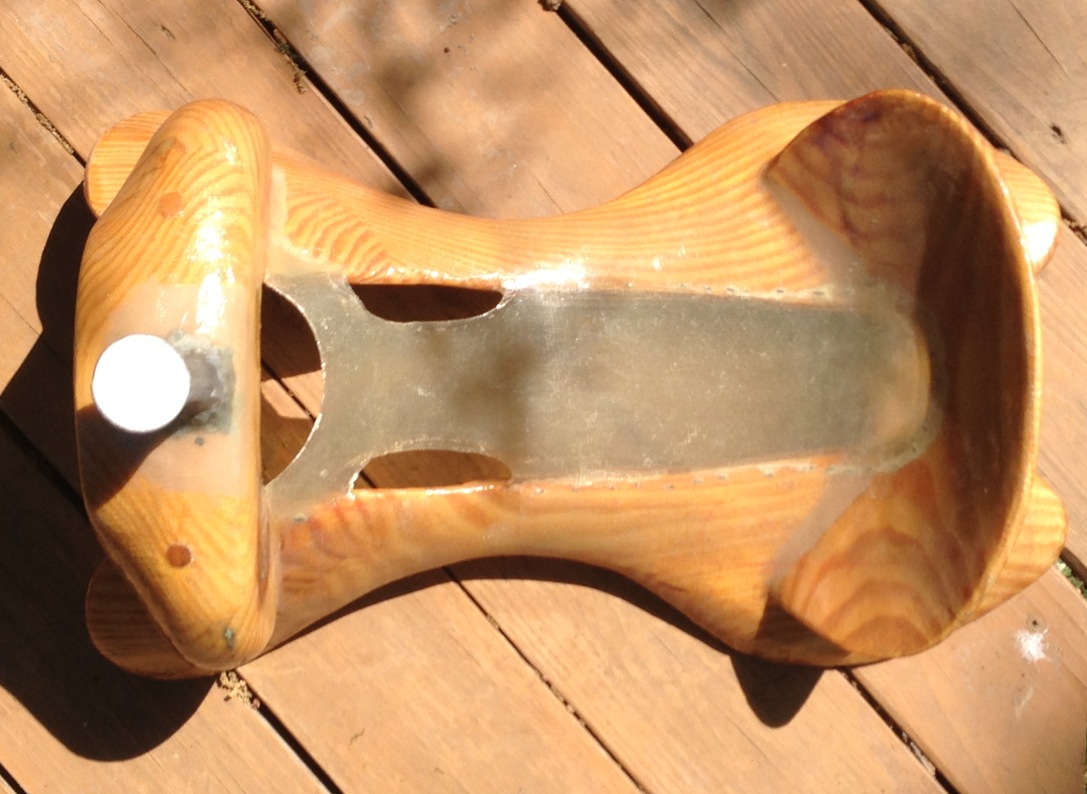
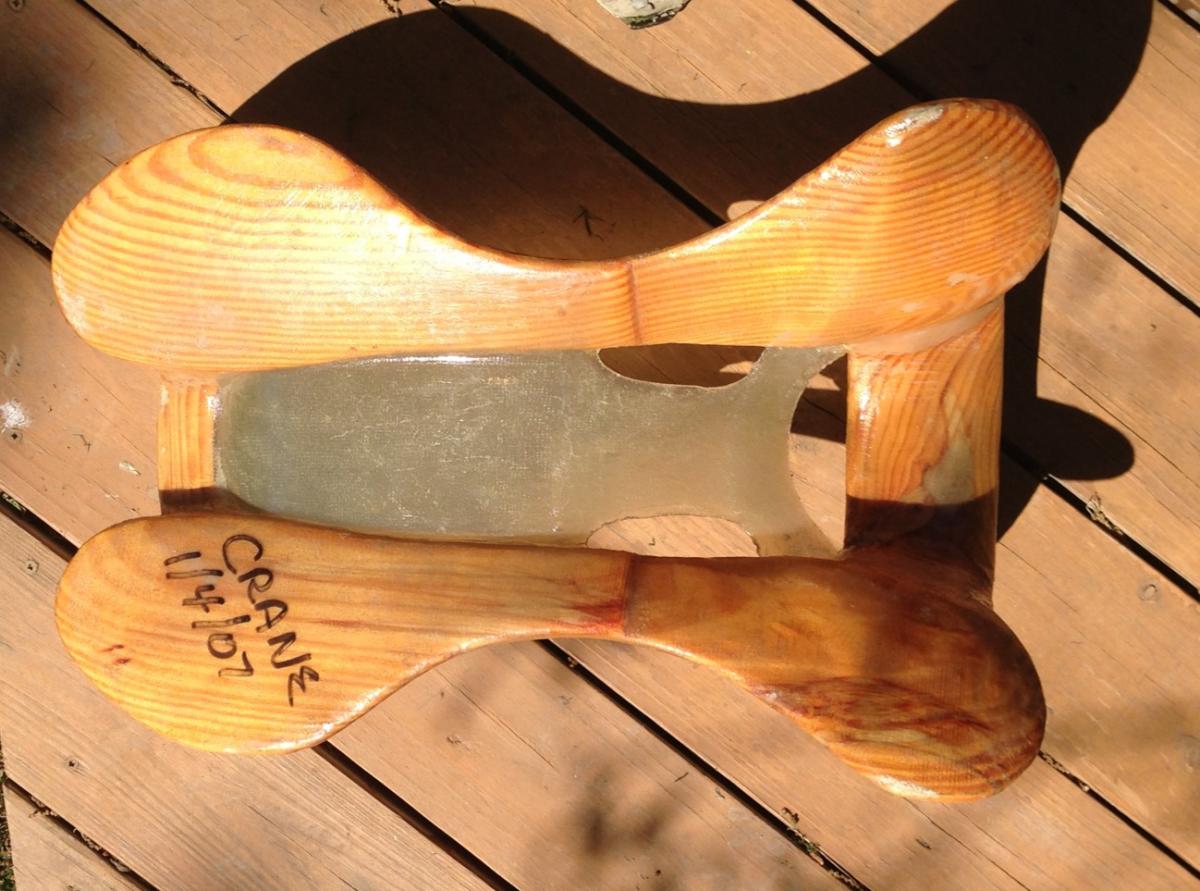
REINING SADDLE TREE FOR SALE, BUILT BY STEELE SADDLE TREES
#1 horn - 2 3/4" high x 1 3/4" cap
16" 'in wood' seat length
gullet - 8" x 6 1/2"
13 1/2" bottom bar spread - front
13 1/2" bottom bar spread - rear
4 3/8" handhole spread
12 1/2" cantle width, 1" dish, 3 1/2" high
CS front, 12" x 3 3/8" thick
8" waist
Yellow Pine covered w/fiberglass, with fiberglass strainer
Price: $250 plus shipping/box
This tree will have a nice, narrow feel for the rider when finished out!
-
Hey Shelly
great idea is is feasable to send these to an intenational destination (Australia)
the price is great but im not sure what the postage would be
Cheers Adam
Postage to Australia is something I would have to calculate after I know what you want...I can put the strap blanks in an international shipping envelope, weigh it, and get a quote for the shipping. Then I will let you know what that cost would be...
Postage to Australia is something I would have to calculate after I know what you want...I can put the strap blanks in an international shipping envelope, weigh it, and get a quote for the shipping. Then I will let you know what that cost would be...
Let me know what you want to order, then I can put that into an international mail envelope, get a qoute for shipping, and let you know...
-
RMR,
I was a die hard user of heel shaves and spoke shaves for many years, and had a full set of heel shaves. I finally learned to use the dreaded potato peelers, and found them to be more user friendly. When you hit a nail and nick the blade on your heel shave, you cuss and spend the next hour re-sharpening your blade. With the peeler, you simply change the blade and get back to working on your ground seat.
You can easily sharpen the peeler on a buffer and cheaply replace it when it wears out. Heel shave ha to be re-adjusted each time you strop the blade. Blades are much more expensive to replace.
Initial investment is much less.
You can spend your time sharpening tools, or shaping ground seats. I learned to use the peelers and sold all my spoke & heel shaves, and have never looked back.
Good luck,
Keith
Total agreement here, Keith!! I do have some heel shaves, and will most likely sell them. I like the quick change out on the blades, also, and have never get mad when I nick those!!
Shelly
-
ANYONE INTERESTED IN SPUR STRAP BLANKS! PLEASE EMAIL ME PRIVATELY, RATHER THAN THRU THE FORUM, AS I AM NOT GETTING ALL THE INQUIRIES ABOUT THE SPUR STRAP BLANKS.
My email is: shelly@liggettenterprises.com
Website: www.liggettenterprises.com
Thanks!
-
Is it possible to get any blank spur straps (both sides)? I love doing the stamping but not real good at cutting and edging the leather. This is the first pair I've ever made but I'm not happy with the edges. Just let me know. Thanks!
I can sell you the blanks - I don't usually do the edges, as this is something I leave for the crafter to do...I would need to know which style you are interested in...I click these out with dies, so the only patterns I have available are what is posted in the pic on the forum...
ML
Shelly,
I'm starting a project that requires a specific type of spur strap. What I require is pretty simple: A bib that is at least 8 inches wide. No holes or slits needed. Pretty simple, just the blank.
Also, I'd like to cut and stamp the strap portion myself so all I'd need are strips about a foot long (allowing for some mistakes since I fairly new to tooling) and anywhere from 1, 1 1/8, 1 1/4 inches in width. Also, no holes or slits needed. Best if all 4 pieces come from the same hide.
How much for each set?
Thanks,
Frank Helton
kickinrig@gmail.com
PS: Do you tool by hand or have a large die for each strap? If the latter, I might be interested in getting some pre-stamped.
The only straps available are what is shown on the diagram I posted to the forum. I have dies to click these out with. I do not use dies to 'stamp' them, as I do all that by hand...
-
Are these still available?
Hi,
Yep, we can still make these up - just let me know which blanks you are interested in, your shipping info, and I will send you a quote for them...
Shelly
-
I use a 12" tuperware pie safe for my strings that I'm cutting, and I store the cut/ready strings in another one...so have two for two different stages. I keep my project strings in the tuperware that I will be working out of, and I will still usually have to rewet a little before braiding, either with saddle soap or with warm water, with a quick dunk and shake off excess, then back into the humidifier for a few minutes. Then soap and braid. I strongly detest yellow soap on rawhide work - I only use white Fiebings saddle soap, but any brand will suffice, as long as it's white. I have seen some very nice braidwork that was made nasty looking by the application of lots of yellow soap!
-
Beautiful, as always!!!! Love seeing your work!!
-
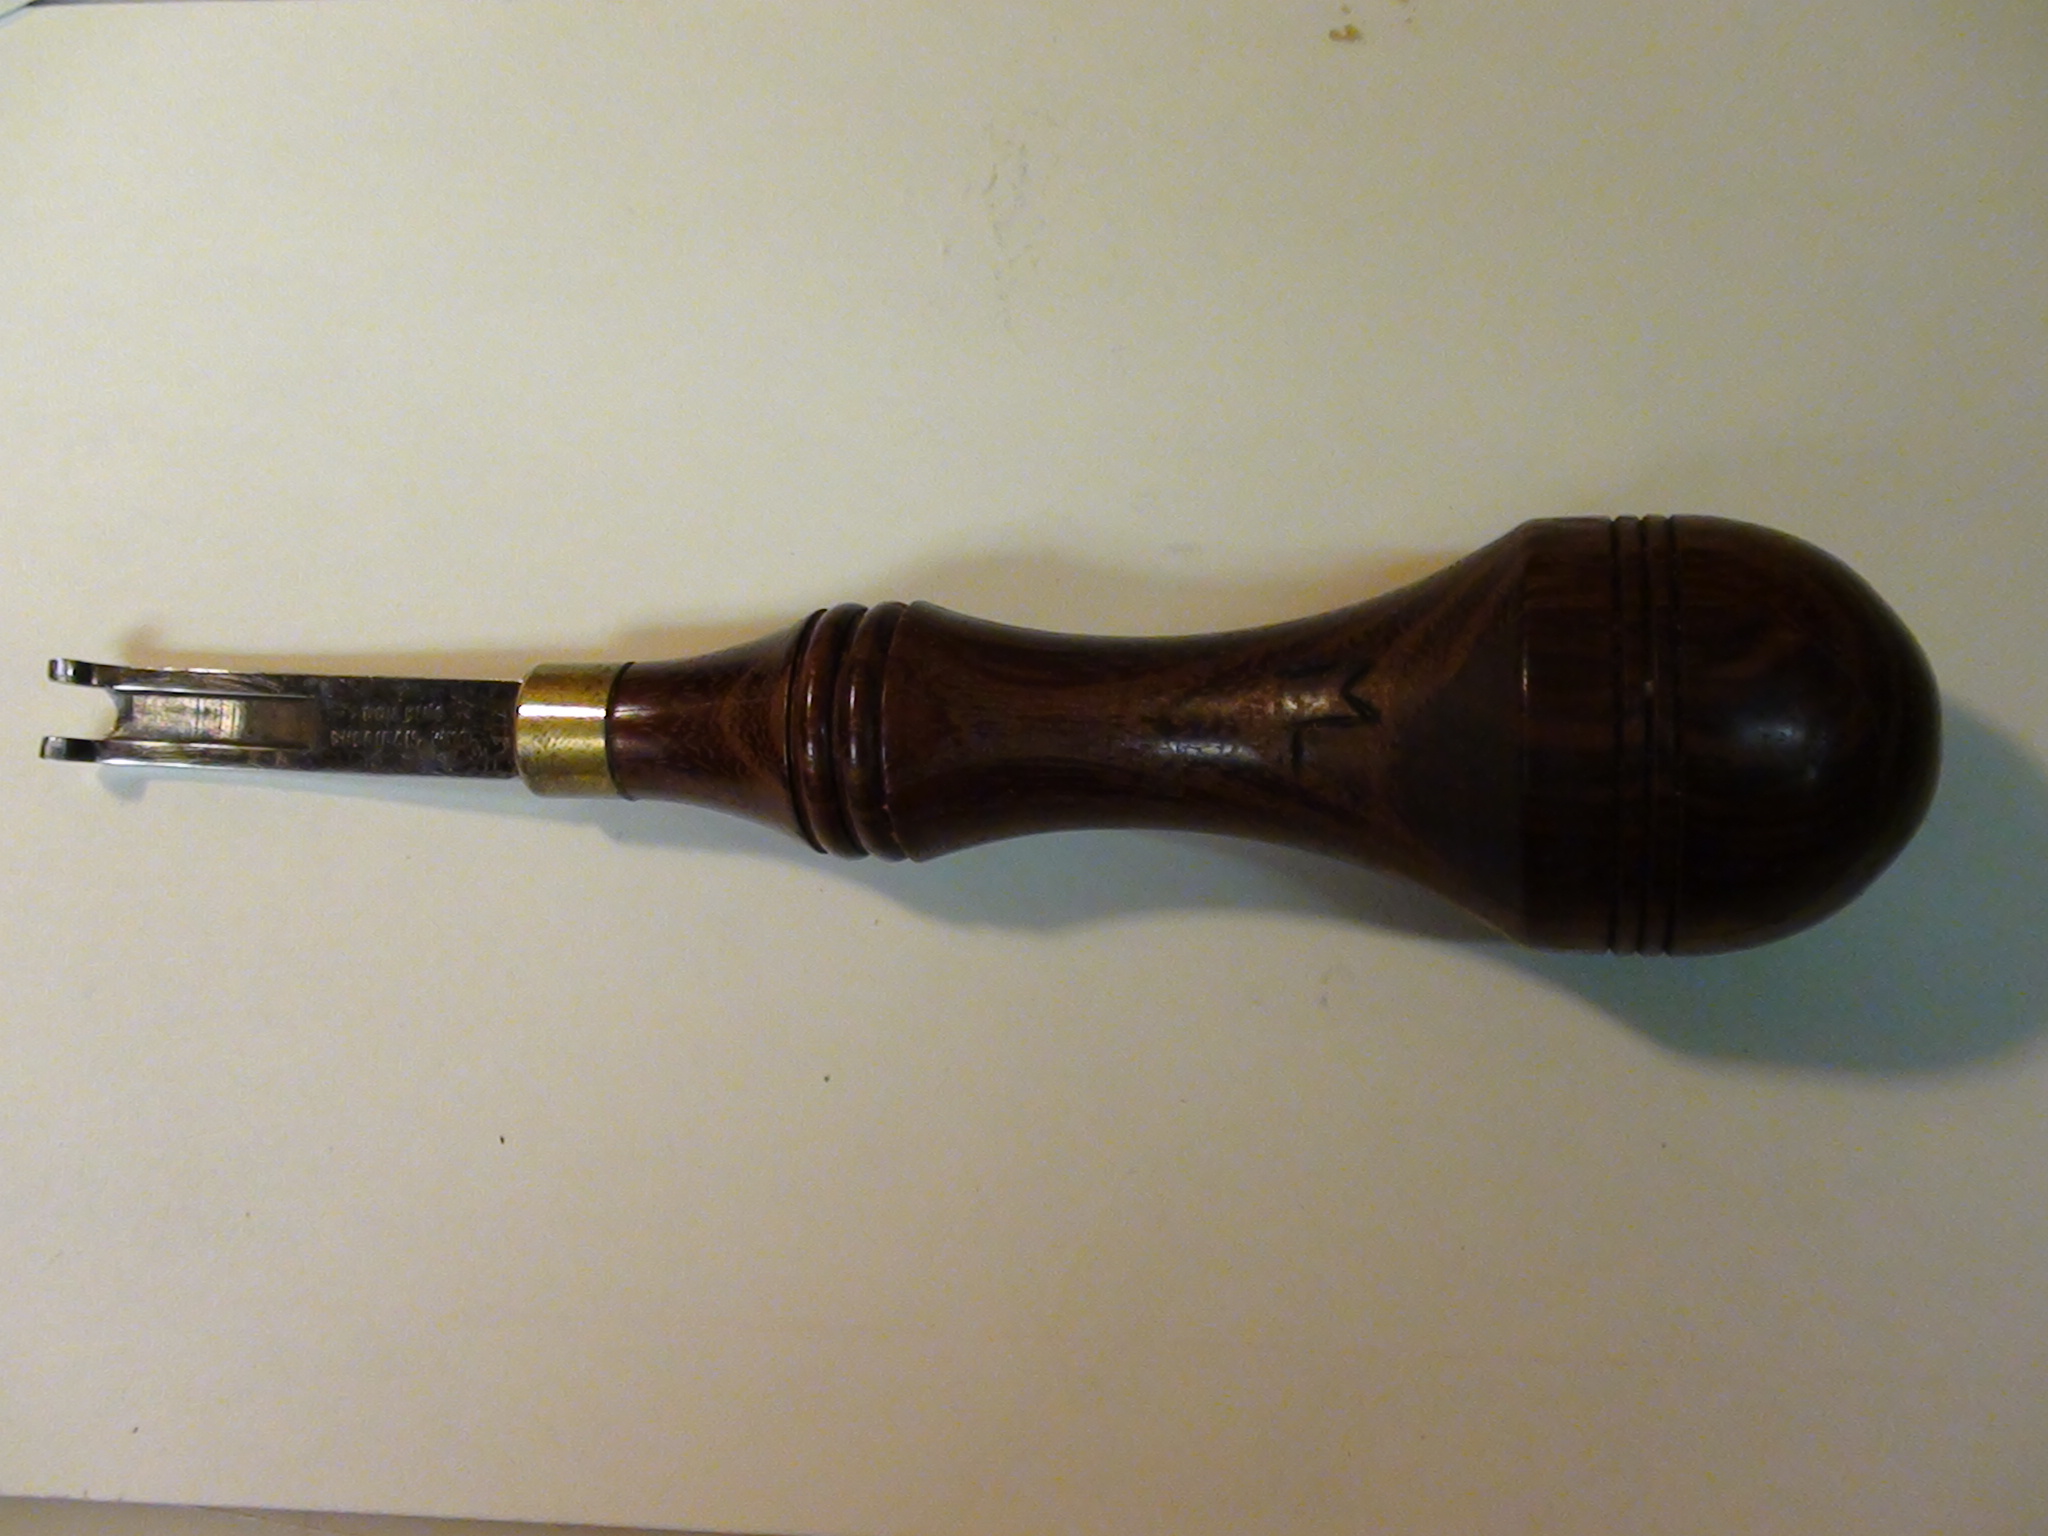
 Hi All,
I just listed the last edgers that I got from Don King, in 1996. I hadn't planned to sell two of them, as they are not marked. And, the one that is marked was overlooked in the last group of edgers I sold on Ebay - this one was on my other bench, out of mind, until I was over there looking for something else the other day, and found it! Anyway, I assume Don just didn't mark these other two, as he did send me some of the tools he had on his personal bench, and I assume he made these up and either forgot or didn't bother, since he was using them himself. I think anyone that knows his work will recognize these as his.
Good luck in the auctions - don't be looking for any more collectable tools from me for quite awhile now - probably not until I am retired and can't carve or stamp any longer!
Shelly
-
Hi,
Just now listed a 3/4" Walt Fay Veiner on Ebay, and three Don King Edgers, all acquired by me personally from these men, in 1996. Unfortunately, two of the edgers Don sent weren't stamped with his name...they came from his personal bench, and I suppose he forgot to do that, since he was using them himself. Anyway, I can vouch for the fact that he sent them to me, and would sign any documentation to that statement. I'm sure most anyone that knows Dons tools will recognize them for his, regardless. Don't know if you are still looking - these are all that I have left to offer up.
Thanks,
Shelly
-
Hi All,
Just listed the last Walt Fay Veiner I have on Ebay - also listed are the last 3 edgers I own that were made by Don King, all from his personal bench. Only one is marked - the other two are his, and anyone that knows his tools will know it when they look at these. I suppose he didn't take the time to mark them since he had them on his own bench...he sent these to me in 1996, when we did a bit of business together - his museum has one of my custom bosals in it now, as part of our tool deal back then!
Good luck in the auction!
SL

-
I hate to ask you to go to more work, but pictures would really help going along with your words of wisdom. I'm one of those people that always have to see to learn. Just an idea if you have time, LOL I've got two jobs so understand time limits.
Thanks and again great words of wisdom Annette
Hi,
I may post some 'how i do it' pix at some point, but not likely in the very near future - have 5 saddles to finish, as well as some braiding work, (which I've already done string for), and lots of repair work to do...Oh, and did I mention that I'm left handed?? I'm afraid pix may confuse anyone that doesn't 'think' about it first...some things I do as a left-hander, others as a right-hander....!
I'll try, but can't make any guarantees on this request right now...
SL
-
If what you are cutting feels like you are cutting plastic, it's too dry, and you've missed the best temper. When I have rawhide that gets this way, I will dip it in warm to hot water, until it starts to soften up, not soaked, and shake off the excess water, and into the humidifier. I use a 14" Tupperware pie keeper. Have two, for stuff that is made up, and ready to braid with, and stuff that is getting prepped. I keep paper towels in the bottom, and put a few over the rawhide, to keep the moisture from condensing on the string in any one place. Plus, the dry paper towels will absorb excess moisture from the string. I check it - if the towels are damp feeling, and the string is too damp, I will change out to more dry towels. I lay the damp ones on the bench, and use them later for other things, or, if they are dry and I need to change the towels again, I switch them back in. Will do this until the strips are where I need them to cut, bevel, etc.
Another suggestion on blades is to use a permanent marker and mark the cutting edge end to end with the marker. As you pull your string, you can see where the unused area of the blade remains, and can move it up/down to get full use of it.
-
It just takes a lot of messin with to find the right feel with rawhide. There is no easy answer. What I usually do with longer braids is start in the middle and braid one way leaving the other end in a ziploc bag until I start that direction. This helps keep the moisture consistant on both ends. If after your work dries you have gaps in your braid then your braiding to wet. Once you finish your braid get a piece of 1"x 4"x 16" hardwood and roll your work on a hard surface to smooth it up. Hope this helps.
Just what I was about to say....!
-
This is a reply to the post that was removed, regarding the string riding up - I've been braiding rawhide, latigo, roo, etc, since 1976. In my opinion, rawhide, once it is tempered, (proper temper will allow you to 'see' thru your initial strip, transparent almost. Then, if it is about ready to be cut, you will know if it is too wet still, if, by pulling it thru your fingers, it leaves your fingers feeling 'wet'). This doesn't mean it's too wet to cut, necessarily, but, it will not bevel or split worth a damn, as it will need to be a bit dryer for that step.
Once it has the proper feel thru most of the strip, I set up my cutter - leaving my strips in the humidifier, to keep them where they need to be. I only work with what I can get thru before the cut strings are too dry to finish them, which is usually about 3 to 6 at a time, if they are about 3/64" each. My first step is to take one of my strips out, shake it out, (these that I worked today were about 8' long, by about an inch in width. Because my strips were fairly uniform in thickness, about 1/32", I did not worry about splitting the strip down at this stage, but, rather, may knock off a bit of the flesh side later on, when I am choosing a string for a project I'm working on. First - I will shake it out, then, I will put the strip hair side down, and pull it evenly over the cylinder of the cutter, with even pressure downward, from the left to right side of the cylinder - this will do a few things - it will take the kinks out of the strip, and flatten it, in case it curled a little in the humidifier, then, it will show me where any areas are still a little too damp, as those areas will 'stick' a bit, and lastly, it will find any weak areas that want to 'stretch', and will pre-stretch that slightly, before you find it later, when cutting the strings, and then the string wants to stretch to nothing and break.
Next, always cut rawhide with the hairside down, flesh side up. Set your razor blade with a slight angle forward toward the string on the cutting edge, so that it somewhat forces the string to feed against the cylinder of the cutter. You will want to have some protection on your thumbs and index fingers doing this work - On the Hansen cutter, the guide allows you to place your thumb close to the blade - you need to keep your thumb close, and the strip feeding thru your hand before it goes into the blade on the one side, and, on the side you are pulling it thru, pull downward, not straight out. Also, pull slightly away from the blade side, so, with your thumb in the proper position on the feeding side, you will also be applying a bit of downward pressure with your thumb, in conjunction with the downward pull of the other hand, so that it should effectively stop any ride up.
When your strings are cut from the strip, and you are now ready to bevel - set the blade in the bevel area on cylinder so that the cutting edge of the blade is at a 90 degree angle to the edge of the fence that the string will ride against. The hairside down, it must be beveled on the hairside, either only the hairside, or, if you are making a bigger string, say for the body of a hackamore, you can bevel the hair side first, then take a bit off the flesh side, but only after the hair side is done. The style of feeding the string through for beveling is the same as for cutting. At this point, if you decide that it needs to be a bit more taken off the flesh side then it's an easy thing to split a little off of these strings, if done a bit at a time. I always keep my thumb on the top of the string, feeding through a bench splitter, to keep the string from riding up against the blade and being cut off. Also, I am keeping my string feeding through my hand in order to feel if it has twisted, and I never pull it thru 'fast'. You pull the string in a downward pull in the splitter, just as you do in the previous process on the cutter.
If you have any further questions or concerns, let me know. I'll try to answer the best I can.
FYI - I sold my Hansen cutter a number of years ago, because I was annoyed with the splitter on it. I chose a splitter that maintained the same adjustment and could be reset with each pass of the total number of strings I was working. This way, all strands are equal in depth when you are done with them.
Hope this helps...once you are cutting at the proper temper, and with the proper technique, you will then understand why I say that you must have some protection for your thumbs and index fingers - the edges of the rawhide strings will cut your fingers up like so many paper cuts - and, if you are putting the proper amount of pressure against the string with your thumb when feeding through the blade, your thumb will look like chopped hamburger if you don't have some sort of protection on it. I have acrylic nails, which I love for braiding - the thumbnail will be toast by the time I'm done, as it will have grooves in it from the strings cutting into it, as they feed thru the blade. Rawhide is supersharp on the edges, and the strings will tear you up when they are in proper temper!
-
Hey,
I am originally from Ohio, but came to Texas a few years ago for grad school. I have been braiding for about 6 years, but only 2 of those have been with rawhide and kangaroo. I dont really have a specialty other than braiding horse gear and small personal stuff like bracelets and what not. If you have any questions about anything, feel free to ask any time. There is a pretty good search function here but if you cant find what you are looking for we are more than happy to help. The braiding section is a small community on here, but a few of us check it pretty often.
Shelly, do you have any more information about the Cowboy Gathering in Denton? I didnt know about it and am free that weekend so I might have to drive up.
Thanks and Welcome!
CW

The gathering starts at noon on Friday, the auction is on Saturday, and it's over Sunday afternoon...here is a ad pasted from their facebook page.

this is the info for the cowboy gathering...
-
Me, too!!
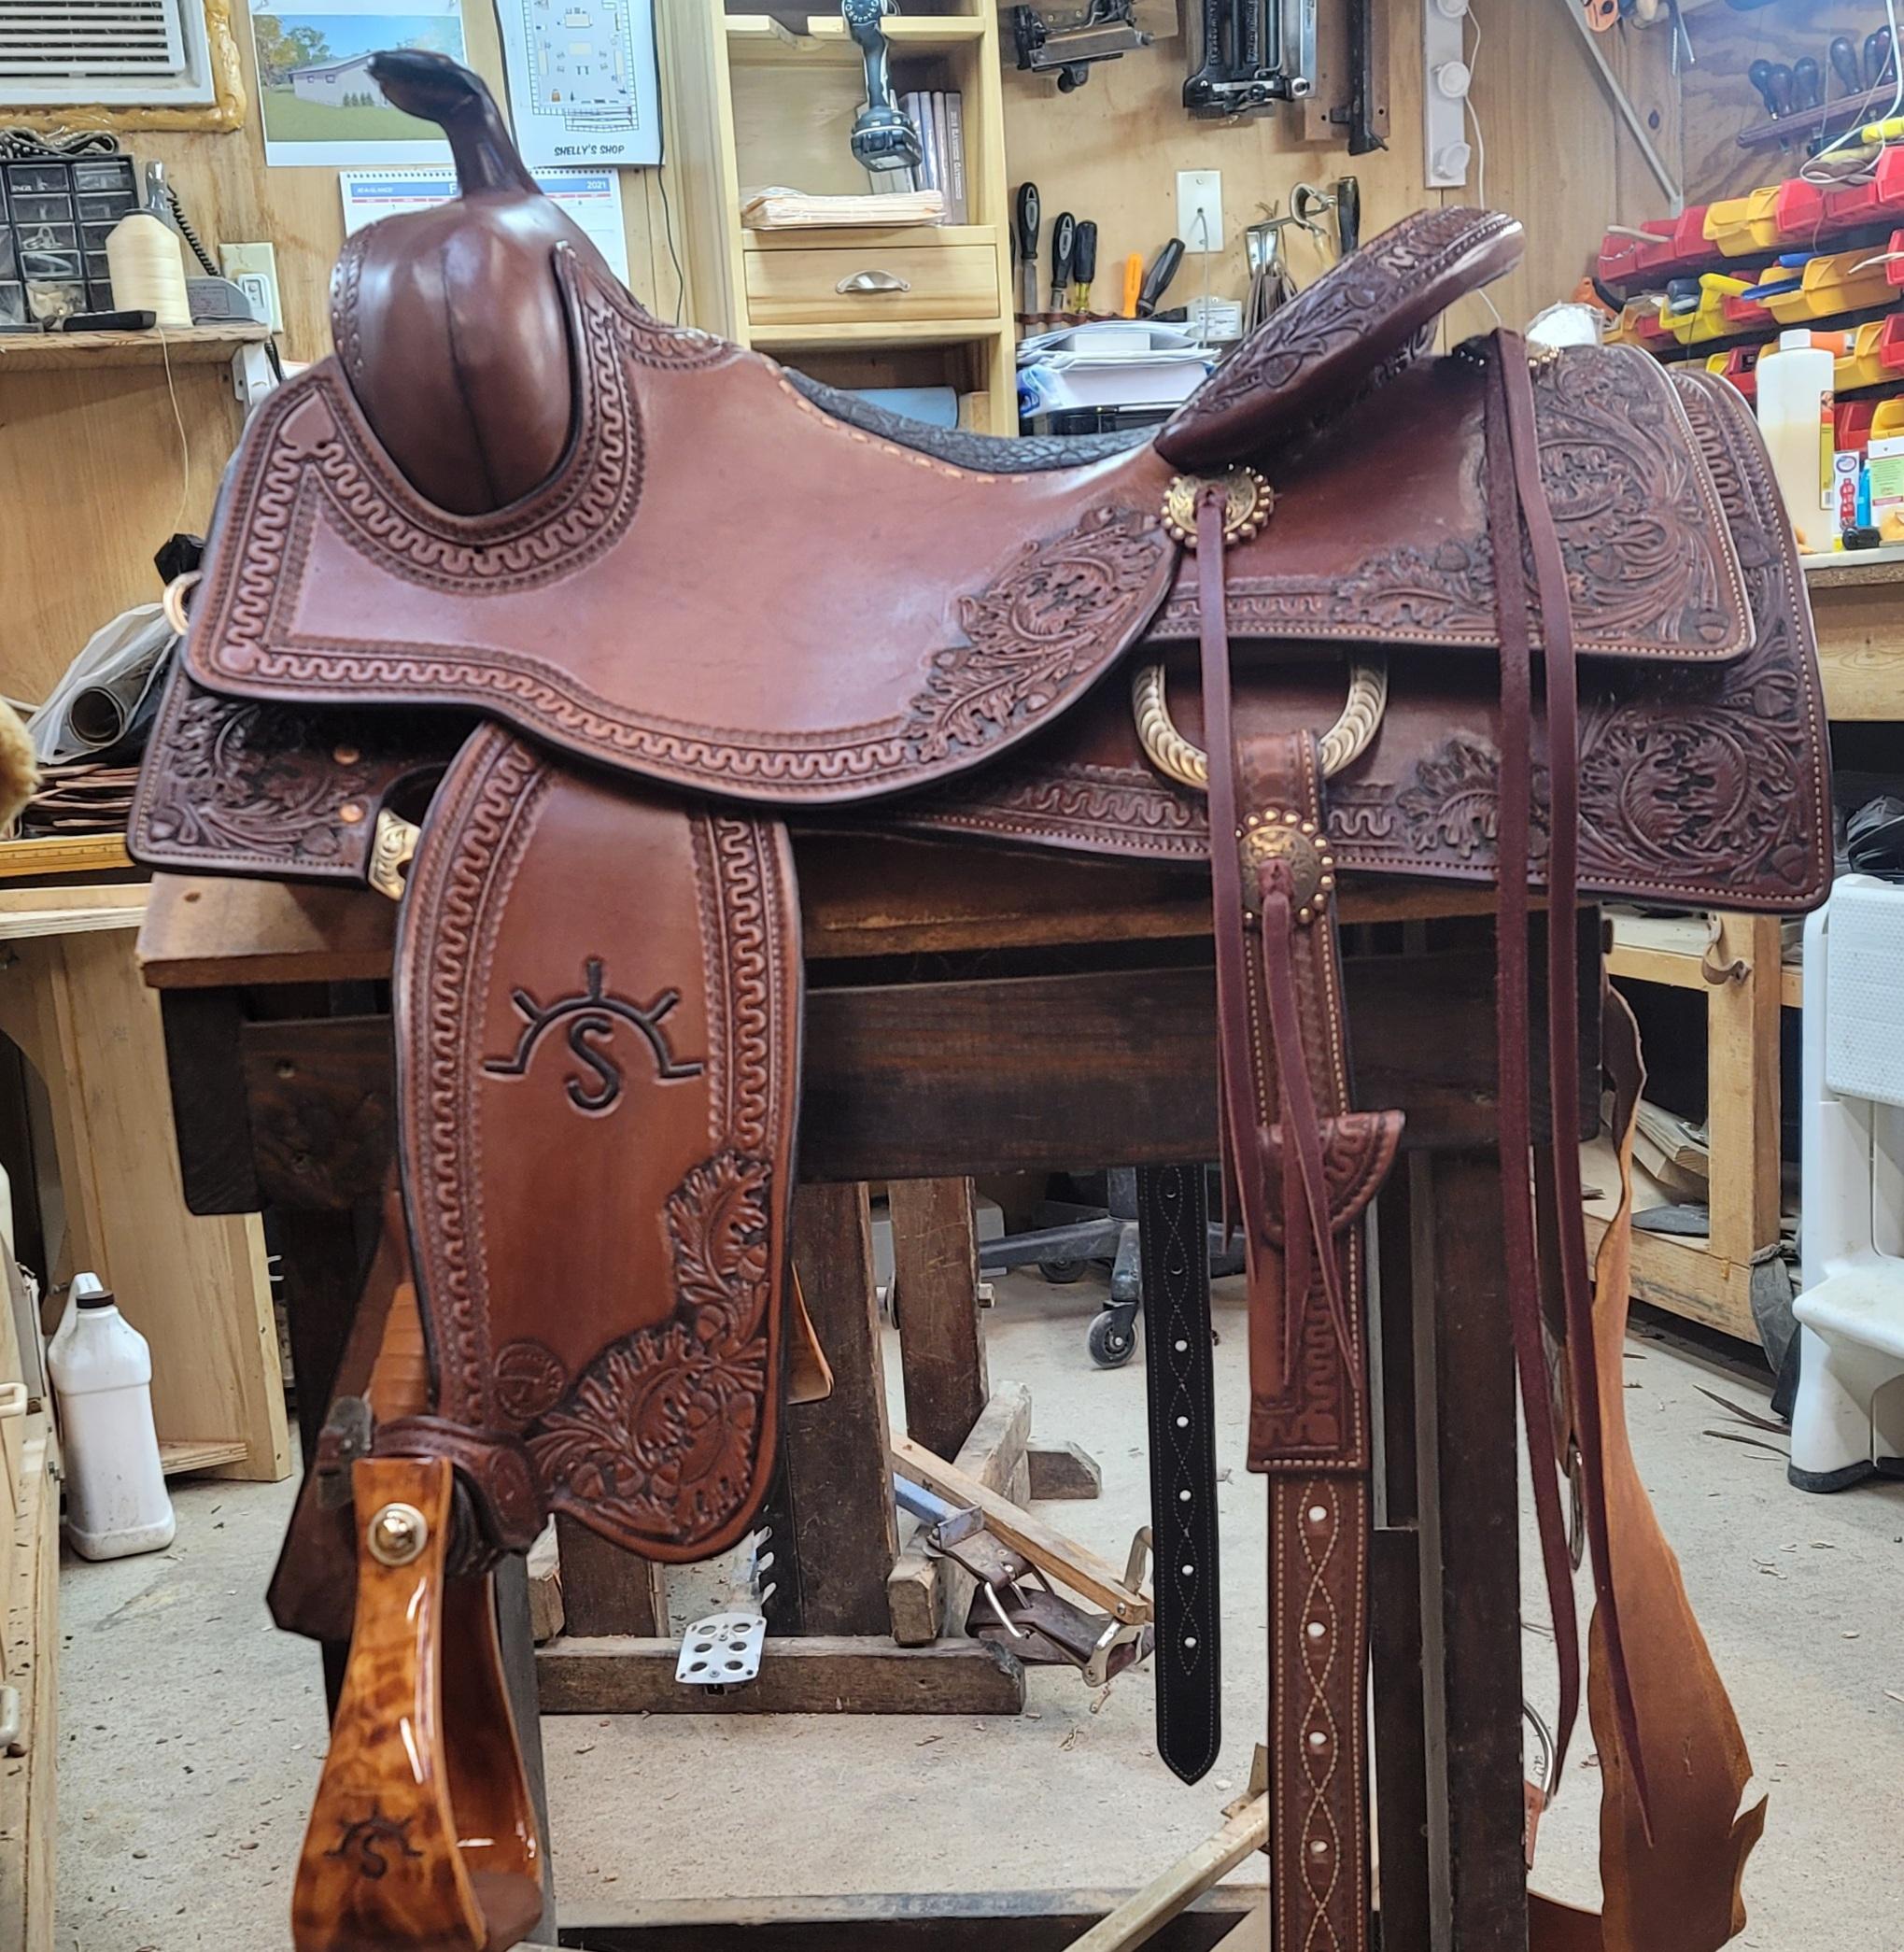


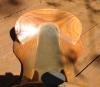
SADDLE IN PROGRESS
in Saddle & Tack Maker Gallery
Posted
Today's progress... Have to finish the swell and install flank, Latigo, offstrap... Goes home soon!