


alex11
-
Content Count
12 -
Joined
Posts posted by alex11
-
-
Thanks for the info, JJN. Unfortunately I wasn't able to apply anything in those documents to my machine. I did end up having the Chinese documentation translated into English, but it was not helpful (it may even be for a different machine entirely!).
Here's what I've figured out so far. Hopefully someone can fill in the gaps, and maybe this will even be helpful to someone else in the future.
- Left-most button (with the 3 arrows on it): Press repeatedly to cycle through the stop positions (values 1-4). It seems that 1 and 3 are the same position, and 2 and 4 are the same position. I can use this to have the machine return to a needle-up or needle-down position after releasing the pedal.
- [M] button: Press repeatedly to cycle through startup speeds (values 1-7: 1 means start slowly; 7 means start quickly). Since I'm using the machine at very low speeds, using value 1 seems to be best. Using value 7 with a low max speed will result in overshooting the speed at first.
- [+] button: Press to change max speed (values 200-4000 rpm). After pressing this key once, use both the [+] and [SET] buttons to adjust the RPM value up and down.
-
[SET] button: Press and hold to enter settings menu. Once in settings menu, press the [+] button to cycle through the available settings (values S.0-S.9,S.A on the right-most side of the display). Then press [SET] button to select a setting for modification (some settings seem to be disabled; maybe they are used in other machines with more features?) Then use the [+] and [SET] keys to modify the value of the chosen setting. Press the pedal to save the value, or wait 10sec.
- S.0 - Disabled
- S.1 - Values L.0-L.9 -- no idea what this does.
- S.2 - Toggle between "P" and "E" (motor direction: forward and reverse)
- S.3 - Disabled
- S.4 - Disabled
- S.5 - Values 1-5 -- no idea what this does.
- S.6 - Disabled
- S.7 - Disabled
- S.8 - Disabled
- S.9 - Disabled
- S.A - Displays "P.F", but you can't change the value of setting.
-
1 minute ago, R8R said:Who makes the new motor?
Looks like first button is "needle up" / "needle down" when positioning is enabled.
Second button is motor rotation, and also serves to adjust parameters. (probably doubles as minus button?)
Plus is....plus?
Set is set.
The new motor is made by Yuma (http://www.yumamotor.com/EnIndex.Asp).
I'm more interested in what the 10 settings menus are -- values [0, 1, 2, 3, 4, 5, 6, 7, 8, 9, A] after holding down the SET button.
I imagine that other 4-button servo motors from other manufacturers probably have very similar interfaces, so I'm hoping someone can provide instructions for any 4-button servo motor.
-
19 hours ago, shoepatcher said:Artisan should provide you with a set of English instructions for the motor. If they do not, let everyone on this board know! That is poor customer service.
glenn
Sorry for the confusion -- the machine itself is from Artisan, but I'm replacing the servo motor they supplied with a direct drive, needle-positioning aftermarket motor.
-
Hello,
I just installed a direct drive servo motor on my Artisan 618, and I'm having trouble figuring out the menu system. The unit has 4 buttons, and I've only been able to find setup instructions for 2 button units. I've emailed the manufacturer, to no avail. I tried running the Chinese instructions through an online translator, but it didn't give useful results. I'm close to hiring a translator to translate the Chinese instructions, but there's no saying that the original instructions are even very comprehensive to begin with!
From my experience with 2-button units, it seems like most manufacturers and models have roughly the same user interface and menus. So even info about a different 4-button model might prove useful. However, I haven't been able to find much.
If anyone can provide information about what each menu might do, or any relevant documentation, or even a settings menu flowchart, I would very much appreciate it!
Thanks
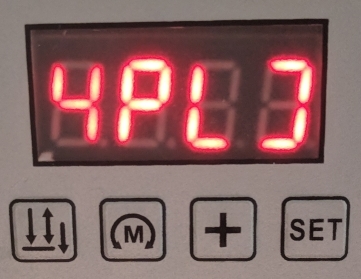
Here's the control panel when it's idle. The left-most digit can be changed by pressing the left-most button; it has values [0-4], which represent different needle stop positions. The two right digits are a "spinner" animation.
Holding down the "SET" button brings me to this screen. The right-most digit can be incremented by pressing the "+" button; it has values [0-9,A], which I think each represents a different setting. I think that then pressing the "M" button cycles through potential values for that setting.

-
15 minutes ago, mikesc said:Try searching this
site:leatherworker.net stepper motor
there have been some interesting threads about stepper motors here, frequently they have been used in a way that seriously reduces the "footprint"..
Amongst the results for that search string above is this following thread
http://leatherworker.net/forum/topic/70144-new-to-sewing-leather/
some of the pics may give you some ides about alternative table and mounting methods that can save some space..Oh wow, the photos in that thread are exactly what I want to achieve -- thanks! I swear I did search before posting, but I guess "stepper motor" is the key word
") 15 minutes ago, mikesc said:
15 minutes ago, mikesc said:BTW..the Chinese company that you linked to does say that they accept MOQ ( minimum order quantity ) 1 piece..
The MOQ of 1 is just for samples. I always assumed they would only fulfill a sample order if they expected you to order a lot later on. Do you think I would be able to just order 1 sample and that's it?
-
Does anyone know of a space-saving table solution for flatbed machines?
I just recently got an Artisan 618-1SC, and since I live in an apartment I would love to reduce its footprint. I was thinking of modifying the table (basically cutting it in half). I would then just wheel it up next to a multipurpose work table (to use as an "outfeed table" when working on big projects). But if there already exists a cylinder-arm machine style small table that will fit a flatbed machine, that would be even easier.
Another thing I've been considering is converting the belt-driven servo motor to a direct-drive geared setup, which would be much more compact. Does anyone know of a direct-drive conversion kit that doesn't break the bank? Efka is just way too much for a hobbyist like me...
This thread by @bikemaniac was very interesting, but more cost/work than I was hoping to go to. If I do something similar, I'll probably just reuse the motor and controller in my existing servo motor... but the problem is gearing it down (i.e. replicating the 3:1 gear reduction currently being done by the belts/pulleys).
http://leatherworker.net/forum/topic/59848-my-very-first-almost-homemade-sewing-machine/I found one promising direct-drive conversion kit on Alibaba, but of course they won't sell me just 1 unit, and I can't find anyone who stocks this:
Any suggestions or wild ideas are welcome!
-
I think I've got it! Many thanks to everyone!
I did each of these one at a time, and each one seemed to get me a bit closer:
- Rethread the upper using only one of the holes in each thread guide plates
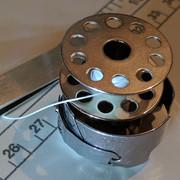
- Wound a new bobbin full with thread, and with much higher tension on the winder (I didn't realize the winder tension disc was very loose before, so the winding was previously not tight or neat)
- Used a #18 needle (I don't have any leather #19 needles)
- Repositioned the thread controller to minimize the distance that the thread controller spring travels
A few other notes:
- Part of the issue may be how sensitive the bobbin tension adjustment is -- I didn't realize how big a difference a small turn makes!
- I measured the thread with a micrometer (the best I could manage -- it's hard to measure without compressing), and it was around 0.33mm -- so it's possible that it's #92 or #138. It is a brand new spool of A&E #92 from threadexchange, so I hope it's not mislabeled!
- The bobbin tension still seems a bit tight, but I can live with this. I'll double-check the timing as Wiz mentioned
- The bobbin is a bit sloppy in the case, but no different than the other various bobbins that came with the machine. I'm not sure how much tolerance is allowed. I'll probably just get a new set of bobbins, bobbin case spring, etc just to be sure
-
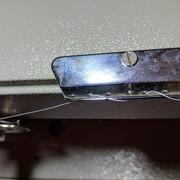
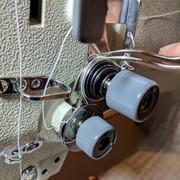
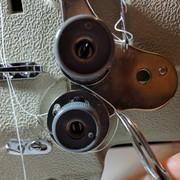
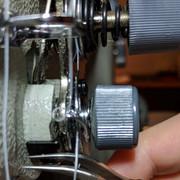
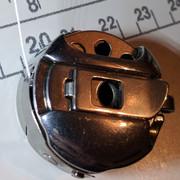
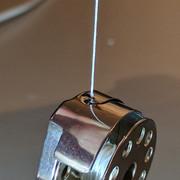
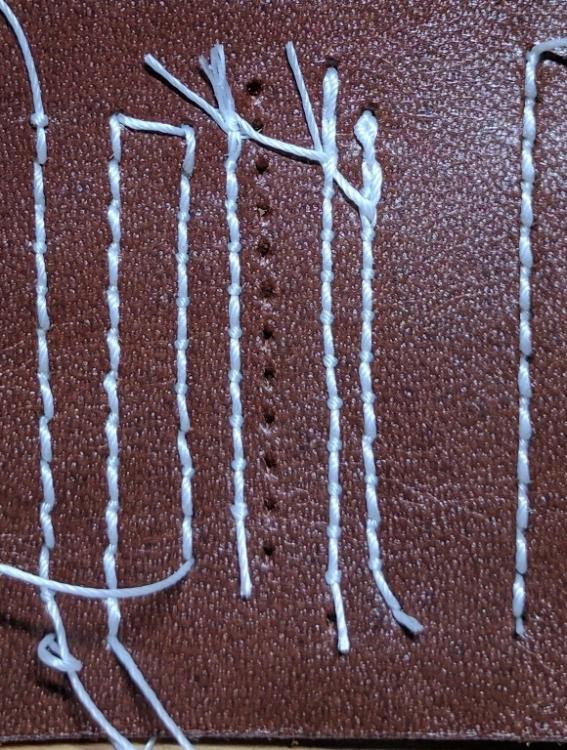
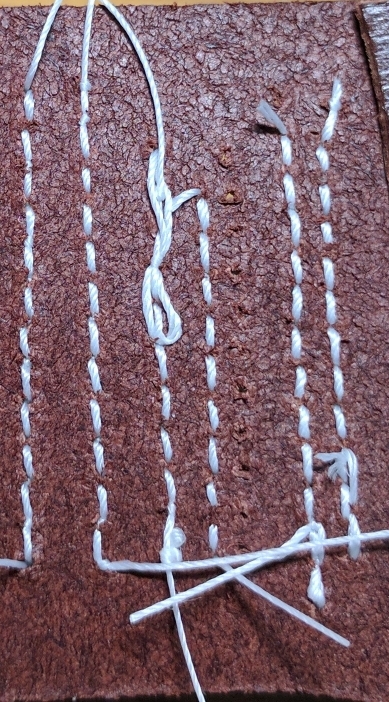
37 minutes ago, RockyAussie said:I can only think to suggest loading a couple of pics of the thread path and close in on the tension discs and spring. Also which direction does the bobbin spin when you pull thread through it?
Here are some pictures of the thread path and the bobbin. Click the thumbnail for high-resolution versions.
BTW, thank you both very much for helping!


-
38 minutes ago, RockyAussie said:If the top thread does not seem overly impeded coming through anywhere I would take of the top tension discs and make sure there is no little sharp bits that could be making it drag. A fine sand and polish can help as these discs dont rotate around and the one spot is all it takes.
I disassembled the tension discs. They were dirty, so I cleaned them with isopropyl alcohol. However I couldn't feel any burrs anywhere that the thread contacts.
I also disassembled and cleaned the thread controller disc, as much as possible (the two plates can't be separated). I noticed there's a slot where it screws into the machine body, so when I reassembled it I angled it so the thread is closer to the tension controller spring. I also kept the controller knob loose, so the controller spring could move more freely.
This seems to have improved the tension balance a bit. However I still have to have the bobbin tension extremely tight and the upper tension as loose as possible -- which in my naive opinion doesn't seem right.
-
3 minutes ago, Sonydaze said:When you fully raise the presser foot, does the top thread pull through fairly easily?
Yes -- it doesn't take a lot of effort to pull the thread when the foot is up. When I pull, the needle bends a bit, but not too much.
-
Hello,
I just recently got my first industrial machine -- a used Artisan 618-1SC. I'm just testing it out with leather, and am having problems with the tensions. Specifically, my bobbin tension is as tight as possible, and my upper tension is as loose as possible, and yet I'm still getting the bottom thread showing.
- The bobbin tension is so tight that the thread barely comes out when bounce it like a Yo-Yo (the technique I've seen in a lot of videos as a way to tell the correct bobbin tension)
- The upper tension is so loose that any looser and the knob would come off
- I'm using 5-6oz bridle leather; a Groz-Beckert 135x16TRI size 20 needle; and size 92 polyester thread. See attached photos for the issue
- I went through the machine manual and checked that all recommended adjustments are within spec (they are).
- I believe I've threaded the machine correctly, based on the manual and a youtube video. In particular, the upper thread is correctly going through the thread controller disk, and I threaded the tension disc with the presser foot up (and made sure the thread seated fully in the disc)
- I've removed the bobbin spring and cleaned the area with isopropyl alcohol. I also re-bent the spring so that it applies tension well.
- I've also noticed that when I do a back-tack using the reverse lever, the stitch gets a bit loose
As it is, the tension balance is not terrible -- I could live with it. But it seems wrong that the bobbin tension is at its maximum and the upper tension at its minimum. With this setup, there would be no room for adjustment at all!
Can anyone give some advice about what else to check?
Also, is there a dealer that supplies parts for this machine? I tried emailing Artisan but haven't heard back
Thanks!
Alex

4-button servo controller instructions
in Leather Sewing Machines
Posted · Report reply
I bet all these cheap manufacturers use very similar code on the microcontrollers that run their products. Within one manufacturer, I can definitely see them developing one controller solution and sharing it among all their servo products, disabling features for some products. With how Shenzhen marketplaces work, I wouldn't be surprised if a bunch of cheap manufacturers use literally the same pre-programmed microcontrollers!
One neat feature of this new servo I got is that it returns to needle-down position when you release the pedal, and going heel-down on the pedal will move the machine to needle-up position. Additionally, there's a button on the integrated LED light module which when clicked will perform 1 stitch. That could turn out to be very useful!
I'm still trying to figure out what these settings do. My guess is that one of them might be "braking level" or "braking power", but I haven't been able to notice any difference in behavior.