Pterytus
-
Posts
30 -
Joined
-
Last visited
Pterytus's Achievements
Member (2/4)
-
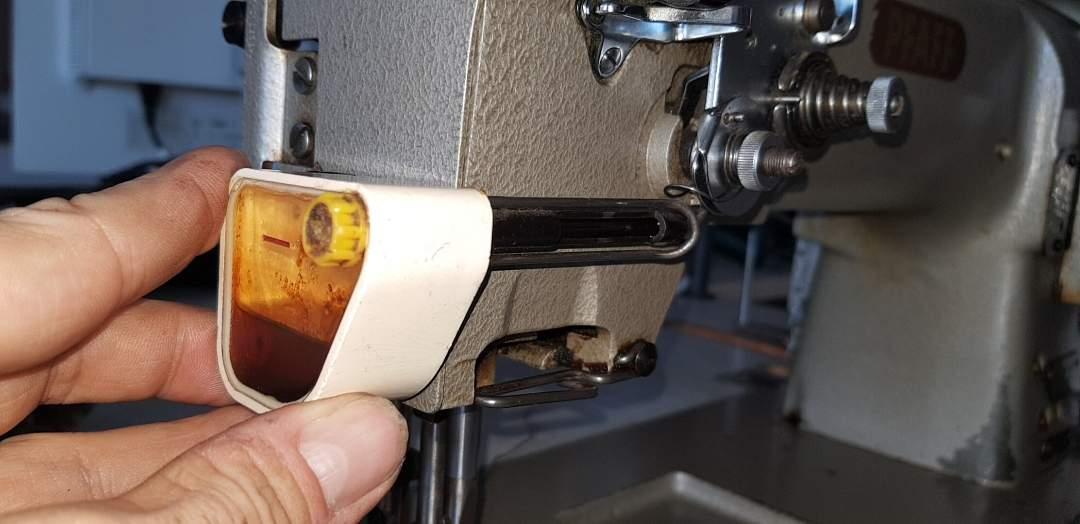
Hey guys, this little gadget came with my "new" Pfaff 545 today. It seems to be some kind of top thread oiler (with the wick missing). There's no brand name or the like printed on it anywhere. It attaches to the front plate of the machine with two bolts. I've never seen something like that before (besides the "bathtubs" on top of 45 or 29k's). Does anyone know anything about it? TX in advance, Pete...

-
Adler 104 stitch length - adjustment manual
Pterytus replied to Pterytus's topic in Leather Sewing Machines
Well, with me sometimes it's "personalizing" my machines - I just can't leave the things the way they are. And if I can improve things in the process (or at least don't make 'em WORSE ;-) then I'm likely to go for it. Now I do not have to adjust backwards stitch length once I change forwards stitch length. I know me: I'd just forget it and create "false" stitches while trying to lock a seam. Especially on leather I'd rather avoid that. Oh, glue is dried - so back to sewing X-max presents ;-D -
Adler 104 stitch length - adjustment manual
Pterytus replied to Pterytus's topic in Leather Sewing Machines
Okay, I just HAD to test it ;-) No 3D-Printer, no plastic. Metal it is - so it took some time but it came out ok, I think. Before, with the flat frame it was: short: F1.4mm/R2.1mm (50% off!) middle: F4.8mm/R5mm (that was the only SL-area which was ok) long: F9.7mm/R8.1mm I tried three different stitch lengths with the new SLL-frame F and R and they came out fairly equal: short: F1.9mm/R2.1mm middle: F4.6mm/R4.8mm long: F8.1mm/R7.9mm Which is enough for the 2-3 backwards stitches I usually need. So now I can rest!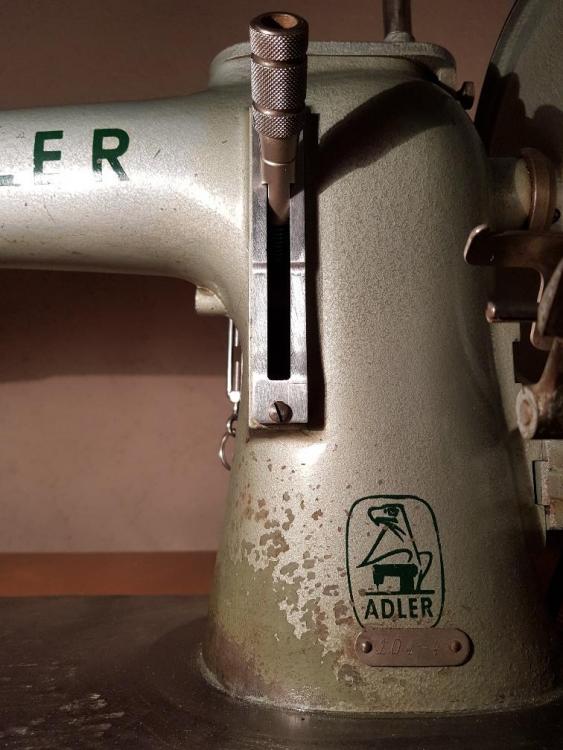
-
Adler 104 stitch length - adjustment manual
Pterytus replied to Pterytus's topic in Leather Sewing Machines
The main thing to find out was the "adjustable vs. built-in" problem. And because it seems to be built-in mainly (not that you could not make it even worse by bad adjustment) and cannot be cured with a screwdriver, the matter is kind of "solved" for me anyway. The work-around is independent from that. So thank you for your helpful input! Sure, I'd keep the original frame anyway and the plastic would only be to test if it works, maybe optimize it and finally build a copy from metal which lasts. I'm pretty happy with all-metal machines and would not add something plastic for real usage. ---- If I actually HAD a flux capacitor (and maybe a Delorean), I'd travel back in time and tell the Adler guys to place the damn pivot point in a better place to solve that problem once and for all - unless, that is, they'd put me in a loony bin, which is a far more likeley scenario... :-) -
Adler 104 stitch length - adjustment manual
Pterytus replied to Pterytus's topic in Leather Sewing Machines
Ah, I've been called much worse! ...and with reason ;-) And sorry, did not intend to give anyone geometric nightmares, they're THE WORST! Next time I'll just show you the (completely non-stochastic) formulae, btw., they're y_F=-0.021x²-0.433x+9.654 and y_R=-0.018x²-0.264x+8.082, that better? :-D Anyway, NOW would be a good time for a 3D-printer. Just to verify (or falsify) my madness. So it's metal-or-nothing for me now... -
Adler 104 stitch length - adjustment manual
Pterytus replied to Pterytus's topic in Leather Sewing Machines
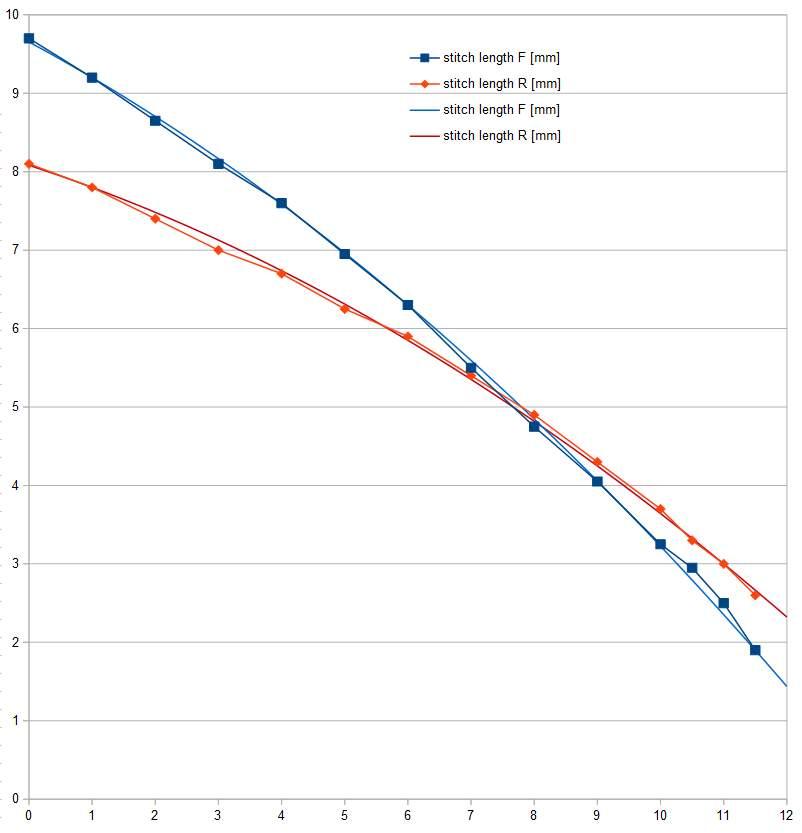
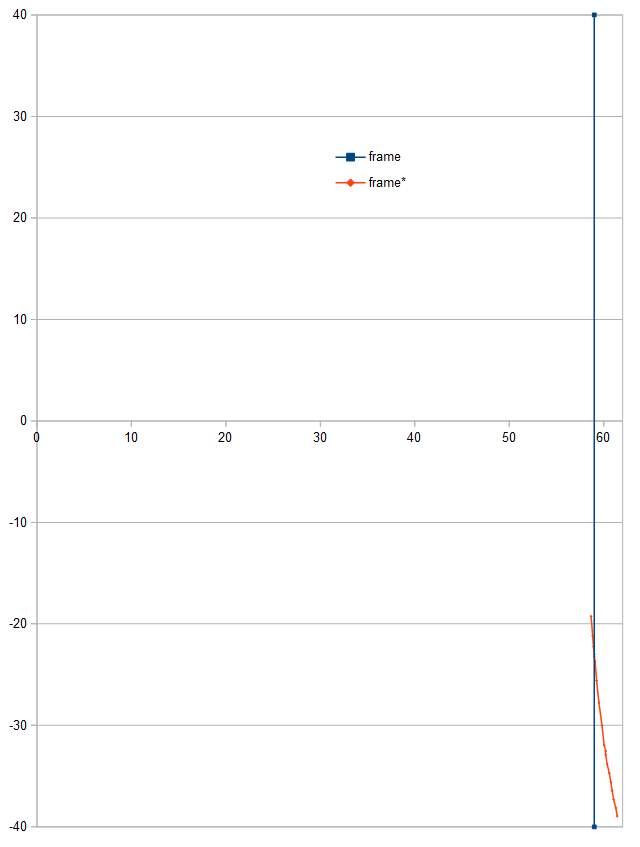
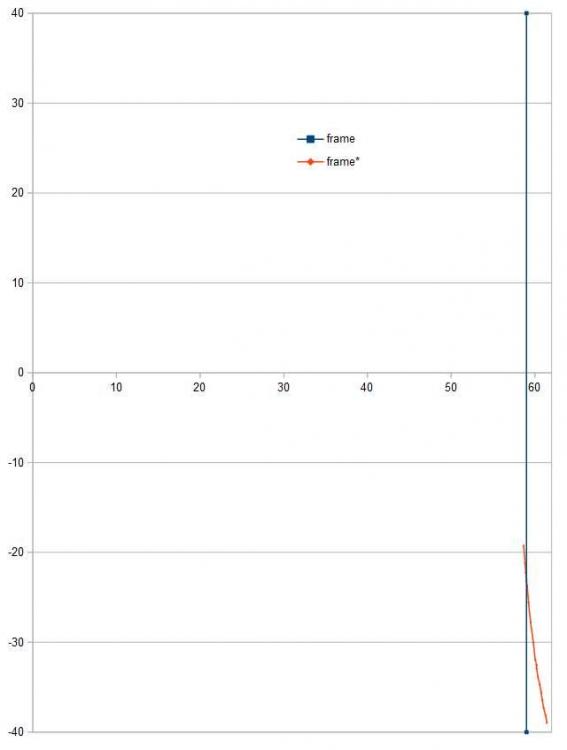
So I DID go a bit further and collected some data ;-) The first graph shows F and R stitch lengths in blue and red (x-Axis is number of revs of knurled SLL-nut) - measured data and approximated quadratic equasions to ease calculation. So if you reduce lever travel below the intersection at 5.2mm stitch length (F) accordingly you'd end up with equal stitch lenths F and R by just flicking the SLL up and down. The second graph shows pivot point of SLL (0|0) and flat SLL-frame surface at x=59mm in blue. Changing lower SLL-frame geometry from blue to red would result in the required lever travel reduction. True: You'd lose approx. 1.5mm F stitch length, because R only goes up to 8.1mm - which should still be ok. Maybe it's just a matter of opening up upper SLL-frame. This should be possible because the rest of the machine is capable of 9.7mm. The red line in the second graph is roughly a straight line so it would not even be necessary to machine some complex contour but just add some kind of wedge etc. to make the modification possible. I'm not sure if it really is necessary/worth to realize that in hardware (see above) but it seems realistic and not too challanging. Anyway I wanted to share my findings with you guys :-)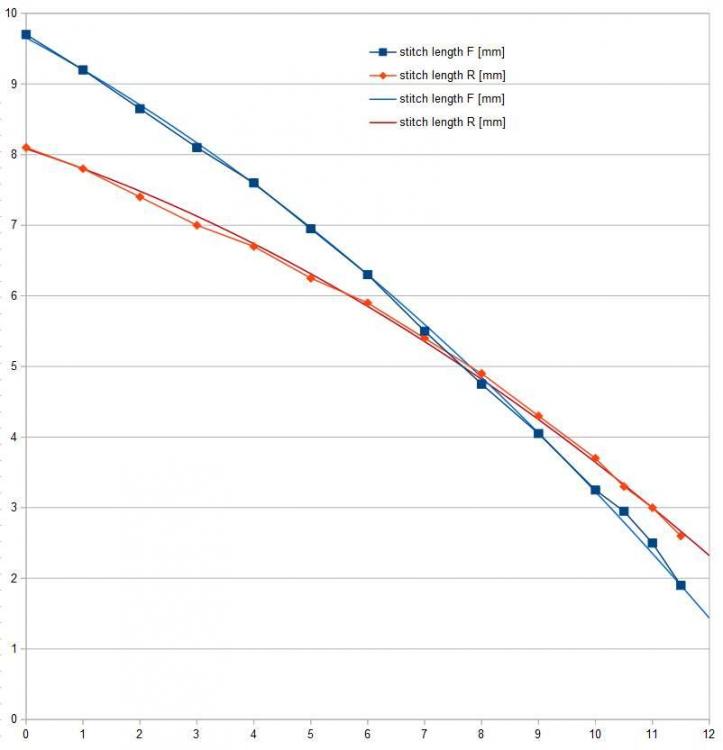
-
Adler 104 stitch length - adjustment manual
Pterytus replied to Pterytus's topic in Leather Sewing Machines
You're probably right ;-) At first I thought it was/is a matter of adjustment. In that case, I would have preferred to get it right. So maybe it got a little out of hand once I realized it is a built in "feature". But at least I found That out in the process, so I think it was worth discussing anyways. -
Adler 104 stitch length - adjustment manual
Pterytus replied to Pterytus's topic in Leather Sewing Machines
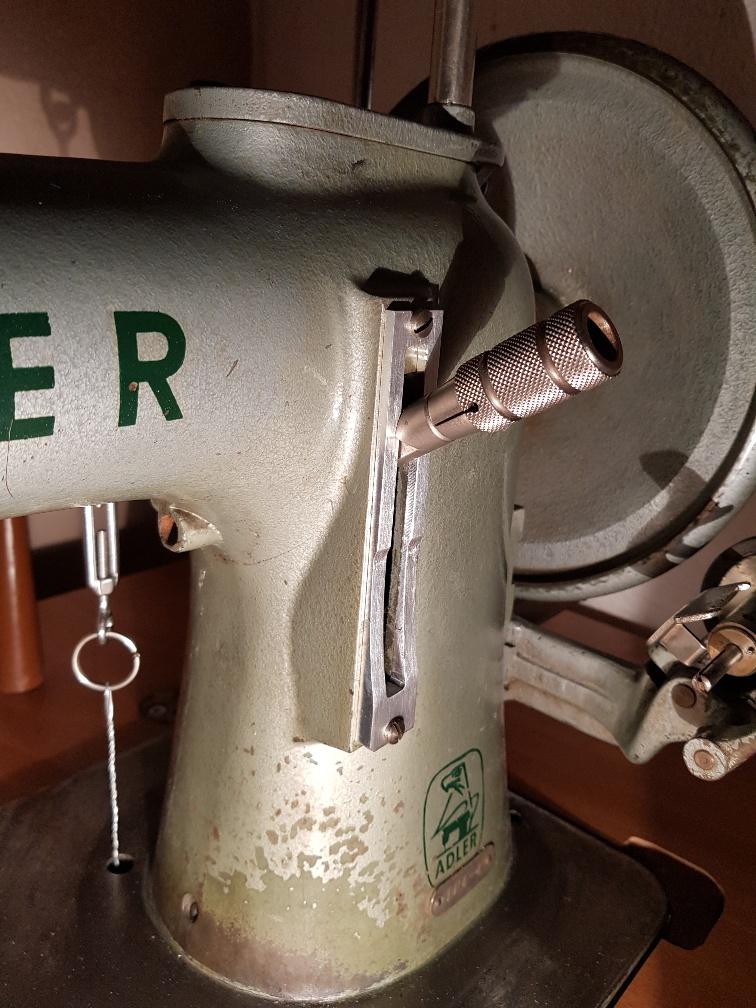
I think I'm "OK" with metal ;-) So I COULD in fact do something like that. But it would only partly solve my problem: On such a machine (late type or modified mine) you'd have to adjust R stitch length each time you change F stitch length, if you want it to be equal. Does not seem that practical - but in fact "solves" the problem for the company because noone can complain about, uh, what-I-do. So this could be (part of) the reason. So a real solution would be to design something like a curve which protudes more or less outward on the R (top) side of the SLL frame and limits the SLL in the correct angle to match F stitch length. With my data it would mean plus-material directly above 0 (center). Level-material at 5.2mm F stitch length and minus-material above 5.2mm stitch length. That way I'd only have to "flick the switch" in order to get correct (matching) R stitch length. I believe the problem is the pivot point position of the SLL relative to the direct line between the centers of the main shaft and lever connection of the fork (below the bedplate). If the pivot point would be in line with those two centers, F and R would be exactly the same (simple geometry). On my (the) Adler 104, the pivot point is significantly off this line to one side - maybe there is a good reason for that, but this seems to result in the observed behaviour (there's a draft attached, don't know if that helps to explain what I mean :-) It's the same on my Haid&Neu, but on a garment-sewing household machine noone really cares about unequal stitch length (or even recognizes it). If you work with leather it does matter. So if all that is true, it is not a matter of adjustment...
-
Adler 104 stitch length - adjustment manual
Pterytus replied to Pterytus's topic in Leather Sewing Machines
I checked the stitch lenghts F and R for different settings of the stitch length regulator and measured 10 stitch lenghts each. First test was full stitch length, the others were changed by full knureld knob revolutions, with zero (centered regulator) being 13 revolutions in. And the result is really interesting: 0: F97mm/10, R81mm/10 (-17%) 5: F77mm/10, R62mm/10 (-20%) 7.5: F52mm/10, R52mm/10 (+/-0%) 10: F33mm/10, R42mm/10 (+27%) 12: F14/10, R21/10 (+50%) So with my current setup there is ONE stitch length at ~5mm in which F and R stitch lenghts are equal. Longer stitches result in reduced R stitches, shorter stitches result in increased R stitches. Would be really interesting to compare it to an equal machine (sister 104-4 from the same production year). Or maybe there is something to adjust other than what I already tried. -
Adler 104 stitch length - adjustment manual
Pterytus replied to Pterytus's topic in Leather Sewing Machines
@Bert51 Yes, needle timing is checked and ok (I built myself something like this gauge). The machine sews ok with different needle and thread sizes, only F and R stitch holes do not match. @Constabulary I'd have to measure this to have the exact figures, but it's something like 10% off, I'd guess. And yes, it's in all lever positions. Otherwise I would not really mind (or would not have found out in the first place as 9mm is not my regular go to stitch length ;-) -
Adler 104 stitch length - adjustment manual
Pterytus replied to Pterytus's topic in Leather Sewing Machines
So I went through all the adjustment rules, but there seems to be missing something. The description tells you to adjust the eccentric on the main shaft (and I've done that). But that alone CAN NOT be the solution for uneven F/R-feed as it only synchronizes the needle position to the feed dog position. So let's remove the needle. The machine still transports the fabric (correct or incorrect). So the needle timing does not affect the feed kinematic in itself and thus can not cure the problem at hand. Next would be feed dog lift. Not relevant in this case, as it also does not affect the (in-plane) F/R feed dog movement which is the main problem (you might be able to deribelately shorten F feed to R feed length by a prematurely diving feed dog - but that's cheating). The key problem is visible with the machine in F when the feed dog is in its in-plane dead center nearest the back of the machine. When changing to R, the feed dog moves to the front of the machine but changes direction shortly before the stitch lenght regulator reaches it's end stop and moves a little to the back of the machine again. THAT is the "missing" R feed - which has nothing to do with needle timing or feed dog lift timing. It's a result of the internal stitch length regulator kinematic (slider position, pivot points etc.) and I'm not quite sure it can be adjusted - or maybe I am missing something... -
Adler 104 stitch length - adjustment manual
Pterytus replied to Pterytus's topic in Leather Sewing Machines
Great, thanx! Maybe the solution is somewhere in there. -
Adler 104 stitch length - adjustment manual
Pterytus replied to Pterytus's topic in Leather Sewing Machines
Well, I'd strip it, if only I knew where to start tweaking. Turning the eccentric on the main shaft does not do the job and I don't know where else to look but I'm pretty sure it's just a matter of adjustment somewhere somehow... On the furthest dead center of the feed dog (nearest to the back of the machine), there is nearly no gap in the stitch plate. And lots of gap in the stitch plate on it's nearest dead center (nearest to the front of the machine), so the feed dog seem to be off center by quite a bit. When the feed dog is in it's furthest dead center and I change from f to r the feed dog moves to the front first but goes a litte back in the end. This is the "missing" r feed travel. When the feed dog is in it's nearest dead center and I change from f to r the feed dog moves a little further to the front first and then all the way to the back, accordingly. I have a small smooth running Haid&Neu Torpedo which works pretty similar to the Adler design-wise (two or so notches down the size-o-meter). I think I will play with it a little to try and unterstand what's going on. If I get to the bottom of it on the H&N it's just a matter of bigger screwdrivers for the Adler. -
Adler 104 stitch length - adjustment manual
Pterytus replied to Pterytus's topic in Leather Sewing Machines
Ok, so it's not the wedge piece, which works the same 0° and 180°. The scale plate is worn only in certain areas (f/r approx. the same amount btw.). Test in worn and not-worn areas still result in different stitch lengths f and r. Adjusting the eccentric helped, but didn't completely equal out f and r feed (still 8.5f to 7.5r). Further rotation only results in backwards transport at the end of forwards movement - which can't be the solution, obviously. So a little nonconlusive here - but hey! Who wants to go Backwards anyway... -
Adler 104 stitch length - adjustment manual
Pterytus replied to Pterytus's topic in Leather Sewing Machines
Thanx, good points. The scale plate is a little worn, this shouldn't have too much of an effect cause it's not too bad, but I'm going to check that at first, also the wedge piece. If that's not it - which I expect - I'll have to adjust the eccentric trial and error style, I guess ;-) And yes, the check spring was misplaced (pretty obvious, now that I look at the picture again...). I corrected this when I tried to thread it (after the photo was taken) but thank you for the tip anyways.