Shooter McGavin Report post Posted January 1, 2011 I'm having trouble grasping the concept of getting perfect stitch lines along the guns profile. I always end up with either too much space between the gun and the stitch line, or not enough. In some cases, it's a combination. Of course, I can always revise the stitch line on subsequent holsters for the same gun, but there has to be a better way to get them right than trial and error. Currently, I trace the gun outline then go about 1/2 to 5/8 of an inch outside of that line to establish my stitch line. This is my most current holster. As you can see, the forward edge of the trigger guard butts up nicely to the stitch line, while the other lines of the guns profile are quite a bit inboard of that. Not to mention, the leather has a tendency to reshape the threads as it stretches to allow the gun room in the holster. It's hard to pre-plan for that. I guess I'm just a bit aggravated and looking for some input from more experienced leather workers. Thanks, and have a great new years! Quote Share this post Link to post Share on other sites
Shooter McGavin Report post Posted January 1, 2011 Actually, you can see the same sort of thing going on in the 1911 holster that is set as my avatar. I promise you that the lines that run at an angle to the frame of the gun were entirely parallel to it before the holster was molded. PS. I know my spacing between the pair of stitch lines leaves something to be desired. This was like my 3rd holster and I still hadnt obtained a freehand groover yet. It was tough to try to follow a line with the standard offset groover. Quote Share this post Link to post Share on other sites
NoahL Report post Posted January 1, 2011 Guns tend to get smaller as you go from back to front, that's why you are seeing the stitch line creep away from the gun as you go down the holster. If you use the same distance all down the gun for your stitching this will happen because there is less gun for the leather to stretch over. Unfortunately, I don't really have a fix for you other than to try to find the difference in size between the trigger guard-area of the gun and the muzzle end and make a mark that much closer to the gun and draw a slanted line connecting the two points. I'm sure more experienced holster makers will have a better way of doing it--I just sort of wing it on that slant Quote Share this post Link to post Share on other sites
katsass Report post Posted January 1, 2011 (edited) FWIW from the grumpy old man: I make my initial trace of the firearm then measure the width if the gun at different points from hammer to muzzle. To each of these measurements I add the thickness of the leather I'm using..........ie. 8/9 oz leather equals 8/9 64ths inch (1/8 inch) I add the two measurements together and divide by 2 (1 inch width at the breech end of an auto pistol, plus 1/8 inch equals 1 1/8 inch...divided by two equals 9/16th inch) and put a mark at the point along the trigger guard side of the outline, 9/16 inch outside of the trace line, and corresponding to the location from which I took the measurement. . Continue making dots along the length of the patten at the locations from which you took your measurements. The diatances may or may not differ along the length of the gun. Take as many or as few as you feel you need. Play connect the dots. Smooth out the line with your inherent artistic ability. After a while you can get to the point that you can gauge things pretty accurately, keeping an eye out for wide trigger guards and that sort of thing. That's basically how these were done. Now, I don't bone my holsters, I just firmly mold them by hand. I also only use two layers of leather for almost all of my holsters, which would make boning much more difficult.....but my method keeps the stitch line tight. Wheelguns are a bit more of a problem but my system works for me on them also. Mike P.S. For pancake holsters, use your initial trace line along the top side of the pistol as your stitch line when using my method. Mike Edited January 1, 2011 by katsass Quote Share this post Link to post Share on other sites
Tac Report post Posted January 1, 2011 (edited) I use a tip that I learned here quite a while ago for use in figuring the stitch line of pancake style holsters... I trace the outline of the gun out. Then I measure the thickness of the slide at it's widest point. I cut this measurement in half (1 inch wide=1/2 in., etc.). I then set this dimention on my wing dividers and use them to trace the outline of the gun I have drawn, leaving a slight impression the exact distance I set them too, away from the gun's outline. I then use this as my stitch line for both the slide and trigger guard sides of the gun. It works well with semi-auto pistols and usually follows the lines of the gun very well, while allowing enough room for the pistol without it being too tight or too loose. Revolvers, due to their cylinder bulk, require a little more "trial and error".... These are the wing dividers I use. Here are a few examples of my work using this method to get my stitch lines.... Hope this helps... -Tac Edited January 1, 2011 by Tac Quote Share this post Link to post Share on other sites
RobDude30 Report post Posted January 2, 2011 I'm probably a little backwards from everyone else. I'm just starting out and trying to figure all of this stuff out as well. On a pancake holster, I always do an initial molding of the leather before I put the pieces together. The next step I do is to mark and glue the pieces, then after some drying time for the glue, I will do some more molding. Only after I have the molding done, will I lay out the stitch lines. At this point, I can easily follow the outline of the gun and can adjust the stitching to tighten up the retention if I need to. I always stitch last. I use colored linen threads a lot and this method helps to keep the thread clean as well. May be upside down, backwards, and completely wrong, but has worked for me. Quote Share this post Link to post Share on other sites
gregintenn Report post Posted January 2, 2011 I'm a guesseer. The more holsters I make, the closer my guesses seem to be. Every once in a while, I run across an odd shaped gun that throws me for a loop. Quote Share this post Link to post Share on other sites
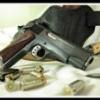
okie44 Report post Posted January 3, 2011 I am a little like gregintenn, in that I am a guesser. The method I use is perhaps a little risky, but it has worked well for me. I like start by downloading a good profile of the gun, then adjusting it to full size, then printing ir out, and then cutting it out, to use as a pattern. I mark the first stitch line, as the top of the slide. I measure the thickness of the slide, then use 1/2 that distance, plus the thickness of the leather, and move the pattern that far from the initial line, and draw my stitch line. This will result in a holster that seems too small for the gun. I then soak the holster in water, or rubbing alcohol, and put the gun in the holster. It will have to stretch the leather a good bit, and will require working the leather around the gun with fingers, or tools. When the gun is finally fit to the holster, it will be a nice close fit, and with all the stretch taken out of the leather, it won't work loose after a while. Some times I am a bit worried when I start, but have never had to throw one away because it is too small. The reason I like to use alcohol, is it leaves the leather a bit firmer, dries faster, and is not as likely to rust a metal gun. The photo I have included, is an old one, and the boning is not too good, but it is the only pic I have right now. You can see the fit tho. Hope the long winded post is of some help. Quote Share this post Link to post Share on other sites
Shooter McGavin Report post Posted January 3, 2011 Thanks everyone! Gives me some ideas to experiment with. Quote Share this post Link to post Share on other sites
dickf Report post Posted January 4, 2011 I use Photoshop to lay out my patterns. I scan the gun and bring it in on top of the pattern. I then use the pen tool to trace the outline on both sides. Once I have both sides as paths, I can position them precisely with the ruler tool. The distance from the guns outline will be determined by the thickness of the gun itself and the leather you're using. That's how I make every pattern I have and how I get my lines to hug the profile. Quote Share this post Link to post Share on other sites