mlapaglia Posted October 7, 2011 Report Posted October 7, 2011 (edited) Ok, I did 2 pancake holsters so it was time for an Avenger. I have to say that for me I like the avenger better than a pancake. Its 8/9oz shoulder. Brown 4ply linen cord. Eco-flo Briar Brown stain with Fiebings USMC black on the inside. EVOO after molding. Leather Balm w/ Atom wax as the first finish. I want to try the mop and glo but have to buy some first. I looked at the 3 part "How to make a leather holster" video by particle about 20 times and wore out the printed copy of Holster Design (long) by mattsh. Then grabbed some paper and started drawing. 3 days later I threw it all away and started over this time remembering what I had learned in the two tutorials. It went together pretty well. I forgot to burnish the reinforcement piece and the initial stitch line for the barrel was way too close. So close in fact that I could not get the barrel in to the part of the holster where it should go. So I stitched another one farther away and then pulled the stitches for the first line. You should not have any problem seeing the original set of holes. I also wasn't paying attention when I did the edging. I went ahead and edged the inside of the sections that were supposed to be glued together. Makes sanding and burnishing a lot of fun. Dyed it after it was cut out. I still need to learn how to not get streaks. I cant afford an airbrush yet so I may just have to wait. I did bake it for 20 minutes at 125 and it got nice and firm. First time it really worked for me. I think it wasnt as damp as the last time I tried it. Removing saddle stitches is not easy when you are trying to not damage the leather. Any way, the new stitch line let me get the gun in the holster and do the molding. I went with minimum boning. I think I like the avenger this way. Considering the mistakes I made I'm happy with how it turned out. Please feel free to let me know what you like and what you think needs to be corrected or improved. With the exception of the first picture all the others were shot by my son the professional photographer. Figured the kid could use the advertising. Let er rip guys. Edited October 7, 2011 by mlapaglia Quote
wizard of tragacanth Posted October 7, 2011 Report Posted October 7, 2011 I would suggesting curving the stitching around the trigger guard, following the natural line, rather than making it square. I think that doing the inside black and the outside tan is kind of different and interesting. That could be your signature design element. Did you use a stitch groover? Nick Quote
Members Dwight Posted October 7, 2011 Members Report Posted October 7, 2011 Dip dyeing is one sure way to get rid of streaks, . . . and do the dying right after you cut out the blank pieces. In this case, you would have dyed both pieces, . . . then after a couple days drying, . . . come back and very gently do the flesh side of the holster with a dauber to get the black interior. OR, . . . you can do the Katsass process, . . . glue two thinner pieces of leather flesh to flesh, . . . after you dye them, . . . for a lined holster that is bi-color. I fought back and forth with all sorts of "better ideas" on dying, . . . one day as I was reading an email I got years ago from Lou Alessi, . . . (he dip dyed all his parts and pieces as soon as they came off the cutting table), . . . I just asked myself who the expert was and who wasn't. Lou won. May God bless, Dwight Quote
Members markush Posted October 7, 2011 Members Report Posted October 7, 2011 I like the color, I don't know if I can pick out the streaks but I like the lighter and darker areas personally. To me it looks just like a good user holster should. I also like that you Incorporated a little bit of tooling. I agree with Wizard and think you should try to follow the trigger guard with the stitch line, that's the first thing that jumped out at me. The last thing I would suggest is...try to get those angles rounded off more. With my first couple holsters I too wanted sharp crisp lines and have to really make a conscious effort to round them off. But rounded contours really do look better once you can bring yourself to do them. Looks good, keep up the good work! Quote
Members mattsh Posted October 7, 2011 Members Report Posted October 7, 2011 I agree with Wizard on the stitching, try to make it match the contour of the trigger guard, otherwise it looks pretty good. As a heads up to everyone, if you dont want to buy or cant afford an Airbrush, Oreilly Auto sells a product called Preval Sprayer for about $5. Its a pressurized spray can that has a glass jar attachment that you can put your dye in. It works really well and you can spray about a half dozen holsters or so with one can (I cant recall, I've sprayed enough that I lost count, but I think it was about 6 maybe 8). Anyway, its a good value. You can get these from most any auto parts store. http://www.oreillyauto.com/site/c/detail/PVL0/267.oap?ck=Search_N1968_-1_-1&pt=N1968&ppt=C0171 You can get these at Tandy but they cost more, about $9 if I remember correctly. Quote
mlapaglia Posted October 7, 2011 Author Report Posted October 7, 2011 (edited) I would suggesting curving the stitching around the trigger guard, following the natural line, rather than making it square. I think that doing the inside black and the outside tan is kind of different and interesting. That could be your signature design element. Did you use a stitch groover? Nick Dip dyeing is one sure way to get rid of streaks, . . . and do the dying right after you cut out the blank pieces. In this case, you would have dyed both pieces, . . . then after a couple days drying, . . . come back and very gently do the flesh side of the holster with a dauber to get the black interior. OR, . . . you can do the Katsass process, . . . glue two thinner pieces of leather flesh to flesh, . . . after you dye them, . . . for a lined holster that is bi-color. I fought back and forth with all sorts of "better ideas" on dying, . . . one day as I was reading an email I got years ago from Lou Alessi, . . . (he dip dyed all his parts and pieces as soon as they came off the cutting table), . . . I just asked myself who the expert was and who wasn't. Lou won. May God bless, Dwight I like the color, I don't know if I can pick out the streaks but I like the lighter and darker areas personally. To me it looks just like a good user holster should. I also like that you Incorporated a little bit of tooling. I agree with Wizard and think you should try to follow the trigger guard with the stitch line, that's the first thing that jumped out at me. The last thing I would suggest is...try to get those angles rounded off more. With my first couple holsters I too wanted sharp crisp lines and have to really make a conscious effort to round them off. But rounded contours really do look better once you can bring yourself to do them. Looks good, keep up the good work! I agree with Wizard on the stitching, try to make it match the contour of the trigger guard, otherwise it looks pretty good. As a heads up to everyone, if you dont want to buy or cant afford an Airbrush, Oreilly Auto sells a product called Preval Sprayer for about $5. Its a pressurized spray can that has a glass jar attachment that you can put your dye in. It works really well and you can spray about a half dozen holsters or so with one can (I cant recall, I've sprayed enough that I lost count, but I think it was about 6 maybe 8). Anyway, its a good value. You can get these from most any auto parts store. http://www.oreillyau...N1968&ppt=C0171 You can get these at Tandy but they cost more, about $9 if I remember correctly. Gentlemen, I totally agree about the stitch line right angle. I know better but had what in my family we call a brain fart. I made several first timer mistakes on this one. The main thing I learned is not to do leather work when I cant devote all my attention to it. Thank you all for the comments and suggestions. It helps to get feedback. Nick, I did a stitch gouge line on the front of the holster but did not do one on the back side. It was an economy piece of shoulder from Tandy so the inside was a little rougher than I like. I shaved it down but it still looked less than great so I figured the black would hide the defects on the inside of the leather. I do like the way it came out. Im not sure it will look good with a darker outside color but I like your suggestion of it being a signature element. Thanks. Dwight, Ill give dip dying a try. I just need to stock more dye than a 4 oz bottle in order to try it. Markush, Thanks for the comment. I have been fighting sharp corners since I started. Im getting better but still need to keep an eye on the angles. Mattsh, Ive seen the preval sprayer but never knew how long it would last. Thanks for the estimate I'll give it a try. Since I normally use stain I will probably have to thin it out some. Its pretty thick compared to dye. Edited October 7, 2011 by mlapaglia Quote
Members evandailey Posted October 8, 2011 Members Report Posted October 8, 2011 Ok, I did 2 pancake holsters so it was time for an Avenger. I have to say that for me I like the avenger better than a pancake. Its 8/9oz shoulder. Brown 4ply linen cord. Eco-flo Briar Brown stain with Fiebings USMC black on the inside. EVOO after molding. Leather Balm w/ Atom wax as the first finish. I want to try the mop and glo but have to buy some first. I looked at the 3 part "How to make a leather holster" video by particle about 20 times and wore out the printed copy of Holster Design (long) by mattsh. Then grabbed some paper and started drawing. 3 days later I threw it all away and started over this time remembering what I had learned in the two tutorials. It went together pretty well. I forgot to burnish the reinforcement piece and the initial stitch line for the barrel was way too close. So close in fact that I could not get the barrel in to the part of the holster where it should go. So I stitched another one farther away and then pulled the stitches for the first line. You should not have any problem seeing the original set of holes. I also wasn't paying attention when I did the edging. I went ahead and edged the inside of the sections that were supposed to be glued together. Makes sanding and burnishing a lot of fun. Dyed it after it was cut out. I still need to learn how to not get streaks. I cant afford an airbrush yet so I may just have to wait. I did bake it for 20 minutes at 125 and it got nice and firm. First time it really worked for me. I think it wasnt as damp as the last time I tried it. Removing saddle stitches is not easy when you are trying to not damage the leather. Any way, the new stitch line let me get the gun in the holster and do the molding. I went with minimum boning. I think I like the avenger this way. Considering the mistakes I made I'm happy with how it turned out. Please feel free to let me know what you like and what you think needs to be corrected or improved. With the exception of the first picture all the others were shot by my son the professional photographer. Figured the kid could use the advertising. Let er rip guys. You can get an airbrush from Harbor Freight for $15 (their deluxe model). It is actually a very decent airbrush and perfectly fine for dying where you are just laying down large areas. The only area it really gives up performance to a higher end brand is in fine detail. Quote
mlapaglia Posted October 8, 2011 Author Report Posted October 8, 2011 You can get an airbrush from Harbor Freight for $15 (their deluxe model). It is actually a very decent airbrush and perfectly fine for dying where you are just laying down large areas. The only area it really gives up performance to a higher end brand is in fine detail. I agree, the problem is not the airbrush but the 50-100 dollars for the compressor. Things are a little tight now. Next hunk of leather I can sell I hope to get a compressor and airbrush. Right now they have the deluxe brush and a 1/5 hp compressor for $70.00. Until them I do what I can. Next one I do will be black I have almost a gallon of Vinegaroon. Quote
Members jlaudio29 Posted October 8, 2011 Members Report Posted October 8, 2011 Gum tragacanth takes care of rough back sides. And if you always pick out your leather at a tandy store you should make sure that your backs look good. If you do not go into the store and get it mailed to you then id suggest getting some leather from Springfield Leather, call in the order and specifically tell them your making holster and need the backs nice, they will usually pick out out some good hides. Quote
Members mattsh Posted October 8, 2011 Members Report Posted October 8, 2011 Even with dye I mix it 50:50 with rubbing alcohol Quote
mlapaglia Posted October 8, 2011 Author Report Posted October 8, 2011 Gum tragacanth takes care of rough back sides. And if you always pick out your leather at a tandy store you should make sure that your backs look good. If you do not go into the store and get it mailed to you then id suggest getting some leather from Springfield Leather, call in the order and specifically tell them your making holster and need the backs nice, they will usually pick out out some good hides. Thanks for the tip on Gum Tragacanth. I actually used it on this one. Between shaving it and using Gum Tragacanth on the inside it looks a lot better than it did. The problem was this was a $21.99 single sholder. They picked the best one they had for me that was actually an 8/9. The better parts made the first two holsters I did. Things are tight at the moment so I use what I have and what I can get cheap. Trust me as soon as the money gets straightened out Ill be getting some good leather and an airbrush. Quote
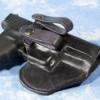
Contributing Member TwinOaks Posted October 8, 2011 Contributing Member Report Posted October 8, 2011 Since all the things about the leather have been covered, I'll offer a recommendation about the photography: Don't display .38spl ammunition with a semi-auto (unless it's a S&W model 52, or a Coonan 1911); put the correct ammo in the picture. As a gun owner, I'm pretty sure you can see the reasons for this. Quote
mlapaglia Posted October 8, 2011 Author Report Posted October 8, 2011 Since all the things about the leather have been covered, I'll offer a recommendation about the photography: Don't display .38spl ammunition with a semi-auto (unless it's a S&W model 52, or a Coonan 1911); put the correct ammo in the picture. As a gun owner, I'm pretty sure you can see the reasons for this. Mike, I had a short talk with my kid about that since he took the photos for me. It's actually .357 ammo from the speed loader of my Model 27 S&W and the clip is from his H&K USP 9 Airsoft. He was going for "art" and we had a talk about accuracy vs "art". Those pics will never be seen except here. I wondered who would catch that. Thanks for the comment. Michael Quote
Recommended Posts
Join the conversation
You can post now and register later. If you have an account, sign in now to post with your account.
Note: Your post will require moderator approval before it will be visible.