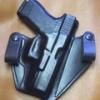
Randyc Report post Posted October 15, 2008 I've been working on my designs for tunnel/loop Avenger style holsters. The first holster I made is for my Makarov pistol. I covered the throat band with caiman alligator. This one actually began life as a holster for my Glock 23. I stitched too close to the form and the Glock wouldn't fit. Instead of the scrap bin, I was able to make this one work for my Makarov. I added a Texas Star Concho for grins. The second holster is one that actually fit my Glock 23. I finished the holster in Fieblings dark brown. My white thread took on a nice gold tint. This is my daily LEO duty holster. As you guys can probably figure out, I don't wear a regular duty rig at work. The third holster, I made for my Glock 34 competition pistol. I plan to switch between my model 23 and 34 for on duty wear. I finished the edges with Fieblings dark brown to provide a little contrast to the basic black holster. I know I may be critiqued on the width of my belt loops. I were western style belts with those thick metel belt tips. My belt tips won't fit through standard width loops. Quote Share this post Link to post Share on other sites
MatthewD Report post Posted October 15, 2008 Nice and clean I like them Quote Share this post Link to post Share on other sites
King's X Report post Posted October 15, 2008 Very nice! Keep it up! ATX Quote Share this post Link to post Share on other sites
BOOMSTICKHolsters Report post Posted October 15, 2008 Howdy, Randyc. How are you cutting your leather? Do you use shears, a head knife, an exacto knife, etc? Your holsters would look a little bit cleaner if you could cut the leather so the edges are continuous, with no angles or points. It sounds silly, I know, but it makes a big difference. If you do end something in a point, try to make it flow into the lines of the holster, if that makes sense. When cutting larger belt slots, I like to use a round punch at either end and a bag punch to cut the straight sides. It is easy to do, and you get a uniform size (you determine the width you want by which round punch you use). Another way to improve the look of your holsters is a boning trick. After you have formed the basic shape with your hands (when I'm not using a press to save time, I like using my thumbs and knuckles to work out the shape of the gun, but as Brock Morgan mentioned, I have a "take no prisoners" approach to making holsters), chase the outside edges with a blunt, round object like a butterknife handle or a screw driver handle, or whatever else you can find that is large and smooth enough not to leave a scratch on the leather. Then chase that line again with a bone folder, or anything else that has a finer edge, in order to leave a more distinct line in the leather where the bonning starts. Doing this will really make the molding of the holster "pop out" at you. Finally, what brand of leather are you using? If you use sides, there is a trick to make your patterns easier. Take the belly portion of the leather that is not suitable for holsters and cut out a piece larger than your holster would be. Wet it, and shape it around your pistol. Now bone the edges in really tight to the pistol so they are very defined. Once that is done, use an ink pen to mark a line about 1/8" from the edge of the "defined edge" of the boning. Now step back and look at the leather, which is covering a lot more than a holster would. Use your pen to mark the shape of your holster; where the muzzle will be, how much clearence you want for your grip, draw thwe belt slot out, and draw the contours of the entire holster, as well as drawing where the belt looop and the reinforced mouth would be. All of this is done while the leather is still fairly damp, so that once you're finished you can flatten the leather out and voila, you have the basis for a holster pattern. Cut the leather where you drew your lines and trace half of the shape onto a manilla folder to make your pattern. Cut out along the molding line you made to mark where your stitches should be, and note where you marked the reinforced mouth so you can duplicate that on your pattern. I know that's a lot of stuff to think about, but I think it will help bring your gear to the next level. Good luck! Quote Share this post Link to post Share on other sites
WaG35 Report post Posted October 16, 2008 Randy- I agree with Boomstick. I like the overall design ideas, but I think rounding off the edges would increase the eye appeal. More importanly, I know where I can send my most common screw up now. I carry a G35 on duty and use a G23 as a backup, and I have a habit of building left handed holster because I am a moron and lay my pattern on the wrong side of the leather. And I'm not left handed. Quote Share this post Link to post Share on other sites
Randyc Report post Posted October 16, 2008 Howdy, Randyc.How are you cutting your leather? Do you use shears, a head knife, an exacto knife, etc? Your holsters would look a little bit cleaner if you could cut the leather so the edges are continuous, with no angles or points. It sounds silly, I know, but it makes a big difference. If you do end something in a point, try to make it flow into the lines of the holster, if that makes sense. When cutting larger belt slots, I like to use a round punch at either end and a bag punch to cut the straight sides. It is easy to do, and you get a uniform size (you determine the width you want by which round punch you use). Another way to improve the look of your holsters is a boning trick. After you have formed the basic shape with your hands (when I'm not using a press to save time, I like using my thumbs and knuckles to work out the shape of the gun, but as Brock Morgan mentioned, I have a "take no prisoners" approach to making holsters), chase the outside edges with a blunt, round object like a butterknife handle or a screw driver handle, or whatever else you can find that is large and smooth enough not to leave a scratch on the leather. Then chase that line again with a bone folder, or anything else that has a finer edge, in order to leave a more distinct line in the leather where the bonning starts. Doing this will really make the molding of the holster "pop out" at you. Finally, what brand of leather are you using? If you use sides, there is a trick to make your patterns easier. Take the belly portion of the leather that is not suitable for holsters and cut out a piece larger than your holster would be. Wet it, and shape it around your pistol. Now bone the edges in really tight to the pistol so they are very defined. Once that is done, use an ink pen to mark a line about 1/8" from the edge of the "defined edge" of the boning. Now step back and look at the leather, which is covering a lot more than a holster would. Use your pen to mark the shape of your holster; where the muzzle will be, how much clearence you want for your grip, draw thwe belt slot out, and draw the contours of the entire holster, as well as drawing where the belt looop and the reinforced mouth would be. All of this is done while the leather is still fairly damp, so that once you're finished you can flatten the leather out and voila, you have the basis for a holster pattern. Cut the leather where you drew your lines and trace half of the shape onto a manilla folder to make your pattern. Cut out along the molding line you made to mark where your stitches should be, and note where you marked the reinforced mouth so you can duplicate that on your pattern. I know that's a lot of stuff to think about, but I think it will help bring your gear to the next level. Good luck! Jeff Thanks for your detailed critique of my latest holsters. I use a manila file folder to draw out my patterns. I drew out my design for the Glock 34 holster on graph paper and used a compass to draw out the rear of the holster. I then transferred the pattern onto a manila folder. Outside of my pocket holsters, that is the first belt holster that I have been satisfied with. I have not done much in the way of hand boning and have relied on my press for forming. I like your idea of using the belly to make actual patterns. I will have to try that method. I use a head knife to cut out my patterns. For my belt slits, I use a small-rounded wood workers carving chisel for my initial top and bottom cuts. I then use a utility razor knife to cut the slits. I've been using leather from Weaver and planning to upgrade to Hermann Oak or Wicket & Craig leather. Randy Quote Share this post Link to post Share on other sites
BOOMSTICKHolsters Report post Posted October 16, 2008 I rarely use a head knife - I think they're great for folks who make bridles, saddles, etc, but holsters have too many sharp turns and inside curves for a head knife to be effective (at least in my hands). I typically use leather shears and round punches to cut out my holster shapes. Using them correctly is a skill in itself, but it can be done quite efficiently. I highly recommend you give hand boning a try. In my opinion, a press should be used for saving time - not as an alternative for hand boning. It's a lot of hard work, but I know you will enjoy it, and you will learn a lot about what makes a holster work right. One of the true marks of skill in a holster maker is their ability to hand bone a holster. Also, I really recommend spending a little extra the next time you order leather and get some Hermann Oak or some W&C leather, even if you get the C grade or utility grade stuff. It is so much easier and much quicker to case and mold, and makes a better looking holster in the end. You can order directly from W&C or get some tannery grade Hermann Oak from Weaver. It is worth the difference in the time you will save working the leather, trust me. Finally, try using a 5/16" or 3/8" dowel on top of the pistol to make an exaggerated sight track. Not only will it improve the draw, but it will actually strengthen the holster. BTW, I applaud you for posting your stuff up for critique. I understand that it is a humbling task, but it sure will help you improve. Be sure to keep posting pics of your work, as I really look forward to seeing your progress. Have fun! Quote Share this post Link to post Share on other sites
K-Man Report post Posted October 16, 2008 (edited) I utilize the press offered by Weaver to do the initial forming of the holster around the gun. Once that's been done, then I utilize a couple of boning tools and modeling spoons to highlight the lines of the gun. Here's a couple of pics that show how much of a difference it makes by going the extra step in comparison to just utilizing the press (or similar). (Not trying to hijack your thread, but simply want to show the effect you can get by taking the extra time to do that.) As you do more holsters, and more guns, you'll learn where the lines are that you want to follow. Each person's interpretation is different in that respect. In my experience, the Hermann Oak leather has proven to be the best for holster making. I've utilized WC as well, but find it to be better for knife sheaths, tooling, and a few other things. Edited October 16, 2008 by K-Man Quote Share this post Link to post Share on other sites
Randyc Report post Posted October 16, 2008 Thanks Guys, I do appreciate the critiques of my holsters. I’m especially great full for the hints and ideas posted by some of you more veteran holster makers. I’ve done pretty well with the sales and buyer feedback of my pocket holsters and have sold a few belt holsters as well. One day, I will be too old to be a lawman and hope to build holsters full-time. I believe anything worth doing is worth doing well. Little by little my holsters have improved and much of what I’ve learned about leatherwork in general and holster making in particular, I learned from you guys on this forum. Randy Quote Share this post Link to post Share on other sites
Srigs Report post Posted October 17, 2008 I also use a small dowel rod to wet form a site track. I don't use head knifes. I use shears and good quality snap off knife blades to do my cutting. For slots, I have a half moon chizel that is ~1/4" wide for top and bottom and use the knife and straight edge. Use a press to do the heavy forming but hand boning is the way to go. I use deer antlers for boning and works great for burnishing also. I made my own drill press burnisher with 1/2" oak dowel and use a round file and cut in different size groves to handle different thicknesses. This saves time and I have made one for each color. Quote Share this post Link to post Share on other sites