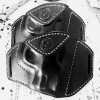
Members zaptoid Posted April 24, 2009 Members Report Posted April 24, 2009 HOWDY ALL. I WAS POKING AROUND THE WEB AND I CAME UPON A PRETTY INTERESTING GUN HOLSTER TUTORIAL. DONT KNOW IF IT IS ON HERE SOMEWHERE BUT I COULDNT FIND IT SO HERE YA ALL GO. http://www.shanewhitlock.com/photo/v/leath...G_3531.jpg.html Quote
Leather Bum Posted April 24, 2009 Report Posted April 24, 2009 That's an interesting tutorial. Thanks for the link, zaptoid. Would anyone mind explaining why belt slots are sometimes cut curved rather than straight. . .? L'Bum Quote
Members Rayban Posted April 24, 2009 Members Report Posted April 24, 2009 Thanks ZAP.....excellent tutorial...just when I was thinking of ordering a blue gun.....think I'll try the tracing thing first, then use the real gun for final fit. Thanks again. Quote Raybanwww.rgleather.net
Contributing Member TwinOaks Posted April 24, 2009 Contributing Member Report Posted April 24, 2009 Good tutorial, I'll get a message off the the owner and see if we can make it a permanent link. There's a few things I do differently that I'd like to add: 1. I always seal the leather to prevent rub-off of the dye 2. I "set" the leather by heat drying it. You'll get different numbers from different people, but I use a convection oven set at about 140(F) and just get the leather hot. Then I remove it and let it finish air drying. When heated like this, the leather takes the molding and really holds the shape...IMO, a lot better than just air drying. Quote Mike DeLoach Esse Quam Videri (Be rather than Seem) "Don't learn the tricks of the trade.....Learn the trade." "Teach what you know......Learn what you don't." LEATHER ARTISAN'S DIGITAL GUILD on Facebook.
Members Rayban Posted April 24, 2009 Members Report Posted April 24, 2009 Interesting Mike....been thinking of trying the oven thing on a knife sheath....will my wife's discarded toaster oven work?? Interesting how you pick up lots of cool tid bits on these tutorials...things that are sitting right in front of us but never recognize....like mounting a burnisher to a lathe.....I could have thought of that if I had only thought of it....dahhhhh. Quote Raybanwww.rgleather.net
Contributing Member TwinOaks Posted April 24, 2009 Contributing Member Report Posted April 24, 2009 Hey Rayban, Yes, a toaster oven works well. My leather oven currently pulls some additional duties cooking dinner. I got the idea from either Regis or Jordan, as they mentioned it in one of their threads (probably a good while back). Whichever one it was cited the magic temperature as 140F. I don't trust the oven's temp setting all that much, I don't have a laser thermometer to check it with, and all I care about is "good and hot". I have found that once you do this (I'm using this process on wet formed holsters, not just cased) the inside of the holster will be like a sauna. Some wadded/twisted paper towels work well for absorbtion. Important point here: Use test pieces to determine your oven's temp range. Scorched holsters smell BAAAAAAAADDDDD! Oh yeah, and, you might not want to try this with nylon thread- I use waxed linen. Also, do NOT try to speed things up and use a microwave....Johanna has something posted about that. Quote Mike DeLoach Esse Quam Videri (Be rather than Seem) "Don't learn the tricks of the trade.....Learn the trade." "Teach what you know......Learn what you don't." LEATHER ARTISAN'S DIGITAL GUILD on Facebook.
Members Bronson Posted April 24, 2009 Members Report Posted April 24, 2009 you might not want to try this with nylon thread- I use waxed linen. Nylon thread is fine in that temperature range. Bronson Quote
Members BOOMSTICKHolsters Posted April 24, 2009 Members Report Posted April 24, 2009 Would anyone mind explaining why belt slots are sometimes cut curved rather than straight. . .? Most of the time, it is simply for the sake of looks. Functional reasons include putting a longer slot in a pattern where it otherwise wouldn't fit, or for adjusting how the holster rides on the body. For example, If I have someone that asks for a magazine holder that doesn't bite into their side, but that also doesn't have a sweat shield, I will angle the slots so the top of the slots are farther away from the magazine body than the bottom of the slots. This allows the top to have a little more give so the mag stands off a bit without really sticking out too much. Much can be accomplished by the angle, size, and placement of belt slots on a holster. It just takes some engineering and a little experience to use these features to get the results you want. Quote
Contributing Member TwinOaks Posted April 24, 2009 Contributing Member Report Posted April 24, 2009 Thanks Bronson for clarifying that. Since I only use linen (hand stitching, still...) I don't have any experience with the nylon. Quote Mike DeLoach Esse Quam Videri (Be rather than Seem) "Don't learn the tricks of the trade.....Learn the trade." "Teach what you know......Learn what you don't." LEATHER ARTISAN'S DIGITAL GUILD on Facebook.
Leather Bum Posted April 24, 2009 Report Posted April 24, 2009 Thank you very much, Boomstick. I had wondered about the angled slots as well. L'Bum Quote
Members zaptoid Posted April 24, 2009 Author Members Report Posted April 24, 2009 Good tutorial, I'll get a message off the the owner and see if we can make it a permanent link. There's a few things I do differently that I'd like to add:1. I always seal the leather to prevent rub-off of the dye 2. I "set" the leather by heat drying it. You'll get different numbers from different people, but I use a convection oven set at about 140(F) and just get the leather hot. Then I remove it and let it finish air drying. When heated like this, the leather takes the molding and really holds the shape...IMO, a lot better than just air drying. That would be great and thanks for the additional tips Im gonna need all the help I can get. I also just noticed I am or I was a first time poster so greetings to all of you sorry for not introducing myself ealier. I have always wanted to get into leathercrafting going back to my days as a young boy on my uncles ranch out in Elsinore CA. he was a Leathercrafter/Silversmith and I always looked forward to my visits to the ranch. Quote


Recommended Posts
Join the conversation
You can post now and register later. If you have an account, sign in now to post with your account.
Note: Your post will require moderator approval before it will be visible.