Members amuckart Posted July 4, 2010 Members Report Posted July 4, 2010 Hi all, I've finally picked up my #6, serial number 7536. There are pictures online at: http://picasaweb.goo...sMachineNo7536# On first inspection she's filthy, but doesn't appear badly worn. I want to restore it and I'm wondering if anyone has advice on what sort of things to look out for with these machines. I'm relatively confident I can systematically strip it and reassemble it without losing track of the parts, but I'm interested to know what pitfalls there are with these machines and what the major wear points are etc. It's missing the wax pot off the top. The guy I bought it from swears blind he has it somewhere, but I'm not holding my breath. I can jury-rig something to serve the purpose, but I'd like to know what I should expect to have to pay for a replacement. Has anyone repainted the fancy hand wheels? What sort of paints are best to replicate the original look? Also, I'd really like to know where to get a set of sockets to fit the square-drive bolts the machine uses. My A1 restoration is currently stalled by my not having the correct tool to remove the recessed square-drive bolts in the head. Many thanks. Quote -- Al. Medieval Stuff: http://wherearetheelves.net Non-Medieval, including my machines: http://alasdair.muckart.net
Members amuckart Posted July 9, 2010 Author Members Report Posted July 9, 2010 Here are some locally-hosted pictures of it. I plan on getting the base sandblasted, but using evaporust and soda blasting to clean up the head parts since sandblasting can re-profile the surface of the metal. The stand in this picture is missing the bolt-on shelves. I have them, but one of them is broken so I need to get it welded up. The pitman rod has been replaced with an ugly chunk of galvanised steel. I have the nice shaped original wooden ones for my A1 so I plan on making a bigger version of one of those to replace it with. This is about as bad as the rust gets. Luckily this is restricted to the feet of the stand. Here are a couple of shots of the back of the machine, which there don't seem to be many of on the forum. The machine when I got it was covered in dirt but has a relatively light consistent patina of rust without any deep pitting I can see. The cam tracks in the main wheel are a great example of something that must have taken a highly skilled patternmaker to make originally, but which are ideally suited to modern CNC machining. When I have the machine stripped down I plan on contacting the engineering department at my local university to see if I can get the parts scanned with a 3D scanner. The shuttle seems nice and sharp but I haven't got the machine to the point of being able to sew with it to find out yet. Serial number 7536. From reading other forum posts I'm guessing this puts the machine in the 1920s somewhere. The flywheel has a sort of 'roped' design on it, which is different to the square linear design on Badger's second one. I'm curious as to how many designs there were. The roped decoration can be seen in this image from Moore Leather's post of BUSM catalogue pages but there isn't enough paint left on the needle bar actuator arm of my machine to tell if it had the roped decoration on there too. Seeing as I'm going to have to repaint the machine I'd really like to work out what the original livery probably looked like. The one in the catalogue pages has a quite different stand to my one too. Quote -- Al. Medieval Stuff: http://wherearetheelves.net Non-Medieval, including my machines: http://alasdair.muckart.net
dirtclod Posted July 9, 2010 Report Posted July 9, 2010 A 6 point socket might work on the square nuts. As your tearing it down i would take pictures of everthing along the way just incase you forget how some thing goes back togeather that wouldn't take but a few minutes and may save hours of hair pulling when you put it back togeather. I can't wait to see it all back togeather and sewing. John Quote I'm old enough to know that i don't know everything.
Members amuckart Posted July 10, 2010 Author Members Report Posted July 10, 2010 Hi John, A 6 point socket might work on the square nuts. Sadly the geometry is all wrong, and trying is practically guaranteed to strip the corners off of the bolts. As your tearing it down i would take pictures of everthing along the way just incase you forget how some thing goes back togeather that wouldn't take but a few minutes and may save hours of hair pulling when you put it back togeather. Oh yes indeed. I have over 1500 pictures of my Pearson & Bennion A1, taken as I stripped it apart. Pictures of this will all end up on my website eventually. I can't wait to see it all back togeather and sewing. Me too, but it's a little while away yet. I imagine it's going to be a long process to rebuild her and I've got other machines in the pipeline at the moment. I've got a 5-in-1 and a 45k I'm working on right now and as soon as I've got myself a set of 4- or 8-point sockets I'll finish my A1, then a couple of post-beds, then I can start thinking about whether to start the #6 or do the bell-knife skiver. Having cleaned and oiled it it looks like it'll sew Ok as it is but I haven't built a bobbin winder yet so I haven't had a chance to find out. Cheers. Quote -- Al. Medieval Stuff: http://wherearetheelves.net Non-Medieval, including my machines: http://alasdair.muckart.net
dirtclod Posted July 10, 2010 Report Posted July 10, 2010 (edited) When i read that a 6 point socket wouldn't work. I though maybe a piece of square tubeing might do it. For more leverage you can drill a hole in it and stick a screwdriver through the hole or maybe weld a bolt or nut on the end if the tubeing fits and then use a wrench to break them loose.If that won't work ask at the Universty and see if they can make you a wrench. They may have a machine shop. Tell the teacher it would be a good project for a student..LOL. Edited July 10, 2010 by dirtclod Quote I'm old enough to know that i don't know everything.
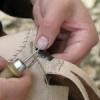
Members amuckart Posted July 10, 2010 Author Members Report Posted July 10, 2010 Another question about my machine for people who know more about them than I do. On my machine, there is a an open-topped box at the back of the machine with a pipe that goes through a hole in the chassis of the head to the front of the machine (ignore the needle, I poked it in to make sure the hole did go all the way through like I thought). On the catalogue page I linked to above, and on this picture from Badger's post about his second machine there is a tube coming off the front of that pipe to a box under the bed where the needle comes down past the shuttle. Here's a picture from my machine showing the needle at the bottom of its stroke protruding into the space where it looks like the box attaches On the catalogue page there's what I'm guessing is a burner under the box too. My guess is that this is the "patent top-waxing apparatus" mentioned in the catalogue, but I am curious as to how it's purpose differs from the top wax pot, and if/where I can get such an apparatus for my machine (Badger, do you use yours?), since if it is what I think it is it might be fiddly and messy but it would be right useful for some of the sewing I plan on doing with my machine. Quote -- Al. Medieval Stuff: http://wherearetheelves.net Non-Medieval, including my machines: http://alasdair.muckart.net
Members Singermania Posted July 22, 2011 Members Report Posted July 22, 2011 Another question about my machine for people who know more about them than I do. On my machine, there is a an open-topped box at the back of the machine with a pipe that goes through a hole in the chassis of the head to the front of the machine (ignore the needle, I poked it in to make sure the hole did go all the way through like I thought). On the catalogue page I linked to above, and on this picture from Badger's post about his second machine there is a tube coming off the front of that pipe to a box under the bed where the needle comes down past the shuttle. Here's a picture from my machine showing the needle at the bottom of its stroke protruding into the space where it looks like the box attaches On the catalogue page there's what I'm guessing is a burner under the box too. My guess is that this is the "patent top-waxing apparatus" mentioned in the catalogue, but I am curious as to how it's purpose differs from the top wax pot, and if/where I can get such an apparatus for my machine (Badger, do you use yours?), since if it is what I think it is it might be fiddly and messy but it would be right useful for some of the sewing I plan on doing with my machine. Quote


Recommended Posts
Join the conversation
You can post now and register later. If you have an account, sign in now to post with your account.
Note: Your post will require moderator approval before it will be visible.