


amuckart
-
Posts
574 -
Joined
-
Last visited
Content Type
Profiles
Forums
Events
Blogs
Gallery
Everything posted by amuckart
-
Those Chapman sets look good. I bought a Winchester branded set from a gun shop. Gunsmith sets are nice because they’ve got heaps of different size flat bits, and importantly they’ve got multiple widths, so you can get the right size without marring the edges of the hole the screw is in. if you’ve got a good variety of hollow-ground flat heads then the rest are all pretty standard. Extra-long shaft drivers are good for getting to needle plates etc. but are harder to find.
-
Is the Singer 29-4 an advisable choice for someone on a budget
amuckart replied to Jiggity's topic in Leather Sewing Machines
I wouldn’t go near a 29-4 unless I specifically wanted a difficult rebuild job. If I were on a budget I’d look for a used Pfaff 355 or similar walking foot small cylinder bed machine. -
Keeping Northmount’s point about cantilevering and balance in mind, the way I would do this is: - Take everything off the table and take the table top off the stand. - Remove the rubber edging. - Flip the table top so your marking etc. is on the underside and also so any tear out of the laminate is on the bottom. - Mark the line you want using a pencil. - Cut the end off the table using a track saw if you have access to one, or a circular saw and straight edge guide if not. Leave about 1/16th” extra. “Diablo” blades are good for cleanly cutting through the laminate but make sure you use a new, sharp, blade with a decently fine tooth pitch and only just enough blade extension to get through the material (assuming you can adjust that on your saw). - Take the sawn-off end and use it to mark out the rounded corners on your cut edge and saw most of the waste off leaving about 1/16th” clearance to the marked line - Get a straight 1/2” router bit that is long enough to cut the full thickness of the table top and has a guide bearing at the tip. - Clamp the off cut in place lined up with your marked out lines and use the router to trim the corners and cut lines straight and square. If you’ve never used a router before get someone else to do this. It’s not a great cut to be making for a total beginner. - If the edging is fit into a slot, use a slot cutting bit in the router to machine the slot and reinstall the edging. - Reassemble everything. If you’re borrowing a saw to do this it’s polite to buy a blade, IMO. Cutting laminates blunts blades quite fast. with that servo motor you can get rid of the speed reducer too and get some space back. Using that space for a needle position synchroniser would be a better quality of life improvement unless you have a particular need for _really_ slow stitch speeds.
-
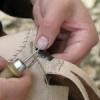
Mine came with the toothed one for crepe soles. I made a knife one from a bit of old hacksaw blade, just guessing at the dimensions but it seems to work Ok.
-
Thank you so much, that information is greatly appreciated.
-
Watch how the thread is coming off the spool as you sew. If it’s not despooling cleanly and catches at certain positions that’ll cause a tension spike in the top thread. The solution if it’s just catching at a certain point is to make sure the thread guides are exactly centred over the spool and to make sure there’s enough distance between the top of the spool and the thread guides. if the thread is catching because the bottom of the spool has rolled or collapsed a bit I don’t know how to solve that.
-
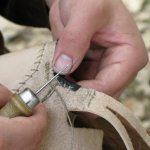
They’re great machines, you can still get needles for them. At two cranks per stitch it does get tiring though. I need to put a motor on mine. I would love to see more pictures of the alcohol burner! Mine is missing that and I wasn’t aware it was even an option. What style of feed dog does yours have? There are two - a toothed one for crepe soles and a channeling one for leather.
-
Find info on number 6 sewing machines
amuckart replied to Bobbymagee53's topic in Leather Sewing Machines
G’day! Whereabouts are you? If you are on FB there’s a Pearson group on there that’s currently the best source of knowledge on the machines. I know a bit about the machines (I’m in Wellington) and gordond on here is probably the NZ expert. I re typeset the manual and redrew many of the pictures a few years ago. I see Tigweldor had linked it above. -
Looking for info Pearson & Bennion A2 Leicester
amuckart replied to JLA1913's topic in Leather Sewing Machines
What a cool machine! I have a Pearson & Bennion A1 but wasn’t aware there was an A2 as well! Exact dating isn’t possible but it’s Pearson & Bennion it is pre-1896 or thereabouts. Pearson & Bennion were acquired by British United in 1896, and after that machines were marked British United Sewing Machine Co. or BUSM. No idea what it’s worth, depends entirely on the collectors in your vicinity. If it were near me I’d pay a couple hundred NZD for it, just for the novelty value and interest. -
If you’ve ever wondered what workplaces without OSHA and EPA would look like, here’s your answer. I feel sorry for that painter, and his family, and I don’t want to think about the poor sods working wherever those parts got chromed.
-
I think this is sound advice. If you have a dedicated binding machine, you have a dedicated binding machine; if you have a small cylinder arm machine with a synchronised binder attachment you have a flexible tool that can be adapted to multiple purposes.
-
Adding pulleys to slow down a Consew 206RB
amuckart replied to melinda's topic in Leather Sewing Machines
I second Northmount’s advice to ditch the clutch motor and replace it with a servo if you can possibly afford it. If you’re going to go to all the work you’ll get a much better experience from a servo than a speed reduced clutch motor. You’ll also be able to add a needle position sensor, which is a big quality of life improvement. They aren’t terribly expensive really are worth saving up for. I will never go back to use a clutch motor on any machine I own now. -
You may be setting yourself up for disappointment if you try and sew wallets on a 7-class machine unless you’re making extremely chunky wallets. They are not built for fine work. The needles and feet and holes in the feed dog are all huge and I’m not even sure it will tension wallet-appropriate thread without a whole lot of work.
-
I have a 30” arm 221 that came to me with a servo motor and synchroniser on it. I think the motor is a Ho Hsing but it’s not nearby to check. I don’t see any reason why any other kind of servo motor wouldn’t work so long as it had the required power. I also wouldn’t put anything less than a 750W on it, but where I live at least the price difference between a 550W and a 750W is trivial.
-
I reckon this bit should be made a pinned post on this forum. I’ve not seen such a succinct and useful explanation of check spring function and setting anywhere.
-
That was me If you don’t need the machine in a specific timeframe, and you’re comfortable with setting it up from scratch assuming it’s never been even vaguely adjusted, it might be worth it. I’m not a professional machinist or mechanic, but I’d stripped and rebuilt machines before I got mine. It still took me the thick end of 6 months to get it sewing properly. I value that as a learning experience now but it was a struggle at the time. Mine came from Hightex (CowBoy’s parent company) so I figured it wasn’t quite as much of a crapshoot as buying a random brand one. That said, someone else had done the same thing and had to completely dismantle the machine, flush machining debris out of the head and grind on a few parts before reassembling the whole thing from scratch before it would sew. With the resources available on here I could probably do that with a 441 today, but now that there’s a dealer in NZ who offer support etc. I’d be mad to and the next CowBoy machine I buy will be from the dealer. Not all machines are made equal, and not all factories making the same models do equally good jobs. I’ve got four Chinese clone machines from different factories and the Highlead is streets ahead of the others in terms of quality. The CowBoy/Hightex isn’t bad (except for the paint job which looks like they did zero surface prep beforehand). The Mercury is Ok but nothing to write home about and the rando brand one sews, but is not at all well finished and is kinda roughly cast. Fortunately it doesn’t get used much these days.
-
Thank you Uwe, that’s really useful!
-
Thank you Uwe, that neatly solves a problem I’ve been having. I see all the binder shells are for 9mm thick material. Does it matter if you’re binding over thinner stuff? I’m assuming the 9mm is a maximum thickness, not an absolute, so if I’m only binding over 3 or 6mm it should still work. Thanks.
-
Powder Coating - has anyone tried it?
amuckart replied to iron1951's topic in Leather Sewing Machines
I have a 45k25 I've been 'almost finished' restoring for about 7 years now. I had the head soda blasted then powdercoated. I'm very happy with the finish. It's a good gloss black, excellent film thickness with just a tiny bit of orange peel effect that can be seen in originals. Things I wish I'd done differently are having the head done all as one piece (which is how they were done originally but I ended up separating the arm and top for soda blasting and should have just left it as it was; and being a bit more explicit with the powdercoaters about what exactly needed masking and what didn't, because there are a couple of surfaces that didn't get masked which should have been. Overall I'm very happy with the result. It takes decals well and at some point I'll get around to finishing the decals and clear coating it. -
Hi Willford. Whereabouts in NZ are you? I got a Cowboy/Hightex CB-4500 imported directly and it's not a process I would recommend unless you're already a skilled mechanic. I'm strictly an amateur and had time to learn how to get my machine up and running but it took quite a while and I had zero support. I absolutely wouldn't buy a machine off of Alibaba/Aliexpress. Parts, yes, whole machines, no. Not unless you're willing to have an unsupported non-working machine land on your doorstep. If I were you I'd talk to Auckland Sewing and see what they've got. They're the NZ distributor for Cowboy/Hightex now and I've always had good service from them. Their Internet presence is mostly TradeMe but you can email them. https://www.trademe.co.nz/stores/auckland-sewing-ltd
-
Biothane is just a pain to sew, regardless of the machine. I've sewn it fine on my 441 clone, and while the 205 might be a better engineered machine, it's not magically better in ways that are probably going to be relevant for sewing biothane. My experience of biothane was that you absolutely, positively, must use thread lubricant. I used silicone thread lube and that worked well, but be aware that once silicone lubed thread has been through the thread path it will always have some silicone lube on it. I'm not aware of anything that will reliably completely clean silicone lube off. I made a lube stripper for the lube pot on my 441 by poking a needle hole through a thickish bit of silicone cut out of an old reusable coffee cup lid. I poked the thread through this with a needle and left it inside the lube pot. It left enough lube on the thread to work but not so much that silicone lube dripped and sprayed around everywhere the way it did without it. The other thing you have to do with biothane is go up at least one, maybe two, needle sizes for the size of thread you're working with. The coating on biothane doesn't punch cleanly and it fills up the groove in the needle which stops the machine from throwing the thread loop properly and you get missed (or no) stitches. I ended up going up a needle size and cranking the tensions up as high as they'd go to get a decent stitch. It worked Ok, but if I was going to do it again I'd want to dedicate a machine specifically for biothane that wouldn't get used for anything else.
-
Looking for one particular part for a Pearson No.6
amuckart replied to HollyMac23's topic in Leather Sewing Machines
Hi Holly, To clarify, are you looking for the slide cover that goes on the top? I don't have a No.6 any more but my recollection is that this is a pretty simple part. Given measurements an engineering shop should be able to make one without any difficulty. I'm not sure how active he is on here at the moment, but Gordon Disher is near you and has a handful of No.6'es. -
I can't add anything beyond the "bigger spring, new brake leather" other people have already said, but I'd love to know more about your japanning process.
-
Is it a good choice? Seiko CH8B cylinder bed
amuckart replied to Ehgreen's topic in Leather Sewing Machines
I looked at a CH8B when I was hunting for a big stitcher a few years ago. In the end it wasn't worth it because feet and needle plates and other parts were too difficult to come by. Irrespective of any other merits and flaws, the Juki 441 clones from manufacturers like Cowboy/Hightex, Cobra, and Highlead have become the de-facto standard for modern heavy leather stitchers and as a result there is a much wider range of feet and needle plates and other accessories available for them than there is for other similar machines like the Seiko you're looking at. I ended up buying a Hightex (Cowboy) 441 clone from China. It was a bit of an adventure but I got a machine and a full set of harness feet and needle plates and a pedestal stand for only a little more than the Seiko I'd been looking at would have cost me. Since then I've acquired a Highlead 441 clone which is better built and noticeably higher quality (and at normal price, quite a lot more expensive) which the feet and needle plates fit on to just fine. As others have noted, a 441 type machine is probably overkill for what you want to do. You may well be better off with a smaller machine that'll handle thinner materials more gracefully. -
There's more than one question in here. Bags, straps, belts, and knife sheaths are all very different things, made by different trades out of different materials. The biggest barrier to giving an answer though is that "leather" covers a large range of materials from different animals, of thicknesses that was tanned, curried, and finished in a huge variety of ways in accordance with the intended purpose. Two pieces of leather made for different purposes could have almost nothing in common save that they once graced the outside of an animal. Think about leather used for gloves and leather used for the soles of shoes. Both 'leather' but utterly different in nearly every physical property you can name. Pre-industrial leather is also a very different material from modern 'vegetable' tanned leather that's been tanned using a short process in highly concentrated solutions of tanning liquids, so you can't extrapolate backwards based on the behaviour or modern leathers. Most modern veg tan is machine thicknessed and has a highly corrected grain surface. If bought as russet it also tends to be quite dry because it's intended to be tooled or dyed and finished by the maker. Modern leathers don't tend to come in nearly the range of finishes etc. that pre-industrial leathers did, and pit tanned leather that's been slowly tanned over the course of 6-12 months is a physically very different material than modern veg tan. Of all the expertly-made 18th century shoes I've seen, none have had any evidence of rounded edges, even along the topline.