amuckart
-
Posts
577 -
Joined
-
Last visited
Content Type
Profiles
Forums
Events
Blogs
Gallery
Store
Everything posted by amuckart
-
I can't add anything beyond the "bigger spring, new brake leather" other people have already said, but I'd love to know more about your japanning process.
-
Is it a good choice? Seiko CH8B cylinder bed
amuckart replied to Ehgreen's topic in Leather Sewing Machines
I looked at a CH8B when I was hunting for a big stitcher a few years ago. In the end it wasn't worth it because feet and needle plates and other parts were too difficult to come by. Irrespective of any other merits and flaws, the Juki 441 clones from manufacturers like Cowboy/Hightex, Cobra, and Highlead have become the de-facto standard for modern heavy leather stitchers and as a result there is a much wider range of feet and needle plates and other accessories available for them than there is for other similar machines like the Seiko you're looking at. I ended up buying a Hightex (Cowboy) 441 clone from China. It was a bit of an adventure but I got a machine and a full set of harness feet and needle plates and a pedestal stand for only a little more than the Seiko I'd been looking at would have cost me. Since then I've acquired a Highlead 441 clone which is better built and noticeably higher quality (and at normal price, quite a lot more expensive) which the feet and needle plates fit on to just fine. As others have noted, a 441 type machine is probably overkill for what you want to do. You may well be better off with a smaller machine that'll handle thinner materials more gracefully. -
There's more than one question in here. Bags, straps, belts, and knife sheaths are all very different things, made by different trades out of different materials. The biggest barrier to giving an answer though is that "leather" covers a large range of materials from different animals, of thicknesses that was tanned, curried, and finished in a huge variety of ways in accordance with the intended purpose. Two pieces of leather made for different purposes could have almost nothing in common save that they once graced the outside of an animal. Think about leather used for gloves and leather used for the soles of shoes. Both 'leather' but utterly different in nearly every physical property you can name. Pre-industrial leather is also a very different material from modern 'vegetable' tanned leather that's been tanned using a short process in highly concentrated solutions of tanning liquids, so you can't extrapolate backwards based on the behaviour or modern leathers. Most modern veg tan is machine thicknessed and has a highly corrected grain surface. If bought as russet it also tends to be quite dry because it's intended to be tooled or dyed and finished by the maker. Modern leathers don't tend to come in nearly the range of finishes etc. that pre-industrial leathers did, and pit tanned leather that's been slowly tanned over the course of 6-12 months is a physically very different material than modern veg tan. Of all the expertly-made 18th century shoes I've seen, none have had any evidence of rounded edges, even along the topline.
-
Edge slicking devices do exist in 18th century contexts, for example shoemakers used them for sole finishing on some work, but that doesn't mean it was a universal practice across all crafts that used leather as a material. Try narrowing down your search to the context of the project you want to make and then go looking for references to the tools that would have been used to do the job.
-
That argument doesn't hold and it's based on a bunch of unfounded assumptions. Firstly that an un-rounded edge is "sharp" which they aren't and secondly that rounding an edge is simple and fast which isn't necessarily true. It depends an awful lot on the item, what it's made from, etc. etc. The comment was made on FB by someone who isn't a leatherworker, so I wouldn't give it much credence.
-
What's The Smallest Cylinder Arm That'll Sew With 277 Thread?
amuckart replied to amuckart's topic in Leather Sewing Machines
My STH-8 will sew with 277 thread, but it doesn't like it. My understanding is that the CW-8 is basically the same machine in a cylinder arm configuration. Too much friction between the material and the machine. Because 441s have no lower needle guide like machines originally designed for needle-feeding difficult material, the needle deflects instead of feeding and you get inconsistent stitch length and missed stitches. Oh I wish I could go down that route! Unfortunately the cost of a Campbell machine landed here in NZ is around the NZ$10,000 mark, so that's not happening any time soon. -
i find myself sewing some tightly curved things that are too small for me to do on a 441 clone, and I'm wondering what the smallest machine that'll sew with 277 or 207 thread is. Singer 45k is too big and I don't think a CW-8 type machine will be small enough or feed think thread. The stirrup plate on the 441 might be a so,union but I'm damned if I can get an acceptable stitch quality using it, and I've had zero luck feeding Biothane without a feed dog. Is there a machine out there that'll do this? Thanks.
-
it looks like the love child of a Singer 45k and a Pearson & Bennion A1. I can see turning that handle getting real old real fast.
-
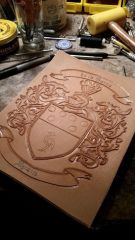
How much does an 8.5x11 family coat of arms sell for?
amuckart commented on DOUBLETAP's gallery image in Gallery- Our Leatherwork
 No problem. Unfortunately these "genealogy" websites are numerous, and almost all of them peddle wildly inaccurate information (a lot of it simply made up, or recycled from other sites that made it up) and not many people in this day and age know about what heraldry means or how it works.
 -
How much does an 8.5x11 family coat of arms sell for?
amuckart commented on DOUBLETAP's gallery image in Gallery- Our Leatherwork
That's shaping up to be a nice piece of work, but I wouldn't go down that route. Despite what lots of unscrupulous genealogy websites tell you, there is no such thing as a "family crest" or a "family coat of arms". Heraldic armory belongs to individuals, not families, and it is real heritable property. You can't use another person's heraldry just because you share the same surname any more than you can go and live in their house or drive off in their car just because you share a name. Doing so is illegal in many jurisdictions. I happen to own armory of my own, thanks to my father. Obtaining arms was a very expensive process and I would have no more tolerance for someone who stole my armory than I would if they stole any other part of my identity. Both the Garter King of Arms (the English / Commonwealth heraldic authority) and Lord Lyon King of Arms (the Scottish heraldic authority) are extremely clear on this on their websites, which are the authoritative websites on heraldry and armory in the world. Lord Lyon's website says: From: http://www.lyon-court.com/lordlyon/216.181.html The English College of Arms has the following as the very first item in their FAQ: From: http://www.college-of-arms.gov.uk/resources/faqs So, irrespective of the quality of your work and the value of your time, selling "family" coats of arms in any form is dishonest at best, and potentially illegal. -
Need Help And Or Advice On A Large Sewing Machine Table...
amuckart replied to cdurkinz's topic in Leather Sewing Machines
I've tried that and it didn't work well. They weren't quite the right height, the out feed had no slope away from the machine and they were much too light so the drag of the fabric could pull them over. If you're building something for a permanently placed machine, you may as well build it directly into the table and not have to deal with the join between the machine table edge and the big table edge. -
Need Help And Or Advice On A Large Sewing Machine Table...
amuckart replied to cdurkinz's topic in Leather Sewing Machines
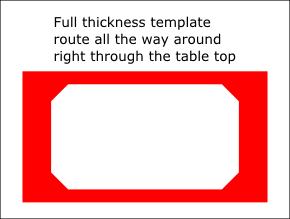
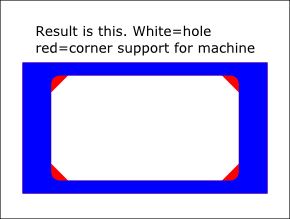
I would use the router around the whole circumference. You'll get a far better result that way. Take most of the material out with a jigsaw, leaving a small amount inside the lines, then take it back to the lines with the router. It does mean you'll need two templates, one for the full thickness cut and one for the corners. First route full thickness with a template like this: Then route the corners half (or whatever) thickness with a template like this That will give you a hole like this: You'll need a way to ensure the templates are perfectly lined up but that can be done by making sure the outsides are exactly the same size and clamping a builder's square on to the the table.


-
Need Help And Or Advice On A Large Sewing Machine Table...
amuckart replied to cdurkinz's topic in Leather Sewing Machines
Router bits have cutting edges that are a certain length, say 1 1/4". With a router bit like that you can cut material 1 1/4" thick. If you want to cut material 1 5-16" thick you have to leave 1/16" of the shaft sticking out pf the bushing on the router. This is invariably a Bad Idea. If you can get a 1 1/2" bit, then you can use up to 1 1/2" thick material for your table top. That's more than enough for what you want to do. 1" is plenty for table tops like this. -
To answer this question - no, adding a reducer won't affect the way the machine stitches. Have you checked for wear throughout the machine? Does the shuttle carrier have any play in it if you try to rotate it while holding the hand wheel still? Is the point of the shuttle worn? What type and size of needle are you using?
-
Thank you very much for sharing this.
-
Need Help And Or Advice On A Large Sewing Machine Table...
amuckart replied to cdurkinz's topic in Leather Sewing Machines
I was a bit unclear. You can't (or rather, shouldn't) try and cut materials that are thicker than the cutting edge of the router bit + bearing are long because doing so requires only partial insertion of the shaft into the collet of the router and if you get that wrong it can go very badly very fast when the bit is spinning. -
Need Help And Or Advice On A Large Sewing Machine Table...
amuckart replied to cdurkinz's topic in Leather Sewing Machines
Yes, that's what you want. There are two types of flush cut router bit: ones with the bearing at the shaft; and ones with the bearing at the tip. For this job you want one with the bearing at the shaft, which that ones has. To use a bit like this you need to cut the bulk of the material out first so you're just using the router bit to create the finished edge. Just make sure that whatever material you end up using is thinner than the router bit is long. -
Need Help And Or Advice On A Large Sewing Machine Table...
amuckart replied to cdurkinz's topic in Leather Sewing Machines
The secret to routing slots for a sewing machine is to use a template and a good plunge router that you can set the depth on (especially for the corners). I've made complex router templates out of 4mm masonite/hardboard before and that has worked well. I drew up the plans in inkscape (free SVG editor), printed them, checked the dimensions and stuck them to the hardboard. I used a stanley knife to carefully cut the shapes out, going over it with multiple passes, not trying to do the whole cut at once. You could use a scrollsaw or a jigsaw if you're really good with one, but a knife is more accurate if you're not. Slots are easy, just clamp a straight edge on to the material, clamp a couple of stops to that and route between them. All of the big loft-style sewing tables I've seen have been custom built for the space they're in. They're not inherently complex things to build if you've got the tools. There's no reason you couldn't build one with a hand saws and a hammer & nails, but power tools would make it quicker. The only tricky bit is getting a consistent slope away from the machine at the right angle to help the outfeed but not so steep that the fabric just slides down it. -
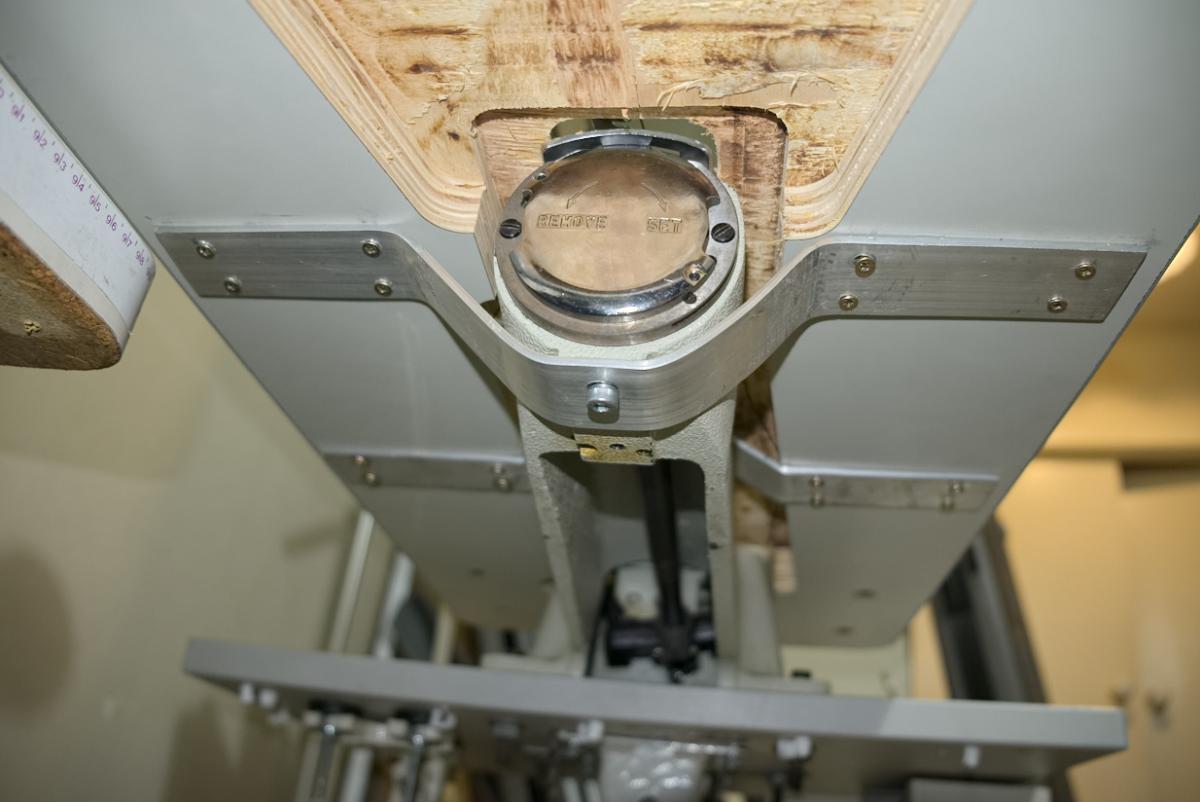
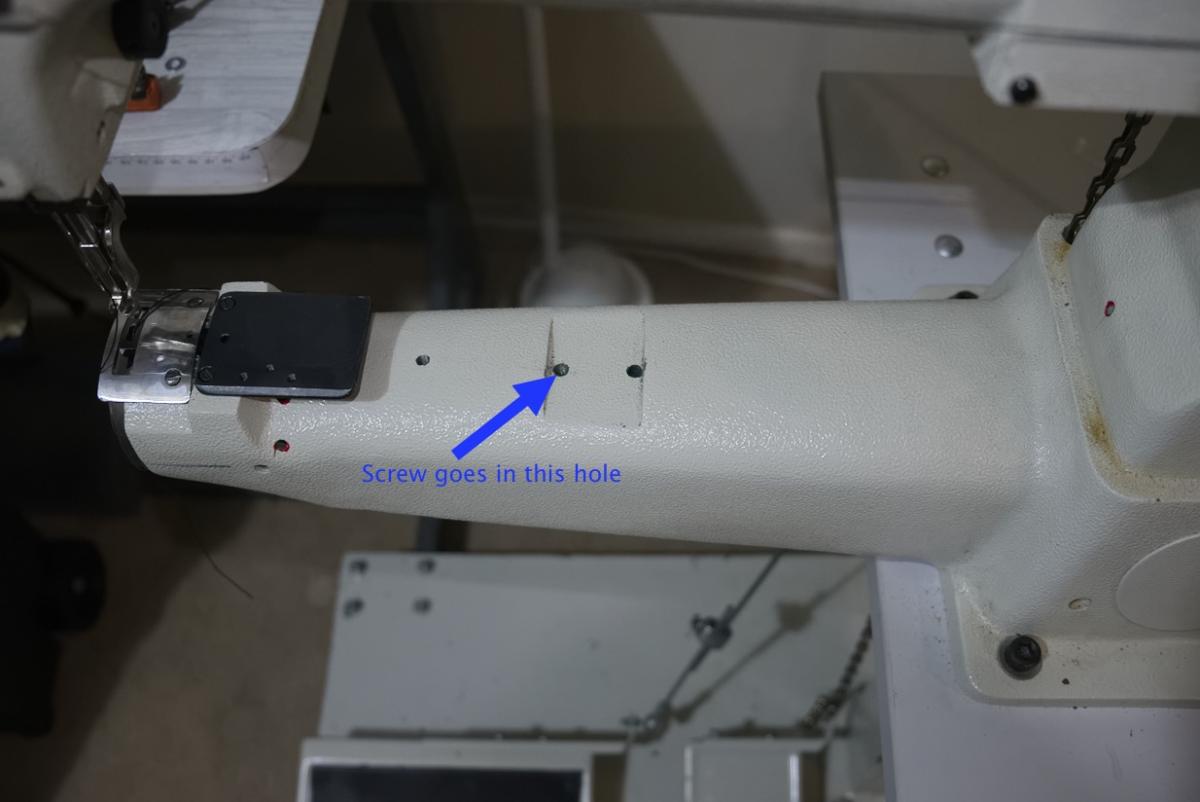
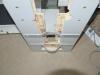
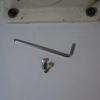
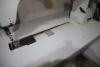
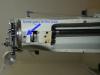
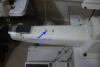
This is not my idea, I saw this specific implementation on Donna Nobilo's machine. It is very similar to the way flatbed tables attach to Pearson No.6 machines, and similar to the way flatbeds attach to 29k patchers. Donna runs Ethos Leather in New Zealand and is a member on these forums. It is so much better than the (IMO ridiculous) way the tables come from the Chinese factories with four bolts at the back of the flatbed to attach it to the machine table I don't know why they don't ship the tables built like this already. It takes less than a minute to attach, and requires only two bolts. It's pretty stable with just one but it is slightly more secure with two. You need two M8 machine screws. I'm using cap head allen screws and an M5 allen key. If you used an M8 wing screw that would make the lower attachment easier, I just don't happen to have one. The m8 screws don't appear to be a perfect match for the threads tapped into the machine head, but they do work. I don't know what the thread standard in the holes in the machine is, but at least some of the other bolts in 441s are metric as well. The table attaches using brackets made of bent aluminium strip. This stuff is 50mm wide and is a standard stock item at big box hardware stores. The rear strap of the bracket sits across the rectangular cutout in the arm The front strap of the bracket wraps under the shuttle race Add the machine screws and you're done This cost me less than $10 to do, and about half an hour to make. The only vaguely difficult bit was measuring up the bends. Here's a video showing how easily it goes on and off. https://youtu.be/u8zhPB5c5iA

-
Cowboy Cb3200 Problems ... Can Someone Please Help?
amuckart replied to RoosterShooter's topic in Leather Sewing Machines
Glad to hear you got it working. If you can share the specifics of what you adjusted to get it working again it would be of use to future visitors to this forum. -
Thread Knots Showing At Corners
amuckart replied to NewYorkerInSydney's topic in Leather Sewing Machines
When you say "knot" what do you mean? Is the upper thread not drawn down into the stitch properly or is the lower thread being drawn up too far and showing on the top? What point in the stitch is the machine when you lift the foot? It should be at a point where the shuttle has picked up the loop of top thread but the needle is still all the way through the material. -
It's a fairly ancient singer patcher. There will be a model number on the small round-ended rectangular plate on the front of the machine. It's probably a 29-4 or 29-13. Without its treadle base or a motor it's not a lot of use because these models couldn't have the hand wheel moved to the front like later models could. If they sew they're useful for lighter leather, but they're next to impossible to get parts for. They feed using the foot and will leave marks on soft leathers unless you modify them. They were originally designed for sewing elastic into boots but they are modernly used for repairs and sewing patches onto jackets and the like. The presser foot rotates through 360 degrees, so they can sew a circle without having to rotate the work. Unless you specifically want a restoration project, or you desperately need a patcher for some reason I'd pass on it.
-
I hadn't, thanks for that.
-
Busm & Pearson Hm6 Needle Clamp Screws Size/system
amuckart replied to gordond's topic in Leather Sewing Machines
AFAIK all the screws in the BUSM machines are BSW. I have a mate who go,unreels at MOTAT who has access to all kinds of thread guages. If you want to send me one I can get him to measure it. -
Cowboy Cb3200 Problems ... Can Someone Please Help?
amuckart replied to RoosterShooter's topic in Leather Sewing Machines
Wiz has already mentioned having the shuttle race on too tight. I've had that problem too, but it didn't come right until I completely removed the shuttle race and reinstalled it, being careful not to do the screws up all the way. On my machine I do the screws up just until the springs disappear and that seems to work with size 277 thread. The other times I've had this happen to me on my CB4500 it was either because the upper thread was getting caught on the shuttle, as Wiz said, or because the shuttle position was wrong. It was cycling back too early and the top thread was getting caught between the back of the shuttle and the top rear of the shuttle race. The symptom aside from the loops was that as the takeup lever moved upwards, instead of drawing up the loop from around the shuttle, it pulled the check spring right up and drew off more upper thread through the tension disks. It did this even with the top tension wound all the way up. You can check this by turning the machine over by hand while looking into the end of the arm with the shuttle cover removed. Turn the machine over slowly and see if you can see where it's happening. Sometimes this will only happen when there is material in the machine, and sometimes it'll work if the machine is turned over very slowly but not when it's run at speed. If you turn it over slowly and it works, or you can't see anywhere where the thread is catching, try running the machine with the motor and see if you can see it. If you still can't see it, remove the needle plate and try again. If that doesn't work, check all the timings. I'm not sure if the CB3200 is a 441 clone or a different type of machine but the shuttle timing for walking foot machines is set in the head of the machine, rather than directly off the shuttle driving cam like non-walking foot machines. If the CB3200 is a 441 type machine, you could go over the steps in the Juki TSC-441 Engineer's manual, but for me at least, it took a few reads to get the sense of that set of adjustments. If you think the shuttle position is wrong, you can adjust that by removing the cover plate on the front of the machine under the stitch adjusting lever. If you peer in there with a torch while you're cycling the machine you should see a hex bolt come into view that moves in sync with the shuttle. This is the connection between the shuttle driving cam and the shaft that actually turns the shuttle. If you loosen that hex bolt off you will be able to turn the shuttle manually. To do this, set the stitch length to zero, remove the needle plate and feed dog (which will necessitate removing the shuttle race and shuttle first). Cycle the machine until the shuttle has rotated counterclockwise as far as it goes in its cycle. At this point there should be about 3/64" of shuttle point sticking out past the rearmost lip of the shuttle race. If it has disappeared completely the shuttle has rotated too far counter-clockwise. If there is more than about 1/16" of the shuttle point sticking out, it is rotated too far clockwise. If that looks correct, with the stitch length at zero, cycle the machine until the needle has gone past bottom dead centre and come up 3/8" (5mm). In this position the shuttle point should bisect the vertical centreline of the needle, about 1/32" above the eye. If that is correct, leave the machine in that position and move the stitch length lever up and down between its maximum forward and reverse lengths. The needle and centre foot should not move more than about 1/32". If all that is correct, then I'm not sure what's happening. If it is not[/u] correct, then you need to re-time the feed. You do that by making adjustments to bits in the top rear of the machine where the main shaft turns the shuttle driving cam and the main feed cam.