amuckart
-
Posts
577 -
Joined
-
Last visited
Content Type
Profiles
Forums
Events
Blogs
Gallery
Store
Everything posted by amuckart
-
Cowboy Cb3200 Problems ... Can Someone Please Help?
amuckart replied to RoosterShooter's topic in Leather Sewing Machines
whar are we looking at? Top or bottom? Can you describe the problem, what you were doing /changed right before it started happening, and what you've tried so far to fix it? -
The Lee Valley brad points are specially lipped so they're a different thing than the cheapo ones you can get. I've tried a normal brad point bit and it doesn't work well because there's nothing to cleanly cut the perimeter of the hole. With the lipped bits there is. The plug & tenon cutters are no good to me. I'm outside the USA so I work in metric units, not fractional inches. I'll see if I can find some 5mm OD carbon steel pipe.
-
Thank you for the ideas. I don't have a drill press, alas, but I think one of these lipped brad point drill bits with some careful stropping might do the trick. I'll order one and find out. I'll also try and find some tubing if the right diameter. http://www.leevalley.com/US/Wood/page.aspx?p=42247
-
Junker & Ruh Nr. 22 / Sd28 Adjustment!
amuckart replied to Michael Meijer's topic in Leather Sewing Machines
Very nice. Those are neat machines. Much more useful than the SD29 with it's extremely limited throat depth. -
Here's Singer's patent for a machine for sewing leather cases. It illustrates the setup of the 45kSV mentioned earlier in this thread. https://www.google.co.nz/patents/US2652014?dq=US+2652014+A&hl=en&sa=X&ei=B5AvVdPYBIbo8AWc34DICw&ved=0CBwQ6AEwAA
-
I'm trying to find a way to cut a clean 5mm (~3/16th) hole through 12mm (~1/2") of leather, made up of 3 layers of 4mm veg bridle. I can't pre-punch the holes in each part beforehand, so I need something that'll go through all of the layers at once. A drill, even a very sharp one, doesn't leave a clean hole, and I haven't seen any sort of hole punch that isn't tapered on the outside and far too wide 12mm up from the cutting edge to made decent holes. Has anyone solved this problem already who can give me pointers? Thanks.
-
Seeking A Source For 346 & 415 Bonded Polyester In Colours
amuckart replied to amuckart's topic in Sewing Leather
Thanks, I'll flick them an email. -
The skiving knives sold by Lisa Sorrell who is an advertiser on this site are excellent. They come insanely sharp, hold a great edge and are easy to sharpen. They're US$78 for both sizes. http://sorrellnotionsandfindings.customboots.net/product/skiving-knife/
-
A lot of that sounds like the blade just isn't sharp enough. Splitter blades need to be really sharp to work well. If you wouldn't shave with it it's way too blunt. If you wouldn't let someone do surgery on you with it, it's too blunt.
-
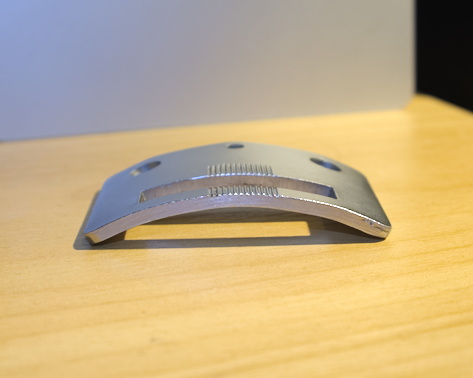
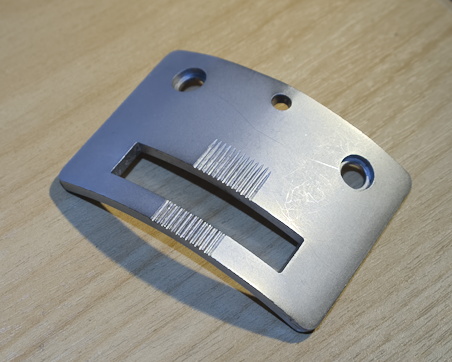
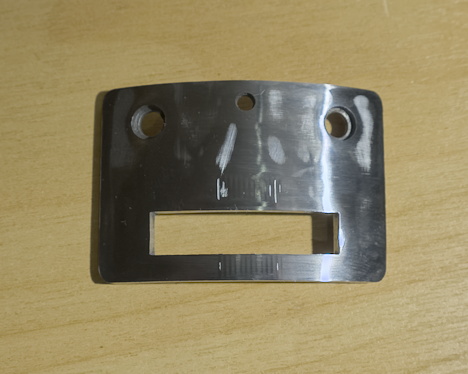
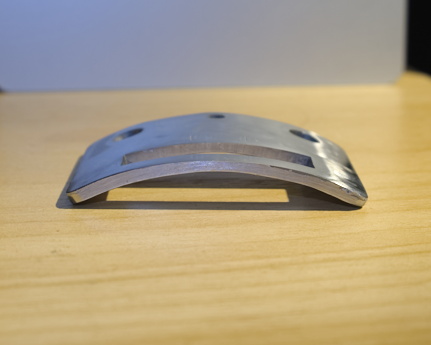
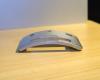
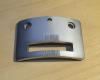
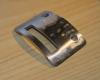
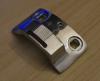
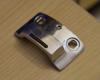
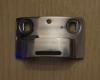
Interesting about your holster plate being smooth. When did you get your machine? I was hesitant to grind the grooves off of the standard plate because they were very deep and I thought it would remove too much material. I just had another look and did it anyway. They're not 100% gone, but only slight traces remain. Before & afters: It's interesting how polishing shows up irregularites in the plate that were hidden by the satin finish. I wish they'd satin finish all the feet and plates, it is much less prone to corrosion in humid environments than a polished finish. Another thing worth mentioning, on my machine at least, I can install the holster plate without having to remove the feed dog. I can't do this with the stirrup plate.


-
Here's before & after pictures of my holster plate. I ran it down on a belt grinder, 120 & 200 grit to get the grooves followed by 80 micron trizact which gave an acceptable finish. I made sure to relieve all the edges and corners slightly on the trizact belt and did the inside of the slot by hand with 2000 grit. I don't understand why Cowboy stamp these grooves in either. Before: After:

-
Thanks Wiz. Do you know what the structural differences were between the 31 class machines billed as tailor's machines like the -15 and the ones designed for leather, other than the roller pressed feet? The 31-15 was definitely a tailor's machine originally, but it seems to be very popular was a machine for leather garments and cowboy boot tops. Thanks.
-
Do I Have A "complete" Busm / Pearson #6 - Or What?
amuckart replied to Constabulary's topic in Leather Sewing Machines
Yes. The heating system had a hot wax bath that sat under the shuttle race which the needle dipped into at the bottom of its stroke.The hot wax was similar to shoemaker's pitch, but I don't know the exact details of it. Similar wax is still used in some needle & awl machines for sewing soles onto shoes. -
31-15s with intact treadle bases are somewhat uncommon. Most machines lost the treadle drive wheel when they were converted to motor driven. I have a treadle one that had been converted but still had its treadle wheel. I replaced the pitman rod with one from a 29k stand and removed the motor, which pretty much halved the weight of the whole thing. I haven't found anything that the 31-15 will sew that the treadle won't power through. Learning to treadle does take practice, especially with the industrial stands but it works well in my experience. I do end up handling the hand wheel a lot more than I would with a motor driven machine though.
-
Do I Have A "complete" Busm / Pearson #6 - Or What?
amuckart replied to Constabulary's topic in Leather Sewing Machines
It's not a wax pot, it's a water reservoir for the hot waxing system. There was a pipe that went from it though a hole in the machine to the water bath on the front when they were fitted with the hot waxing apparatus. -
Do I Have A "complete" Busm / Pearson #6 - Or What?
amuckart replied to Constabulary's topic in Leather Sewing Machines
Partly I disassembled and reassembled it as a test, then dismantled it again and stripped the paint but never got to the point of reassembling it fully. A few years ago I came down with a chronic neurological condition that has taken most of the dexterity in my hands, along with my ability to move big lumps of cast iron about. After the machine had sat for too long I gritted my teeth and sold it. I regret that, of course, but at the time it seriously looked like I'd never be able to work on machines again. What I will say is that for all that it's big and looks like it has lots of moving parts the HM6 is a fairly simple machine. Everything is on the outside, so it's quite easy to work out what does what. They were built to last, and built to adjust into wear at the high wear points, so they come apart and go back together again fairly easily. I'd rate a No.6 as easier than a Singer 45k25. I had mine soda blasted to strip it and was planning have it powdercoated black. I did that with my 45k and I was very happy with the results. The thing I did wrong was to assume that the powdercoaters could mask it for me, but the machine is way too complex for that and they said they couldn't do it so would have to mask it myself and bring it back to them. If you're just going to re-paint with 2-pack spray paint or something masking is easy but masking for powdercoaters is hard. It took me so long to find the right silicone plugs for the screw holes etc. that the machine had started to pick up surface rust. If I'd had the masking gear ready and had taken it straight from the soda blaster, masked it and given it to the powdercoater, it would have been fine. If I were doing it again, I'd probably do the stand first, get that all ready, then strip the machine, repaint it, mount the main frame on the stand and reassemble it on there. As far as I could see all the screws in it are BSW and you can still get Whitworth tap and die sets, so if you need to manufacture any replacements it's a lot easier than with the strange proprietary screws in Singer machines. Another thing to mention explicitly is that you've got a complete bobbin winder there, including the top wax pot. Do not let that go! They are rare as hen's teeth and worth quite a lot. I'm curious about the pedal on the left hand side of the stand. I would like to see photos of that when it's assembled to see what it does. -
Is the top tension being released properly when you raise the presser foot? What you describe does seem high, but if it stitches Ok and isn't unbalanced or burying into the work too far it should be Ok.
-
Do I Have A "complete" Busm / Pearson #6 - Or What?
amuckart replied to Constabulary's topic in Leather Sewing Machines
looks complete, and with a good range of feet too, good score. -
Looking at those pictures, it's not going to be able to take a '25 needle plate and probably won't take '25 feed dogs either. The needle plate on a '25 is curved and the casting on your machine under the needle plate is flat. It's a very interesting machine, and it looks very complete, which is quite rare. If it were mine I would leave it as-is, use it to its strengths - it would probably be really good for sewing round the edges of case work - and get another cylinder arm machine. Failing that, you could probably sell it to a collector for enough to buy a GA5.
-
Junker & Ruh Sd28 Instruction Manual
amuckart replied to celticleather's topic in Leather Sewing Machines
Thank you for sharing this, it's a big improvement on what we've had so far. -
I don't need NPS, but it is nice. Not at the expense of basic functionality though. Thanks for that. I'll probably go for the 750W Jack one the next time I'm ordering something from them, which will be after I've got another job, but the machine is working for now. Treadles are so much easier!
-
Nope. Without the positioning unit plugged in the motor just spins at top speed as soon as it's powered on. I just put a dumb servo from another machine that isn't getting much use at the moment on the 441. It's only a 400W, but it seems to do the job and it's slow enough to control. It'll get me by until I get a better one.
-
My 441 clone has an old Ho-Hsing HVP-58 motor on it that I pulled off of another machine. It's got plenty of power, needle positioning, and what seemed like a useful range of adjustments to pickup speed etc. The problem with it is that its low speed setting is still 200spm, which is a bit too fast for me. "No problem!" thinks me, "I'll just put a smaller pulley on it". No such luck. I replaced the 100mm pulley with a 50mm pulley, got a new belt to go between the motor and speed reducer, and tried it out. It runs at exactly the same SPM. The problem is that it's too clever for me. It's not getting its rotational speed from the motor, it's getting it from the NPS unit on the shaft on the machine. In addition to the usual needle-up and down position sense wheels, it also has a speed sensor wheel so the net effect of putting the smaller pulley on is that the machine runs at exactly the same speed but the motor is whirring away much faster. *sigh*. Time to save up for a dumber motor.
-
Hi Yzabel, There are three pedals, two that make the machine go, and one that connects to the foot lifter. That's the horizontal bar that runs right across the top of the machine. If you press down on the right hand end of it the foot lifts up. The right hand end has a hole in it, that's where the foot lifter chain or link hooks on to. It goes down through a hole in the stand and connects to the pedal. Here's the current state of a freshly typeset HM6 manual I have been working on. It is free for personal use, but not for re-publication anywhere. This is based on a number of different manuals for the HM6 I have copies of. BUSM HM6 Manual.pdf
-
I have huge machine envy right now! I really want to get hold of an original treadle stand for my 45k. Can you share more detailed photos of the feet and feed dogs on the machine at the moment? Thanks.