JoeS Report post Posted July 29, 2009 Hi everyone, I'm fairly new to sheath making and still wrestling with good sound construction methods and design. None of what I have made so far can touch what I see here but I'm chipping away at it one problem at a time thanks to all of you who share your ideas and methods here. My question has to do with machine sewing. I use a Tippmann and thought if I built a flat bed for it a lot of my troubles with stitches staying straight on back would be improved. I make sure to get my edges as square as I can, cut a top groove, run a stitch marker and pre-punch the holes unthreaded, cut a groove on the back and stitch it around. ( I started doing that to improve the leather tearout on the back and it's better but not great) If I use a flat bed I think I'll be making more trouble for myself because of the belt loop being sewn on first. So, is it a matter of skill that I lack in just eyeballing it around freehand or am I missing something? I'd like to be able to do the separate belt loop types as well as the mexican loop, drop loop and the loop type that folds back into the sheath under the welt where sewing on a bed isn't as much an issue. I would like to avoid hand stitching and have seen some fine sheaths here done by machine and I'm hoping to get some tips from those more experienced to point me in a direction I can work towards improving my work. thanks, joe Quote Share this post Link to post Share on other sites
iwannabeacowboy Report post Posted July 29, 2009 Are you using the material guide on the Boss? Charlie Quote Share this post Link to post Share on other sites
JoeS Report post Posted July 29, 2009 Are you using the material guide on the Boss? Charlie Hi Charlie, I had a feeling I was missing something simple. I had put that material guide out of my mind when I bought the Tippmann and it looks like that's where it stayed. I'll pick one up this week. Thanks, joe Quote Share this post Link to post Share on other sites
Dwight Report post Posted July 30, 2009 Joe, . . . whenever I sew leather for a sheath or a holster, . . . I use the method taught by John Bianchi. Take a pair of long (10 or 12 inches long) dividers, . . . blunt, round & sand the points to get rid of scratches. Decide how far from the edge you want to sew, . . . and mark that line using the dividers. One end goes over the edge, . . . the other drags and scores the leather where you want the sewing to go. I usually do it twice, . . . once for position, then with a bit more pressure to make an indentation into the top leather piece. Sew the thing, using the machine (mine is a Tippmann also), . . . make sure you use a leather needle, not a round point needle. When you are done, . . . lightly moisten the back with a sponge or something, . . . and here you will need a special tool, but you can make it easily. Take a piece of steel or brass (NOT ALUMINUM) that is 6 or 8 inches long, about an inch wide, and 1/4 to 1/2 inch thick. Round the whole tip of one end so it is REALLY SMOOTH, . . . make a handle of duct tape on the other end. Where you wetted the leather, . . . lay down the rounded flat tip and literally rub the stitches down into the leather, . . . and at the same time, . . . it kinda like "erases" the marks made by the needle coming out the back. Don't forget to do the front also, . . . and if you did well with the dividers, . . . this tool will lay your stitches down in the groove really beautifully, . . . and later on you will find you don't need the groover or stitch marker. Anyway, . . . may God bless, Dwight Quote Share this post Link to post Share on other sites
JoeS Report post Posted July 30, 2009 Joe, . . . whenever I sew leather for a sheath or a holster, . . . I use the method taught by John Bianchi.Take a pair of long (10 or 12 inches long) dividers, . . . blunt, round & sand the points to get rid of scratches. Decide how far from the edge you want to sew, . . . and mark that line using the dividers. One end goes over the edge, . . . the other drags and scores the leather where you want the sewing to go. I usually do it twice, . . . once for position, then with a bit more pressure to make an indentation into the top leather piece. Sew the thing, using the machine (mine is a Tippmann also), . . . make sure you use a leather needle, not a round point needle. When you are done, . . . lightly moisten the back with a sponge or something, . . . and here you will need a special tool, but you can make it easily. Take a piece of steel or brass (NOT ALUMINUM) that is 6 or 8 inches long, about an inch wide, and 1/4 to 1/2 inch thick. Round the whole tip of one end so it is REALLY SMOOTH, . . . make a handle of duct tape on the other end. Where you wetted the leather, . . . lay down the rounded flat tip and literally rub the stitches down into the leather, . . . and at the same time, . . . it kinda like "erases" the marks made by the needle coming out the back. Don't forget to do the front also, . . . and if you did well with the dividers, . . . this tool will lay your stitches down in the groove really beautifully, . . . and later on you will find you don't need the groover or stitch marker. Anyway, . . . may God bless, Dwight Dwight, Thanks for taking the time to explain your techniques, it's just what I'm looking for. I really enjoy hearing about and learning how others go about their work. I do have a nice old pair of dividers that I've smoothed and use to mark guide lines for stamping and I'll definately give it a try. I've been wanting a good creaser as well and I'm thinking I could use those dividers for that too. I'm assuming you run the dividers on both sides before you stitch? I do use leather needles but have not tried wetting the stitch lines and burnishing with steel or brass. I have tried bone burnishers left over from my graphic art days but I did it dry. Left a nice sheen on the leather but didn't do much for the stitches. I'll have to hunt down some brass to compare with the bone....any excuse for a new tool is good for me. I also like the idea of not cutting a groove thru the grain, so as soon as my edge guide gets here I'll be giving it all a try. have a good one, joe Quote Share this post Link to post Share on other sites
JoeS Report post Posted July 30, 2009 sorry about duplicating Dwight's answer. I haven't figured out yet how to strip it out to just leave my reply. joe Quote Share this post Link to post Share on other sites
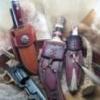
JoeS Report post Posted August 3, 2009 Hi again everyone, A guy came into the shop recently looking for a simple sheath for a knife he made and though he didn't want to spend much, I thought it would give me the opportunity to get some practice in on a paying job and to try the techniques Dwight explained. I used an old skin I have which I'm guesing is around 10 oz. for the body and some horse hide for the back panel/belt loop. I hope I'm in the right place being that I'm continuing Dwight's reply but I'm also looking for some hard critiques of my methods. So, here it is glued up with a line scribed on the front only with my dividers as Dwight suggested . Next I punched holes with an unthreaded needle so I could see step by step what's going on with my stitching. I didn't scribe a line on the back until I punched the holes so I could make sure they lined up ok. So after they were punched I ran the dividers over the holes again front and back to see if it would smooth them out some. stitched burnished damp, oiled with neatsfoot and then aussie wax One thing I left out was that before I glued it up I put a couple coats of satin sheen on the inside to seal it like I've read here, but either I didn't let it dry long enough or it's the wrong stuff to use because it or something was coming off onto the knife blade. Today I stuffed some aussie wax down in there and it seems better. I'm kind of putting myself on the spot before I'm ready to take in work, but I figured what the heck, I have to start somewhere, so I would really appreciate any comments so I won't have to sweat the next one out as much. Thanks for looking, joe Quote Share this post Link to post Share on other sites
pancho47 Report post Posted August 3, 2009 looks good to me ,all you need is the strap that goes around the handle Quote Share this post Link to post Share on other sites
JoeS Report post Posted August 4, 2009 Thanks pancho47....I did get a retainer strap on it but forgot to take a pic Quote Share this post Link to post Share on other sites