

The Ultimate Guide to Leather Foil Stamping: From Beginner to Pro
Entry posted by Jinglin in 19-Week Step-by-Step Tutorial for DIY Crafters
4,308 views
1. Introduction: Why Foil Stamping Enhances Leather Craftsmanship
In the world of handmade leatherwork, the leather foil stamping effect is more than just decoration—it’s a symbol of quality and sophistication. A precise, reflective imprint instantly elevates the value of a leather item, whether it’s a wallet, belt, or notebook cover.
Foil stamping isn’t merely a visual detail; it reflects mastery of handcrafted leather decoration techniques. This comprehensive guide will walk you through the tools, materials, processes, and advanced methods that bring foil stamping to life.
2. Foil Stamping Machine Basics
Manual vs. Electric Machines
-
Manual Foil Stamping Machine: Budget-friendly and perfect for small-scale production or customization. Requires experience and manual control.
-
Electric Foil Stamping Machine: Offers precise temperature and pressure settings, ideal for batch production. Higher upfront cost.
Key Components Overview
-
Heating Plate: Transfers heat to the stamping die and foil.
-
Pressure Adjustment Knob: Controls downward force for even imprinting.
-
Temperature Control Unit: Ensures accurate heat levels, reducing burning risks.
Safety Guidelines
-
Always wear heat-resistant gloves to prevent burns.
-
Operate in a well-ventilated area to avoid inhaling fumes.
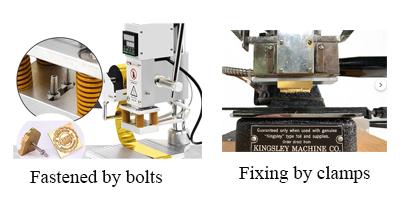
3. Complete Die Installation Workflow
Step 1: Choosing Your Hot Stamping Mold

-
Brass Stamp: Excellent for crisp detail and frequent use due to high heat conductivity.
-
Silicone Dies: Flexible and gentle on soft or textured leather.
Step 2: 3 Tips for Proper Installation
-
Use mounting screws or bolts to secure the die firmly.(Different brands of hot stamping machine molds have different installation methods)
-
Clean the die bed before mounting to prevent misalignment.
-
Lightly press after mounting to check for stability.
Step 3: Temperature & Pressure Testing
-
Always test on scrap leather before working on the final product.
-
Recommended temperature range: 95–135°C, adjusted based on leather type.
-
Use thick paper or positioning clips to assist in pressure testing.

4. The Golden Rules of Material Preparation
Leather Type Compatibility
-
Vegetable-Tanned Leather: Excellent for foil adhesion; ideal for detailed designs.
-
Chrome-Tanned Leather: Varies based on finish; always test foil compatibility.
Foil Selection Tips
-
Color: Gold, silver, and rose gold are most popular.
-
Material: Choose leather-specific foil for better adhesion and durability.
-
Durability: Opt for UV- and wear-resistant foils for long-lasting shine.
5. Step-by-Step Stamping Instructions
Stage 1: Preheating
-
Preheat for 5–10 minutes before stamping.
-
Reference Temperature Table:(Recommended hot stamping temperature for different materials)
| Leather Type | Suggested Temperature |
|---|---|
| Vegetable-Tanned | 105–125°C |
| Chrome-Tanned | 90–110°C |
| Suede | 85–95°C |
Stage 2: Positioning Techniques
-
Use a positioning ruler or tape for alignment.
-
Two Methods:
-
Marking with a pencil or awl
-
Pre-punched guide holes
-
Stage 3: Pressing the Foil
-
Apply medium to firm pressure depending on material.
-
Hold for 2–4 seconds to ensure even transfer.
Stage 4: Cooling & Peeling Mistakes
-
Mistake 1: Peeling foil before it cools—causes tearing.
-
Mistake 2: Ripping foil too quickly—leaves smudges.
6. Advanced Techniques for Skilled Crafters
Creating 3D Foil Effects
-
Use deep-engraved brass dies
-
Double-press technique enhances dimensionality
Multi-Color Foil Layering
-
Process: Apply base layer → Cool → Align second die
-
Use guide holes to avoid registration errors
Stamping on Specialty Leathers
-
Suede: Use lower temperature to prevent scorching
-
Oiled Leather: May darken; always test beforehand
7. Troubleshooting Q&A
Problem 1: Foil Doesn’t Stick
Five Common Causes:
-
Temperature too low
-
Insufficient pressure
-
Incompatible foil
-
Die misalignment
-
Leather coated with residue
Problem 2: Blurry Edges
-
Clean the die thoroughly
-
Adjust temperature and time
-
Consider using a sharper, higher-quality die
Problem 3: Excess Foil Residue
-
Use a rubber eraser to clean edges
-
Ensure static-free workspace
-
Improve foil cutting and trimming before use
Conclusion
Mastering leather foil stamping takes time, precision, and the right tools. With the knowledge in this guide, you’ll be equipped to create polished, professional-grade pieces that highlight your craftsmanship and attention to detail.
Whether you're just starting out or looking to level up, the right combination of technique, materials, and creativity will make every piece shine—literally.
0 Comments
Recommended Comments
There are no comments to display.
Join the conversation
You are posting as a guest. If you have an account, sign in now to post with your account.
Note: Your post will require moderator approval before it will be visible.