


jiml
-
Posts
26 -
Joined
-
Last visited
Content Type
Profiles
Forums
Events
Blogs
Gallery
Posts posted by jiml
-
-
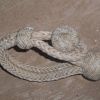
I'm trying to braid a pair of split reins and have hit a road block. I'm going off of memory of a pair my dad used to have. I'm using 8 strands, part of it is flat braid and part is round. My problem is the end knot, I want to braid a knot that will slip through the ring on the bit and then come back through the rein to secure itself. I have found some pineapple knots on here that kinda look what I'm after but not exactly and they don't really show how to braid them. I have done endless internet searches but don't know what the knot is called and therefore haven't found it or how to braid it. Any and all help would be greatly appreciated!! Well it's that time of year again, I know you have sent a couple of documents in but your name came up on my CNS and COI report. If you already have these please forward them to me so that I have a copy on hand and I will make sure that they get in!
I found this picture that shows what I'm trying to do in theory!!
Jim
-
The common denominator here is practice....practice....practice!! I do agree with your leather comment though, most of what I have bought has been from Tandy's, but I had a saddle maker give me a bunch of scraps of Herman Oak and I could not believe the difference in definition and depth between the two!!! I think one problem I create is with my pressure, I think I'm pressing to hard when creating my line. I think I need to back off the pressure and simply score the leather with the divider and then create the line with my tool, may help me create a more smooth flowing line than the wavy lines I'm getting now.
By the way, I checked out your website...very, very nice work. Thanks again for the advice. Jim
-
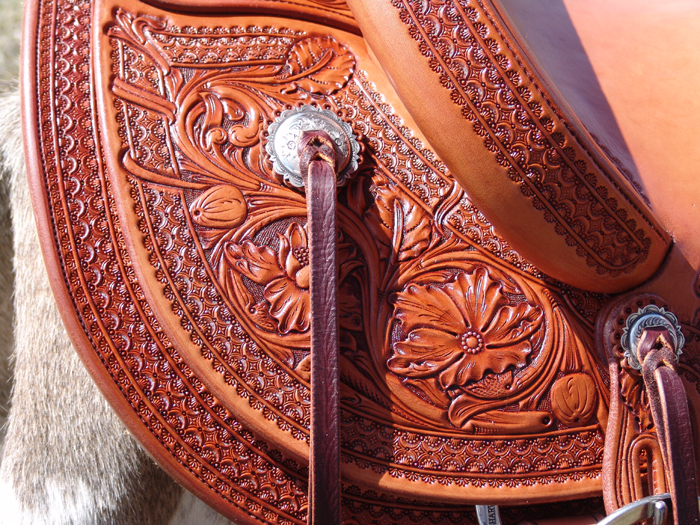
Troy, Here is a picture of what I'm trying to achieve!! This is a snapshot of a saddle from Keith Valley (my hero) See the lines, how clean and symmetrical they all are. I looked this morning and he is a member here on leatherworker so I might drop him a line as well. Thanks again. Jim
Hey Jim,
I use all of the tools you described to make my borders. I've found that if the project piece is cut out to it's final size, it's much easier to make your borders smooth and symmetrical. It sounds like you have the right ideas and even the right tools to do what you want to do, just maybe not the knowledge. By posting pictures, you sure will help everyone understand exactly what you mean.
Troy

-
Thanks Troy, I will try and throw some pictures on today.
Hey Jim,
I use all of the tools you described to make my borders. I've found that if the project piece is cut out to it's final size, it's much easier to make your borders smooth and symmetrical. It sounds like you have the right ideas and even the right tools to do what you want to do, just maybe not the knowledge. By posting pictures, you sure will help everyone understand exactly what you mean.
Troy
-
Okay, need some help/advice/suggestions here. I am new to this and up to this point have been self taught and have learned through trial and error and of course what I can get from all the awesome advice on this site!!!! Thank you to everyone that shares their information and insight to those of us learning!!
I'm having a terrible time creating clean symmetrical lines, for example my sewing lines near the edge. I have tried tracing with dividers (sort of works but haven't found a way to keep them on a very good line around the whole piece), I have tried edgers, again works okay but they only work on my sewing line. I even bought the guide for my swivel knife. I'm just not having great success with any of it. I know I need to continue practicing with all of the above, but does anyone have any tips or tricks concering this topic. Thanks again to all!!!
Jim
-
Mark,
Excellent, excellent work....love both the look and the finish!!
-
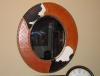
2Nd Mirror
in Art
Thank you all for the kind words.
Thanks Storm, I've looked at a lot of your work and am truly impressed!!
-
Absolutely love your work!! Gives me something to shoot for!!
-
2Nd Mirror
in Art
Here is my second mirror project, didn't get the first one posted as it was a Christmas present that went to the wire and didn't have time to snap photos!! Feedback is always greatly appreciated!!! Jim

-
Excellent ideas all!!! I did try smoothing which did help quite a bit, I also thought of the idea of incorporating the mistake into a design. (Absolutley love the saying "if you can't hide it, make it obvious!) it's not as bad as it started out being, of course as soon as it happened I freaked out and came straight to the forum! I will post some pictures today! Thanks again for the great advice!
-
Can someone please help!! I'm building a large leather bound mirror frame for a christmas present. I'm scoring the main portion in a diamond shape pattern and I got off on one of the lines. The leather is already glued to the frame so replacing is really not an option. Does anyone have any great ideas on how to hide/cover up/repair a cut. Any and all ideas are welcome. Will post pictures when I'm done.......
-
Thank you all for the nice words. I appreciate the feedback. Definately a work in progress!! But I can see how it can become addictive!
-
 Okay all, here is my first project. Don't hold back let me have it!! (but be gentle!!) I made these for my 4 yr old nephew so scaling them down was a bit tough. Not real happy with some of the designs either, but figure I can work on that. Really appreciate any feedback. Take care. Jim
 -
Hey Jim!
I just got back from Asheville, NC where I took a class at the Extreme Leather Workshop from Pete Gorrell, an Al Stohlman Award Winner and the Academy of Western Artists Saddle Maker of the Year in 2000. ArtS from this forum and I finally met face to face in this class, and both of us learned a ton. I'm self taught and have been abusing leather since 1981, and I learned more in those three days than I have managed to teach myself the rest of the time.
One thing Pete mentioned is that most folks tend to carve (or actually tool) too wet. The leather should actually dry back to almost its original color. It will feel cooler than room temp when you touch it with the back of your hand which means it still has moisture in it. Some folks swear by putting a carving solution in their casing water. Some use a tiny amount of dish soap. Pete showed us a trick using a little spray of Lexol leather conditioner rubbed in with our hands and then just a drop of baby shampoo rubbed in until the foam disappeared. My knife never flowed through the leather as smoothly. Of course, my carving didn't get any better looking, but is sure was smooth!!
Hope this helps.
Mike
Thanks again to everyone for taking the time to help me! Mike, great advice....do you add the lexol and / or baby shampoo right before you start carving or as part of your casing process??
-
Thanks all....I think it's a little bit of everything mentioned here! I let the leather dry out a bit more and it worked much better...now just to get this knife sharp and I think it's a start!
-
I really need some help here! I am just starting to tool leather. I've done some repairs and such in the past, but have never really tried my hand at much more. I have poured over these forums and read most of the posts on casing and carving leather. From what I understand everybody carves the leather while it is damp. Everytime I try I leave terrible drag marks!! I know that my knife needs to be sharper, but if I carve on dry leather it actually carves pretty decent. I can't help but think I am missing something. Any and all help would be greatly appreciated!! I don't know what I would have done if I hadn't found this site, you are all great!


Braiding Knots
in How Do I Do That?
Posted
Thank you Mark!!! The Pineapple knot site is awesome. I'm thinking a man rope knot might just be the ticket!