


desertw0lf
-
Content Count
15 -
Joined
-
Last visited
Posts posted by desertw0lf
-
-
Looking to make myself a good, solid (10mm thick) weight lifting belt. I would like to put a 4" roller buckle on it - preferrably two prong but would settle for one prong if that is my only option. Problem is, I cannot find that type of hardware anywhere.. any ideas?
-
I'm doing a new seat for my bike and I have a whole roll of 2-2.5 oz embossed leather splits.
The tooled center portion of the seat is 7-8 oz . I was wondering if this embossed stuff would be rugged enough to use in the sides and wrap around to be riveted to the pan...
Top will be laced to the side skirting.
Trying to finish this puppy by tonight so help is much appreciated
Never mind. Idiot neighbor tipped a quart of glue over onto the seat top not an hour after I got it all tooled up, that crap dries fast and is a great way to weld a seat and tools to ones bench. =(
-
I'm doing a new seat for my bike and I have a whole roll of 2-2.5 oz embossed leather splits.
The tooled center portion of the seat is 7-8 oz . I was wondering if this embossed stuff would be rugged enough to use in the sides and wrap around to be riveted to the pan...
Top will be laced to the side skirting.
Trying to finish this puppy by tonight so help is much appreciated
-
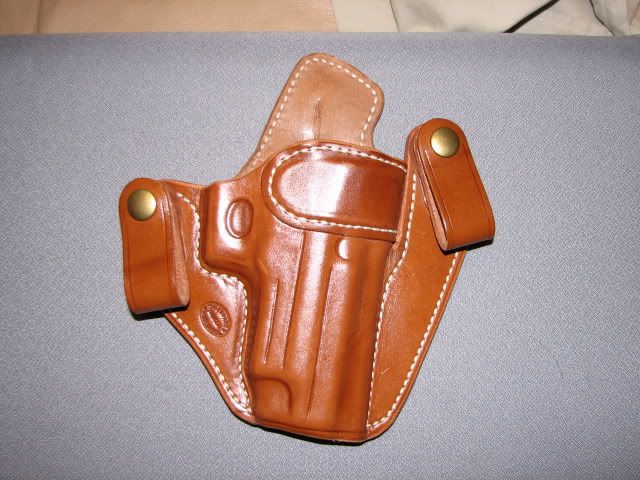
There are a few holster makers out there that provide reinforcement for the mouths of their holsters either with kydex or steel. The two I will be referencing today are Garrity Gunleather and Milt Sparks, the difference in the construction is that the Milt Sparks stitches all the way around their reinforcement which seems to compound the problem.
Here is a picture of a Garrity Gunleather 2C1 Holster. You can see the kydex reinforcement sewn into it, only sewn on the top, I presume glued in to keep it stable. Kydex will only form with heat and I know for a fact this is pre-formed. The leather and stitching would burn with the 300 degrees required to form it. Because it is preformed it would be necessary to stitch around that tight corner, probably not being able to get it close enough to the needle with the throat plate in the way, even if stitching sideways. Is hand stitching my only option on this part or am I missing a specific technique?

I do know the maker is using an Adler 205 in this case to stitch it. I am using a Toro 3000 which is, as far as I can tell, not that much different in and around the throat plate.
Here is a picture of the Milt Sparks VMII. This is steel reinforced and is QUITE rigid. They manage to stitch all the way around the reinforcement. The only way I can think of this being done, other than by hand, is if there is a small enough throat plate that would enable me to get it inside the holster and rotate it around it or stitch the bottom portion, slide the steel reinforcement in then finish up the stitching, still having to rotate around the throat. This would mean the bobbin would have to be located elsewhere.
VMII
Also, I realize that "If you build a holster properly, it does not require any reinforcement" However, I want to build what the market asks for and frankly, this is a nice feature.
.. I stitch my reinforcements on BEFORE final construction/wrapping/forming/etc...
-
I've made a large leather belt out of a 3" strap from Tandy. Website says it's 13oz saddle skirting. The edges are all very sharp right angles. I would like to soften, or round these edges. What is the easiest way and/or the best tool to use? Thanks for any replies.
Use an edge beveler first, and then go at the edges with a piece of heavy denim, canvas, or an edge slicker.
-
Have a question - can I dye a product, oil it up with Neatsfoot oil, and then use Carnuba wax as a final finish without using eco-flo or other type of acrylic topcoat?
So :
Eco-Flo Black Dye,
Good coating of neatsfoot,
Rubdown with Carnuba wax, and buff with a microfiber cloth?
Or is that not enough for say, an IWB holster?
-
I am looking for holster clips, if possible I would like them to be like the ones on the Crossbreed SuperTuck - I've attached a link to a picture of a supertuck for an example. I have searched high and low and cannot find anything quite like them. I need to get about 50 of them quick like, the black metal clips that Tandy sells are close to 3 bucks EACH, and that is too much!
Supertuck holster : http://www.crossbreedholsters.com/desktopmodules/catalookstore/ImageViewer.aspx?link=Images%2fSuperTuck_Large.jpg&desc=Larger+Image&PortalID=0&viewerid=-1&mid=-1
Those are the kind of clips I need, but without the cross embossed into them!
Thanks!
-
This is my In-Cognito Deluxe IWB holster and matching compact mag-pouch.
The holster is hard-rolled horsehide with full-coverage gator, and features a molded kydex reinforced mouthband,smooth leather lining, suede backing with sweat membrane barrier underneath, and belt lops with hidden snaps. Thanks for looking!
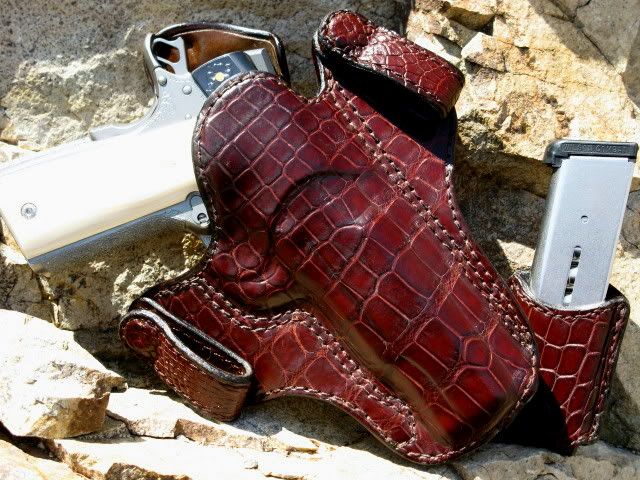
Beautiful.
-
Is there any resource on the web for free basic tooling patterns for me to get the hang of it and get in some practice? I am flat broke right now, but want to practice my tooling which I am horrible at judging by my first attempt and do not know where to find patterns for it.
-
I've been doing this playing with leather thing for about two months now. I've made five holsters and a knife-pouch from scratch. I haven't ever really made anything else, but I want to do something special for my father for all that I put him through growing up.
He has an '07 HD Nightster completely tuned out that he rides when he feels like getting away from the nice easy riding of his Fatboy. I have a spare stock seat coming in the mail that he does not know about and I really want to make him a custom seat. I will need a ton of practice on my tooling, I know, and if anyone has any good resources for that that don't cost much (because I am currently so far in the poor that it isn't funny) I have plenty of scrap pieces to practice on. I have some basic tools, swivel knife, five basic modeling tools. That's about it. I read the Seatmaking tutorial up above and will read it several more times before I proceed, I am sure.
I don't want to remove any foam from the seat, it is a pretty uncomfortable seat as is for my father, so I want to basically tool a custom center and re-cover the seat.
What weight leather would you suggest for this?
Basically, I want to tool in his service year, Vietnam, and under that a star and on the bottom I am going to try to find out the Unit he was with and include that there.
I know it is a lot to go after as a novice, but it means a great deal to me to do something special for my father, and I will have to undoubtedly practice tooling and lettering for hour upon hour before ever doing the final thing.
Any advice is appreciated.
-
So I am new to Leatherworking. I picked it up as an idea for a fun hobby, and to try and make holsters for my growing collection of small arms - and maybe branch out from there. I dived right in on day one, making myself a holster for one of my Taurus compact .40's. I have made 3 more since then. Please have a look, tell me what you think. My wallet is certainly screaming and smoking as my small collection of tools grows bigger and bigger. Going to try to hit one of the custom countertop shops here and see if they have any marble, or granite cutoffs I can use as a slab (because im poor) so I can try my hand at tooling and designs!
My first holster, my first ever time working with leather. Not very good.. I later cut off the ghetto loops, and used set-screws to hold a different set of loops on there properly. I dyed this blue the other day to get the hang of dying leather.

My second attempt, an IWB holster for my 1911 GI. Stitches are a bit better, edges are slightly less crap-tastic. Dyed and then 20 minutes later washed it lightly to see what affect it would have on the color. I like it.


And finally these two holsters I did at the same time. The first one is an IWB for a Taurus M850 Revolver. I am unhappy as hell with the metal spring clips, and as you see I did not get the dye under the clips themselves (this has been touched up since the picture was taken) and there are a few spots where I did not dye well, or where I did not get sealer (also been fixed/touched up). I am desperately looking for a better kind of IWB clip as the spring clips just aren't what I was looking for. Stitching is a TON tighter, and I am doing a lock-stitch with a stithcing awl (much better on my hands). This holster will probably be scrapped.

And the last holster is for my father, a retired federal officer. It is made to fit his duty-carry SIG Sauer. I think I did pretty decently on this one. Really need to find a way to smooth my edges out, and cut them better with the tools that I have. Need to acquire a bone folder that isn't cheap plastic and sharp-edged. I am pretty happy with it, though and dad loves it. Note the pawprint stamp on this one and my revolver one. Something fun I got to play with!
 So easily amused. The "missed spots" where I didn't get enough dye have been fixed. Both holsters finished with "eco-flo" Cocoa Brown.
Sorry for the lengthy post. Please, any comments, critiques, and suggestions are welcome.
My next project to tackle? TWO shoulder-holster rigs. Working on ideas and designs as I write this post.
Weight Lifting Belt - Anyone Make One?
in How Do I Do That?
Posted · Report reply
I want the belt 4" all the way around, including where it buckles, for various reasons.
It is pretty rare to find a max-legal-thickness (10-13mm) belt second hand. Especially in certain sizes. Belts like I want are going to run ~140.00 which is why I want to make one, and maybe look into producing a few.