


Paramedic04
-
Posts
44 -
Joined
-
Last visited
Content Type
Profiles
Forums
Events
Blogs
Gallery
Posts posted by Paramedic04
-
-
Think of an oz of leather being 1/64 of an inch. 8oz = 8/64" = 1/8". I've never done a stock cover with cartridge loops, but I try not to tool or stamp on anything thinner than 6oz. I definitely wouldn't go any thinner than 10 oz on a sling as veg tan cowhide does have a tendency to stretch the thinner it is. I'm fairly new to this as well, mainly doing holsters, belts, and some fire department related strap goods, but it sounds like you're on the right track.
-
Gorgeous. Those edges are beautiful!
-
If you dyed the leather before working it, you should have been all right. Molding will stretch the leather; burnishing it will close the cell structure. Both will cause uneven dye absorbtion
How did you apply the dye?
What brand of leather is it?
tk
I was thinking along the same lines. I wet mold first before I dye, because I had some inconsistencies such as what you've experienced using water based stains and dyes. I switched to Fiebing's Pro Oil and now I can do the dye job before or after, the color stays regardless.
-
I honestly am not going to stick a loaded firearm that I paid hard earned money for in a holster that's not reinforced with stitching and take the chance on a negligent discharge and injuring myself, someone else, or damaging my very valuable self defense tool. THAT'S why I always stitch and sometimes double stitch in areas on my holsters.
-
I use copper rivets or chicago screws depending on the application... the dual cap rivets have never impressed me. Definitely worth the effort to attach the clip to a separate piece, then glue and sew that piece to the holster if you're doing them in a foldover style holster. You don't want to hear the sound of a newly cerakoted or hydrodipped weapon sliding into a holster with a rivet making contact and marring the finish (made that mistake, and thankfully it was with my own gun, not someone else's).
-
TwinOaks, I learned that the hard way on one of my earlier holsters. If I make a holster for a weapon with a rail on it and there's no accessory mounted, I make sure to put some gaffer tape over the length of the rail to make sure I don't get the interior molded too tight in the grooves. Thanks for looking! I appreciate the pointers... were it not for this community, I'd still be sitting at the bench scratching my head. Everyone here is an awesome wealth of knowledge and it is greatly appreciated!
-
Looks awesome! I'm a little biased as that's my EDC platform... there's just something about a 1911 in a leather holster that I can't get away from.
-
Thanks guys!
-
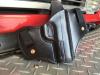
Pancake IWB for Smith and Wesson M&P 40.

-
I love a good KA-BAR sheathe project! They all look good!
-
Very nice work. I really like that color.
-
That's how I do my holes as well. Takes the guess work out of whether or not the awl blade is level or not!
-
Good looking shields!
-
I've got a pair of hemostats with heatshrink tubing on the jaws all the way to the hinge. No marks on the needles, and easier to keep up with than pliers.
-
Sounds like it could be your stitch holes are too big or your needles are too big to me. I'm relatively new to leatherworking myself, but I had that same problem doing the first wallet I ever tried. Post some pictures if you have any so we can get a better idea of what your problem is.
-
Thanks for this... gonna try to hammer out a pair for my wife soon!
-
I spray mine through an airbrush, 3 light coats and let it set overnight. Always cut it 50/50. I used a brush and damp sponge for a while, but I can assure that I get an even coat even better with the airbrush.
-
If you're set on having that stiffener wrap around, you could skive it down gradually on the backside. Would definitely help with the protrusion off your hip.
-
Really digging these!
-
Thanks for the advice guys! I'm going to see how much leather I have and I'm going to try these techniques. I really appreciate the input!
-
Thanks for the quick reply JLSleather! It's a 4" barrel, he wants a midway ride with a 15 degree cant to fit his 1.5" double thick belt I made him. I think I may have it figured out, I've been mocking it up with foam sheets and will hopefully have something to show off in the next day or so. I appreciate the help!
-
Ok, up to this point all I've really done for revolvers is an Avenger style holster for revolvers. My dad saw my 1911 pancake holster and wanted one similar for his Colt Python. Making a pattern for the semi autos are simple due to them being fairly flat along the length of the sight line. For all of you holster makers, how do I adjust this process of pattern making for a revolver? The cylinder is almost directly over the trigger well and I'm trying to figure out where I compensate for the cylinder thickness in my seam line. Usually I'm pretty good and finding an answer for this, but for some reason, no matter how many times I sit to research this throughout the forums and various search engines, I can't find the answer. Any help is greatly appreciated, and to the admins, thanks for maintaining the best resource for leather craftsmen on the internet! This forum is amazing!
-
In my experience, if you thin the acrylic down with a reducer and apply in light coats, flexing the leather while it dries with each coat, it shouldn't give you too much trouble. Acrylic sits on top, unlike spirit and oil dyes that penetrate the grain. Also, if you have any resolene, a coat of 50/50 mix (with water) will help your paint stick more evenly. I use Wicked Colors by Createx. They come pre-reduced and light coats really make those colors pop.
-
I'm using the Blackhawk Demonstrator 5" 1911 for my 1911 holsters ($20 compared to $45 for Ring's Blue Gun). It has a rail on it, but I've found that when I wet mold the holsters, most of the retention is from molding around the trigger well, making the rail a moot point. I've also used it to make several holsters for Kimbers and Springfield models without issues.


Scan And Print Your Own "blue Guns"?
in Gun Holsters, Rifle Slings and Knife Sheathes
Posted
Man, this could really open up some possibilities... someone could send you the files to print from around the country and you'd just have to print them out, make your holster, and mail it out.