


Martyn
-
Posts
262 -
Joined
-
Last visited
Content Type
Profiles
Forums
Events
Blogs
Gallery
Posts posted by Martyn
-
-
On 08/01/2017 at 11:32 PM, silverwingit said:
Europeans have gotten away with making and using personal and heavily-used equine items with saddle stitching for a few hundred years longer than we have.
Just to expand on this - because hidepounder referenced it too. British saddles might seem like effeminate things used by posh people to pose around the countryside on horseback, drinking champaign and socialising - and there might be some truth in that today. But this has not always been the case. It would be a mistake to assume that English saddlery isn't as 'robust' as Western saddlery or that the techniques used are somehow inferior. Horses were first domesticated in Britain and used to ride, pull chariots and ploughs from about 2500BC. The same is true for most of Europe - there is about 4,500 years of hard-use saddlery (farming, travel and warfare) behind the techniques used in European saddlery today. The motor car is not yet 150 years old and before that, horses were used for everything and even as late as WWI, Cavalry still actually meant going into battle on horseback. Britain alone had over a million horses in that war. They were used to pull ambulances, artillery and supply wagons as well as carry troops - they even had gas masks.

-
On 08/01/2017 at 11:32 PM, silverwingit said:
I am no expert by any means but my work is perfectly serviceable and cosmetically acceptable
You are too modest Michelle - I saw that camera harness you made and the stitching struck me immediately, I thought it was knockout good - I use exactly the same technique you describe but I'm not yet anywhere near as neat and consistent as you. One day.
") On 08/01/2017 at 11:32 PM, silverwingit said:
On 08/01/2017 at 11:32 PM, silverwingit said:One way picks up on the direction imparted by the front side stitch, the other cancels it. It's all highly dependent on the direction in which you are stitching.
This is dead right. I had the same problem and it took me a while to figure it out. If you are casting a loop and it's flattening your back side stitching, it's because of the direction you are sewing - left to right/right to left or front to back/back to front - and whether you are casting the loop over or under the needle. If you are casting over and it flattens the stitch, just cast under instead and visa versa. The hard part is remembering all the different permutations. :D
I keep meaning to go on one of Nigel's courses one day, he's only about 20 miles from me and I really should take advantage of it.
-
Seems I have touched a nerve. My apologies.
Maybe I'm missing something, but I dont see a groove in that saddle?
-
5 hours ago, hidepounder said:
OK, I'll bite! Where did you read that I said stitching HAD to be recessed?
You didnt. I'm just making the argument for the other side, because so many labour under the misconception that stitching should be recessed to protect it. Very rarely does it need it - maybe on saddle skirting where two bits of leather are constantly rubbing over each other, or the inside of a knife sheath where the stitching could be exposed to a knife edge, then yeah, it makes sense. But for the most part, it's cosmetic.
5 hours ago, hidepounder said:So grooving is often performed as much for it's look as for necessity.
That's my point. For the most part, it's a cosmetic choice.
We all have our preferences, but you have to admit, there is a sort of blinkered obsession with following the Stohlman method when it comes to stitching? His method and the Western style isn't the only way. For most products and with modern bonded polyester thread, the stitching will probably outlast the leather (and the owner), grooved or not. There are other options and those options dont put the stitching at risk and they are not inferior.
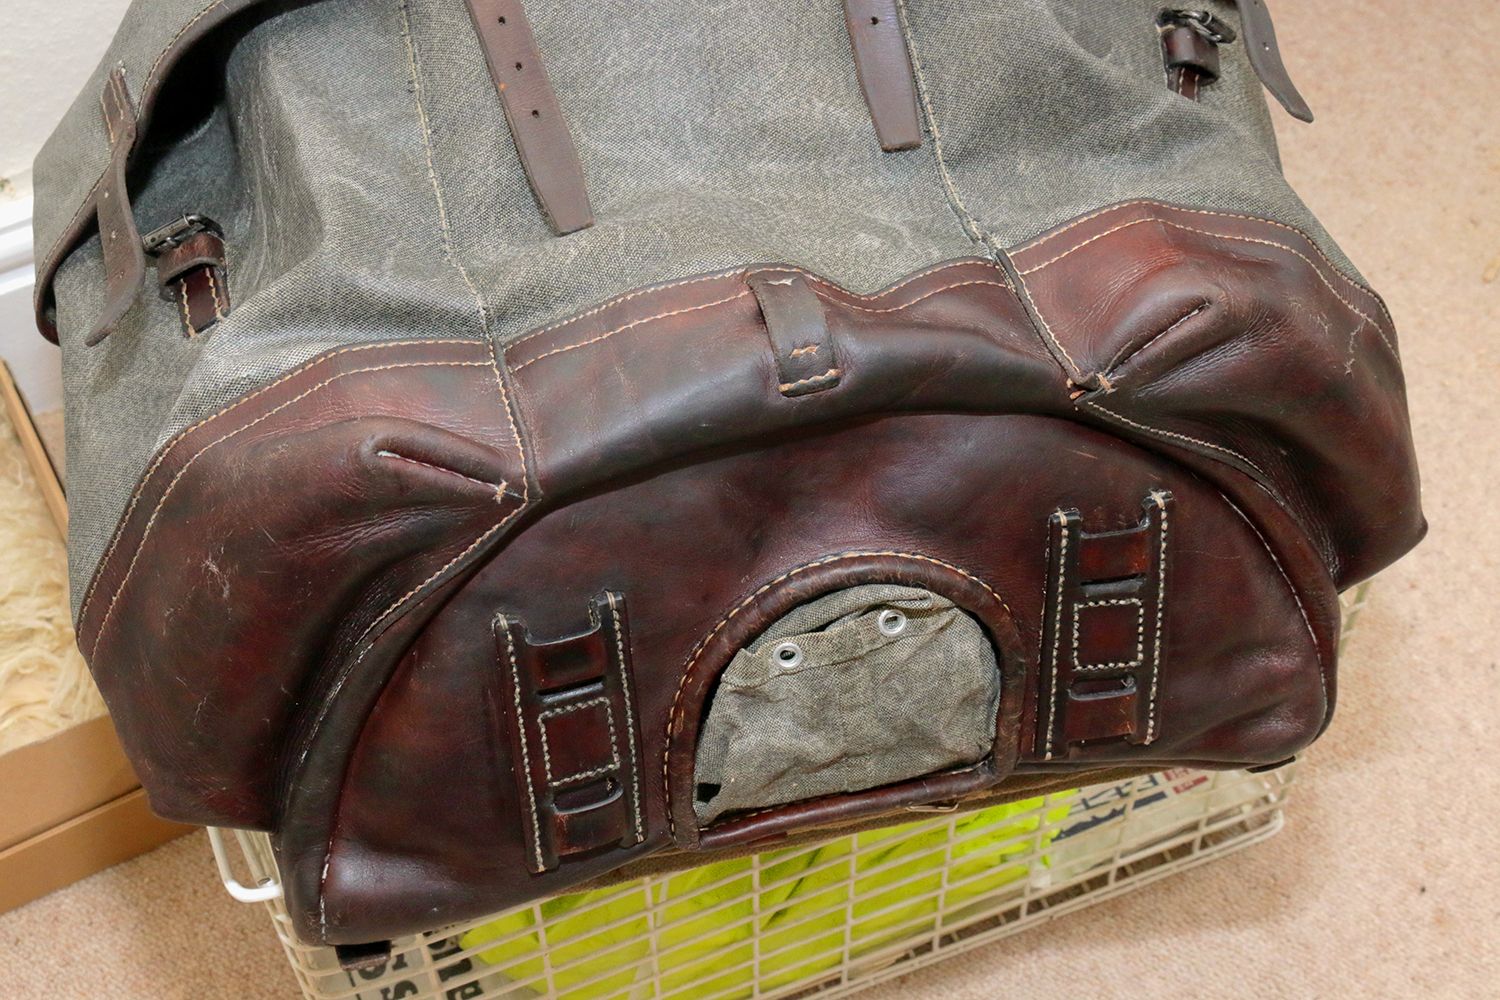
BTW, my back[pack wasn't well looked after. This was the condition it was in when I bought it:
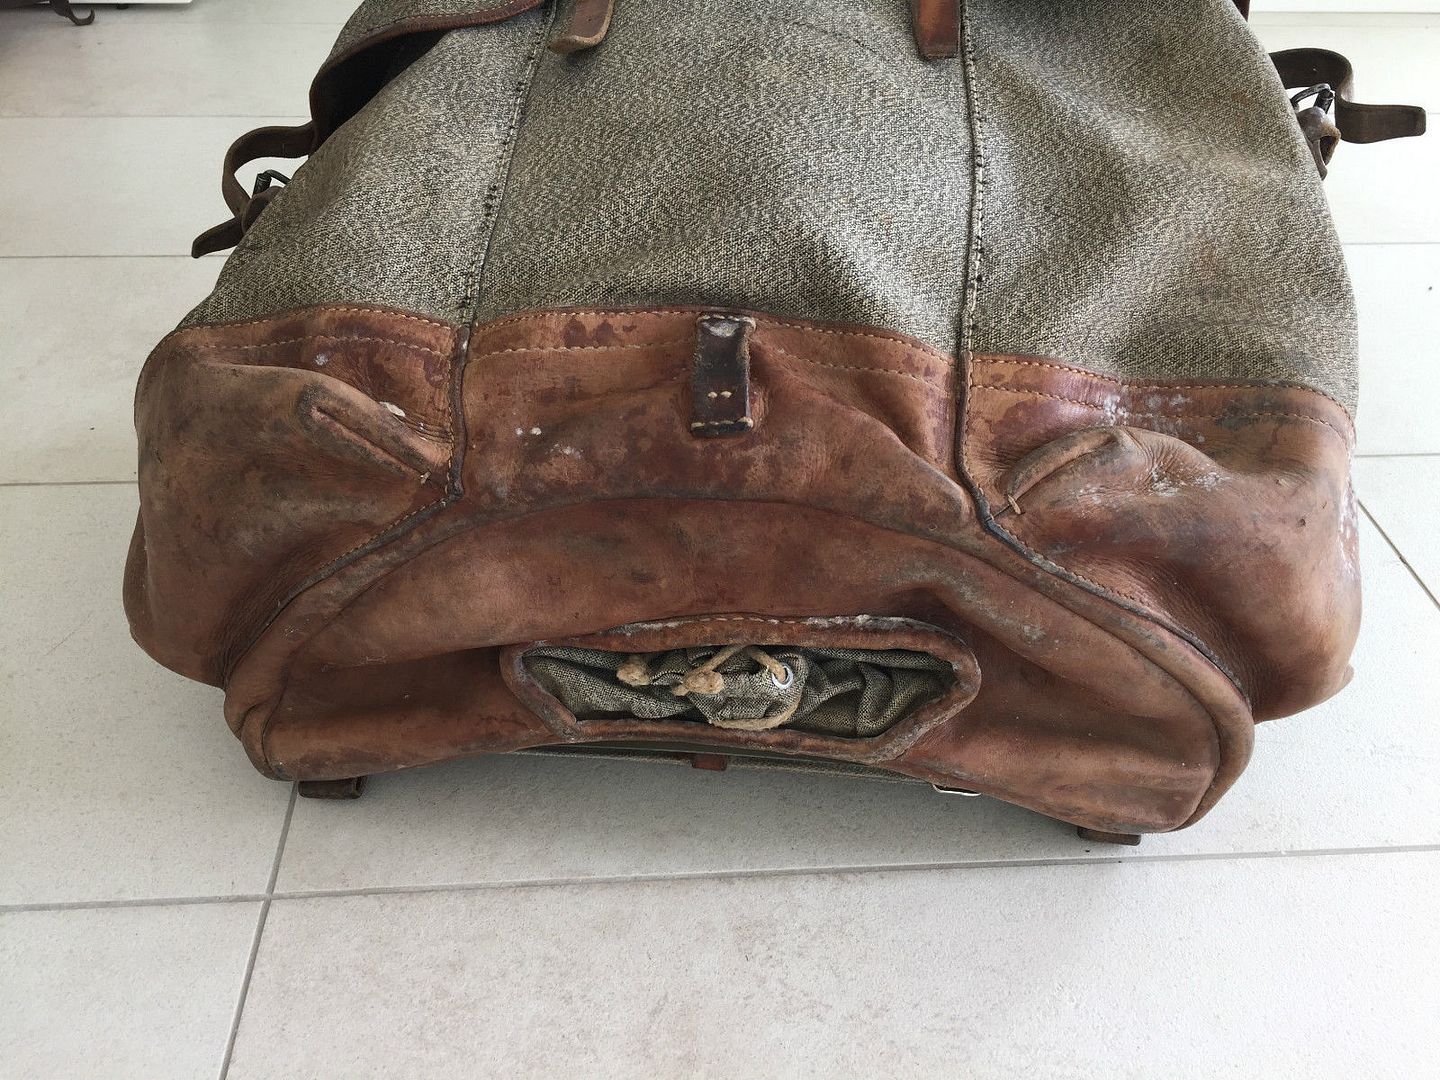
...and after I had cleaned it, treated the leather and re-proofed the canvas (and added a couple of blanket strap mounts on the bottom)...
-
12 hours ago, hidepounder said:
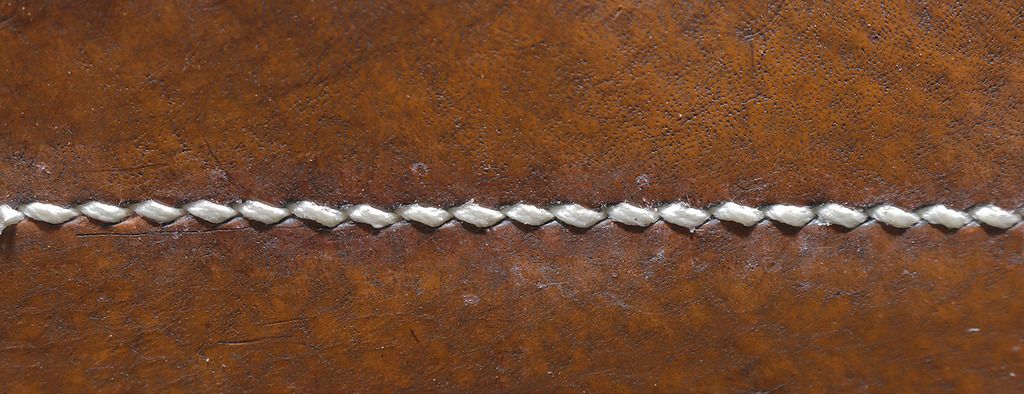
The purpose for a stitching groove is to protect the thread from abrasion. Day to day wear can cause the thread to fray when it's not in a groove....
I'd draw your attention to this....
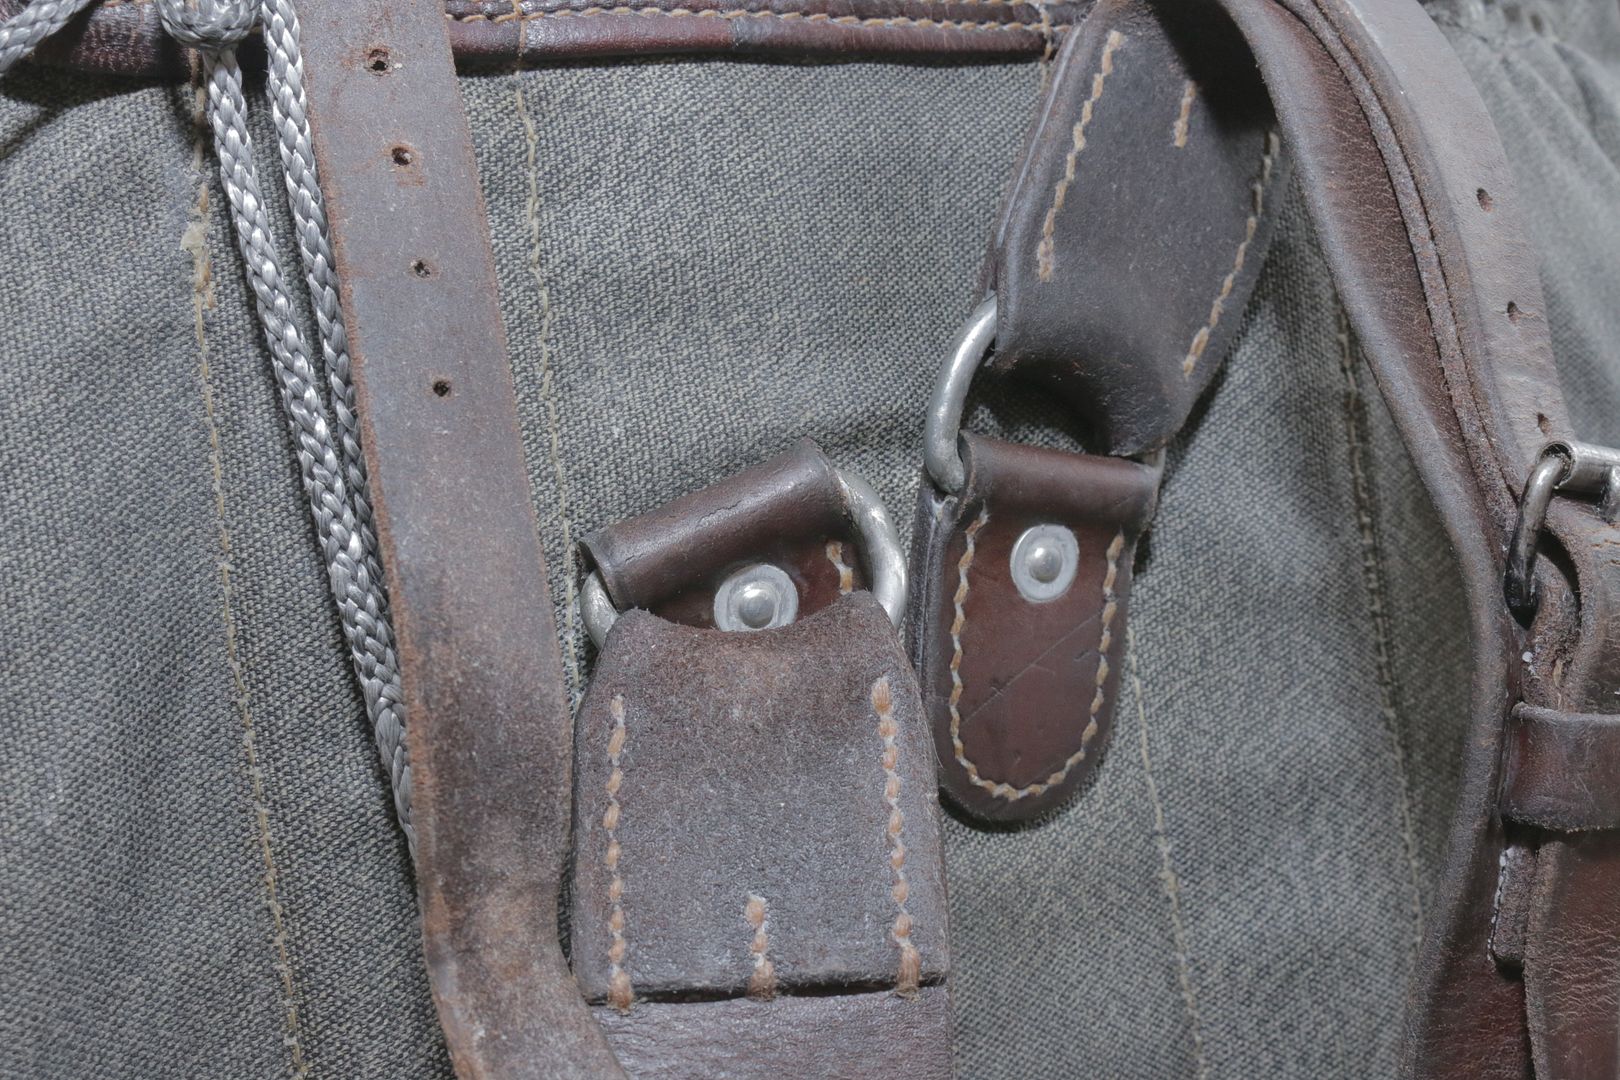
It's the webbing on a Swedish Army backpack. The saddlers mark is date-stamped 1949 and these packs were not decommissioned with each soldier, they were handed in, cleaned and re-issued. This pack has had a hard life, but in spite of it being nearly 70 years old, I'd say there are a few more decades in it yet. All stitching is linen obviously, no groves to be seen and no evidence of an overstitch wheel. I agree there are times when a groove is a good idea, but for general surface stitching, even on items that are destined for extremely hard use, it's absolutely not necessary. You wont see it on any English saddlery and there is loads of old tack knocking around to testify to it's durability.
-
15 hours ago, Vo1lok said:
How did you achieved that? Can you xplain please?
Yeah, you saddle stitch as normal but cast a loop on the back. This guy explains it well....
https://youtu.be/3zTOqJCWbfY?t=231
-
Yeah, it's a Dixon plough gauge, or about 70% of one - it looks like it's had some parts replaced, not sure if the fence is original. This is what mine looks like:

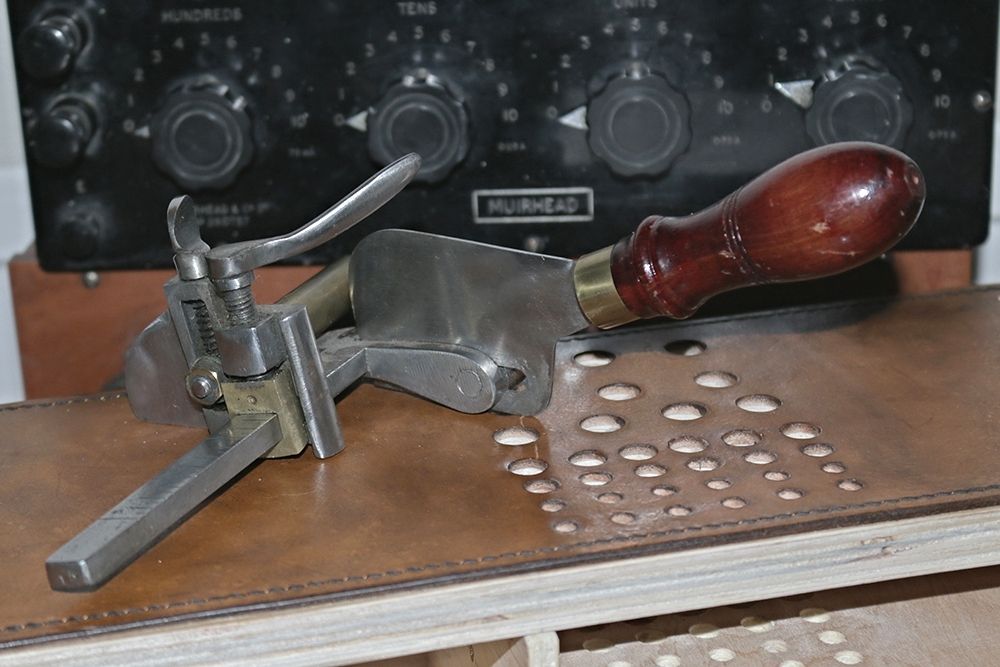
Be careful sharpening the blade. These are valuable tools that are no longer in production and you wont get a replacement blade if you mess it up.
-
6 hours ago, AndyL1 said:
Excellent mod! I think I found the spring on Amazon:
Yep, that's the one I used.
-
I'd try it as-is first, you shouldn't have any problem clamping it, I think the clamps are rated for about 200lbs or something ridiculous. The cam puts a helluva lot of force through the limbs. If anything, I think yours may work better. In fact, you may not need a spring at all.
-
1 hour ago, bkemp said:
Thanks for getting those measurements! Just for clarity, the gap is 60mm with no tension?
Correct. But like I said, the Tandy pony has clamping tension in the limbs, they are not parallell and the block at the bottom is not square, but a slight wedge. If I remove all the hardware, the top of the block is 58mm and the jaws are clamped together. It's actually perfectly usable without the bolt and wingnut. If you watch this video of an unmodified Tandy Pony, you'll see what I mean:
1 hour ago, bkemp said:The measurements on mine like it sits: 38mm no tension. 32mm closed.
I am looking at the yellow spring that is 16x8x45mm. Thoughts?
Yeah, that sounds about right. You have to remember you'll add some with the washers. It also depends how far down you put the clamp, but yeas, sounds about right. It depends how wide you want the jaws to open under the force of the spring. It looks like a 45mm spring will open them to a little past neutral, but that is just an educated guess.
-
5 hours ago, bkemp said:
Really like this modification! Thanks for sharing in detail!
Can anyone tell me the inside measurement of 2 clamp arms or the block at the bottom on this specific pony?
I made a homemade pony and would like to add the spring. What I really need to know is how much longer the spring is than the gap between the arms. I can calculate this once I know the space.
The gap is...
Fully closed: 56mm, fully open: 60mm - and the inside washers (1x steel penny washer + 1x rubber penny washer) are 4mm each side. But remember, the legs on a Tandy clamp are in a state of compression, so are squeezing on the spring at all times. So the 65mm spring is about 48mm fully compressed and about 52mm with the clamp fully open. That 4mm of movement in the spring, creates about 22mm of 'range' at the jaws. The jaws will open wider than that but need a little manual assistance. I was limited because the legs of the clamp are glued in place and I didn't want to risk breaking them by trying to force in a longer spring. But if I was doing it again, I'd probably try and carefully take one of the legs off and install a 70mm spring just to give it a little more range - though I haven't actually needed more so far.
Oh and the centre line of the spring is 185mm below the very top of the jaws.
Go with the yellow 'light duty' springs. They are plenty strong enough.
-
2 hours ago, Axeman said:
Uh... because I thought you were supposed to....and I bought a fancy tool that makes the groove. I am pretty new to leather work.
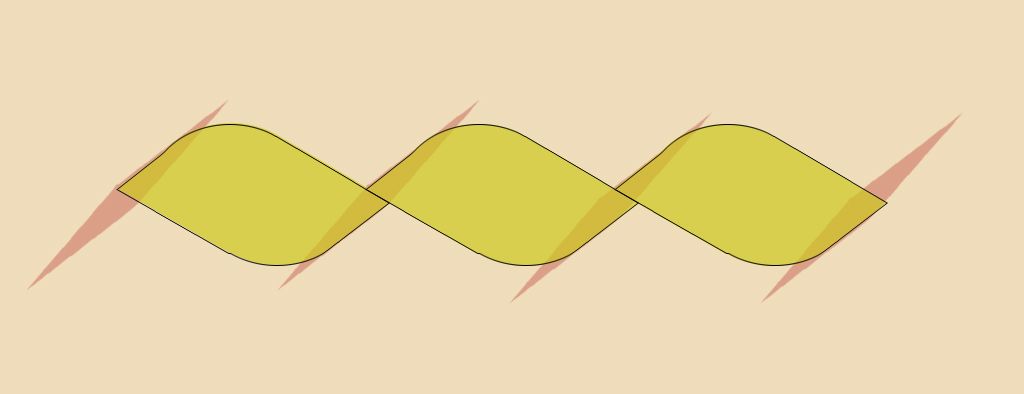
The groove just forces the stitch to run straight, so if you're not too good at stitching, it can make your work look neater, but there is a price to pay for it. A saddle stitch makes a zig-zag pattern like this....
If you run it in a groove, it flattens out the stitch. It stops it from laying naturally in a zig-zag and effectively destroys the look of the stitch. It ends up looking more like a machine stitch.
This is a good video for getting your head round saddle stitching. Like I said, it takes practice, but it's not rocket science and the result is well worth the effort. Best of all, it's a fraction of the cost of a sewing machine and the perfect solution for axe masks, knife sheathes and such.
Here4's another - it's a long video, but the technique is probably explained a bit better and he uses chisels to make the holes instead of an awl - which I think is an easier, albeit less traditional method.
-
17 hours ago, Axeman said:
To be quite honest, the reason I want a machine, besides the bloodletting, is that when I punch my stitch holes with my 4prong diamond punch, the holes (backside) dont always land in my groove!!
....and you are using a groove because?
A good saddle stitch is a beautiful thing, but running it in a groove forces it to run straight and destroys it. The groove serves no practical purpose.
-
Learn to saddle stitch. Far, far better than an EZ awl and the stitches are so much nicer, In addition, in terms of pure quality and craftsmanship, saddle stitching is absolutely the top of the pile. There isn't much sewing in an axe mask which makes it a perfect candidate for a real saddle stitch. Most people who use machines accept taking a step down in quality in exchange for convenience, speed and cost efficiency - that only works out if you are doing a LOT of sewing.
You should at least try it before investing in a machine. It takes some practice to do it reasonably well, but it's not rocket science.
-
On 20/06/2016 at 4:01 AM, Boriqua said:
if I get a really nice pronounced zig zag on the front I get a nice but very straight line on the back side. If I cast then I get a more reserved zig zag on the front but get almost as consistent a zig zag on the back.
That is a 100% mirror of my own experience.
I've kind of settled on casting pretty much all the time now. I agree you definitely do lose a bit of zig on the front, but I like the better zag on the back and I also agree, it's easy and very consistent. Your picture above is completely acceptable to me - lovely work. I like the idea of it being the same on the back, even if you almost never see it.
-
On 03/07/2016 at 11:44 PM, alpha2 said:
I have noticed that the depth of the stitch groove can straighten out the stitches. All that effort, and the groove straightens it out. Bummed. (It also has to do with the ratio of thread size to stitch groove.)
Dont make a grove, it's absolutely not necessary.
There is no reason why you cant get a decent angle on both sides...
Front
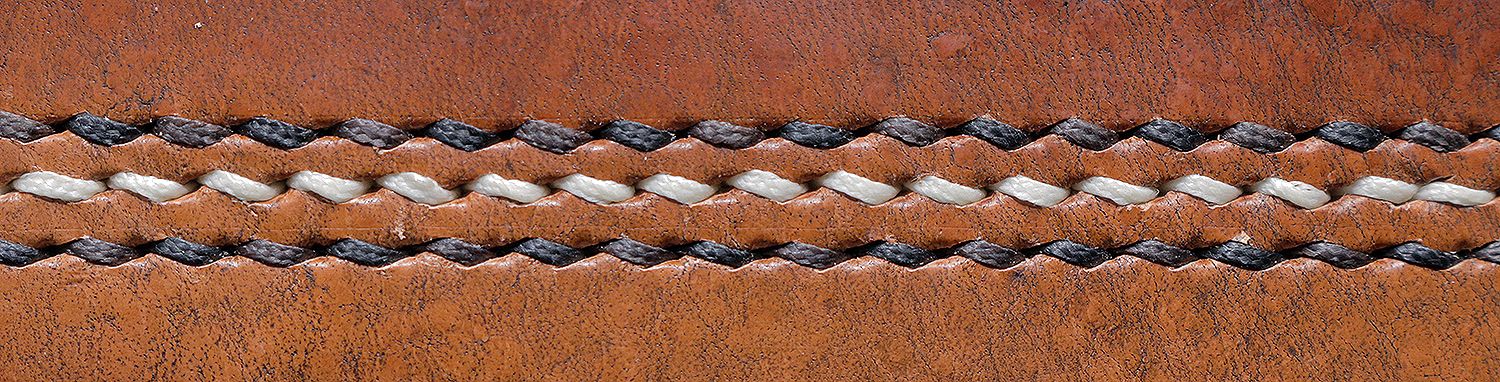
Back
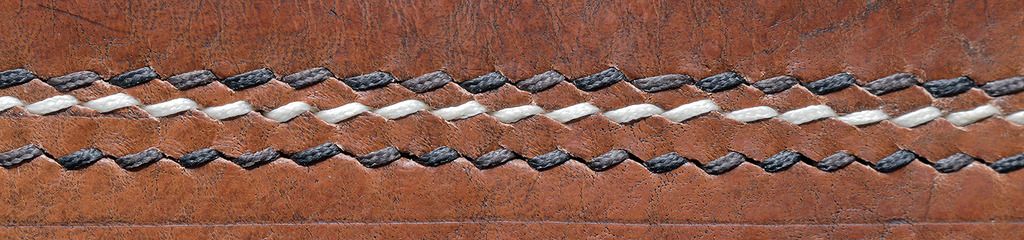
average stitching but I get good angles always.
-
50 minutes ago, Boriqua said:
I bought this set for 9.99 shipped on ebay almost a year ago
That's a really good idea. Can you remember the brand or do you have a link?
-
10 hours ago, plinkercases said:
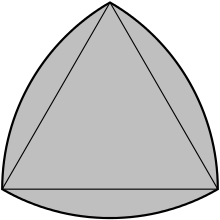
Yeah, that's the shape that JLS was suggesting, just an arc based on an equilateral triangle, but it's not a parabola or catenary. I might be splitting hairs, but it doesnt look quite right to my eye. It's easy to do though and probably close enough that I doubt anybody would pick up on it or complain.
-
5 hours ago, JLSleather said:
Still, looks like an equilateral triangle would be inscribed, so no need to do the math (WOOHOO). Set a compass to the width of the strap, draw an arc. Move to other side, draw same arc. Wah-Lah ..
I dont think it's that simple. I think the shape of the curve changes within the arc. The parabolic curve is close to, but not quite the same as a catenary curve and I think the EP is a pointed catenary - at least as far as I can tell. I'm not sure if there is actually any kind of standard for it though, it just seems to me that most of what is called an EP, looks most like a pointed catenary to my hyper-accurate, mark I eyeball.
-
I *think* it's two intersecting catenary curves (the curve you get when you hang a chain), or a pointed parabolic arch.
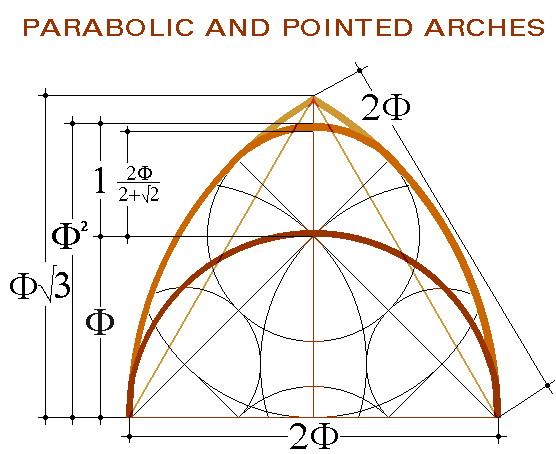
... a pretty complex shape.
-
1 hour ago, Boriqua said:
I'm with you .. I have the Twin eagle in black, dark brown and light brown and there is one or two other colors I want to own but I like to have some yellow around because .. well I really like yellow ... but I dont think I would ever use the 900m that comes on a twin eagle spool so its nice to be able to grab a still fairly hefty roll of thread for under 10 bucks shipped that I will only use occasionally.
If you like Tiger thread there are usually some folks on ebay selling colours in shorter lengths on cards. It's not the cheapest way to buy it, but it's a good way to get a selection of less often used colours without having to fork out for full spools. I usually get 40 meters and take it off the cards and spin it up onto old wooden spools.
-
Ritza 25 or Tiger thread as it's called, 0.8mm waxed, bonded polyester....

-
1 hour ago, Boriqua said:
Certainly not great stitching but will give you an idea on a holster. I tried the groover and didnt like it and sold it immediately but to each their own. I just really dig the zig zag when I get it right. Here it is at 6spi with an awl

That's lovely, very nice.
-
1 minute ago, plinkercases said:
So now my question is who used what pricking irons? and from where? I am not going to Tandy for these unless folk shave had resounding success.
What I combination of stitch pacing and number of pricks seem to cover most needs? I do a lot of curved stitch lines......
I would suggest using stitching chisels not irons. Irons are designed just to mark the leather with spacing and angle, then you punch through with an awl. They are very wedge shape in section and if you try to punch through, you will have an ugly big hole on the front. Stiching chisels have straight sided tines and are designed to punch all the way through OR just mark the leather for follow up with an awl. Chisels give you the option of either/or use of an awl - they are also MUCH cheaper. The Japanese chisels are very good and have had a huge surge in popularity, particularly Seiwa brand.

Saddle Stitching, Front/back Look Different?
in Sewing Leather
Posted · Edited by Martyn
This is just nonsense. You are conflating one style of saddle with saddlery in general. Who makes the harnesses that pull artillery? Have you ever seen a Shire horse? Where do you think they come from? I'll give you a clue - I live in the county of Staffordshire, which is inbetween the counties of Cheshire and Debyshire. They were used to haul the heaviest farm machinery and pull the biggest wagons. Who do you think make the harnesses and tack for these animals? Your statement is absurd.