showtime
-
Posts
14 -
Joined
-
Last visited
Recent Profile Visitors
1,323 profile views


showtime's Achievements
Member (2/4)
-
No problem, unfortunately though I have only really stated possible problems and no real answers. However, I will continue to provide updates along this journey and we will hopefully get this resolved soon. Once it's all said and done, I feel like I will have a good understanding of how to get these LU-1500 series machines set up to factory specifications. It has been helpful communicating with Juki - Tokyo, they have gone above and beyond what I would have expected any manufacturer to do in assisting us. At this point, our Juki contact is meeting with a specialist and will be getting back to us before the end of this week.
-
Thanks for your response Floyd, i truly wish I would had evaluated my machine and recorded measurements for all of the adjustments in the engineer's manual when it was new and before use. Unfortunately, I didn't really know enough about the nuts and bolts of these nor did I have the experience to know that I should do such a thing. I will definitely be recording the adjustments made, just wish I had a good baseline from when the machine was new. Hopefully any new machine owner onlookers will take the advice to learn about their machine and take some measurements early on (but don't loosen screws or make changes until you know what you are doing). 1.) When you say " lower “carefully” presser foot" is this by rotating the hand wheel? So it sounds like the needle, feed dog, and throat plate all align but the inner foot is raised .010"? If that's the case your machine seems to mostly match the manual, aside from the inner foot being off .010" (which can easily be adjusted with the eccentric specified in 10.2.) However, I suspect that variance is not a big deal and I wouldn't mess with it if it is sewing good. Still not even sure if the manual is the gold standard or just a good baseline. 2.) Interesting observation about the clutch reset button when the bottom shaft pulley has set screws at 9 & 6 o'clock. When my bottom shaft is oriented that way I experience the same thing, however I do not experience that when my needle is at bottom dead center (obviously since my bottom shaft doesn't seem to be synced to my needle perfectly and isn't in the 9 & 6 o'clock position). This is useful though, it at least tells me that my bottom pulley is in the right position on the lower shaft (again not even sure it is possible for it not to be, since I haven't taken that apart yet.) 3.) Your feed dog is stationary when the needle is at dead bottom and you move the reverse lever? I think this adjustment has to be checked with a stitch length more than 0 (10.1 specifies max stitch length) otherwise you wont have any reverse movement on the lever. I also agree that the 1541 is a different machine and should be treated as such. My inquiring brain is just curious to the reasoning in the engineering, I have to be careful because sometimes curiosity kills the cat! Thanks Floyd, truly appreciate you taking the time to respond and share some of you notes.
-
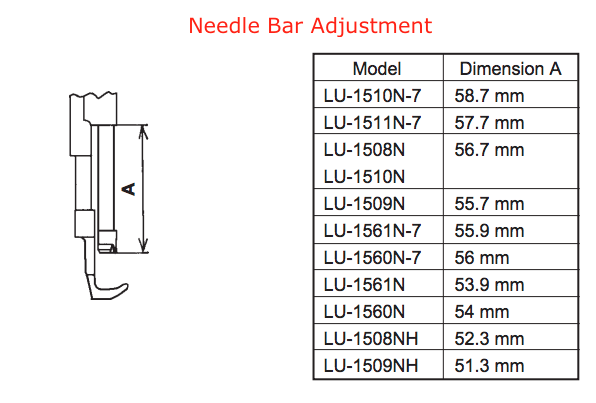
It's worth noting that the most suspicious culprit would be the needle bar being knocked out of adjustment, however it is set correctly (per the manual) at 52.3mm. Juki asked me to double check that, and I would have asked the same, but it is correct per the manual. Here's a picture of that portion of the manual for the readers of this thread:
-
Along with a few typos, in my last post that contained images I placed one of the images in the wrong section. The image from the manual showing the timing of the upper and lower shaft was accidentally placed in section 10.1 instead of section 9. Just in case that caused confusion for anyone...
-
Ah, thanks for the clarification... I didn't consider how the return spring could come into play there. I definitely tried ensuring the foot was lifted as minimally as possible (tension discs still engaged), and that didn't seem to make a difference in my case. I think I also tried lifting the foot as high as possible but I will need to double check that and make sure the upper tension releases enough for that test once I get the sewing machine back together. Thanks for the feedback!
-
Hmm, interesting. Are you referring to the upper tension disks being released when the foot is raised? I always thought the top tension released when the foot was raised strictly as a way to remove the material from the machine. I thought the goal was to ensure those tension disks weren't released when lifting and turning to ensure consistent tension. If my understanding was incorrect, maybe this could be a lead... It's worth a try, when I get the machine back together I'll see if purposely lifting the foot all the way and releasing the upper tension changes what happens with the corner stitches.
-
Thanks for your comment, Brian. That's a great piece of advice. I think in my particular case it's not an issue with the top tension releasing on the turn since the knots are coming to the top of the material. It seems the top tension is either increasing, the bottom decreasing, or a combination of the two. I guess I'll work on getting the machine set up as specified in the engineering manual before I continue chasing that specific issue, but definitely open to suggestions on it!
-
UPDATE - Corner Stitching - Bobbing Tension Spring : I did get the bobbin basket out of the machine to take a closer look at the tension spring, unfortunately everything actually looked fine. I think it was a bit of an optical illusion to see that the spring was "bent" while the basket was still in the machine (and my hopeful thinking.) I cleaned under the spring and tested it and it seems to be working perfectly, no room to bend the spring in any further as it is following the contour of the basket nicely. NEXT CHAPTER - Standard Adjustments Per Engineering Manual: Since the corner stitching problem remained elusive, and recalling that the machine did have an impact with a piece of metal that was being sewn into nylon (at slow speed), I committed to going through all the adjustments in the engineering manual in a hope to start "fresh". As a teaser, I ran into some issues with achieving the adjustments specified in the manual, have been in communication with Juki (Tokyo), and I am still in the middle of resolving said issues. Before I get into the details, let me recap the sequence of events that led to this initiative... Bought machine new, "set up" by the dealer to sew my materials. Machine worked great for about 2 years sewing the same products. Just recently, needle strikes metal piece when sewing it with some nylon (at slow speed) Shortly after, needle breaks when sewing and machine gets thoroughly jammed Jam is worked loose Noticed the machine is skipping stitches occasionally Checked timing and noticed the hook to needle timing is retarded Adjusted hook to needle timing per manual and validated needle bar height is correct While testing the new timing, the skipped stitches seem to have stopped but I am now noticing the corner stitching tension issue Couldn't resolve corner stitching issues through expected means (check previous posts to see what I did), decided to go through and validate / fine tune all adjustments in the engineering manual to get a fresh start I have gone through just about every applicable step in the engineers manual, I will outline what I have done and some of the issues I have ran into. 1.) Needle Entry Position - Slight Adjustment Clearance between presser and walker bar should be 8.0mm +/- 0.1mm, my machine was set at 7.78mm so I adjusted it to 8.0mm. 2 & 3.) Longitudinal & Lateral Position of Feed Dog - Slight Adjustment Mine was slightly off, so I fine tuned it so the hole is centered with the needle. 4.) Height of Feed Dog - Already Correct Mine was correct at 0.84mm. 5.) Height of Hook - Already Correct Mine was correct at 1.0mm between top of the hook stopper tab and bottom of throat plate (slot). 6.) Adjusting Inner Hook Guide - Already Correct Mine was correct having a clearance of 0.2mm between guide and bobbing basket. 7.) Needle to Hook Timing - Originally out of adjustment Mine was correct after previously adjusting it... hook tip meets center of needle once the needle rises 2.3mm, needle bar is set to 2.3mm, hook tip meets needle 2.5mm above top of needle eyelet. Also, hook to needle distance is correct along with the deflection from the needle guard. 8.) Lift of the Presser Feet - Already Correct Mine are correct, they lift 9.0mm with the hand lever and 16.0mm with the knee lifter. 9.) Timing between Upper & Lower Shaft - Not able to adjust correctly? This is where it starts to get interesting... Per the manual the timing should be checked when the needle is at it's lowest dead point and feed is set to 0mm. With those conditions the orientation of the two set screws on the bottom shaft belt pulley should be parallel and perpendicular to the machine bed (manual image attached). In my case, the pulley was slightly advanced from that position. At this point in time I thought it must be close enough, because retarding the pulley by one tooth on the belt would go past the targeted position in the opposite direction. Since I received the machine new and didn't expect that the dealer would have changed this when setting up the machine, I figured it must be correct. More on this later... 10.) Feed Cam Timing 10.1) Horizontal Feed Cam Timing - Was never adjusted correctly? Another interesting observation... The manual states that the machine should again be rotated where the needle is at it's lowest dead point, and in this case the feed set to maximum. With these conditions the manual states that the feed dog should not move when the reverse lever is operated. My machine was not set up like this, and it wasn't set up like this since the day I received it from the dealer. I know because I always made it a point to active reverse at the point during the needle stroke in which the feed dogs would not shift, in my machine's case this was after the needle has slightly risen (maybe 1.0 - 2.0 mm). I went ahead and adjusted the machine per the manual, I'm assuming the manual is right but it seems odd that the feed motion would be centered at the point in time in which the hook tip has not yet reached the needle, more questions about this summed up at the end of this post... 10.2) Top Feed Cam Timing - Not able to adjust correctly Can't achieve the specifications outlined in the manual... This adjustment times the up and down movement of the inner foot. The manual states that the following things should all come into alignment at the same time when this is adjusted correctly: Needle tip Bottom if inner presser foot Top of throat plate Top of feed dog (not explicitly said in manual, but confirmed by Juki - more on that later) In my case, it is impossible for me to achieve alignment of all of these since my feed dog rises out of the throat plate before the needle arrives (needle is 9.0mm above throat plate when feed dog is level with throat plate). 11.) Feed Motion 11.1) Amount of Alternate Vertical Movement - Already Correct This setting basically translates to how high the feet lift. My machine is set to the standard setting in the manual of approx. 3.0mm. 11.2) Alternate Momentum - Already Correct This translates to setting the difference between the inner foot lift amount and the outer foot lift amount. My machine is set to the standard setting where the inner and outer feet have the same amount of lift. 12.) Needle Sway - Not applicable Not applicable to my machine. 13.) Stitch length of Normal & Reverse Feed - Not yet adjusted I haven't touched this yet because it is dependent on the horizontal feed cam adjustment, which I haven't finalized / committed to yet. 14.) Balancer - Not applicable Not applicable to my machine. There are some additional steps that I haven't explicitly checked but the operation of those items seems to be functioning as intended, or the step itself does not apply to my machine. ---------------- After going through these steps...now I'm a little confused, I am not able to obtain some of the settings specified on the manual. To recap: Upper and Lower shaft timing can not be set exactly as specified in the manual (half a tooth off, can only adjust in one tooth increments) Timing of top feed cannot be obtained as specified (needle tip, throat plate, feed dog, and bottom of inner foot aligned). Problem is the feed dog rises out of the throat plate before the needle arrives. If focusing on the second issue it seems that the vertical movement of the feed dog is ahead of the needle, it's important to now that with this machine the eccentric for the feed dog vertical movement is clocked / fixed to the bottom shaft and cannot be adjusted. As such, the vertical movement of the feed dog is completely regulated by the timing between the upper and bottom shaft. Hmm, makes sense that my upper and bottom shaft timing doesn't seem perfect (again, bottom shaft is advanced slightly, which makes sense that the feed dog vertical movement is advanced). I went ahead and tried retarding the bottom shaft by one tooth on the pulley... This improved the condition of the feed dog to needle timing, but it still wasn't quite perfect. In addition, the lower pulley position seem to still not be correct per the manual but this time the discrepancy is in the opposite direction. In contact with Juki (Tokyo)... At this point I'm not sure if the manual is incorrect or if something else in the machine is knocked out of whack which is not allowing me to obtain some of these adjustments. Utilizing my wife as a resource sense she happens to speak Japanese, we have been in contact with the sales / engineering group of Juki in Tokyo. They agree that something doesn't look right and so far have confirmed with their own pictures that the manual is correct, those adjustments should be able to be obtained. The only thing I can think of at this point is the needle counterweight on the end of the upper shaft being shifted out of position. I suspect that it would be clocked to the shaft with a flat for the set screw or something similar rendering that impossible, however in the parts book it shows no such thing (but the parts book has been misleading before.) I don't want to start messing with that until I know more. This was really just an update for all of you, as the problems are not completely resolved. However since I don't have a new / properly working machine to compare to, if anyone has a 1508NH or 1500 series maybe you could help me out by answering a few questions: Does the top of your feed dog, top of your throat plate, point of needle, and bottom of inner foot all come into alignment on the down stroke? Or, does your feed dog rise out of the throat plate before the needle arrives? Does your bottom shaft timing belt pulley align perfectly with the machine bed as specified in the manual when the needle is as dead bottom? When your needle is at dead bottom and you actuate the reverse lever, does the feed dog remain stationary? Alternatively, does the feed dog remain stationary when using the reverse lever only after the needle has slightly risen? General Questions: I noticed the 1541 specifies centering the horizontal feed (feed dog doesn't move when actuating reverse lever) when the hook tip meets the needle. The 1508NH (my machine) specifies when the needle is at bottom dead center. The 1541 seems to make more sense to me since the hook to needle timing would be the same in forward and reverse (I presume). When centering at needle bottom dead center (before hook arrives), it seems to make the hook timing retarded when operating in reverse. Any idea why the difference in the specifications between these similar machines? Does it make sense to center the feed timing before the hook meets the needle (@ needle bottom dead center)? Our contact at Juki is telling us that the stitch quality will be the best when the feed dog doesn't rise out of the throat plate before the needle arrives (they should meet at the same time). It makes sense, is this how most walking foot machines are set up? Is there the possibility that this particular machine (1508NH) is supposed to have the feed dog rise out before the needle arrives?


-
Dave, thanks for the lead, I will take the tension disks out and take a look / polish them up. I'm not sure that would cause the issue only on corners but anything is a possibility.
-
Thank you CowboyBob and R8R for your responses. CowboyBob: Upon further investigation It does appear that part of the bobbin spring is slightly bent. When looking at the edge of the spring where the thread exits, the top portion of the spring seems to be bent outwards slightly. I suspect the thread is being pulled up towards the higher end of the spring when turning and thus receiving less tension. I am working on getting a replacement spring on hand and will give it a try, I will update this thread with the results. R8R: Great suggestions, in this case the needle is centered in the foot and throat plate. However, your comment may help someone searching for this same issue in the future. Thanks again everyone, I'll be back with an update...
-
Hi Bob, Thanks so much for your reply. I should have mentioned that I am and have been using #92 thread and a #22 needle, which in the past has worked perfectly. Based on your reply I went ahead and tried a #23 needle but unfortunately still have the issue. I also tried changing the travel on the check spring (shortened and lengthened) as well as reducing the check spring pressure, all without a change to the problem corner stitching. Tried everything one thing at a time, I'm at a loss on this one *scratches head*.
-
Hello there Ladies and Gentlemen, I'm hoping one or more of you marvelous sewing machine magicians would be so kind to lend me some advice on this problem that has me at my wits end. Background: I have been sewing nylon webbing using bonded nylon thread, everything has been working fantastically for quite some time until a few days ago. I had a needle break and the machine got jammed, I cleared the jam and got everything going again not thinking much of it. Next time I was back on the machine I noticed skipped stitches and needle thread being cut on occasion. To resolve this, I checked the timing and noticed the hook rotation was retarded according to the factory manual. I went ahead and corrected the hook rotation, made a small tweak to the needle guard, and generally got everything in-line with the factory specs (rotation, hook tip to needle distance, needle guard deflection amount.) I'm not sure if the rotation got knocked out of spec from the jam or if that's how it came set up from the dealer (had them set the machine up after purchase a few years ago.) Testing out the machine after the timing change seems to have resolved the previously mentioned issues, however while testing I have now noticed another problem... Problem: The bobbin thread is pulling up to top of material on corner stitches. When sewing a straight line of stitches the tension balance is fine, however when turning the corner stich knot pulls up like the upper tension is too much - resulting in the upper thread slightly cutting across to the next stitch. I stop and turn when the needle has started to rise and the hook has captured the upper thread. I have never had this problem before, sewing the exact same material, same thread, same needle. It leads me to believe something may have gotten knocked out of spec? I can sew straight for inches and inches with the tension remaining consistent, but as soon as I make a corner stitch the bobbin thread comes to the top. Here's what I have tried, all without luck: Retarding the timing back to where it was before I set it to factory specs Reducing upper thread tension (It lessens the effect of the problem, but the problem still exists and then the balance of tension on the straight stitches is off.) Using more and less bobbin tension with compensated upper tension Turning the material at various different points during the needle stroke New needle Smaller needle It doesn't consistently do this on every corner, I would say 50% of the time when turning material clockwise and 40% of the time when turning the material counter-clockwise. I can't wrap my head around what may be causing the tension balance to shift to the upper side when turning the material? Do any of you gurus have any insight you can lend me? What else can I check? Thank you in advance for taking the time to read this!!
-
Here's a video that first shows the forward motion and then shows the reverse motion (which goes forward before reversing on each stroke.) [media][/media] https://youtu.be/1Sd4KLRKdvo
-
Hello Ladies & Gentlemen! New here but have been following the forum for awhile now learning a wealth of information! Appreciate all the knowledge that has been shared here. I'm hoping someone can chime in and help me understand the issue I am having with my Singer 143W3. When feeding in reverse the stitch length is shorter than feeding forward. Of more interest, when in reverse the material moves away from the operator a small amount before moving towards the operator. On the contrary, when feeding forward the material only moves away from the operator (no back and forth motion as seen when running in reverse.) I have verified that the feed dogs are indeed still moving in the "wrong" direction when they protrude through the throat plate in reverse, of course correcting and proceeding with a normal reverse feed. I have tried playing with the feed dog height to see that was grossly out of spec and causing the issue, but as suspected, it did not effect the issue. I'm not sure what the feed dog timing is supposed to be on the machine, but it appears that the first point in which the feed dogs remain stationary while actuating the reverse lever is when the needle rises 7mm above it's bottom point. Is there an adjustment to reconcile this issue I am having? May this be a clue that something seemingly unrelated is not set correctly? Truly appreciate and help or advice that can be shared! ST