Dave9111
-
Posts
63 -
Joined
-
Last visited
Dave9111's Achievements
Member (2/4)
-
Binding with a right angle binder on a walking foot machine
Dave9111 replied to Dave9111's topic in Leather Sewing Machines
When I bought my twin needle Seiko 339, the seller, who was an awning company, was selling the machine as broken. Because after sewing only a few inches, the thread in the left needle was entirely unwound. The awning company was trying to make long seams and it just didnt work at all. Folks on this forum recommended right twist thread and that fixed the issue immediately, but the selection of right twist thread is pretty limiting. I probably need to try some better, left twist bonded thread in the left needle. Thanks. -
Binding with a right angle binder on a walking foot machine
Dave9111 replied to Dave9111's topic in Leather Sewing Machines
Great! Thanks for the tips and the pictures. Ill try that out. Very nice work! Do you use right twist thread in your left bobbin on your two needle machine? -
Binding with a right angle binder on a walking foot machine
Dave9111 replied to Dave9111's topic in Leather Sewing Machines
Hi Guys, so binding has been going fine on my Pfaff 1245 with the synchronized binder. Most of the things I work on are larger. A 24" x 12" cover is small. My Dad had a need for a small pouch he could wear on his belt. The pouch is only about 5 inches long by 3 inches tall. Really small for me. I made a couple, each time with improvements. I decided to bind the edges with 3/4" nylon 4088 tape. That went fine. But then I realized I didnt have a great way to finish the binding. I usually just run the binding over the beginning of the tape, then run it off the edge. Then burn/melt the tail off with a hot knife. Is there a better way? My crude method looks crude when done on a small piece. What fo you guys do? Small stuff is hard! -
Sams Club sells commercial cutting boards. I cut them up with a table saw to get smaller pieces. Great for backer board while using a hole punch and relatively cheap. I think they are about 20x24 inches or so.
-
Hi Uwe, Sorry you had to part with it all. My daughter and niece live in Chicago. My Dad and sister are in Plymouth, Mi. Whoever got it all; If you want to part with some of it, post a listing of what you have. I might have some interest in a few things. Dave
-
Id look at Mcmaster Carr and see what they have. You might also be able to use a urethane roller. Once you get a new roller, dont leave it under pressure when your not using the machine. Some urethane, I believe, can be machined. Rubber can be ground or sanded. I had a rubber puller roller that had a flatspot. I put the roller in a drill press then used a sander to make it round. Ive heard of rubber being turned in a lathe after freezing it. But Ive never done that.
-
Binding with a right angle binder on a walking foot machine
Dave9111 replied to Dave9111's topic in Leather Sewing Machines
Thanks nylonRigging. That does look really nice. -
Binding with a right angle binder on a walking foot machine
Dave9111 replied to Dave9111's topic in Leather Sewing Machines
Yes, proper equipment is needed! Ill have to try binding a square with 3/4". Now Im curious if I can do that! But I dont know if I want to setup my twin needle machine for binding. It has 1/4" gauge. And the existing feet wont work at all. Although it does look nice. 😀 Thanks! -
Binding with a right angle binder on a walking foot machine
Dave9111 replied to Dave9111's topic in Leather Sewing Machines
I finally received some 3/4" milspec 4088 herringbone binding I bought off ebay. Usps ground now takes 10 days to get from CA to IN. I have a real binding platter I purchased off Amazon for $14. It has a roller bearing in a plastic disk. It spins on a stainless steel tube. Very little friction. Pretty good for $14. The disk was a bit small so I made a larger disk out of 1/8" masonite which can lay on the smaller disk. It works fine, spins freely. I setup the synchronized binder on the 1245 with a 3/4" folding head, which was about $10 off Ebay and wow! I feel like Im cheating! It just works. Binding with this setup is easy. I tried binding around some 2" inside and outside radius' and it was no big deal. And the stitching stayed in the right place on the tape while making the turns. I thought the 3/4" tape might be a challenge. Nope. 😃 -
Binding with a right angle binder on a walking foot machine
Dave9111 replied to Dave9111's topic in Leather Sewing Machines
Thanks for the pictures and explanations. Very nice! Ive never seen a tape guide, and tape tensioner like that? Where do you buy things like that. -
Binding with a right angle binder on a walking foot machine
Dave9111 replied to Dave9111's topic in Leather Sewing Machines
Thanks kgg, I appreciate all the comments. I have a binding platter on the way. In the picture, is that a 335 or 246 style cylinder bed machine? For bags and backpacks, I can see the desire of a cylinder bed machine. Is there an advantage when using it with mostly flatwork as well? Thanks, Dave -
Binding with a right angle binder on a walking foot machine
Dave9111 replied to Dave9111's topic in Leather Sewing Machines
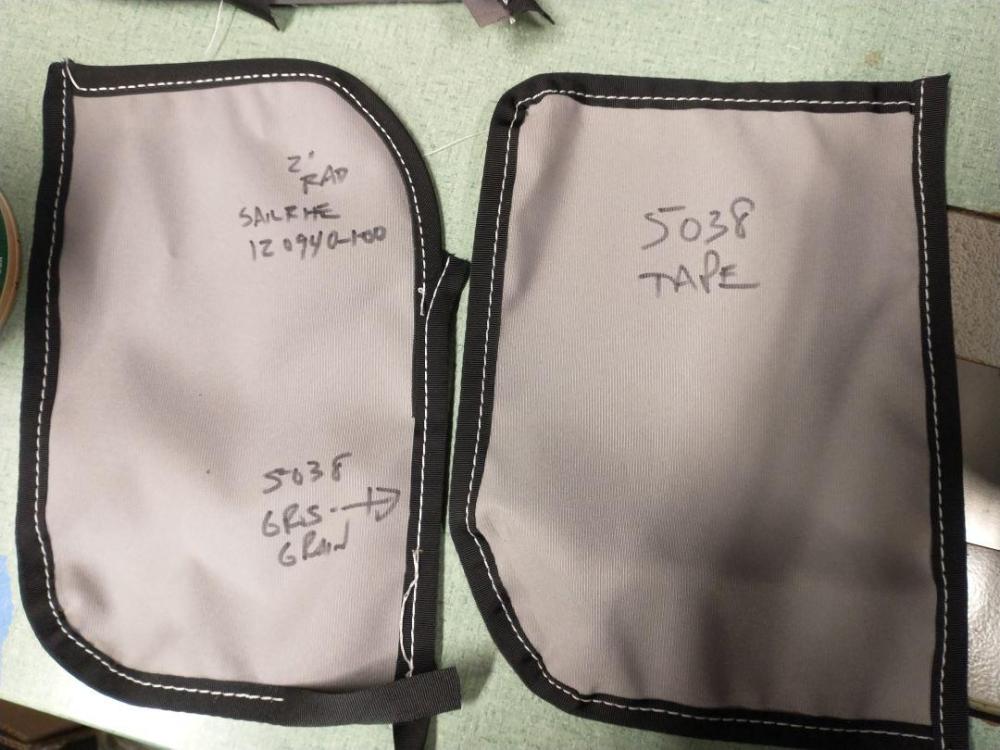
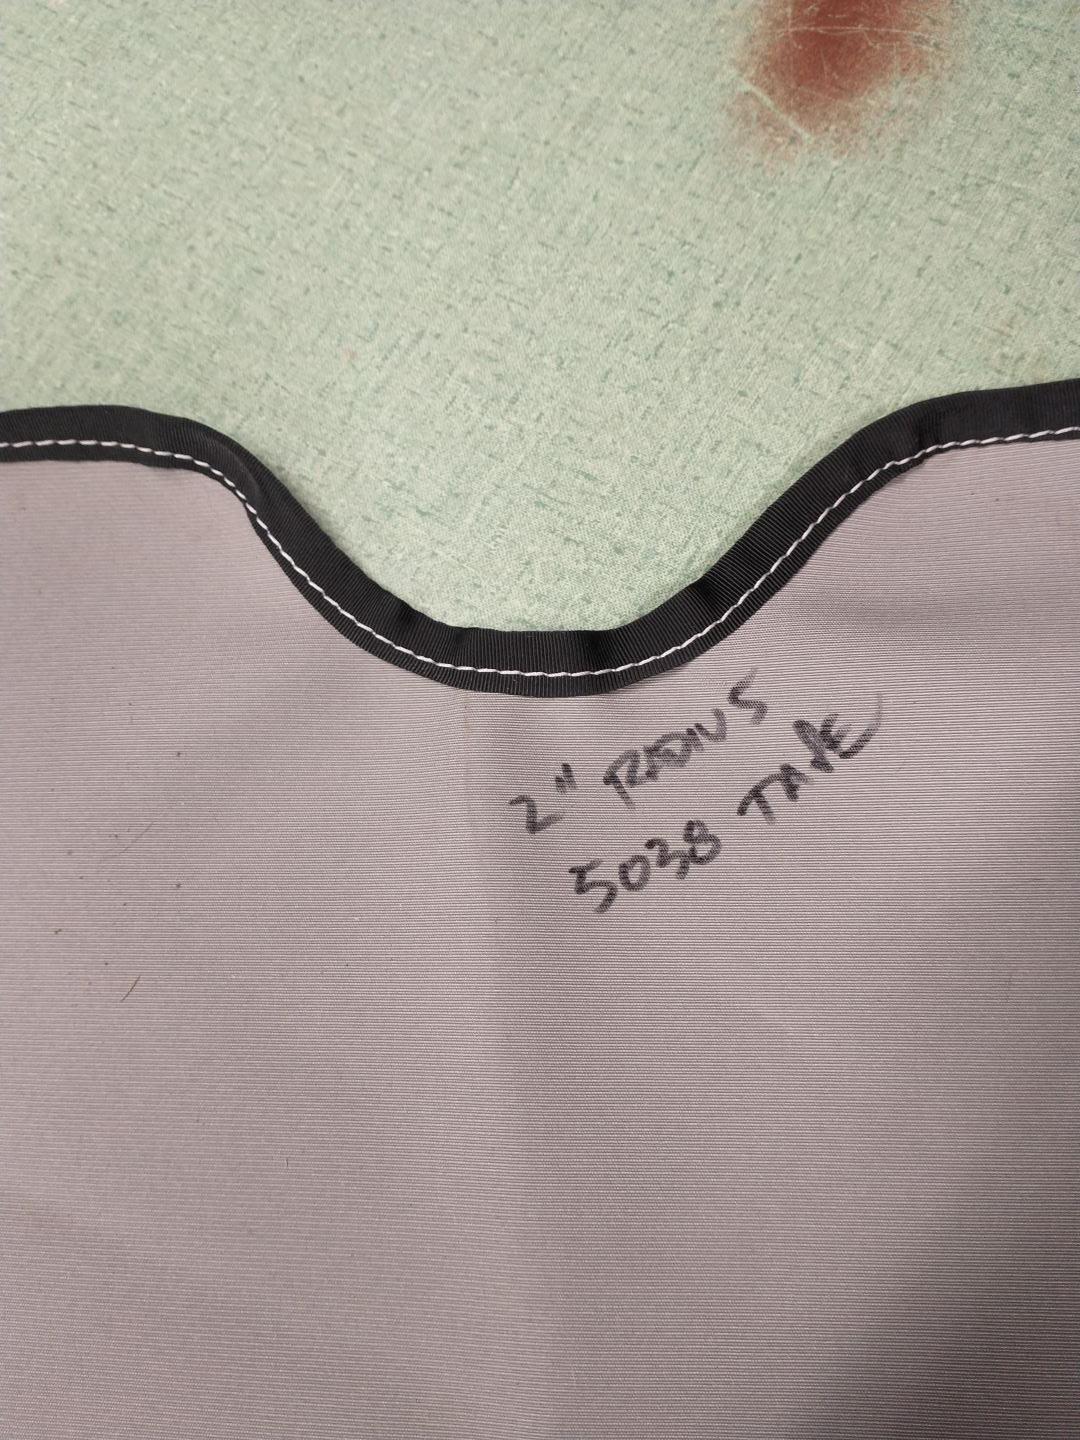
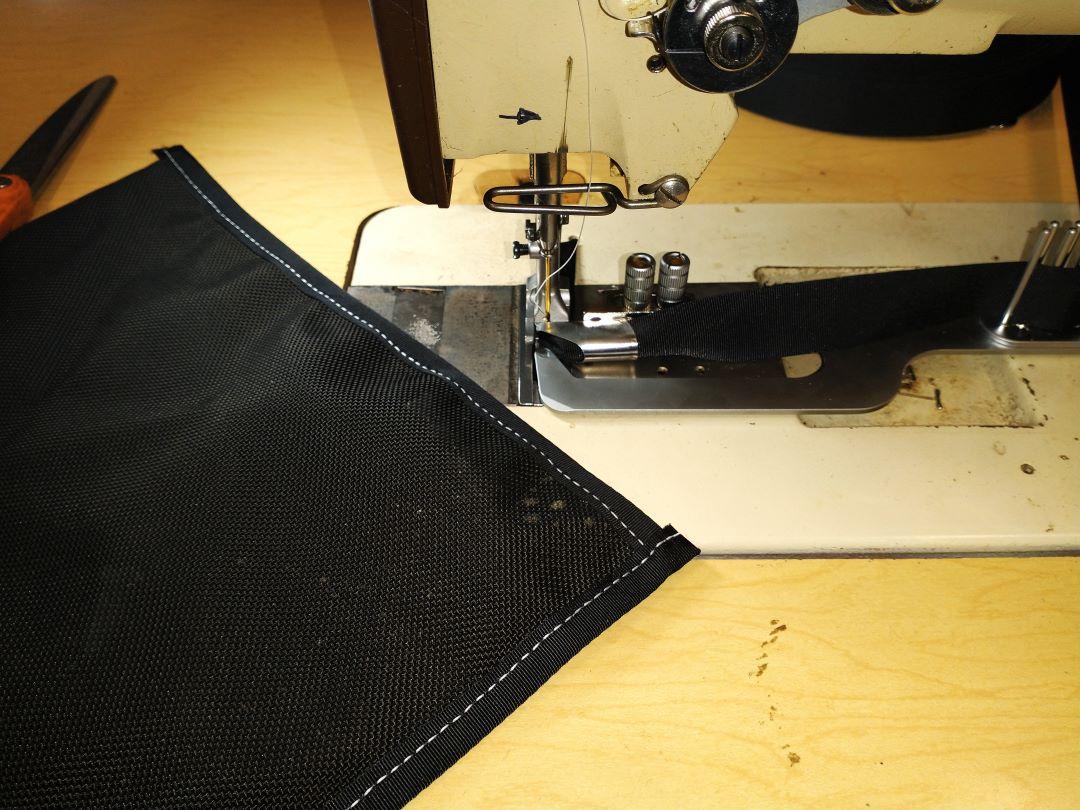
Here are some pictures. The pictures with the straight binder are using some of the thin garment polyester tape I bought off Wawak and Amazon. One was a single fold polyester which just is a flat strip with both edges folded towards the center. The other has, I believe, four layers of polyester folded over. Both work fine with the straight binder but wont work at all in the synchronized binder. The very thin polyester just cant maintain its shape as it goes through the right angle binder. It rolls around and unfolds in the right angle binder head. I would only use the thin polyester binding to hide raw edges that were not subject to much abrasion. The milspec 5038 and 4088 tapes are much heavier and more durable. That said, the thin polyester looks pretty good and would be ok for some uses. Cost wise the milspec tapes are about the same cost as the cheap garment tapes which really doesn't make much sense. The Wawak single fold polyester tape was about $36 for a hundred yards as was the Amazon multifold tape. Milspec tape seems to be not much more expensive. I'll probably stick to the milspec tapes for my uses which is mostly covers and some bags. If you guys see anything I could be doing better. Please comment. Thanks.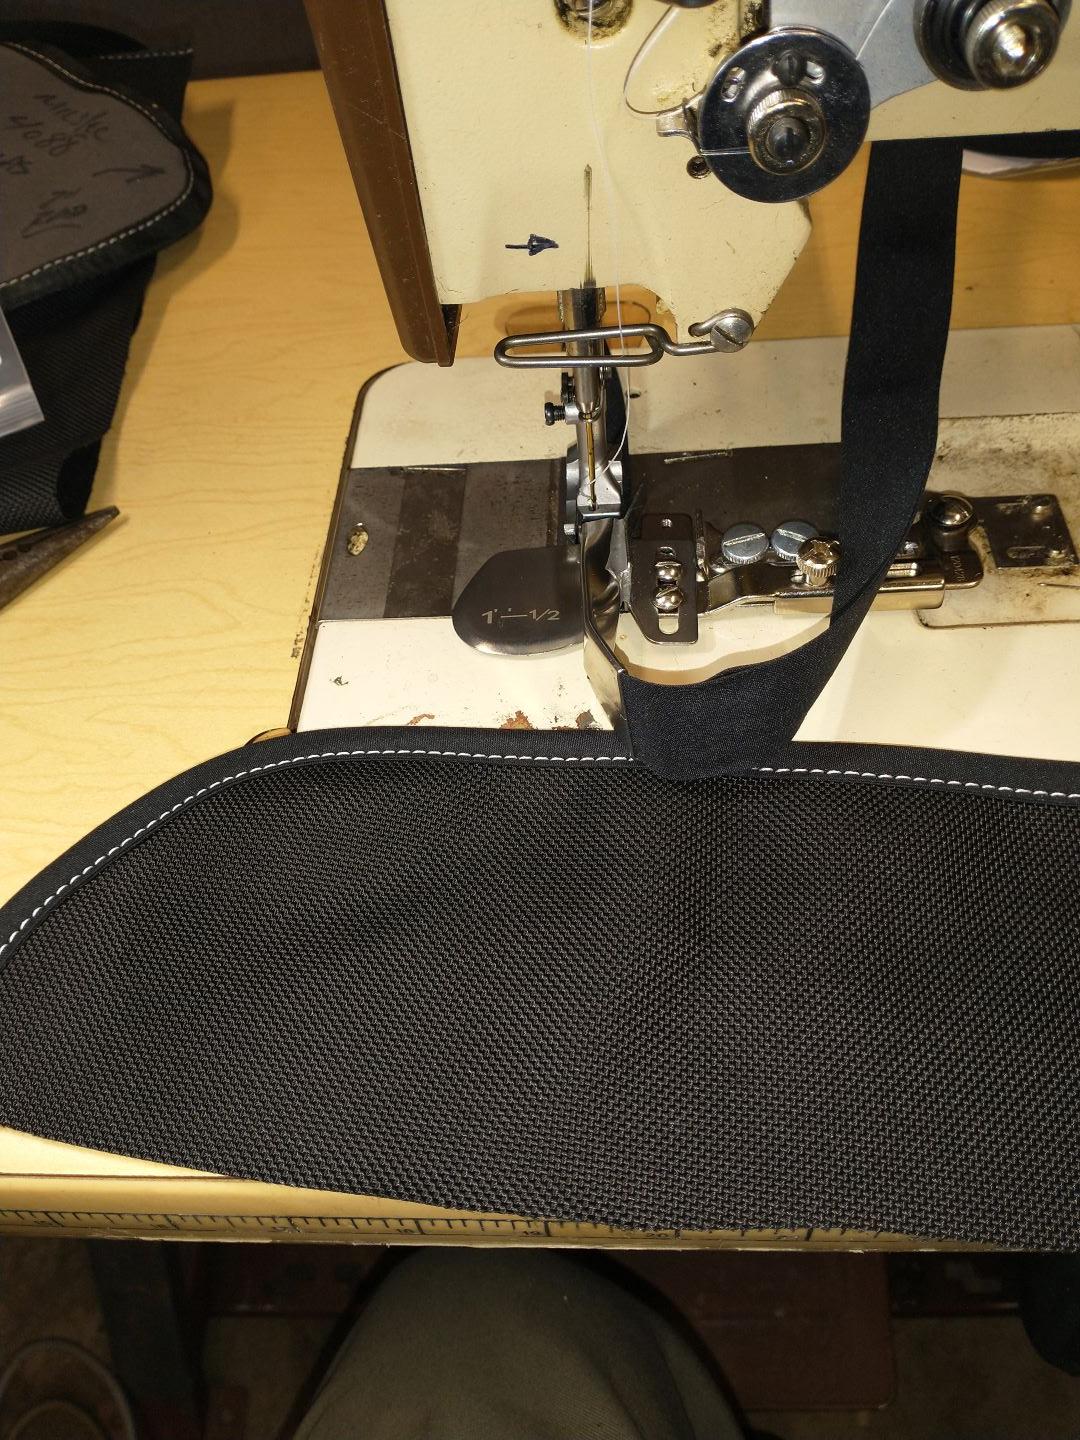
-
Binding with a right angle binder on a walking foot machine
Dave9111 replied to Dave9111's topic in Leather Sewing Machines
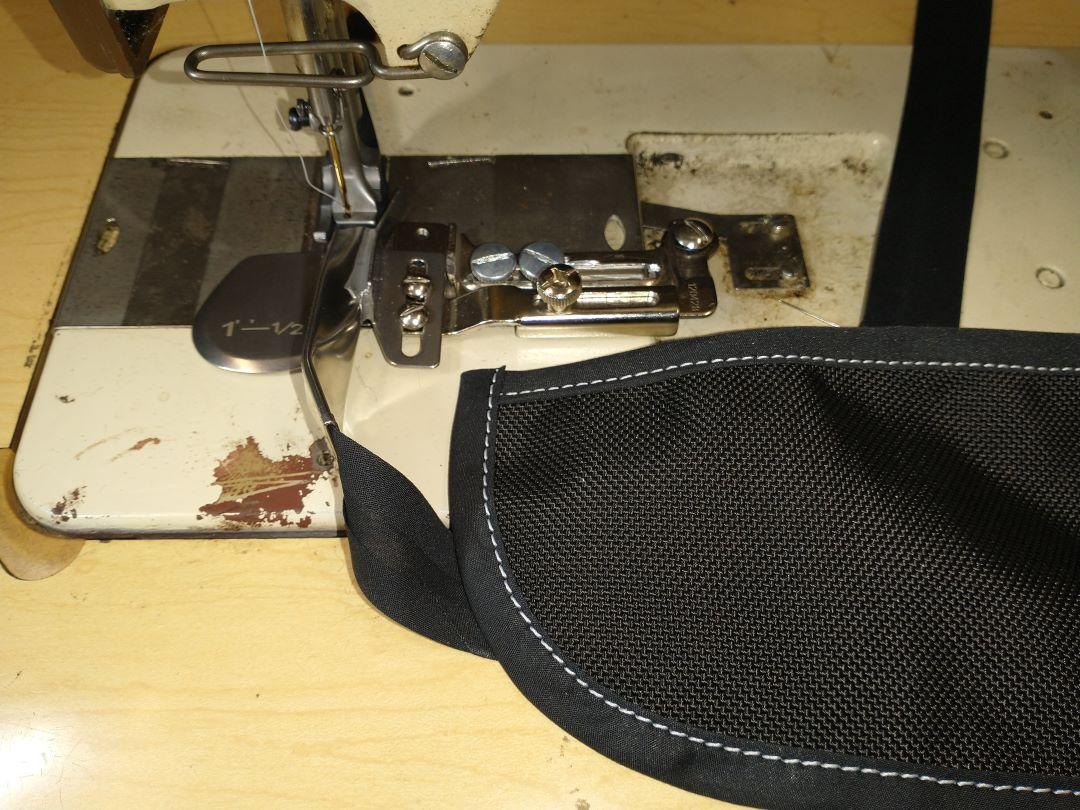
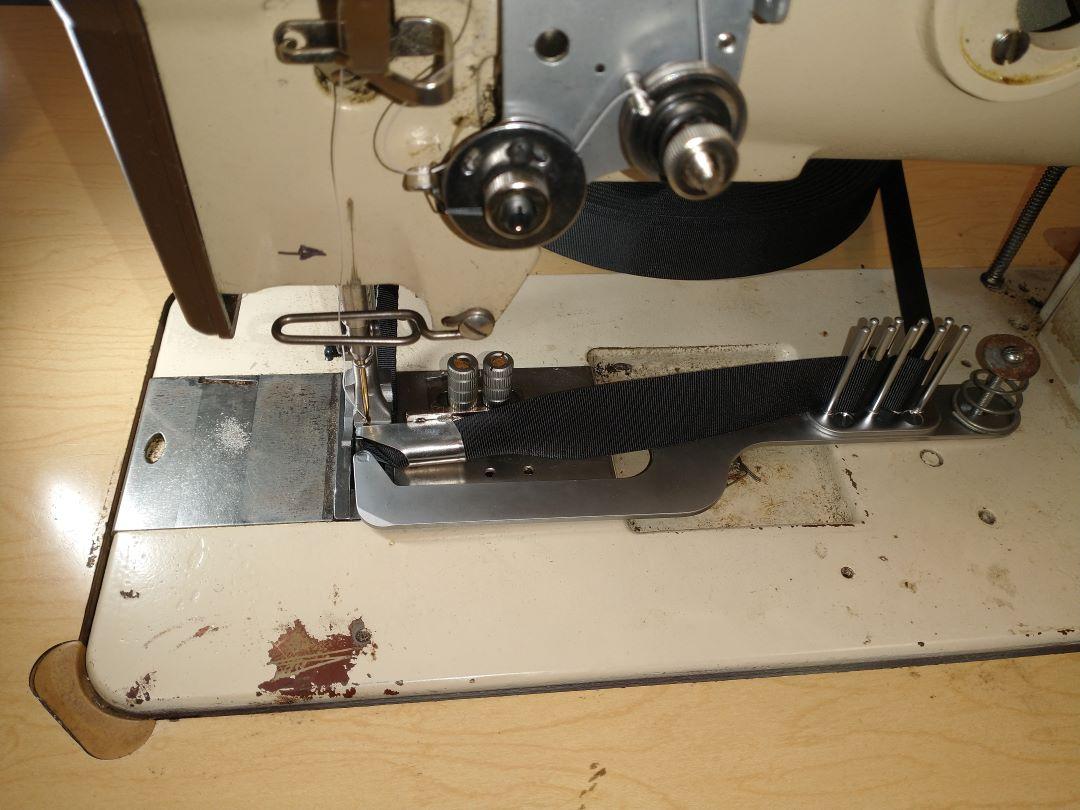
I got out my other Pfaff 1245 to set it up for binding. I fitted a servo motor to it for better control and tried to attach the feet, dog, and needle plate that came with the new synchronized binder. The needle plate wasnt quite right but I had another needle plate that came with the original right angle binder I bought 10 years ago or so and that worked. I had to grind the front foot so it didnt hit the left toe of the rear foot. Also the new feed dog was a bit off to one side and it has a small needle hole so I had to move the feed dog mechanism to the right slightly to keep the needle from bending. Whew! A fair amount of work to get everything right. The synchronized swing binder works nicely with milspec 5038 and 4088 herringbone binding tape. The 1" 4088 can do a 1 inch radius with this binder setup. Very nice. Remember that I had bought some cheap polyester garment binding from Wawak and Amazon and that did not work in my original fixed right angle binder setup, well it doesn't work in the synchronized swing binder ether. So thats consistent. At this point I had many hours into trying to get this right. I bought a $20 straight binder off of Amazon and thought I would try it as well. I got it positioned and ran some milspec 5038 1" through it. It worked ok if I didnt make too sharp a turn. Same with the milspec 4088. But the synchronized binder is easier to use. Then I tried out the cheap garment quality Polyester binding with the straight binder. It works! So now at least I can use the 150+ yards of cheap polyester binder I bought. Regarding the platter to feed the binding, I drilled another hole for the wooden machine rest pin on the back of the table and I'm using the pin and table to hold the flat reel of binding. So far, so good. Ill add pictures tomorrow. Anyway, I think Im set. Thanks for all of the suggestions. -
Binding with a right angle binder on a walking foot machine
Dave9111 replied to Dave9111's topic in Leather Sewing Machines
I bought the folder head for 3/4" tape after your comment. It was about $11 with shipping. Crazy cheap! I'll start looking for some 3/4" tape as well. Its refreshing to have something that looks half way decent as a result! I'm hoping the new binder can get results similar to what you are doing. But there is some substantial skill involved which I still need to learn! I fought with my old 100 yard roll of Rochford straight cut binding tape for years. This 5038 tape that I bought off Amazon is like night and day compared to the crappy Rochford tape. Its an entirely different game with the better tapes. When I bought the bias binding tape at Sailrite, I only bought 10 feet of it and that cost about $7.00. Just enough to figure out if it would work or not. I think most Sailrite buyers are hobby folks making a few pieces of canvas for their boat or project and that's about it. Their fabric prices are not low. I could not afford to do what I am doing if I had to pay Sailrite prices for everything. I buy most of my fabric off Ebay. Some of it has minor defects, but since it is for me, I can deal with that for the lower prices. When you buy binding tape, are you ordering it 100 yards at a time or a lot more than that? 32 to 34 cents per yard seems like a good price for real milspec tape. What is a good price for 3/4" 5038 grosgrain if I am buying 100 yards at a time? Does the 4082 herringbone tape lay down better in the curves than the 5038? How do you determine when to use the 4082 vs the 5038? Thanks! -
Binding with a right angle binder on a walking foot machine
Dave9111 replied to Dave9111's topic in Leather Sewing Machines
An update on my binder: I bought some 5038 tape off of Amazon. It says mil spec but the tape is not marked as such. Still, it works well in my binder. Its quite slippery so it glides through the folder very nicely. 300 yards of black 1" was $35.00 https://www.amazon.com/dp/B0BPK36VBK?ref=ppx_yo2ov_dt_b_fed_asin_title I also obtained some Sailrite bias binding, 1" black polyester. https://www.sailrite.com/Top-Notch-9-Polyester-Bias-Binding-Tape-Black-1-Inch This also worked well and it laid down a bit better than the 5038 in the curves. The problem with the Sailrite tape is cost. $136 for 100 yards, vs the Amazon 5038 tape which was $35 for 100 yards. For my needs, which does not require showcase quality, the 5038 is very adequate. I think if I used a more narrow 5038 tape I could get better results around the corners. However, this is with my existing fixed binder. I did order a synchronized binder off Ebay. It should be here in about 3 weeks. Apparently it is shipping from China. They had the same items on Amazon and those also shipped from China. It costs $130 including the bracket, feet, dog, and needle plate and folder. Thanks for the help guys! I really appreciate it! Here are some picts: